• Welcome to the new NAXJA Forum! If your password does not work, please use "Forgot your password?" link on the log-in page. Please feel free to reach out to [email protected] if we can provide any assistance.

beater!

Yeah they did clean up nice, what did you use to do it?

When i went to swap new u-joints in my 297 axleshafts i couldnt get them to budge, ended up taking them to a bud's shop and dropped them off. Did you use a press?
 
Yeah they did clean up nice, what did you use to do it?
First step was to get the u-joints and hubs removed (see below). Once I had the inners and outers separated, I saturated them in WD40 and let the parts sit overnight so that the scale would loosen up. The next morning I started in with a scotch-brite pad and PB Blaster to remove whatever was willing to come off, then escalated to a medium wire brush on the cordless drill to get off the stuff that wanted to fight. Then I coated everything that was not splined with rust converter, and after it finished doing its magic I sanded with 320 grit, then finally wiped everything with mineral spirits. There are still some pockets that have flecks of the rust or the converter (the rough castings have lots of pits), but the critical areas are all smooth and clear.

When i went to swap new u-joints in my 297 axleshafts i couldnt get them to budge, ended up taking them to a bud's shop and dropped them off. Did you use a press?
I have some large C clamps here, but I couldn't get them out with those. I went to the shop that I used for the engine swap to borrow their press, but one of the guys showed me a trick for trail swap--basically put one shaft on the table with the other shaft hanging loose in your hand, and then beat the ears around the top-facing cap with a BFH until the cap pops up out of the ear (remove the clips first obviously). This worked for all of them. The downside risk is that you can bend an ear, and I did bend one a little bit, but just bang the inside edge of the ear and it will go back out, and everything comes back into position when you center the joint in a vice anyway.

So that's what I did, I beat the crap out of teh joints with a BFH :D
 
Last edited:
Last item on the list of recent updates is armor upgrades. After doing the powertrain swap I bought a T&T HD Crossmember to replace the crappy stock crossmember that was bent and hanging low. This is a short-term upgrade since I hope to do the bellypan when I do the long arms down the road, but I wanted to get rid of the crappy bent stock unit asap, I wanted to get the exhaust setup for the pan, and the extra 1" clearance is a big benefit for the stock ride height. It's 3/8th solid and very nicely built, and it's not prohibitively expensive. Here is a pic of the thing after I cleaned and primered, but before painting.

TNT_HD_Crossmember.jpg


Here is a pic with the thing installed. You can also see the stock Mopar transfer case skid mounted behind it. I had to drill and tap a couple of holes for that, but it all ties together nicely--it works better than the Mopar skid with the stock crossmember.

Crossmember_and_Tcase_Skids.jpg


I also got lucky at the junkyard and found a pair of engine and gas skids on a Cherokee Chief, which they let go for about $50. I've got these all cleaned and painted but haven't gotten them installed yet. Here is the front skid, which I'm going to hold off on installing until I get the lift in (pay no attention to the ACC box it's sitting on :D):

Engine_Skid_Painted.jpg


The gas tank skid needed some beef, so I had a machine shop bend and cut some 1/8th plate, which I welded to the inside. It's all painted and cleaned now too, but I will have to remove it to get the bumper off for paint so I'm going to wait til that's done too. Here is the skid with the plating

Gas_Skid_Plating_Welded.jpg


Here is the skid painted. I enlarged the small drain holes at the rear (from 1" to 1-3/8"), and still need to drill a couple of holes in the plate for the center drain holes, and you can see the plating inside. I'm a little concerned that it won't bolt up tight with the extra plating, but I can use washers if needed since it should not have a lot of shear energy.

Gas_Skid_Painted.jpg


So I'm almost completely armored--or will be soon--but still need rockers.

Next month I hope to finish the body and interior work, and am planning to order a lift sometime in the next week.
 
Lately I've been working on the interior, trying to get to a point where I can get everything installed. Here's what I've done recently.

First big thing was the center console swap, which I detailed in this thread. It's in there nice and sturdy and looks pretty good between the S-10 Blazer seats. I need to pull it back out when I install the floor covering, which I hope to do this week.

Completed_Console.jpg


Next big thing was a complete rewiring of the cargo light. I replaced the broken light with a double-dome from an RV store, and wired it so that I can use it to drive a pair of work lights in the hatch (not yet installed). The wiring and fabrication work are detailed in this post and this post. I will disassemble the thing and paint it the same Krylon Fusion as the interior trim whenever I get around to that.

Cargo_Light_Installed.jpg


Lastly I also wired up a late-style overhead console. This is actually a combination of three different consoles. The shell itself is from a Grand Caravan, and was snagged because it did not have a computer--there are no electronics in the front part at all, no compass or temp display, no mileage computer, no anything. My plan is to cut out a hole in the front dummy plate for a CB radio, and use the rear dead area for a small group of Contura switches. See, nothing but the lights:

No_Electronics.jpg


Although the shell is what I wanted, I had to mix and match from two others in order to get the rest of it setup the way I wanted. Specifically I bought another one from a ZJ for the map light harness (it has switched ground on the front lights, so all four map lights activate when a door is open instead of just the rear two), and also for the remote unlock orb (the Grand Caravan console did not have anything except the lights). The rear half of the ZJ console also let me get rid of the Grand Caravan floor blower controls, which I did not want to use. Finally I moved my old IR keyless module into the console, even though I do not have the fobs, and they suck anyway, but I had the orb so why not. Here is a pic of the thing installed.

Combined_Consoles.jpg


Since there are no electronics on the front sub-harness, I have those wires left and hope to be able to use them with an automatic day/night mirror with a compass and temperature display. I need to buy a CB and wire it up, and I also need to get it reupholstered, but that is secondary to getting the thing installed.

I've ordered a bunch of stuff that is just waiting for weather to be appropriate, and we have a couple of days looking good so I am trying to rush through this while I can. I have garage space lined up to finish the body and paint, but weather and tools are keeping me out of that. I've also ordered parts for a lift that will use the RE 3.5 springs and a bunch of TNT/JKS/etc steering parts, but it will not arrive until later this week or next week and I want to finish the body and interior before I start on that.
 
Last edited:
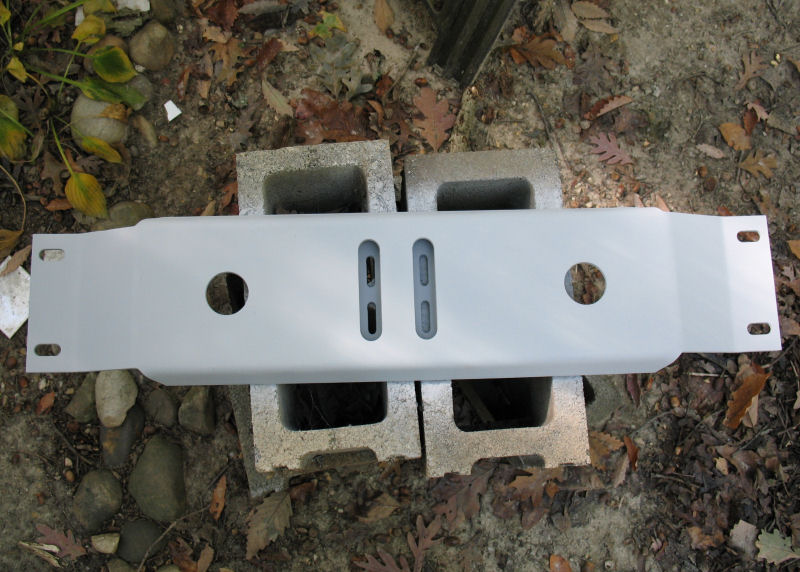
I had ordered some vinyl floor covering from ACC with the intention of installing it during this spurt of nice weather we are having, but when I opened the box I found out it was carpet instead. So I had to ship it back (on my dime) and they are wanting a $40 restocking fee because I ordered vinyl flooring but chose "black carpet" under the "color" option. WTF would I choose black carpet under VINYL??? :gonnablow: Whatever... they can deal with VISA dispute department.

Anyways the engine was at the service mark after the powertrain swap so I got a bunch of that stuff cleared off the list.

First, I had ordered a 
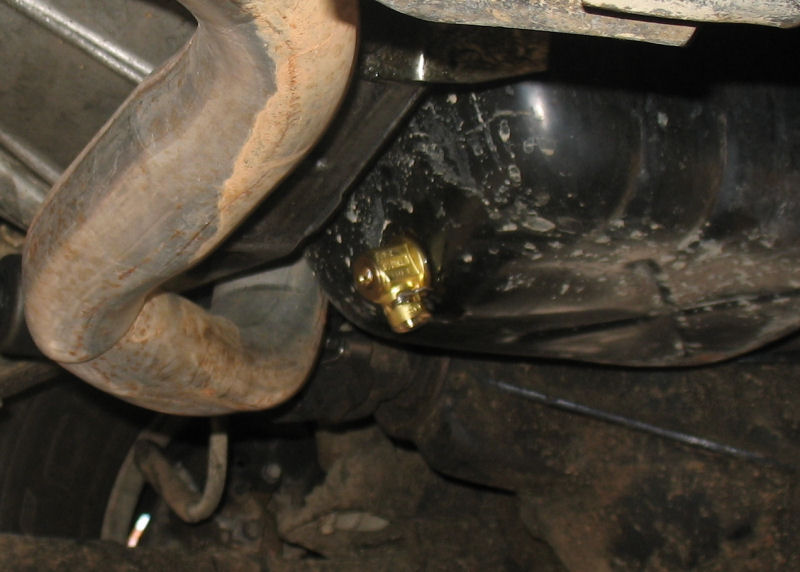
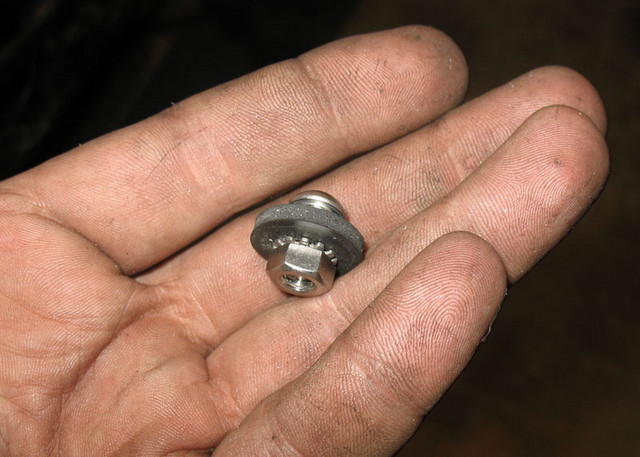
quick oil drain valve for the engine, and got that installed when replacing the break-in oil. These things are pretty neat--all you have to do to drain the oil is push the lever upwards then pull it sideways, and a little ball bearing seal moves up to allow oil out. In the product literature it shows the valve mechanism at the top

valve2.jpg


However as you can see in the picture, when the valve was fully inserted the lever hangs down at the bottom. I am only slightly concerned about hitting it on anything since the XJ engine is pretty well sheltered (I would not use this on a TJ though). We'll see how this holds up over time. I may experiment with the valve gasket at the next oil change to try to move the valve upwards.

Quick_Drain_Valve.jpg


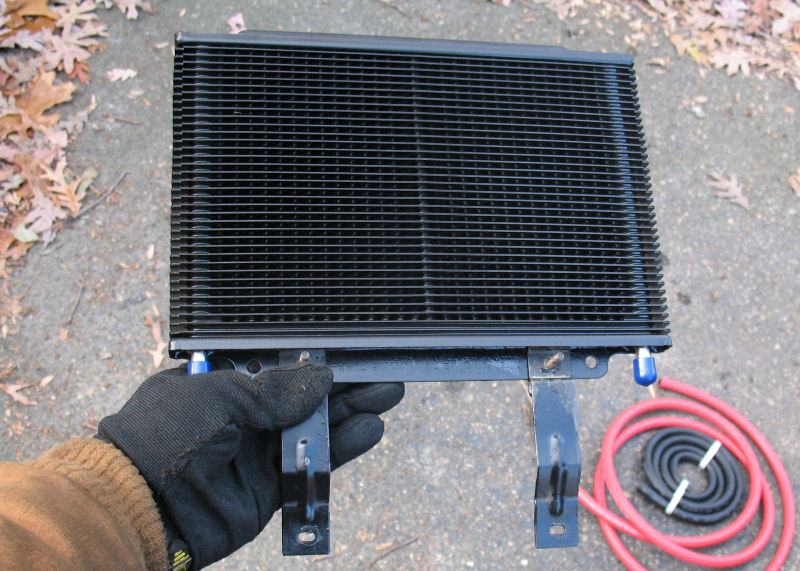
Next on the list was installing a B&M 70268 tranny cooler. Although the beater already had a small tranny cooler as part of the tow package, I noticed that the hose routing was really convoluted when I did the powertrain swap, and I wanted to reroute them into a cleaner and more efficient flow. Also the original cooler is very small and while it is probably fine for light towing, the B&M coolers are so inexpensive that there was really no good reason not to upgrade while the lines were off.

For mounting, I simply removed the brackets from the original, mounted them to the B&M cooler, drilled two new holes in the front crossmember for the tabs to mount up, and then used the zip-tie things to keep the top from flopping around and damaging my new condenser. Here's a pic of the bracket setup.

Tranny_Cooler_Tabs.jpg


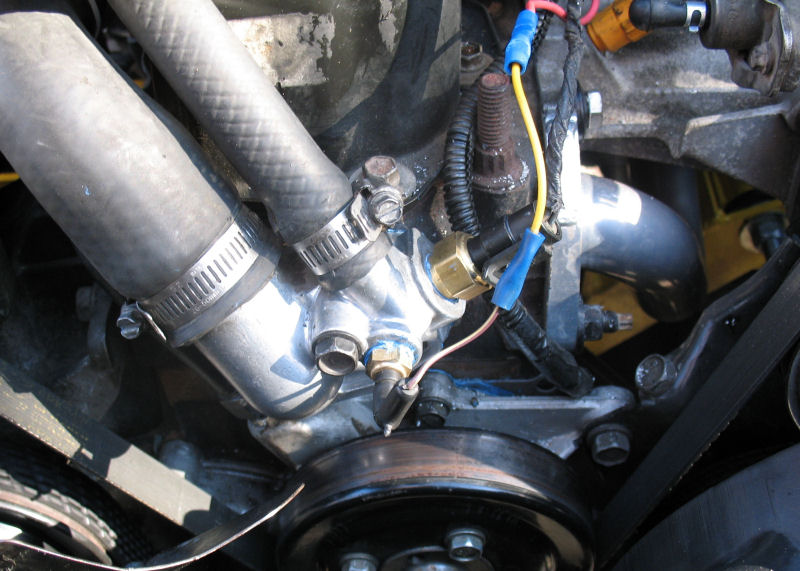
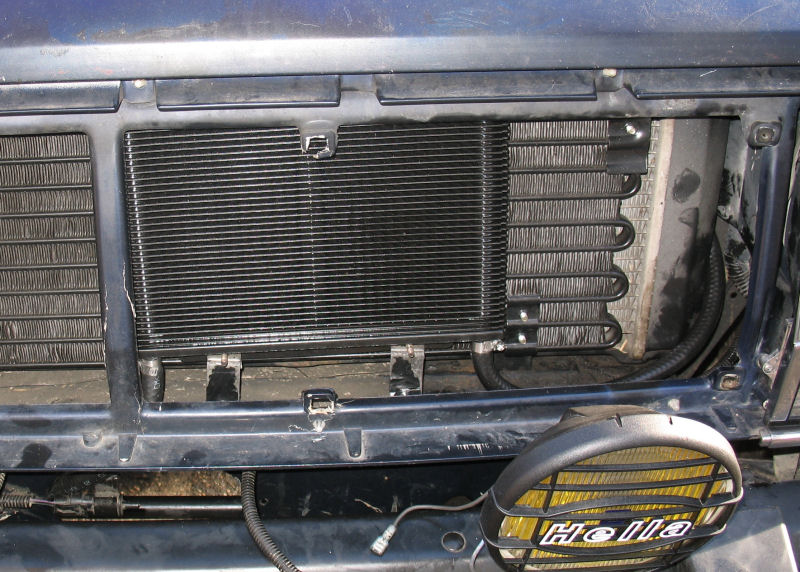
I used the recommended fluid routing, which has fluid coming from the tranny to the B&M, and then going into the radiator before returning to the tranny. I chose to keep the existing hard lines running up the engine since I did not want to mess with replacing the quick disconnects. I used a hacksaw to cut the end off the output line just past the starter, and used the B&M hose to route it into the cooler and then up to the top of the radiator, but the factory return line had a quick disconnect on the end of the soft line and it plugged right into the lower radiator port. Here's a pic of the cooler installed, and you can see the input line coming past the outside temperature sensor and the output line going to the upper radiator inlet along the driver's side.

Tranny_Cooler_Mounted.jpg


Last of the big items was relocating the temperature gauge sender from the block drain plug to the thermostat housing. Since I installed a '99 engine, there wasn't a hole in the head for the gauge sender, and so I had put the sender into the block drain plug. However the temperatures being reported from that were always 15+ degrees higher than actual values according to the ECM (as reported with a scanner), probably due to it being between two cylinder walls. I was also having a problem with the protective tubing around the sender wire being melted against the headers, so all around this was proving to be a bad decision.

Looking at the thermostat housing, it has a second flat spot on the front of the thing which looks like it was designed for just this purpose. I found several posts about people moving the sender here, and measurements show that the sender fits in there without interfering with the bolt, so I figured it was worth a shot. Pretty simple job, drill a 3/8 hole, use a 1/8 NPT plumbing tap from Lowes, and screw the sender in. The hardest part about this was removing the housing to drill the hole, and replacing the thermostat gasket. So far it is working perfectly, and it seems to be very quick to recognize changes in temperature--you really notice when the thermostat opens and closes. :D I need to grab a new sender wire from the junkyard to finish the job, and will route the wire under the loom cover along with the sensor and injector wires.

Temp_Sensor_Relocated.jpg


I also changed the rear differential fluid and gasket, rebuilt the accessory vacuum harness and put the canister back under the bumper, and swapped the original cooling fan back in since the HD unit was running too much and keeping the engine too cold. I still need to do a couple of minor things like change the front differential fluid (will do when installing the lift--can't get at it with the drag link in the way), and a couple of other minor things. Pretty productive week so far though :)
 
Last edited:
I finally got everything lined up to paint the thing at a friend's garage, so I've taken the Jeep to his garage and have been working on some of the body problems so that I can spray next week. We are supposed to have weather in the mid-to-upper 50s Tues through Thurs so I am busting tail trying to get to where I can put two coats down on Wed and Thurs each. Dunno if I'll make it but I'm trying.

Biggest step was to get the hatch replaced--the wiring was in really bad shape, there was a crack in the fiberglass all the way around it, the defog only worked on half the heater elements, etc. I had already bought a hatch from a '96 in anticipation of swapping them out but now I had to do it. First step was getting them both stripped down, with all locks, wiring, etc., removed (everything but glass, which I may do for paint), which took all day yesterday.

Second step was to consolidate the wiring. The '91 had speakers in the hatch, power locks, but no third brake light, while the '96 was the opposite with no speakers, no power locks, and a third brake light that I want to use. I also wanted to add work lights to the hatch, as well as supplemental reverse lights in the license plate bay. What I ended up doing was stripping both sets of harnesses down to the wire elements, and adding wires to the '91 as they were needed. I also had to cut the ends off the bundle in order to snake the whole thing back through the side of the hatch, and then install some of my AMP Mate-N-Lok weatherproof connectors where the two sub-harnesses meet inside the hatch. Here you can see the main harness, and while it's not much to look at it took most of today.

New_Hatch_Wiring.jpg


Another problem with the wire bundle is that the grommets on the wire where it meets the body is not stretchable so I was not able to get new wires into the protector sleeve. What I decided to do was to abandon the tight sleeve and use one of the leftover door jamb booties that I had picked up while experimenting with the doorless modifications, which will still be watertight (mostly) and will also make future wiring modifications much easier. In order to use this, I had to enlarge the wiring holes in the hatch and body, cutting them to the same size as the bootie. Here is a pic of the hole, and another pic showing the bootie mounted.

Hatch_Wiring_Hole.jpg


Hatch_Wiring_Hole_Booty.jpg


I also went ahead and cut the hatch for the work lights and the speakers. For the lights I just used the Dremel to rough out the pre-exisiting channels in between the speaker mounts so that the lights could sit flush, although they will eventually mount to the inside panel and not to the hatch directly. For the speakers, I just drilled some holes around the sides and then used rubber well nuts to secure the speakers to the hatch, with some scrap neoprene (mousepads from Staples) being used for insulation. The far side of this pic shows one of the lights and speakers mounted, while the nearside shows the cutout for the lights and the well nuts for the speakers.

New_Hatch_Lights_and_Speakers.jpg


After the hatch has been painted I will have to reinstall the lock cylinder, wiper motor, third brake light, and all of the other parts. Before I can paint, however, I still have to remove the front end, remove the doors and associated parts, replace the door rivets with screws so I don't have to mess with that after painting, weld up a tear in the front left fender, cut and fold the inner fender pinch seams, hang tarp for a paint booth, wash the jeep, primer it with reveal coat, sand, bondo, then sand, primer, and wash it again. Then I can paint it. I'll be busy tomorrow and Monday.
 
Camera batteries died so no pics. Didn't get as much done as I wanted today anyway. Basically removed and disassembled the bumpers, the grille, the old header panel and all lighting, the hood, and the windshield cowl. The only modification I made was to the cowl--I opened the top under the screen to give me room to work, since (1) I plan to relocate my intake filter up there pretty soon, and (2) I have a small leak at the firewall pinch seam which is allowing rain water to drip onto my blower motor then fall inside. I will probably add a cabin air filter to the HVAC intake under there too, which will help keep the dust out.
 
From yesterday, here is a picture of the hole in the cowl. You can kind of see the fresh air intake back in the corner.

Cowl_Opening.jpg


Today I got all of the door trim removed (mostly) and also converted the doors from rivets to screws. Basically I bought 50 each of 6mm stainless button heads, toothed nuts, and rubber washers

Rivet_Replacements.sized.jpg


Then punched/drilled the rivets out and installed the screws, with the rubber washers in between the door panel and the components.

Rivets_Replaced.jpg


This was a lot of freakin work, but hopefully it will kill some of the jeep buzzing and rattling, and hopefully it will make future maintenance somewhat easier too although I don't think that's worth the effort--basically I am having to do the dog work now instead of possibly having to do it later, and I may not ever need to do any of it.

Glass, handles, latches and everything have been removed. I have no idea how some of this stuff will go back together.

What's a good cleaner for the latches?
 
Here is the tarped area in the garage where I'll be painting. It took 100' of rope, 24 s-hooks, eight rolls of 9x12 sheeting, one roll of 12x20 floor sheeting (not installed yet), and all afternoon to set this up. The air compressor line is behind the wall to the right and should be easily accessible. Paint is much heavier than air so hopefully most or all of it will stay below the 11' tall rope line.

Paint_Booth.jpg


Jeep is stripped except for glass and the chrome luggage rack strip. I cannot figure out how to get the side glass out--it really wants to shatter whenever I push on the corner.

Stripped_Front.jpg


Doors, hood, hatch, fenders... all stripped and waiting for prep and paint. There is another pile of trim parts that will be painted satin black.

Stripped_Body_Parts.jpg


Still need to finish some body work and have to wait for it to quit raining before I can wash the stuff and start sanding and priming
 
My 1/4 windows were tough as well. Found running a wood shim around inside and outside helped loosen the grip. Starting on an inside corner i was able to push window as i peeled back the seal. Once you get both sides of a corner it's simply working the seal all the way around.


Looking forward to seeing it in color, good job dude.
 
Apparently.. :laugh3:

I thought it may shatter a few times as well, but didnt. I have some spare clear glass here if you should need it.
 
Looking good! Very thorough tear down/build...
 
Well the guy who owns the garage stopped by to help and offered to remove the glass... here is the right rear quarter window "removed"

Right_Quarter_Window.jpg


The left window came out okay once we figured out the process, basically lift up the inside corner flap and fold it out, then work down the window edge lifting and folding, and eventually the whole lip will just pull out, then the window can be pulled pretty easily. However we decided not to mess with the hatch, since the fiberglass will not have any rust to worry about and any color difference by the seam probably won't show.

Got all of the other work done too. One of the big items was to repair the damage I'd done to the driver A-pillar when going doorless. First step was to cut out the damaged pillar piece

Drivers_Door_Second_Cut.jpg


Then cut some 22 gauge sheet metal to size

Drivers_Door_Second_Patch.jpg


Welded it into place

Drivers_Door_Second_Weld.jpg


Then use JB Weld as a filler/sealer

Drivers_Door_JB_Weld.jpg


Also added nutserts to the A-pillars to use for securing the YJ mirror brackets, since the original mounts were just threaded into the pillars

Mirror_Nutserts.jpg


Another big problem was the left front fender had been torn in two at the bottom where it mounts under the A-pillar. My little brother learned to drive on this Jeep and he did some pretty good damage to it!

Fender_Tear.jpg


First attempt at fixing it was to weld the pieces back together. However the sheet metal is super thin and even with my little 110v welder on the lowest setting it was still burning holes in the metal. I eventually got some good welds by spider-webbing the metal together--basically I just tapped the trigger and dragged the flux wire across the pieces, and then used the wire as a backing material to lay more welds onto--but it still had lots of holes.

Fender_Weld.jpg


I used some of the 22 gauge sheet metal left over from the A-pillar repair and cut a replacement piece

Fender_Patch.jpg


Then drilled offset holes in the fender panel and the patch, and used JB Weld to glue the two pieces together. This is pretty solid and should hold up really well

Fender_JB_Weld.jpg


Only real rust problem was on the right rear quarterpanel fender lip, with an egg-sized hole on the surface metal and rust through the other two layers

Quarterpanel_Rust.jpg


Cleaned it up really good and hey look there is a hole all the way through now

Quarterpanel_Hole.jpg


I thought about this for a while. Since I'm going to cut and fold here eventually, I didn't want to bother with a full weld, I didn't think Bondo would hold up well, and I don't have time to get a repair panel and do it right. So I got some drywall patch material and sealed it in

Quarterpanel_Patch_Panel.jpg


I layed some more JB Weld onto the outside surface of the patch material so that it was solid on both sides (forgot to take a pic) and will lay a thin coat of Bondo to make it smooth and clean after I sand the rest of the thing down. I'll get a repair panel and do a proper repair when I do cut and fold the rear.

Lots of other minor things done too. For starters I Dremeled out the windshield trim clip posts, and cut away the excess sealant, so that I could install a late-model rubber gasket on the windshield that I snagged from the junkyard. I also went ahead and did the cut-and-fold on the front inner fender pinch seam in anticipation of lifting.

That pretty much wraps up the body work except for some minor cleaning and bondo work that will be done after washing and sanding. That all starts tomorrow. If the weather holds I will have the reveal coat of primer on the heep by closing time tomorrow.
 
Here's a pic of the JB Weld over the drywall patch

Quarterpanel_JB_Weld.jpg


Here's how the jeep sits after degreasing, full washing, and first sanding

Sanded_2.jpg


Sanded_1.jpg


This shit is taking a long time. I'm about two days behind schedule already and the nice weather is moving in tomorrow. I will have to bust serious ass tomorrow--hand sand corner areas, fully wash the body again, wash and sand and rewash all the body parts, remask everything, then bondo and/or primer.
 
Had to sand parts of the body again because I'd either missed them entirely (some corner areas) or had not gone past the clearcoat. After that I moved the chassis into the garage and finished taping it off, then only had enough daylight to finish the hood and front fenders.

Sanded_3.jpg


Only real accomplishment other than that was I got the entire inner fender well completely covered with undercoating, on the fenders and the body.

Inner_Fender_Undercoated.jpg


Tomorrow I have to clean, sand, and reclean the doors, the hatch, the grille, the cowl, and some small pieces like hinges. Three days of plus 50+ weather on Wed-Fri so this will work out okay I think.
 
Raining off and on this morning then always-on this afternoon so I only got the front-end and one door sanded. I went ahead and sprayed the chassis and front-end pieces. Primer is still a little wet in these pics which explains some of the splotches, and there are several runs too. Some of the body defects are already showing up as well, and it looks like I will have lots of dents and scratches to fill and several barnacles to ground down smooth.

Primed_1.jpg


Primed_2.jpg


Primed_3.jpg


Depending on weather tomorrow, I will either finish the doors and hatch, or start sanding and filling the pieces that were coated with primer.
 
welll.... I was wondering why those looked darker in the pics, piece of advice I can offer is do NOT put paint cans next to primer cans in a dark garage. more sanding coming up!

as for today's progress, weather was miserable but it did not rain so I got all the doors done. this is what's involved

first, strip the door down and remove the weatherseal from the bottom edge, then admire the rust you've just discovered. the additional rust in the hinge plates are like sprinkles on a sundae

Door_Prep_1.jpg


ready to prep? start by cleaning every nook and cranny, eliminating as much of the crapola as will come off. everything must go, since new paint will be seeping into everywhere. use a stiff brush, scotch brite sponge pads, or anything else that will knock off the mud and gunk, then rinse it with a garden hose and dry it with a towel

Door_Prep_2.jpg


once it's spotless, start looking at it up close and you'll find where old pieces of sealant and grease are still lying in wait. this stuff will cause you major problems later, since the paint won't stick to it and will cause bubbling/chipping around the edges, and if you try to sand it out you'll just sand it into the paint where it will fisheye and bubble from underneath instead

Door_Prep_4.jpg


the best way to remove the stuff is to wipe the whole door with mineral spirits, and then break out the goof-off for wherever the mineral spirits didn't work. pay special attention to the window lips, the latch assembly, and the door check, since all of those have grease or sealant. use paper rags and burn them in a paint can instead of piling them up to spontaneously combust on their own later.

Door_Prep_3.jpg


once the door is clean, you may now tackle the rust. for the bad areas at the bottom of the door, use a small stiff wire brush attachment that can get along the edge of the fold. periodically bang on it with a hammer to knock off flake that is hiding inside

Door_Prep_5.jpg


rinse it again, and admire your clean rusty door

Door_Prep_6.jpg


then lay on some rust converter and come back tomorrow for filler and repair
 
rust converter did a pretty good job overnight, however it did not regrow any metal as was needed

Door_Prep_7.jpg


in order to really solve the problem, we have to remove the damaged metal from the fold/seam. for this, a dremel with a reinforced cutoff wheel provides precision and cleanliness that's desired

Door_Prep_8.jpg


now for my favorite body fixer, JB WELD, or actually in this case I used some of the Permatex Perma-Poxy stuff that is a lot like JB except it sets up in 5 minutes instead of 2 days and appears to be just as strong. note that the pinch seam is not supposed to be a drainage area--for that there are holes in each corner of the interior panel (you can see one in the very bottom right corner of the first pic in this post, and there is another at the other corner). this means we can seal the pinch seam tight

Door_Prep_9.jpg


while that's setting up, mask off the interior panel to protect the glass and switches from overspray

Door_Prep_11.jpg


then flip the door over and apply your bondo to whatever dents and dings you can see

Door_Prep_10.jpg


now go home and enjoy yourself, for tomorrow we prime in hell!
 
Back
Top