• Welcome to the new NAXJA Forum! If your password does not work, please use "Forgot your password?" link on the log-in page. Please feel free to reach out to [email protected] if we can provide any assistance.

Project Chemotherapy

asp

NAXJA Forum User
Location
Westport, MA
Some history:

I acquired the XJ in the summer of 2007. It was bone stock with 98k on the ticker.
l_03a328661becca6e063124127fbe7972.jpg


Then I bought 31s and a rear locker
Then I did a 2" budget boost at the club garage with the help of Ned and Eric.

l_05113a8bc229e3b9a97ae11ba24ce52b.jpg


Then I put a real 3" lift in

Then I wheeled it for a long time and had a lot of fun and didn't really brake much.
n9120626_37827779_7462.jpg


n9120626_37827784_4113.jpg


l_6a4c0ac3913043de9c7ede5f1b487a79.jpg


Then I put in a SYE, 4.5" lift, 4.56 axles, WJ front brakes, a winch, and a bunch of other good stuff.
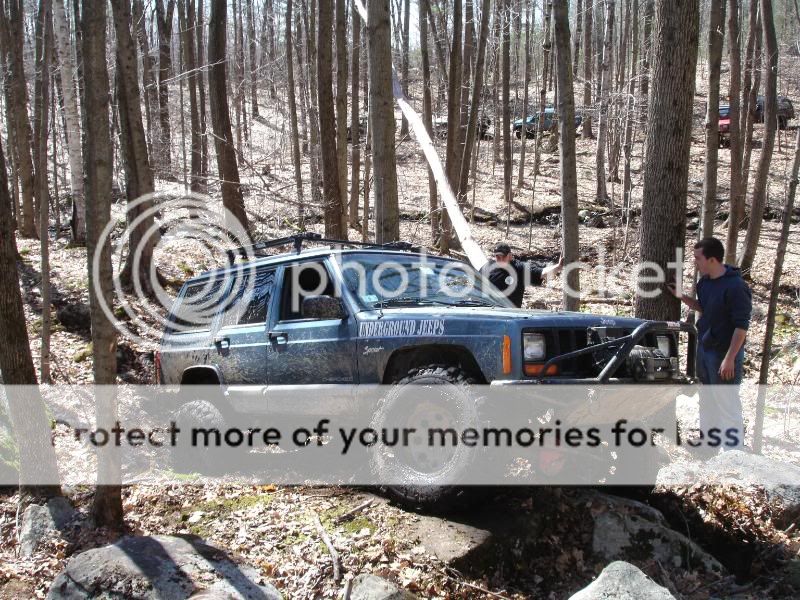
I wheeled it a quite a bit on 34's but knew that the body was on borrowed time due to rust in critical parts.

l_afe1a7c27299429fbeea82421543024d.jpg


DSC01524.jpg


this was steep and really loose. not everyone makes it first try, or at all...
http://s90.photobucket.com/albums/k245/sheepsyj/?action=view&current=MOV01497.flv

At the 2009 show:
2884_95275983454_513533454_2661148_3819240_n.jpg


Now I'm all moved into my new house and the build is underway.

The plan is to run about 104-5" wheelbase, NP 231/300 doubler, 4 link rear, 3 link front, the built dana 44's that I already have, hydro assist, cage, and coilovers/airshocks/ori's. (not sure which one yet...)

No, I won't be wheeling for a good little while.

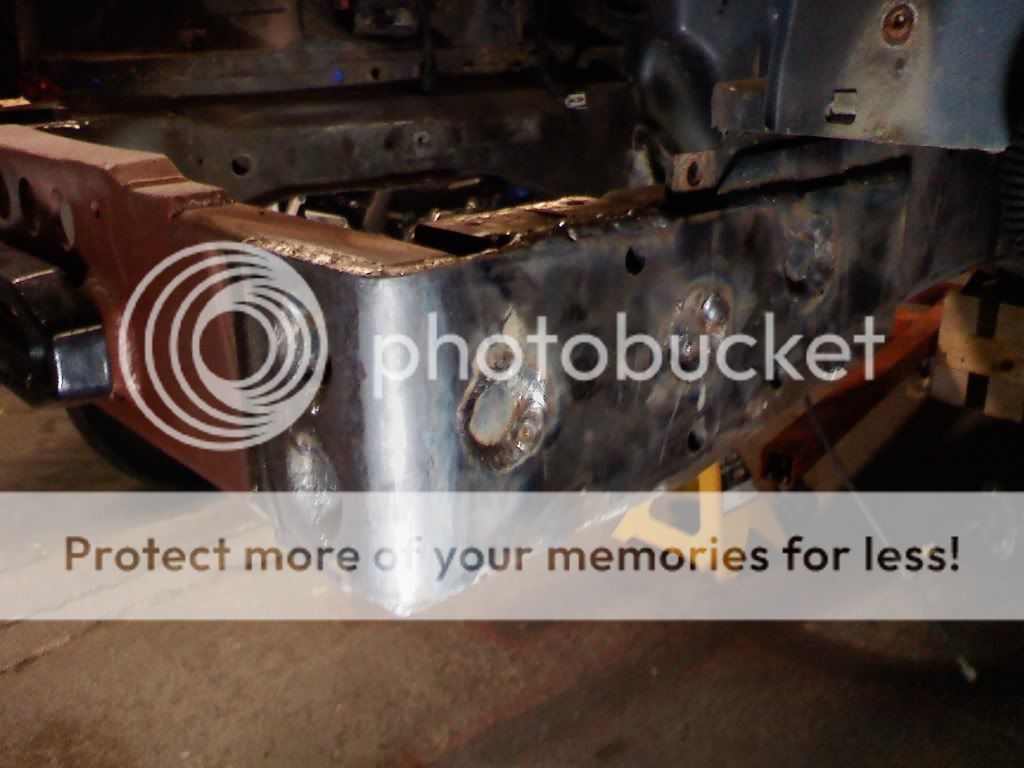
I'm calling it Project Chemotherapy because I'm removing all of my Northeast Cancer. Hopefully when I'm done removing the rust I have something left to work with...

33449_870907357602_9120626_47054889_6136302_n.jpg


64035_870907492332_9120626_47054895_6435388_n.jpg


64035_870907502312_9120626_47054897_3575595_n.jpg


64035_870907507302_9120626_47054898_3704172_n.jpg


I made a cart for my 110V mig welder too. The bottle is held vertical by a 231 chain. The paint was still wet, otherwise I'd have had the welder in the cart...
64035_870907512292_9120626_47054899_3518697_n.jpg
 
I cleaned up the engine bay a bit
67311_872476203622_9120626_47089689_2231985_n.jpg


Everything under here is gone too
67311_872476213602_9120626_47089690_2890279_n.jpg


Well, I guess there's no turning back now... (the lower control arm mount was right there)
67311_872476218592_9120626_47089691_1916955_n.jpg


Cleaned up the remnants of the factory front crossmember and prepped most of the local unibody for welding
67311_872476223582_9120626_47089692_3850557_n.jpg


I made 4 block off plates to cap the crossmember openings
67311_872476228572_9120626_47089693_454004_n.jpg


Burned in
37129_872460749592_9120626_47089089_65353_n.jpg


About that time I decided it would be a good idea to start a notebook and keep track of all my dimensions...
37129_872460754582_9120626_47089090_8001953_n.jpg


Winch sitting in its recessed mount
37129_872460759572_9120626_47089091_5569968_n.jpg


6 holes that don't look like much right now but they're all in the right spot.
37129_872460764562_9120626_47089092_7619512_n.jpg


I'll be working on it a lot more tomorrow too. I should have this piece done by then.
 
Bending the replacement wall

68381_873543614522_9120626_47124318_1780628_n.jpg


Set in place
68381_873543619512_9120626_47124319_1260206_n.jpg


One of my welds
68381_873543624502_9120626_47124320_3360738_n.jpg


Winch in its cradle
68381_873543629492_9120626_47124321_3758278_n.jpg


I love my vise... it's huge and super sturdy. I tapped the stand off and the 2x6 for 1/2-13 to hold the fairlead.
68381_873543634482_9120626_47124322_4696202_n.jpg


The front of it (less the fairlead)
68381_873543639472_9120626_47124323_1940519_n.jpg


Empty cradle
68381_873543644462_9120626_47124324_235329_n.jpg


welded to the unibody
67529_873543130492_9120626_47124304_1784944_n.jpg


Welded in and the header panel sitting in place. I'm going to have to trim 1/2" out of the center of the bottom of the header panel. Oh well. Keen eyes will notice a lack of engine...


68381_873543649452_9120626_47124325_1593722_n.jpg


It looks a bit prettier painted.
67009_873555221262_9120626_47124737_8306242_n.jpg


I'll be tying it to the unibody more, don't worry. I just squared it up and welded it in for now.

I took plenty of pictures, did a lot of welding, did way more grinding, and not nearly enough beer consuming.
 
Last edited:
Thanks! I'm not worried about the back - it's not going anywhere ;)
 
Welded in and the header panel sitting in place. I'm going to have to trim 1/2" out of the center of the bottom of the header panel. Oh well. Keen eyes will notice a lack of engine...


68381_873543649452_9120626_47124325_1593722_n.jpg
just add a body lift, DUH!
 
Can't wait for a couple years from now when me and you can go wheeling. My Honcho will be running great and you'll have already junked this piece of crap and bought a pre-lifted Rubicon or something.
 
verrrr nice i like.
:thumbup:
just add a body lift, DUH!
nooo.... I don't want to mess up my COG
Lookin good dude!
looks real good!
:thumbup:
And not nearly enough pallet burning.

:D
Then bring MOAR!
Looks good. I'm getting ready to start my own project. thinking of a name still lol
Awesome. I though of this name quite a while ago...
Can't wait for a couple years from now when me and you can go wheeling. My Honcho will be running great and you'll have already junked this piece of crap and bought a pre-lifted Rubicon or something.
:sure: your honcho won't be running well...


I don't have any pics, but last night I was experimenting with making a 6 planetary reducer out of 2 3's. Yes, I know it's been done, but I don't have one of the special ones that has 6 holes already. I drilled out the holes for a new planet and the closest reamer I own is .4980 but the hole is .4960-5. If I seat the planetary shafts well enough I think it will work because the shafts themselves measure .4900
 
Flame cut plates (cleanly) because grinders are slow, 5 hole saws per side and 3 steering box bolts. I don't know if I'll be runing assist or full hydro, so I wanted to keep my options open. It only took an extra 10 mins. 10 mins now is better than hours some other time. I cheated with the steering box bolt locations... I clamped the undrilled plate onto the unibody and put a 9/16 drill bit in from the engine bay side and spun it till it marked the plate. To bend the plate over, I welded the back of the plate on then heated the bejeezus out of the bend area, bent it with a 15" adjustable while continuing to torch. When it was too bent to use the wrench but not quite done I hit near the bend with a 3 lb sledge (while heating). (Think: blacksmith)

Here's the driver's side (crappy cell phone pic for now). Still need to bend the passenger side but it got too late to be hammering that loudly. Will take better pictures when the task is done
1103002305.jpg


I'm happy with all of my welds except one or two. Not bad for it being late at night, though. The more I do this the more I'm learning to be constantly adjusting my settings for each individual weld.
 
The more I do this the more I'm learning to be constantly adjusting my settings for each individual weld.

When I first got my Miller, I didnt really care about having the fancy new AutoSet feature. Nowadays, I feel spoiled and rarely have to do any playing around with my settings, even then its only a simple turn of the power knob.


Crossmember is looking good so far!!
 
Finished both sides. Jenn (my ladyfriend) helped me bend the passenger side plate. Took 2 minutes with someone else holding the torch rather than the 15 mins it took me to do it alone.

77025_887683238602_9120626_47459474_4658872_n.jpg


I guess I missed a few spots with the paint...
149534_887683328422_9120626_47459480_1709265_n.jpg


74051_887683393292_9120626_47459483_6649667_n.jpg


73777_887683463152_9120626_47459487_1631340_n.jpg


My overhead welds aren't beautiful, but they're certainly not as bad as they could be.

Food for thought: I opted not to drill holes in the passenger side plate because it has no crush sleeves...
 
Back
Top