• Welcome to the new NAXJA Forum! If your password does not work, please use "Forgot your password?" link on the log-in page. Please feel free to reach out to [email protected] if we can provide any assistance.

Extended Idle 97-01 Install

RWB214 said:
To whom it may concern I have confirmed that this mod will not work on a 99 5 spd. The hole for pin 12 was blocked to keep moisture out so I had to dismantle the connector and dremmel the plastic out. Putting the connector back together was a PITA, but I did it and with the engine idling I inserted a paper clip into pin 12 and connected it to ground. Nothing. I assume that even if the PCM's are the same(auto or manual), it requires some input from the auto transmision in order for the Ext Idle function to work.
The PCMs are not the same.
 
alright i am runnin a 97 xj auto 4.0 and i have a spot for an extra switch in my jeep all mine has is rear defog and rear wiper so with that blank spot if i buy extended idle switch what else will i need. if i pull the cover off will it be just a plug in or with i be splicing and adding wires. i have been reading these forums for 2 hours now. just wondering what i have to do? i have the spot for it just need to know how involved is this project. livin in mn its cold i want it to heat up quicker and run my aux stuff. if anyone has a step by step right up let me know. thanks p.m if ya can help.
 
alright i am runnin a 97 xj auto 4.0 and i have a spot for an extra switch in my jeep all mine has is rear defog and rear wiper so with that blank spot if i buy extended idle switch what else will i need. if i pull the cover off will it be just a plug in or with i be splicing and adding wires. i have been reading these forums for 2 hours now. just wondering what i have to do? i have the spot for it just need to know how involved is this project. livin in mn its cold i want it to heat up quicker and run my aux stuff. if anyone has a step by step right up let me know. thanks p.m if ya can help.

Most likely that blank is for factory fogs. There will be a plug behind there, but won't do you any good. Run new wires in the manner described in this thread and put your switch in the blank.

The info is in this thread, I used it and mine works flawlessly.
 
I put one in my 01 xj a few months back...I mounted a toggle switch in the blank spot, tied one side of the switch to ground and the wire for the other side of the switch had to be run thru the firewall out to the PCM and I spliced into the correct wire going into the PCM. works fine.
 
what is an extended idle and whats the point/or used for?! sorry for my ignorance:(...just wondering
 
fuelfox4949 said:
alright i am runnin a 97 xj auto 4.0 and i have a spot for an extra switch in my jeep all mine has is rear defog and rear wiper so with that blank spot if i buy extended idle switch what else will i need. if i pull the cover off will it be just a plug in or with i be splicing and adding wires.

Just to clarify this point for anyone reading: it doesn't matter if you currently have 0, 1, 2, or 3 switches in your bezel; the install instructions are the same.

Take a look at this thread; there's further clarification of the wiring, etc. in there.

i have the spot for it just need to know how involved is this project.

The worst part for me was finding a foglight pigtail - everywhere I talked to wanted stupid amounts of money for one, until I found a place willing to mail-order a foglight switch with the pigtail and about 6" of wiring to me for $12 (IIRC). Total time to install it (not counting waiting for that part to arrive) was less than two hours.

what is an extended idle and whats the point/or used for?! sorry for my ignorance:(...just wondering

It was a police package option used to raise the engine idle while the tranny was in park or neutral. The idea was that it would improve cooling and battery charging while parked for long periods of time running lights, radios, etc. jeepsareus.com still has the parts necessary for the conversion.
 
hhmmm thats really cool!thanks!
 
Here it is, the answers you've been looking for!

Here it is, the answers you've been looking for!

I just finished installing an Extended Idle Switch in my '99 Cherokee Classic 4.0 A/T. It functions properly, the backlit icon dims with the rest of the dash, and the indicator light comes on when the switch is activated. After reading through this thread a number of times, I feel there's still a lot of confusion out there as to how to wire this properly. I know I was still confused until I read a few different threads about this mod. Let's see if I can pull all the information together and clear it up for future reference.


1. All the necessary parts (minus the wiring pigtail) can be purchased from your dealer or any of the online Mopar parts sellers. I looked at just about every site and the one that consistently came up the cheapest was Mopar Discount Parts dot Com. They also had great customer service and the cheapest shipping rates I could find. Jeromy is a one man show, is very helpful on the phone, ships quickly, and kept me up to date on my order status every step of the way. Just to give you an idea of the expenses you may incur if you choose to do this mod, I have listed the prices from the above mentioned supplier at the time I made my purchase.

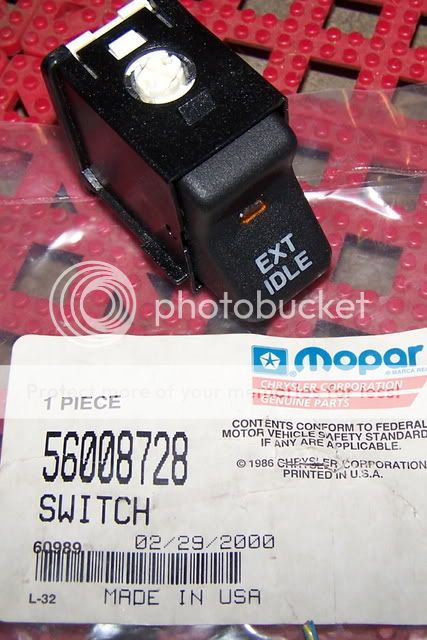
Extended Idle Switch - Part# 56008728 ($27.50)
ExtIdle3.jpg


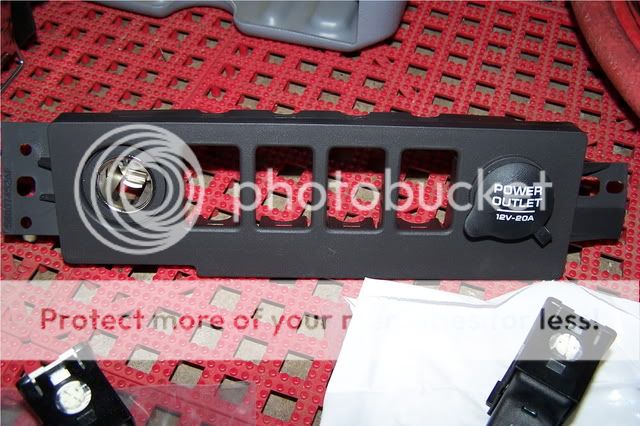
4 Switch Bezel - Part# 4897505AF ($48.58)
Finally found out this part is so damn expensive because it comes with both the cigar lighter and power outlets!
(Also, be aware that these 4 switch bezels have been discontinued and are therefore in limited supply)
ExtIdle2.jpg


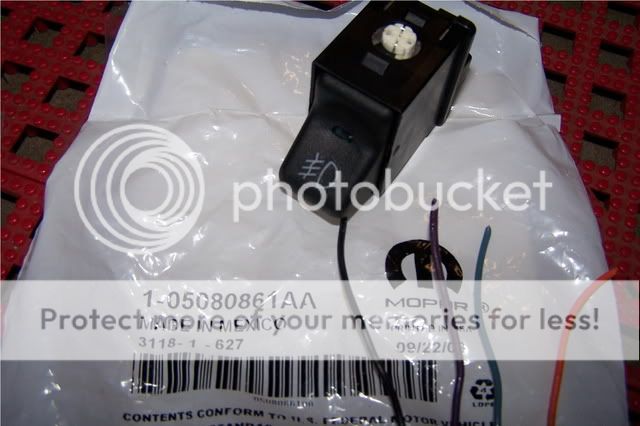
and if your Fog Light Switch has burned out like everyone else's (and you still want to use your OEM switch)...

Fog Light Switch - Part# - 5080861AA ($27.70)
If you want it to last this time, wire it correctly with a relay after the switch.
Mopar Fog Light Wiring Repair Kit (Part# - 5066442AA $111.22) is available if you've got the funds and you're not comfortable with making the upgrades yourself.
ExtIdle4.jpg


The other part you will need is a pigtail for your new switch. You can use either a fog light pigtail, or a window defroster pigtail. I removed both from an XJ that was getting parted out. Both are shown in the following picture. You will notice that the orange and black leads are opposite each other. It really doesn't matter which one you use as the pinouts are numbered on the body of the connector for reference. Grey plug is the Defrost pigtail, black plug is the Fog Light pigtail.
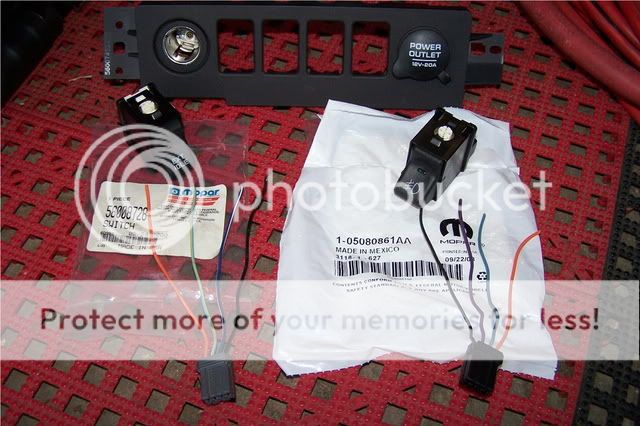
ExtIdle1.jpg


2. The Idle Actuator wire that gets connected to Pin A12 on the PCM has been pretty well covered. I did however follow the wiring schematic in hopes of tracking down the closest possible spot to tap into the existing (Solid Grey) wire. Turns out that it doesn't get much better than right next to the PCM. Unless you have the Police Package (in which case you probably don't need to do this mod) the Solid Grey wire runs from Pin A12 on the PCM to Pin 11 on Connector C107 which you will find right next to the transmission dipstick. That's it, it stops there. This connector is actually further away from the driver's side firewall hole than the PCM is. I guess you could split the loom, find the Solid Grey wire, and splice into it right next to the firewall hole if you really wanted to.

This brings me to my next point. As this Solid Grey wire is not connected to anything other than A12 on the PCM, it doesn't matter whether you choose to cut or splice the Solid Grey wire to make your connection. Electrically speaking, it's the same either way.


3. Extended Idle Switch wiring is as follows (per the FSM):
Pin #1 - Ground (Black on the OEM Ext Idle pigtail)
Pin #2 - Idle Actuator (Grey on the OEM Ext Idle pigtail)
Pin #3 - Fused Ignition Switch Output (RUN) (Dark Blue w/ White stripe on the OEM Ext Idle Pigtail)
Pin #4 - Fused Panel Lamps Dimmer Switch Signal (Orange on the OEM Ext Idle Pigtail)

Unless you managed to score a pigtail from a Police Package XJ, your pigtail will not match up. I chose to use the Defrost pigtail since the #1 & #4 (Black & Orange) leads are the same as the original pigtail. Here's the easiest way to wire it all up:

Connect Ext Idle Switch Pin #1 to Fog Lamp Switch Pin #4 (Black)
Connect Ext Idle Switch Pin #2 to your wire leading to A12 on the PCM
Connect Ext Idle Switch Pin #3 to A/C Heater Control Pin #2 (Dark Blue / White stripe)
Connect Ext Idle Switch Pin #4 to Fog Lamp Switch Pin #1 (Orange)

So why do you tie into A/C Heater Control Pin #2 instead of the hot lead on the Fog Lamp Switch? Because if you use the Fog Lamp Switch as your power source, your Ext Idle indicator light will only come on when your Fog Lights are allowed to come on (i.e. headlights on, high beams off). If you use the Fog Light Switch lead, your Ext Idle indicator light won't come on when your headlights are off and it will turn off anytime you turn on your high beams. Best reasons of all though... the A/C Heater Control wire is close enough that you don't need to extend your Ext Idle pigtail and it is the power source used when Ext Idle is a factory option as shown in the diagram below.

pic1.jpg


You're probably saying, great, now I've got to figure out where the heck A/C Heater Control Pin #2 is too... It actually couldn't be easier. Directly above your new Ext Idle switch is the A/C Heater control knob (Hot/Cold). On the back of the knob you will find a plug with three wires. Follow the wires down and you will see they run right past the back of the Ext Idle Switch. The middle one is the Dark Blue with White stripe that you are looking for. Splice into it and connect it to Ext Idle Switch Pin #3. Easy as pie.


4. To get all the parts to fit together, you're going to have to do a little modifying.

Unless you managed to score the OEM Ext Idle pigtail, you're going to have to cut the little key tab off the plug in order for it to fit into the Ext Idle Switch. This is easily done with a razor blade as the plastic is quite soft.

For some reason, the Ext Idle Switch itself comes keyed the same as the Fog Light Switch. This being the case, both switches will only fit in hole #3 on the switch bezel. Not a problem if you eliminated your fog lights and are using the 3 switch bezel, but if you're using the 4 hole switch bezel, you will need to shave the key tab off the switch. This can again be done with a razor blade but is a bit more difficult as the switch housing plastic is much harder.

Well, I hope this clears up all the misconceptions and muddy information about performing this mod. Enjoy and happy extended idling... :greensmok
 
Why not skip all of the costs for the damn 4 hole bezel along with the switch and just go and buy a black rocker switch and mount it somewhere and make it look clean? Sure it's not stock but you'll save a bunch of dime, that's for certain.
 
Why not skip all of the costs for the damn 4 hole bezel along with the switch and just go and buy a black rocker switch and mount it somewhere and make it look clean? Sure it's not stock but you'll save a bunch of dime, that's for certain.

Where's the cool factor in that? :cool:

I'm just providing the info, not trying to tell everyone this is the only way to go. If you've read through the last 10 pages and checked how many times this thread has been hit, then you know there are plenty of folks interested in making it look factory. Personally, my goal is to make my rig look as clean and OEM as possible while still making it a highly capable trail rig. This mod fits my criteria nicely...

Im with you, it looks good. I used you info and ordered my stuff this morning. Now just need to hunt down some pigtails.......

Mat
 
Has anyone completed this modification with a pre 96 XJ? I plan to do it on my 95 (OBD-1) and have already gathered the missing pin from another junkyard-doner. Just have not completed it yet. It appears it will work on all OBD-2 (96-01) XJ's no problem but I thought I heard that not all of the OBD-1 computers will support the extended idle modification?
 
The high idle raises the RPMS up to a point where the alternator will re-charge the battery better, as it works more efficiently at higher RPMS than idle. This feature is found on police cars as they frequently need to park with their headlights and wig-wags on for extended periods of time, and it would kill the battery if they didn't have this option.

Glad this thread got pulled back up, I'm definitely going to look into this for mine.
 
Yes except it is odd that it is controlled by a switch. I know the Ford Police Interceptor's PCM's automatically raise the idle when in park or neutral, there is no switch to turn it on or off.
 
Yes except it is odd that it is controlled by a switch. I know the Ford Police Interceptor's PCM's automatically raise the idle when in park or neutral, there is no switch to turn it on or off.

This would be even easier to do than the switch mod. Simply ground Pin A12 on the PCM permanently and leave out the switch. You will have high idle anytime you are in park or neutral.

On a side note, high idle is activated by a switch on all of the electronically controlled fire engines in our fleet. They automatically shed accessories and lights if the power draw out paces the alternator output. This is only a problem at idle though. Flip the high idle switch and you can run everything at same time.

Oh and Blaine, sorry I'm no help with your questions regarding pre '96 XJ's. My FSM is for a '99 and I really haven't come across any definitive information regarding this option on an older model. Should be easy enough to figure out by looking at the wiring diagram for your model year. Give it a try and maybe you can do a write up with some solid answers for this common question.
 
Back
Top