-
Welcome to the new NAXJA Forum! If your password does not work, please use "Forgot your password?" link on the log-in page. Please feel free to reach out to [email protected] if we can provide any assistance.
You are using an out of date browser. It may not display this or other websites correctly.
You should upgrade or use an alternative browser.
You should upgrade or use an alternative browser.
Project "BlacknBlueBallz"
- Thread starter BIGSLVRXJ
- Start date
dakzimm
NAXJA Forum User
- Location
- Polk City, Iowa
Well the trans is finally back in. I ended up taking it completely out and pulling the TC back out and starting completely over. It all went back together without issue and is now completely in place. Tomorrow I will be pulling the pan to hook up the new TV cable and starting it up!
I did get a little side tracked and installed the cowl intake. It definitely is made for 91+ Jeeps but I made it work. The cowl is slightly different in the years before 91 so the filter doesn't exactly fit. I was able to get it to fit well enough and it should work just fine. All I have left to do is put the bolts in the black shroud on the firewall and maybe paint the stainless. Not sure I like it in there.

Sent from my HTC U11 using Tapatalk
I did get a little side tracked and installed the cowl intake. It definitely is made for 91+ Jeeps but I made it work. The cowl is slightly different in the years before 91 so the filter doesn't exactly fit. I was able to get it to fit well enough and it should work just fine. All I have left to do is put the bolts in the black shroud on the firewall and maybe paint the stainless. Not sure I like it in there.
Sent from my HTC U11 using Tapatalk
dakzimm
NAXJA Forum User
- Location
- Polk City, Iowa
Got the new TV cable installed and finished mounting the cowl intake bracket. Turned the key over and it started right up. Idles a little rough and occasionally backfires out the exhaust but it finally idles! My spark plugs are completely black and probably fouled due to the engine not firing correctly with the Renix flexplate. I need to change the oil again since there is still some fuel in it, and get some new plugs and it should be good. I ran it for about 5 mins today and it smoothed out quite a bit over that time and didn't throw any codes, so that's good. It sounds really good too. The cowl intake is a little louder than I expected but that's okay with me. The exhaust is fairly quiet but has a nice throaty sound to it. I would have run it longer but I don't want to start destroying things with the thin oil. If I have time tomorrow I will change the plugs and oil.
I also started on some body work. Cleaned up the drivers side of the bed and used a wire wheel to get the factory decals off. I found some small holes hidden under the paint and decals where it started rusting so I'm gonna have to take this truck down to factory primer and bare metal to find and fix all the tiny rust holes and to get an even coat of paint since there is so many layers of primer/paint already on it.
Sometime this week I need to get my driveshaft to the shop to be shortened so I can install that, along with doing axle services so I can get this thing on the road. I'm hoping to drive it by this weekend but well see if I have enough time throughout the week. I am building a computer for a friend later in the week so that will eat up at least a day or two getting that all set up for her.
I will get some more progress pictures and hopefully a video of it moving under its own power soon!
dakzimm
NAXJA Forum User
- Location
- Polk City, Iowa
Success! The plugs did the trick. It runs super smooth, doesn't make any bad sounds, and the only code that showed up after 30 mins was for the lower O2 sensor that I am not using. There is a small oil leak that I think is coming from the oil filter area that I need to investigate.
Here is a video of the truck running.
https://www.youtube.com/watch?v=exZtL75aM1M
It sounds a little "ticky" in the video but it doesn't sound that way in person. It also got much quieter under the hood after the electric fan and fan shroud were installed. I like that the exhaust isn't super loud but it does have a nice grumble to it. The cowl intake is a little louder than I thought it would be but I don't mind.
I also changed the oil and serviced the rear axle. Looks pretty good in there but it would look better with a locker....

I had to modify the fan shroud to fit on the lower bracket. I could have modified that bracket but it was much easier to just cut the shroud. The holes are a little bigger than I needed, but it will work just fine.

Here is a picture of the engine bay mostly put together. There will be a second fuse box where the can of Seafoam is, to run all the accessories, and a second battery where the stock airbox used to sit. I still have to hook up the heater core and finish installing the A/C components as well.

I am going to Dynamic Drivelines in Des Moines tomorrow after work to drop off my driveshafts. The rear one needs to be cut down a few inches and I am just going to have them do all the u-joints on both the front and rear while they have it. Here is the measurements for my rear shaft if anyone is curious. Its with a 4.0, AW4, and C8.25.

I am hoping the shafts will be done so I can pick them up after work on Wednesday, but well see. The computer parts will be showing up Wednesday though so I will have to get that computer together and running before I can install the shafts. Once the shafts are in, I get the NSS adjusted properly, and I convince the girlfriend to help bleed the brakes, I can drive this thing out of the shed! SO EXCITING!
Here is a video of the truck running.
https://www.youtube.com/watch?v=exZtL75aM1M
It sounds a little "ticky" in the video but it doesn't sound that way in person. It also got much quieter under the hood after the electric fan and fan shroud were installed. I like that the exhaust isn't super loud but it does have a nice grumble to it. The cowl intake is a little louder than I thought it would be but I don't mind.
I also changed the oil and serviced the rear axle. Looks pretty good in there but it would look better with a locker....
I had to modify the fan shroud to fit on the lower bracket. I could have modified that bracket but it was much easier to just cut the shroud. The holes are a little bigger than I needed, but it will work just fine.
Here is a picture of the engine bay mostly put together. There will be a second fuse box where the can of Seafoam is, to run all the accessories, and a second battery where the stock airbox used to sit. I still have to hook up the heater core and finish installing the A/C components as well.
I am going to Dynamic Drivelines in Des Moines tomorrow after work to drop off my driveshafts. The rear one needs to be cut down a few inches and I am just going to have them do all the u-joints on both the front and rear while they have it. Here is the measurements for my rear shaft if anyone is curious. Its with a 4.0, AW4, and C8.25.
I am hoping the shafts will be done so I can pick them up after work on Wednesday, but well see. The computer parts will be showing up Wednesday though so I will have to get that computer together and running before I can install the shafts. Once the shafts are in, I get the NSS adjusted properly, and I convince the girlfriend to help bleed the brakes, I can drive this thing out of the shed! SO EXCITING!
- Location
- NE Indiana
Very good progress.
mac 'burnouts before you know it' gyvr
mac 'burnouts before you know it' gyvr
dakzimm
NAXJA Forum User
- Location
- Polk City, Iowa
Finally got some time to post on the thread. Friday I went and picked up my driveshafts, and wow did he do a good job. Painted and everything. He even threw in 2 sets of ubolt style straps for free.
On Saturday a buddy and I got the rear shaft installed, bled the brakes, and spent an hour adjusting my nss and throwing the one on from my white XJ before realizing my shift linkage was off by a gear.... Fixed that and then took her for a spin!
First trip was down the lane and back. It seemed good so I swapped the wheels from the white XJ and went in to town get gas. Filled the whole tank up and have no leaks there. I did discover a small oil leak coming from the pressure sensor adapter but I believe I got that fixed.
The only problems now is a leaky bleeder screw on the drivers front, and I had to pull the driveshaft back out to be shortened another inch. It was just short enough to work but too close to the tcase for comfort. I fear that if I bottomed the truck out it would slam into the tcase. I may need to install my tcase drop because I do have some slight vibes at about 30 mph but that may change after the shaft is the proper length.
I'm really happy with the truck overall. It drives great, it's gone 40 miles so far and up to 65 mph with no death wobble and the alignment isn't too bad surprisingly. Only CEL is for the lower O2 sensor that I don't have.
On Sunday I got the evap canister installed as well as the door speakers.
I ordered my paint last night and that should be here on the 22nd. I'm still trying to figure out what to do for flares. I want flats but don't really want to spend the $400 on a set that only kinda fit in the rear. I found a thread about using Avek pvc board and they turned out really good but I can't find anyone who has it anywhere near me, so that's still up in the air.
As for tires, I'll be running these until I save enough money to get both this and the Commander new ones. On this I'll be running 33x10.5r15 BFG ATs.


Sent from my HTC U11 using Tapatalk
On Saturday a buddy and I got the rear shaft installed, bled the brakes, and spent an hour adjusting my nss and throwing the one on from my white XJ before realizing my shift linkage was off by a gear.... Fixed that and then took her for a spin!
First trip was down the lane and back. It seemed good so I swapped the wheels from the white XJ and went in to town get gas. Filled the whole tank up and have no leaks there. I did discover a small oil leak coming from the pressure sensor adapter but I believe I got that fixed.
The only problems now is a leaky bleeder screw on the drivers front, and I had to pull the driveshaft back out to be shortened another inch. It was just short enough to work but too close to the tcase for comfort. I fear that if I bottomed the truck out it would slam into the tcase. I may need to install my tcase drop because I do have some slight vibes at about 30 mph but that may change after the shaft is the proper length.
I'm really happy with the truck overall. It drives great, it's gone 40 miles so far and up to 65 mph with no death wobble and the alignment isn't too bad surprisingly. Only CEL is for the lower O2 sensor that I don't have.
On Sunday I got the evap canister installed as well as the door speakers.
I ordered my paint last night and that should be here on the 22nd. I'm still trying to figure out what to do for flares. I want flats but don't really want to spend the $400 on a set that only kinda fit in the rear. I found a thread about using Avek pvc board and they turned out really good but I can't find anyone who has it anywhere near me, so that's still up in the air.
As for tires, I'll be running these until I save enough money to get both this and the Commander new ones. On this I'll be running 33x10.5r15 BFG ATs.
Sent from my HTC U11 using Tapatalk
dakzimm
NAXJA Forum User
- Location
- Polk City, Iowa
Small update.
The oil leak is fixed and it currently doesnt leak anything! The bleeder screw also seems to have stopped leaking but I'll keep and eye on that.
The driveshaft is now the proper length and installed for good. I still need to install the front shaft but I'll get to it this weekend probably.
I found the source of my vibrations to be the exhaust hitting the crossmember. I jammed a piece of wood between the exhaust and body in front of the crossmember, then used my floor jack behind it to bend the exhaust just enough that it doesn't hit it. Eventually I'll weld the hanger on properly.
My new wiring harness from Meanlemons over on Comanche Club, should be here Saturday. Hopefully I'll have time to get that installed.
It feels good now that I can just do the fun stuff to the truck rather than all the "necessary to be on the road" stuff.
dakzimm
NAXJA Forum User
- Location
- Polk City, Iowa
Got some goodies yesterday and got them installed today. I got some sway bar links and the tools to install them. That went crappy since I didn't have a big enough socket to remove the pressed in bolts. I tried using a timing sprocket and a piece of metal to try to push it out with the C-clamps. I spent about an hour trying to get the bolts out and eventually realized the nuts I grabbed happened to be the right ones for the factory bolts.... I just threw those on and called it good.
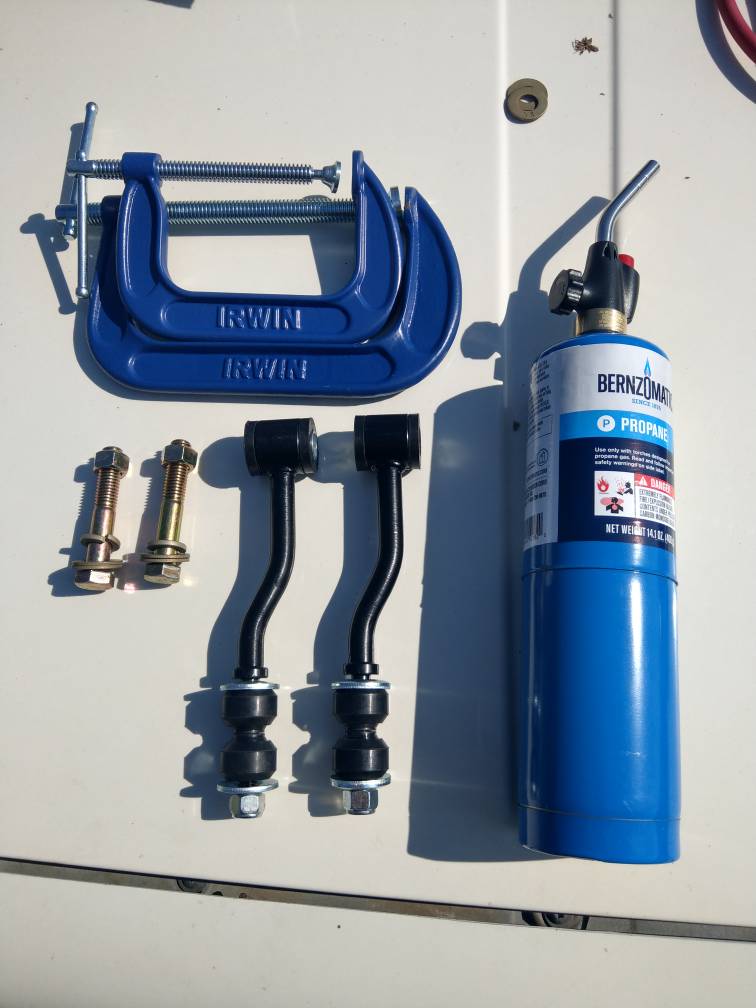
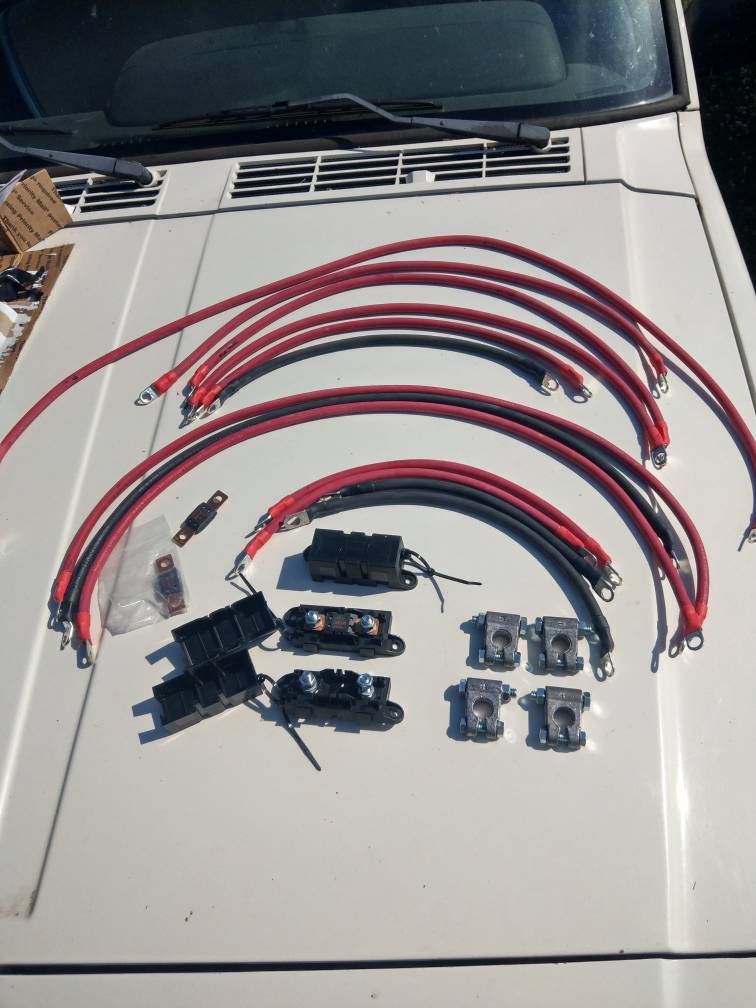
I also received my wiring kit from Meanlemons. He made me a regular XJ kit and a custom kit to run my dual battery setup as well as my second PDC. It's great quality and a very fair price. I don't have my second battery yet so I just hooked up the factory wiring and the second PDC for now.

The last thing I did was installed the front driveshaft. I need to find different ubolt straps for the yoke because the set I have doesnt fit right. The side of the nuts lock up on the yoke before getting all the way seated. Anyone done the ubolt conversion on a Dana 30 yoke? What ubolts did you use?
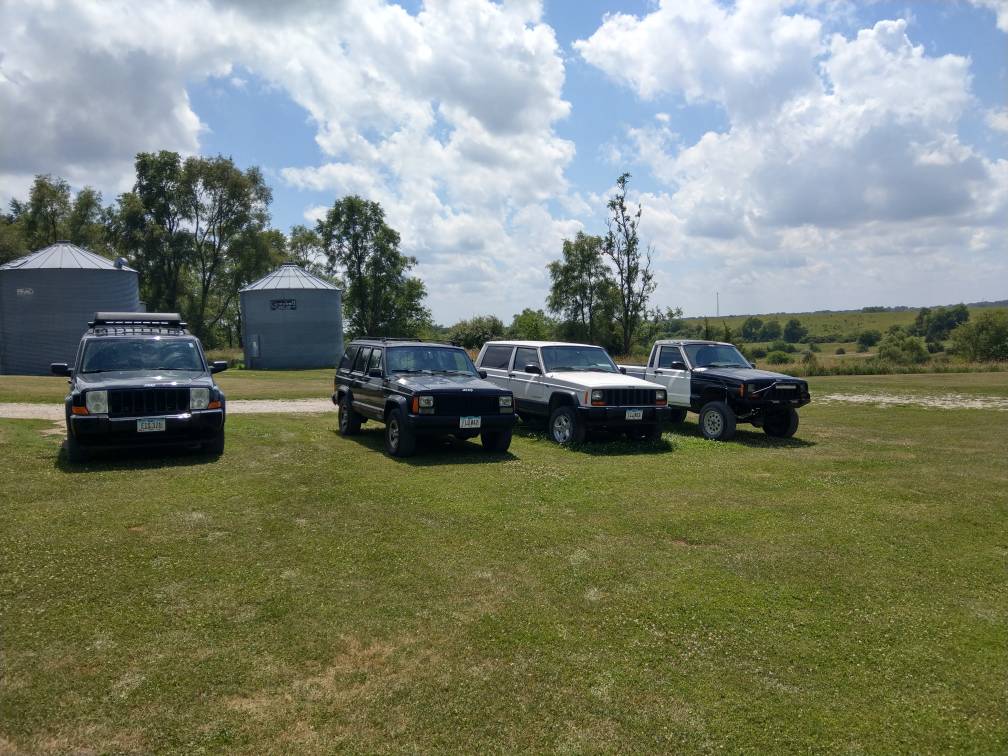
After finishing all the work, I walked out of the shed and noticed this... I think I'm developing a problem....
Sent from my HTC U11 using Tapatalk
I also received my wiring kit from Meanlemons. He made me a regular XJ kit and a custom kit to run my dual battery setup as well as my second PDC. It's great quality and a very fair price. I don't have my second battery yet so I just hooked up the factory wiring and the second PDC for now.
The last thing I did was installed the front driveshaft. I need to find different ubolt straps for the yoke because the set I have doesnt fit right. The side of the nuts lock up on the yoke before getting all the way seated. Anyone done the ubolt conversion on a Dana 30 yoke? What ubolts did you use?
After finishing all the work, I walked out of the shed and noticed this... I think I'm developing a problem....
Sent from my HTC U11 using Tapatalk
dakzimm
NAXJA Forum User
- Location
- Polk City, Iowa
Congrats on the updates and collection!
Never got around to running ubolts on a 30, maybe a little careful grinding will let the nut fit?
Thanks! Yeah I'm gonna try grinding a little off and get smaller nuts.
- Location
- Southern Indiana
Thanks! Yeah I'm gonna try grinding a little off and get smaller nuts.
That sounds painful! :wow:
dakzimm
NAXJA Forum User
- Location
- Polk City, Iowa
That sounds painful! :wow:
LOL I guess the thread title makes sense now huh?
dakzimm
NAXJA Forum User
- Location
- Polk City, Iowa
Some more progress has been made. I finally received all the paint for the truck. I got 12 cans of primer sealer, 12 cans of automotive primer, 12 cans of Deep Blue automotive paint, and 12 cans of automotive clear coat for a total of 48 cans. I'm hoping to get my prep work done throughout this week and paint it this weekend but we'll see how that works out.
I also got a new transmission line to replace my bent and spliced line. I unfortunately ordered the return line to the trans (Dorman part 624-354), instead of the line from the trans to radiator like I needed. I still made it work by making my own bends and cutting the rubber hose to go to my new auxiliary transmission cooler.
I ordered an auxiliary cooler kit from Amazon. There is a picture below. It fits really well on the truck. I mounted it as far to the drivers side it could go with the lines coming out behind the drivers headlight.
I decided to set it up on the hot side before the radiator. So my fluid path goes from the trans to the aux cooler, then into the radiator, and back to the trans. I did this because I wanted to keep the trans fluid warm in the cold winter months and also take some of the load off the radiator when the fluids are really hot in the summer months.
I've also been thinking about what I am doing for the rest of my dual battery setup. I have kind of decided that I want a pair of D34M Optima blue top batteries. As for the trays, I am waiting to hear back from Dirt Bound Offroad to see if their Optima battery trays will fit this model of battery since it isn't listed on their website.
I have also gotten a quote for 5 33x10.5xr15 BFG AT KO2s, mounted and balanced, as well as an alignment for right at $1250.


Sent from my HTC U11 using Tapatalk
I also got a new transmission line to replace my bent and spliced line. I unfortunately ordered the return line to the trans (Dorman part 624-354), instead of the line from the trans to radiator like I needed. I still made it work by making my own bends and cutting the rubber hose to go to my new auxiliary transmission cooler.
I ordered an auxiliary cooler kit from Amazon. There is a picture below. It fits really well on the truck. I mounted it as far to the drivers side it could go with the lines coming out behind the drivers headlight.
I decided to set it up on the hot side before the radiator. So my fluid path goes from the trans to the aux cooler, then into the radiator, and back to the trans. I did this because I wanted to keep the trans fluid warm in the cold winter months and also take some of the load off the radiator when the fluids are really hot in the summer months.
I've also been thinking about what I am doing for the rest of my dual battery setup. I have kind of decided that I want a pair of D34M Optima blue top batteries. As for the trays, I am waiting to hear back from Dirt Bound Offroad to see if their Optima battery trays will fit this model of battery since it isn't listed on their website.
I have also gotten a quote for 5 33x10.5xr15 BFG AT KO2s, mounted and balanced, as well as an alignment for right at $1250.
Sent from my HTC U11 using Tapatalk
dakzimm
NAXJA Forum User
- Location
- Polk City, Iowa
Well today I started preparing for paint. I got the last bit of bondo I wanted to do on the drivers side done and got all the rough edges smoothed out and decals removed. This way when I go to do the paint job for real, I just have to sand everything with high grit sandpaper and start painting. I plan on doing this same thing to the passenger side tomorrow and on Friday start removing lights, bumpers, and the tailgate as well as get the shed cleaned up and ready to start painting on Saturday. I'm very excited!
Last night I got some blue leds ordered to convert my dash lights to blue and I ordered the rocker switch I needed to finish my off road light install. These should be here the beginning of next week.


Sent from my HTC U11 using Tapatalk
Last night I got some blue leds ordered to convert my dash lights to blue and I ordered the rocker switch I needed to finish my off road light install. These should be here the beginning of next week.
Sent from my HTC U11 using Tapatalk
dakzimm
NAXJA Forum User
- Location
- Polk City, Iowa
Well I've decided this will be a 5-10 foot paint job. I cant spend the amount of time it would take to get this perfect. There are so many imperfections and different layers of paint. Oh well, it'll look good to me and ya can't beat spending $200 to paint it. I couldn't imagine what a shop would charge to do all the body work this would need.


Sent from my HTC U11 using Tapatalk
Sent from my HTC U11 using Tapatalk
dakzimm
NAXJA Forum User
- Location
- Polk City, Iowa
Well it's blue!! More to come.


Sent from my HTC U11 using Tapatalk
Sent from my HTC U11 using Tapatalk
dakzimm
NAXJA Forum User
- Location
- Polk City, Iowa
The truck is finally all one color! I did all the prep Friday after work and spent all day Saturday painting.
For prep I ended up sanding everything with 100 grit, 120 grit, 180 grit, and 400 grit with a palm sander, then did 1000 grit and 1600 grit with a sanding block. After that I wiped down the whole truck with a dry rag and followed with mineral spirits before painting. I did not do any sanding between or after any coats of paint but I did use a dry rag and wiped off the over-spray dust from the automotive primer before spraying the blue.


For paint I did:
- 1 medium-heavy coat of primer sealer (6 cans) Plus the many layers that were already on the truck from my previous repairs.
- 1 light coat of automotive primer (5.5 cans) This stuff did not spray or coat well and I didn't want the possibility of "tiger stripes" so I only did 1 coat.
- 2 coats of blue (10.5 cans) This sprayed and coated very well. The first coat was light-medium and the second coat was a heavy coat.
- 2 coats of clear (9.5 cans) These cans sprayed a little sporadic, which led to a couple small runs but overall it coated well. Both coats were medium coats.
These are some pictures I took today after putting the truck back together and giving it a quick rinse. You can see the dents and areas where my prep work wasn't the best but the paint overall looks like a real paint job (cheap Maaco). Since my taillights had some over-spray from the white spray job it previously had, I decided to clean them up, paint the borders black, and spray clear coat on them. I also sprayed some bedliner on the tailgate handle and the top of the rear bumper.


http://i.imgur.com/BPJ6H7G.jpg
Towards the end of the week I received my blue LEDs and my light bar rocker switch so I installed those as well. This thing is really coming together and I love it.

The inner bulb of the marker light on the drivers side only works as a turn signal... weird


The HVAC controls have blue LEDs too but you can't really tell in this lighting. Also these LEDs don't dim all that much so if you are someone who likes your interior lights really dim, this isn't a swap for you.
Some of the last major things I need to do to it:
- Paint and install the factory flares (96- front flares and brackets currently in the mail)
- Put the decals on it
- Bedliner the lower part of the body, the bed, and maybe the hood
- Put the Moonvisor on it
- Get bigger tires
- Figure out a spare tire mount in the bed
- Modify the front yoke to accept my front driveshaft u-bolts
- Probably an auto locker in the rear
There is just a huge sense of accomplishment that comes when you near the finish of a major project like this. September 10th will be 1 year since I got this truck and it is amazing to me that in just under a year I was able to take a pretty much stripped truck and build something like this out of it.
For prep I ended up sanding everything with 100 grit, 120 grit, 180 grit, and 400 grit with a palm sander, then did 1000 grit and 1600 grit with a sanding block. After that I wiped down the whole truck with a dry rag and followed with mineral spirits before painting. I did not do any sanding between or after any coats of paint but I did use a dry rag and wiped off the over-spray dust from the automotive primer before spraying the blue.
For paint I did:
- 1 medium-heavy coat of primer sealer (6 cans) Plus the many layers that were already on the truck from my previous repairs.
- 1 light coat of automotive primer (5.5 cans) This stuff did not spray or coat well and I didn't want the possibility of "tiger stripes" so I only did 1 coat.
- 2 coats of blue (10.5 cans) This sprayed and coated very well. The first coat was light-medium and the second coat was a heavy coat.
- 2 coats of clear (9.5 cans) These cans sprayed a little sporadic, which led to a couple small runs but overall it coated well. Both coats were medium coats.
These are some pictures I took today after putting the truck back together and giving it a quick rinse. You can see the dents and areas where my prep work wasn't the best but the paint overall looks like a real paint job (cheap Maaco). Since my taillights had some over-spray from the white spray job it previously had, I decided to clean them up, paint the borders black, and spray clear coat on them. I also sprayed some bedliner on the tailgate handle and the top of the rear bumper.
http://i.imgur.com/BPJ6H7G.jpg
Towards the end of the week I received my blue LEDs and my light bar rocker switch so I installed those as well. This thing is really coming together and I love it.
The inner bulb of the marker light on the drivers side only works as a turn signal... weird
The HVAC controls have blue LEDs too but you can't really tell in this lighting. Also these LEDs don't dim all that much so if you are someone who likes your interior lights really dim, this isn't a swap for you.
Some of the last major things I need to do to it:
- Paint and install the factory flares (96- front flares and brackets currently in the mail)
- Put the decals on it
- Bedliner the lower part of the body, the bed, and maybe the hood
- Put the Moonvisor on it
- Get bigger tires
- Figure out a spare tire mount in the bed
- Modify the front yoke to accept my front driveshaft u-bolts
- Probably an auto locker in the rear
There is just a huge sense of accomplishment that comes when you near the finish of a major project like this. September 10th will be 1 year since I got this truck and it is amazing to me that in just under a year I was able to take a pretty much stripped truck and build something like this out of it.
dakzimm
NAXJA Forum User
- Location
- Polk City, Iowa
Looking better with the decals on it!
Later this week my new front flares should be coming in. I have to get the rear flares cleaned up and painted black so I can get them all installed as well as cleanup and repaint the trim pieces. Now that the truck is all 1 color, you can see all the overspray and marks on the old trim pieces.
I also need to start saving some cash so I can get bigger tires for this and a new set for the girlfriend's Commander. Im not excited to spend $2000 on tires all at once...


Sent from my HTC U11 using Tapatalk
Later this week my new front flares should be coming in. I have to get the rear flares cleaned up and painted black so I can get them all installed as well as cleanup and repaint the trim pieces. Now that the truck is all 1 color, you can see all the overspray and marks on the old trim pieces.
I also need to start saving some cash so I can get bigger tires for this and a new set for the girlfriend's Commander. Im not excited to spend $2000 on tires all at once...
Sent from my HTC U11 using Tapatalk
Similar threads
- Replies
- 5
- Views
- 1K