• Welcome to the new NAXJA Forum! If your password does not work, please use "Forgot your password?" link on the log-in page. Please feel free to reach out to [email protected] if we can provide any assistance.

beater!

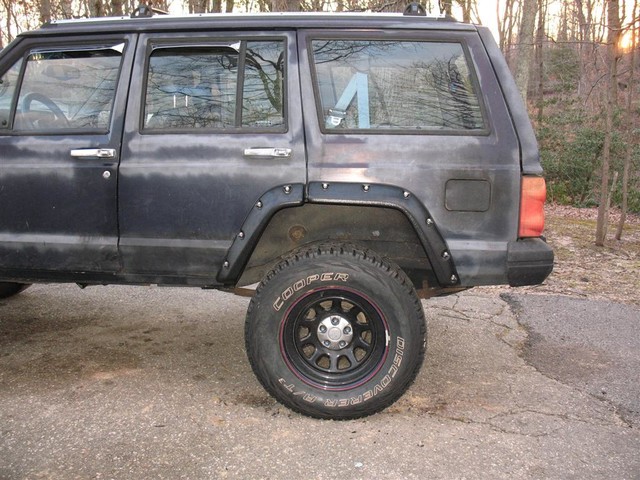
Fixed some of the worst rust, still have a lot to do.

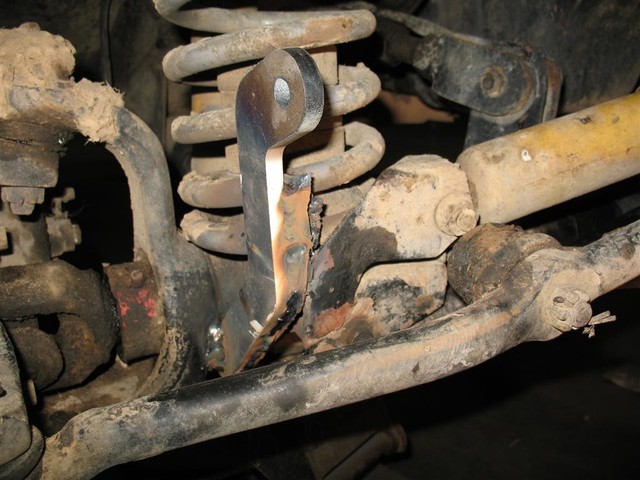
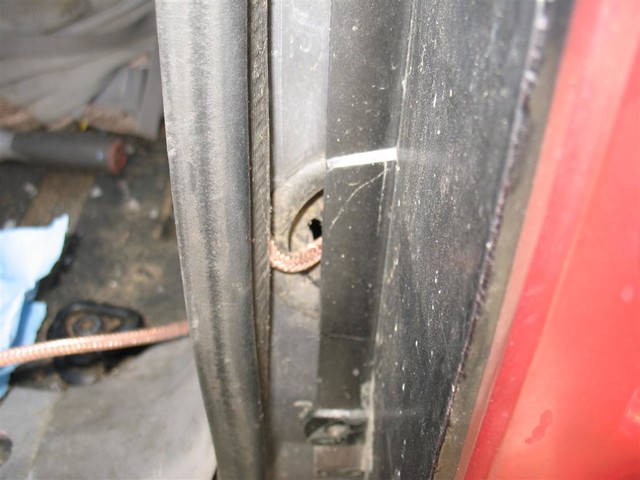
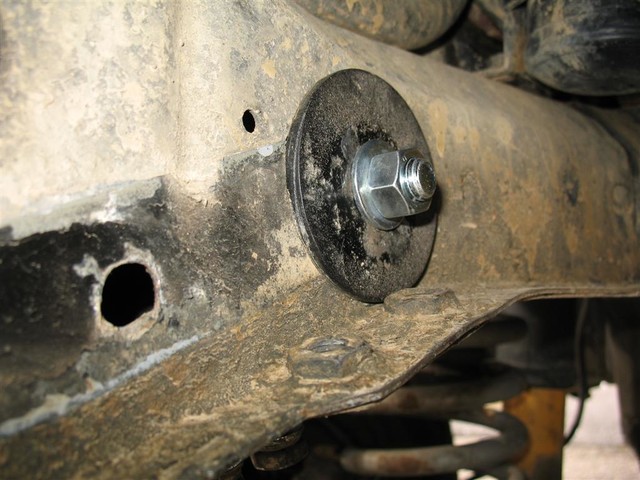
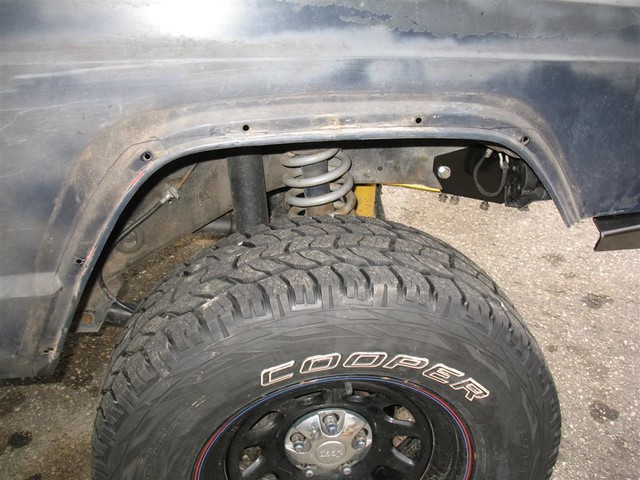
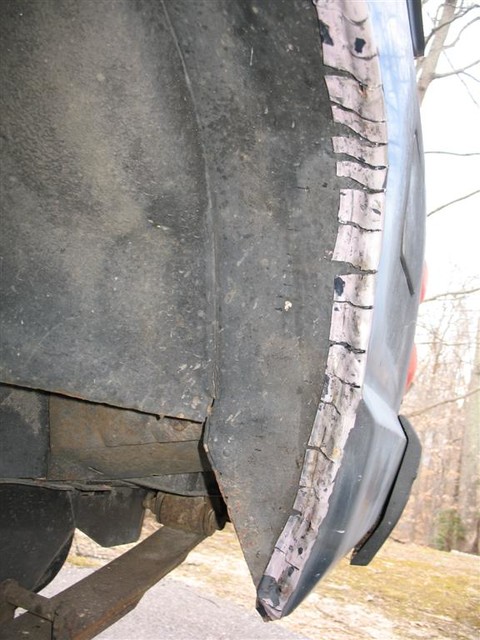
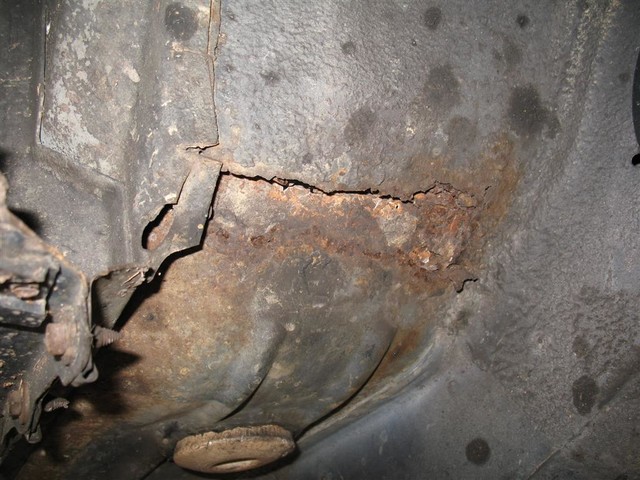
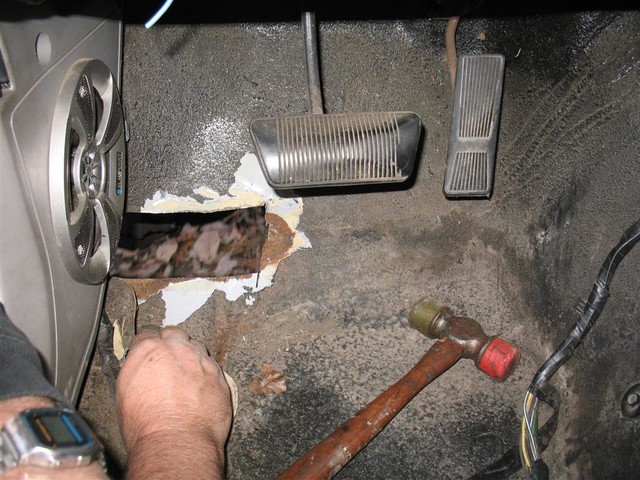
This is what I found in the wheel wells, basically where the water is flung off the tires had gathered up and rotted through the sheet metal. Looking at other Cherokees and now I see that this is a really common problem area.

Front_Passenger_Rot.sized.jpg


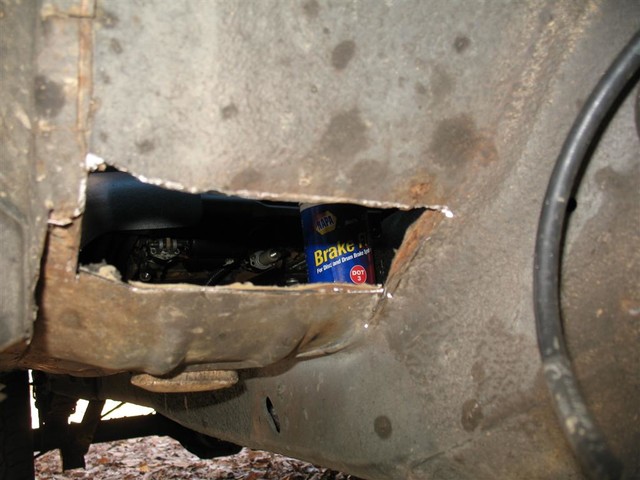
Cut out the section as much as we could without going into the frame rail or around the curve into the rocker. Still some rust inside above the frame rail but I am just trying to fix this so I can get through Winter. Next year sometime I will replace the pans and rockers.

Front_Passenger_Cut.sized.jpg


Same on the drivers side too

Front_Driver_Cut.sized.jpg


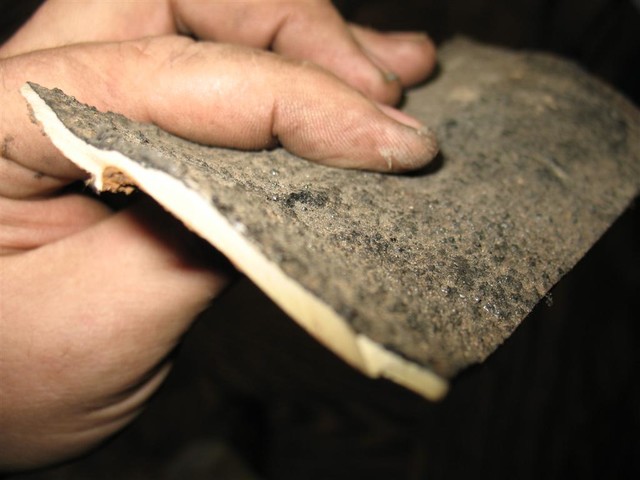
I thought there were two layers of metal but its actually just one layer of metal and then a skim coat of seam sealer.

Front_Floorboard_Seam_Sealer.sized.jpg


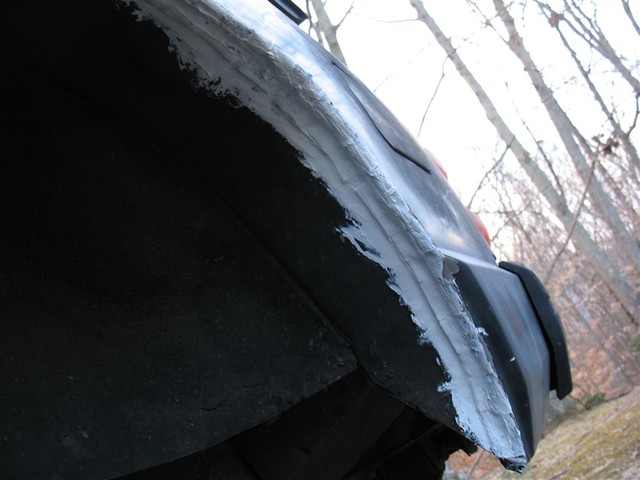
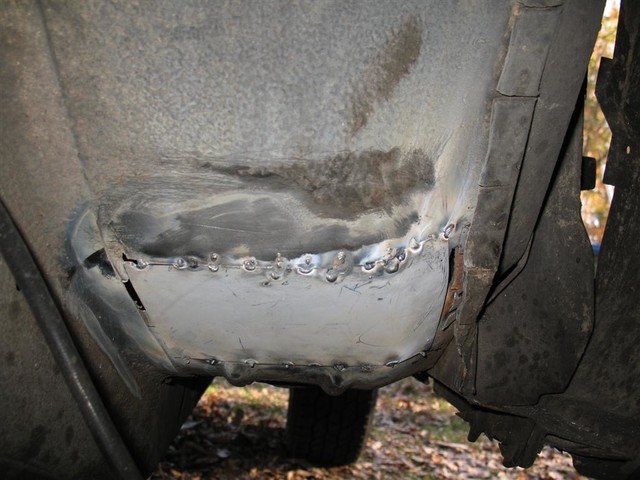
Ended up just cutting a patch that was taller than the hole and tacking it in place. I got a piece of brass from a welder in the local jeep club to use as backer for stitching the sides but couldn't make it work. The numerous tacks are holding the metal on solid, so we went with that and packing everything with seam sealer.

Front_Driver_Tacks.sized.jpg


3M seam sealer over the outside edges of the patch

Front_Passenger_Seam_Sealer_Outside.sized.jpg


and a skim coat on the inside

Front_Driver_Seam_Sealer_Inside.sized.jpg


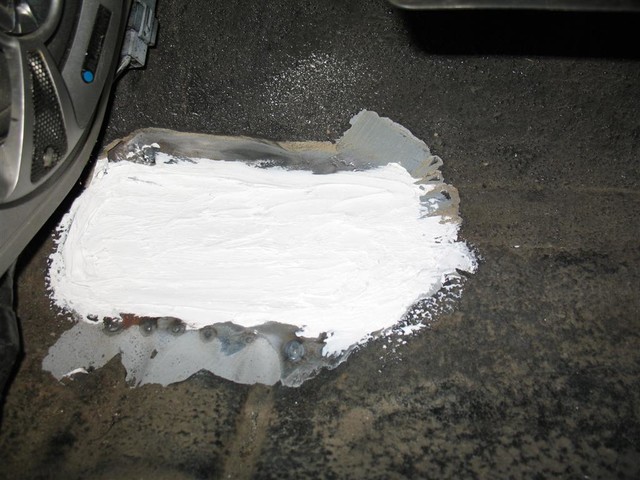
After that dries, I will put some underbody spray on the outside and some Herculiner on the inside.

Not the best work but it should get me through the winter and spring, which is all I was trying to do at this point
 
A few years ago, I replaced my stock gearbox with a YJ gearbox that I bought from a part-out (YJ for the constant-ratio turn-rate, and for the extra mounting hole). It worked pretty well except it had some stiction on cold mornings until the fluid heated enough to make the valve open. That wouldn't be much of a problem except this is my winter DD so it was annoying every morning, and I didn't like explaining to friends that they had to let it warm up, plus it seemed like a potential safety issue.

Looking around, the best option seems like a PSC but I don't plan to run hydro anytime soon so it is way overkill. Another option slight below that was Red-Head Steering, who rebuilds the cases from scratch (replaces the bushings with needle bearings, matches bearings to the internals, etc), and while they are still kind of expensive it seems to be much better option for this kind of use than stock or reman roulette, without going the full PSC route.

I ordered the YJ box (not on their main site, but they had one in stock), and also bought a JCR spacer from a local part-out

Redhead_Gearbox_and_JCR_Spacer.jpg


Took about 4 hours to remove the old and install the new, with a few minutes of help from my neighbor holding stuff in place.

Redhead_Gearbox_Installed.jpg


(ps--that's the in-line transmission filter laying over it)

After everything is done the final result feels great. Steering is very tight, predictable, and consistent, no sloppiness. Hopefully it will loosen up a hair so that its not quite so tight going forward, but for now it feels really good.

I still need to come up with a way to use the 4th YJ bolt (on top). It is kind of high on the rail so I will need to sleeve it. I also need to modify or recreate the spacer. Maybe a project for the summer.
 
I was surfing around and noticed some aluminum 38mm / 1.5" radiator hose adapters on ebay. My dual electric fan setup uses a sensor in the upper radiator hose, but has always been installed in a brass nipple pipe, and even though it always seemed to work alright, there was constant evidence of leakage, and it looked like shit. So I bought one of the pretty ones (this one, but there are many other colors and vendors).

It came with a 1/8 NPT hole tapped in it, but the switch I use is M14x1.5 straight thread. The adapter is aluminum so its soft enough to machine with basic tools. First I drilled the hole to 1/2" and then tapped it with a 1/4 NPT tapered tap that is very close to the right thread size at the thick end of the tap (threads will catch), then used a M14x1.5 bolt from the hardware store with some cuts to thread all the way. I added some thread putty and a copper washer to seal the sensor in the adapter.

Modified_38mm_Adapter.sized.jpg


38mm_Adapter_Installed.sized.jpg


Much cleaner appearance. No leaks yet.

I forgot to take a picture, but one other factor is that the tube is a little larger than the brass nipple (the nipple almost fit in the adapter, so it is probably 1/4" larger). This will let coolant flow easier as well. I'm not sure if there will be any kind of noticeable difference, but it will be interesting to see.
 
I picked up another NP242, this one from a 1990. The bearings and shaft are bad but the internal pieces are good, even the chain is in reasonably good condition.

1990_NP242_Innards.sized.jpg


Current thinking is buy a 6-pinion planetary and move the guts over to the 242-WJ housing that has the late-style gear cuts. Then buy a TW "HD" SYE for a new main shaft.
 
I joined a couple of people from the local FB group for some New Years wheeling at Rausch. Never been there before, but I had the money and I had the time, so I jumped in with them. Mostly greens and blues, a couple of hard ones. The old POS did pretty well, got up Crawlers Ridge and Tip-Top fine, never got stuck on anything and never needed pulling

Articulation was good but I did not bumpstop enough for the tuck--both fender flares are broken and the air dam is just flopping around. I need to cut I guess.

2016_01_01_Rausch_01.sized.jpg
2016_01_01_Rausch_02.sized.jpg


2016_01_02_Rausch_01.sized.jpg


2016_01_02_Rausch_02.sized.jpg


I also tweaked the ZJ tie rod a little (steering wheel is off center), but I can't see the damage just by looking. I have plans for steering just not right away. Everything else held up well, no problems at all.

I saw a lot of other XJs there in various states, good to see them.
 
Lots of stuff in the pipeline but the only thing I finished recently is my tow bar wiring.

My front recovery setup is modular and uses Class III receiver stock with various kinds of Class III inserts (D-rings, skids, whatever). A couple of years ago my neighbor gave me his Reese flat tow bar, and I made some adapters to let me use it with the recovery mounts. Today I finally finished the wiring on it, using the Roadmaster 154 universal kit. It came with a 6-foot harness that bolted to the tow bar, a 20-foot harness that I ran along the frame then under the back seat and into the quarterpanel, and a set of 4 Hy-Power diodes that I spliced into the left / right tail lights to give me running lights and individual turn signals using the different filaments.

Roadmaster_Tow_Bar_Harness.sized.jpg


Roadmaster_Hy_Power_Diode.sized.jpg


Now I can get dragged off the trail and back home if I break something that can't be fixed

Also found a "giant" 48"x20" duffel bag that works to hold the tow bar, spare D30 shafts, drive shafts, and more, for $40 on Amazon (make sure to pick the giant size). I should be able to throw this on the roof rack for trail rides and longer outings.

Giant_Expedition_Duffle.sized.jpg


Pretty pleased to have that all done, started work on it in 2008
 
Finished flipping my tie rod over the knuckle. First was to install the Synergy swaybar end link relocator brackets. These are big pieces of 3/8" plate that get welded to the existing bracket after removing the stock eye.

Synergy_Swaybar_Relo_Brackets_Nude.sized.jpg


Trace the new bracket and cut the eye off

Stock_Swaybar_Bracket_Cut.sized.jpg


Weld the relocator to the remainder of the old bracket and to the axle tube. This is really freaking strong.

Synergy_Swaybar_Bracket_Weld.sized.jpg


Install the Goferit Flip insert, drill the knuckle to 3/4 straight through and then tack the insert into place

Goferit_Insert_Installed.sized.jpg


Tie rod is flipped over the knuckle, lots of clearance, tie rod is above the axle and somewhat protected by the steering skid. Also as you can see I installed a Riddler cover on the D30, and there is lots of clearance there too

Goferit_Tie_Rod_Flipped.sized.jpg


One problem that appeared while steering was fully stuffed to driver side is that the adjuster on the ZJ tie rod catches the lip of the Synergy relocator bracket and prevents the steering wheel from turning back. Lucky I found it while parking at home, and not in the parking lot at work. Short-term I am going to shave the corner of the bracket so the adjuster can slide off, long-term I am going to replace the steering anyway

Synergy_and_ZJ_Adjuster_Stuck.sized.jpg


Also installed Lubelockers and Riddler diff covers front and rear

Riddler_Diff_Cover_Installed.sized.jpg


Also had the local welder who installed the brackets fix my floorpan. There was a spot where it looks like I landed right on a stump or something, the floor was pushed up high right under the seat.

Still need to do a couple more things before my next outing but these were high priority items
 
Last edited:
Thought I posted about the trip to Rausch a couple of weeks ago, but I guess I forgot. Had a great time with Andy and Nick (DITA). Didn't do any damage this trip but I struggled in a couple of places where I shouldn't have. Added more stuff to the list.

2016_02_13_Rausch_Snow_03.sized.jpg


Great time driving home with that on the wheels

2016_02_13_Rausch_Snow_01.sized.jpg


Didn't make this one but had a lot of fun backing out at full throttle

2016_02_13_Rausch_Snow_02.sized.jpg


FYI the Cooper Discoverer AT3 are great in rain and light snow, but don't hold for shit in the mud and deep snow. Starting to think about 35x12.50 MTs and all the crap that comes with them.
 
Got my CB install finalized after work today. Took a few weeks with a little bit of work every time the temp got warm.

The antenna is a 3-foot Firestik II. I bought a JCR bracket that is intended to go behind the tail light, but ended up hacking it down and putting it high on the D-pillar. I cut a little piece of scrap plate and tapped some holes, then cut a notch in the D-pillar under the trim and slipped the plate inside to act as a brace, so the bracket isn't using the sheet metal alone. The hatch barely clears. The antenna is fully above the roof and has a really good signal. I stole this idea from somebody but I don't remember who.

JCR_CB_Antenna_Mount.sized.jpg


The wire is tucked inside the weatherstripping until it gets next to the tail-light, then goes through a hole in the body plug. The antenna wire follows along the passenger side of the cab, over the kick panels, under the dash until it comes out under the driver side.

CB_Antenna_Wire_Body_Plug.sized.jpg


I spent a long time looking and thinking about radios and finally settled on the Uniden PRO520XL--small size, enough features, and a good reputation. It fits on the lower dash panel nicely. I bought a Road Devil amplified mic to try and make up for the lack of transmit gain in the radio. Only problem with this spot is the cord gets in the way a little, and its a little irritating to work the transfer case shifter.

PRO520XL_Installed.sized.jpg


I'm looking at some other options for a better radio and stronger signal but that's all I can say about that. I also plan to move the mic and a remote speaker to the overhead console, and integrate them into a new stereo head unit, but that is down the road a bit.
 
Finished flipping my tie rod over the knuckle. First was to install the Synergy swaybar end link relocator brackets. These are big pieces of 3/8" plate that get welded to the existing bracket after removing the stock eye.

Synergy_Swaybar_Relo_Brackets_Nude.sized.jpg


Trace the new bracket and cut the eye off

Stock_Swaybar_Bracket_Cut.sized.jpg


Weld the relocator to the remainder of the old bracket and to the axle tube. This is really freaking strong.

Synergy_Swaybar_Bracket_Weld.sized.jpg


Install the Goferit Flip insert, drill the knuckle to 3/4 straight through and then tack the insert into place

Goferit_Insert_Installed.sized.jpg


Tie rod is flipped over the knuckle, lots of clearance, tie rod is above the axle and somewhat protected by the steering skid. Also as you can see I installed a Riddler cover on the D30, and there is lots of clearance there too

Goferit_Tie_Rod_Flipped.sized.jpg


One problem that appeared while steering was fully stuffed to driver side is that the adjuster on the ZJ tie rod catches the lip of the Synergy relocator bracket and prevents the steering wheel from turning back. Lucky I found it while parking at home, and not in the parking lot at work. Short-term I am going to shave the corner of the bracket so the adjuster can slide off, long-term I am going to replace the steering anyway

Synergy_and_ZJ_Adjuster_Stuck.sized.jpg


Also installed Lubelockers and Riddler diff covers front and rear

Riddler_Diff_Cover_Installed.sized.jpg


Also had the local welder who installed the brackets fix my floorpan. There was a spot where it looks like I landed right on a stump or something, the floor was pushed up high right under the seat.

Still need to do a couple more things before my next outing but these were high priority items

What kit did you use for the steering flip?
 
I started a winter project in January, and just got all the bolts down today. Still need to do some minor stuff but its working well enough for a quick wheeling trip this weekend. Here's what I started with--the front flares were torn from stuffing the 32s into the fenders, and I had to depend on other people for recovery since I didn't have a winch.

Old_Front_Bumper_and_Recovery.sized.jpg


I thought about my options and decided that I really wanted to take my pos to the next level. I had some money saved, so I bought a set of Napier flares to fix the clearance issues, and a JCR Vanguard winch bumper and Smittybilt X20 10k winch for recovery. First thing to go on was the bumper.

JCR_Vanguard_Winch_Bumper_Installed.sized.jpg


Its a really nice bumper and the tie-in brackets are generally pretty nice too. One thing I don't like is that the passenger tie-in only has one hole through the framerail, and it doesn't have a plate to support the single nut, whereas my old Hi-Country brackets used three holes. I made a little round plate from some 3/16 to act as an support bracket, and I am saving the old HC plate to use as a template to drill two more holes in the tie-in.

Winch_Bumper_Passenger_Support_Bracket.sized.jpg


I had to cut the front fenders to get the corner of the bumper around. This gave me a point of reference for the Napier flares too, which is why the bumper went in first. I lost some of the distinctive lines on this build as a result, namely the air dam and heavy front end. But it looks good like this too.

JCR_Vanguard_Winch_Bumper_Installed.sized.jpg


Next we installed the Napier flares. As above, we used the JCR bumper end cap as the reference, and moved the flare forward so that it was just overlapping. This seemed like it would allow the most uptravel from the tires, and would allow me to move the front axle forward a little more too. The cutting line turned out to be almost directly centered over the fender, basically over the outside bead on the sides, and along the inside crease on the top.

Napier_Front_Fender_Cut_Marker.sized.jpg


Lots of room now

Napier_Front_Fenders_Clearance.sized.jpg


The rear flares followed the traditional cut and fold strategy, this time cutting to the outside bead, and then pounding them in with a hammer.

Rear_Wheel_Cut_and_Fold.sized.jpg


A bunch of 3M body sealer and 3M rubberized undercoating to protect the metal

Rear_Wheel_Sealed.sized.jpg


Loads more room in the rear now too

Napier_Rear_Flares_Installed.sized.jpg


After that was done, I reinstalled my front skid and sway bar, and installed the Smittybilt winch into the bumper and ran the wiring to the battery. I also bought a light bracket from a local guy for $20, and it turned out to be perfect for the old Hella fogs.

Smittybilt_X20_10k_Winch_Installed.sized.jpg


I went with steel cable because I plan to tie around trees periodically, and maybe do some other things that synthetic isn't supposed to be used with. I'm using a steel hawse instead of the rollers.

Smittybilt_X20_10k_Winch.sized.jpg


Overall I'm really happy with the project. I still have a few small things to do, like fabricate a license plate holder, extend the foglight wiring, and clean up the vacuum canister install on the inner fender support. At some point I'm also going to pull it all off to mark and drill the passenger tie-in for three holes, and clone the Hi-Country bracket. I also want to weld on new plates to reinstall my Class III receivers on the frame horns so I can get my flat-tow working again. I also noticed that the steering is "heavier" and less responsive with the added weight, so I probably need to reprioritize the one-ton steering upgrade. I have enough room for 33" tires easily, I am also looking to get some wider treads to fill out the flares a little more. I might be able to fit 35s with enough bump stopping. That leads me towards stronger axles, so once again I am thinking about getting a pair of JK Rubi D44s and building those. For now its good enough to go wheeling.
 
Last edited:
Back
Top