• Welcome to the new NAXJA Forum! If your password does not work, please use "Forgot your password?" link on the log-in page. Please feel free to reach out to [email protected] if we can provide any assistance.

beater!

Probably won't make it this year, my Cadillac is back in the trans shop because the planetary we didn't replace burned up after 300 miles, then need to replace the water pump gasket and AC clutch, and supposed to make a trip to TN a week ago.

Cadillac grills, Cadillac mills, check out the oil my Cadillac spills
 
Replaced the front brake hoses. I could not figure out what exactly I had bought from Northridge 4x4 with the lift, so I ordered another set of them. Says on the label it is custom TJ 24-inch length. Things fit perfect, now I know what they are

Crown_24_Inch_Brake_Hoses.jpg


Also checked the rear brakes, still perfect. They were on the 99 axle when I bought it.
 
That's the second time I've seen that location for the breather... I think I'm gonna try it out myself.

Cadillac grills, Cadillac mills, check out the oil my Cadillac spills

Just like that?

Replaced the front brake hoses. I could not figure out what exactly I had bought from Northridge 4x4 with the lift, so I ordered another set of them. Says on the label it is custom TJ 24-inch length. Things fit perfect, now I know what they are

Crown_24_Inch_Brake_Hoses.jpg


Also checked the rear brakes, still perfect. They were on the 99 axle when I bought it.

Nice lookin' lines. What company makes them?
 
I popped open that 242-WJ and found it out was regular-duty so nothing for me. I tried reselling it to get my money back but no takers. Found some damage on it too, so I decided to scavenge. Since my 242 still whines in Full-Time and 4-Low, I cleaned out the two planetary assemblies and will swap them into my case sometime next week

Here's the differential. It is held together with three 12-point bolts, looks like the same bolts from the driveshafts with the same nylock on the threads (probably not). Take those out then look for screwdriver slots to spread the halves apart.

Differential_Bolts.jpg


This is what it looks like inside (flipped over from previous pic).

Differential_Gears.jpg


Here are all the parts. The center gear is what does all the work, and you can see it has some yellow metal for sliding around on the shell. The rest of it is just some pinion gears and bushings. I thought there would be some needle bearings but there weren't any.

Differential_Parts.jpg


The case got a little rainwater in it, so a couple of places with rust, but mostly just varnish. I used PB Blaster to break up the rust, then a spray bottle with 50/50 mix of ATF and mineral spirits to rinse, and shop towels to clean. Then line it all up and use the bolts to pull the halves back together. It spins nice and quiet.

The 4-Lo planetary cannot be disassembled as simply, and requires knocking out some pins and then pressed back together. But the 4-Lo planetary doesn't have much to it either, just made sure to spray the ATF/MS mix into the pinion gears to lubricate and clean the innards, and that is enough.

Don't know when I will get to pulling the NP242 out of my jeep again, but probably sometime soon. I am having another issue with it with some knocking in 2WD, like the chain is rubbing or the mode fork is not disengaging properly.
 
I did some more reading and discovered that the gear cut was changed on the 4-Lo planetary and annulus gear in mid-94. I will still be able to use the differential planetary in my 91, but not the 4-Lo.

Thinking about it some, I came up with a new plan to use the 242-WJ case for a HD build.

o 4-Lo planetary from a 95+ 241-C (6 pinion) or 231-C (4 pinion)
o 242-HD differential, sprocket, chain, and front output shaft
o Tom Woods HD SYE (provides the HD shaft, and the output housing with speedo)

That should all work with the WJ case that I have. I already have the other parts. I took the shell to the transmission shop that rebuilt the 440-T4 in my Cadillac and had them clean it in their wash cabinet.

NP242_WJ_Shell.sized.jpg


Should only take a couple of years to piece together the parts...
 
Last edited:
The Accel coil that I installed during the engine swap in August of 08 finally died on me today. I had a Delphi in my bag of emergency parts, swapped it in and runs strong now. Might order a Screamin Demon and try that out.
 
My NP242 transfer case was making some more noises, so I pulled it back out for some more work. First thing I noticed is that the scarring on the differential from the chain rubbing had gotten worse. Then I started cleaning the planetary differential and noticed that a couple of the lubricating washers / bushings were missing, and the pinion gears on them had discolored to blue / black.

XJ_Diff_Bad_Pinion_Gear.sized.jpg


I tore down the 242-WJ differential and cleaned it really well, and swapped it over. The 242-J is on the left, and the 242-WJ is on the right. Also notice the shift sleeve on the 242-WJ is a long single piece while the XJ had a notched sleeve--the fork collars were similarly cut. All of this stuff went in fine.

XJ_vs_WJ_Diffs_and_Sleeves.sized.jpg


I also cleaned the 4-low planetary best I could (its swedged so I can't disassemble), reinstalled the double bearing that was originally in the 242-J (more spacing, less wobble than the late-model bearing I had bought), and made a few other changes. Should be the last time I have to open this case, and all future work is going into the 242-HD build.
 
I've been getting more vibes from the front driveshaft again. The problem is the axle is forward a bit, with 33" between the yokes, and the stock XJ front shaft is only 30.6" and there just isn't enough engagement on the splines at the slip joint so it vibes. I spent a bit of time trying to find an alternative that would work, looking at various Spicer catalogs and whatnot, until I eventually found Crown's catalog which said the front driveshaft from a 2002-2004 WJ with the V8 and a NP242 (Jeep part number 52853500) is 32 inches. I found a couple on ebay and at a local yard, but when I asked them to measure they came back with 33" and 32.6" respectively, which didn't sound right at all. There's a guy in Delta, PA with a side gig parting out XJs and Grands and selling the junk on Craigslist (you can find him in the Baltimore and York parts listings), so I asked him to measure and he said 32" compressed. Yesterday I made a day trip and bought it, along with a couple of other items. Here it is--natural resting length is 33" but it squeeze together for 32", so it is at rest when installed, and has enough slack to squeeze it in.

WJ_32_Inch_Front_Shaft.jpg


There's no grease fitting for the slip joint (the boot covers where it would normally be), so I drilled and tapped a hole in the end cap for a 90-degree grease fitting, and drilled a small weep hole next to it to let the excess escape. There is plenty of room under the u-joint, and since the yoke is supposed to point towards the transfer case on these shafts, there is very little movement at that end.

WJ_Shaft_Grease_Fitting.sized.jpg


Once that was done I moved my greasable Spicer joints and centering ball over, and then installed it. Seems to works fine so far. The only real issue now is that my strategy for using XJ front shafts everywhere has fallen apart. At this point I am going to try to find a 31" shaft for the SYE rear, or possible move the rear axle back 1" with the MORE off-set brackets and use another WJ 32" shaft from somewhere. Then I will have to think of another plan for a spare, and sell my collection of XJ shafts.

I also found a couple of Unicorn items that were on my junkyard list. One is the small little woodgrain piece from the Country trim set that goes under the steering column (this one is slightly damaged but is the only one I have ever had my hands on). Another is the lower dash from a Laredo with speakers and no cracks in it--I have never seen one of these that wasn't broken at the ashtray or at the speaker grill. I call these Unicorn items because I thought they did not actually exist.

Dash_Finished.sized.jpg


Nice little drive up there, totally worth it, and overall cost me less than it would have cost for shipping. The beater got 16.3 MPG on the 305 mile round-trip drive, but a fair bit of that was in the country, and the rest was doing 70 MPH on the highways. Need to work on improving it. My dual-electric fan setup with the new 10-blade fan was put to the test when I got stuck on I-695 in Baltimore with ambient temps in the mid 90s--needle stayed about 205 with the AC on, and never went over 220 with the AC off.
 
Last edited:
I removed the stock heater valve a couple of years ago and have been running the hoses straight through. Unfortunately the AC compressor in my pos is pretty beat, and constant heat in the dash kind of overwhelms it, especially with the way the old-style blend system is setup. I've been thinking about alternative systems for a while and finally started working on something a couple of months ago.

The basic idea is to use a simple in-line vacuum valve to block off supply to the heater core. Then use a bypass towards the front of the engine that will let the coolant return to the pump without shedding heat through the valve at a rapid rate. This is similar to how I setup the heater core in my Cadillac when I did the 4.1 > 4.9 engine upgrade, except that car has two independent returns (one from the core, another from the bypass) that practically eliminates heat transfer altogether. With this setup there is opportunity for contagion, but keeping a long distance on the return leg reduces the rate of heat transfer at the far end enough so that it is not a problem.

For the valve, I used a Four Seasons 74671, which is used on some Audi and Fords (check rockauto.com for interchange list). The valve is setup for 3/4" hose (same as the thermostat supply), normally open (flows when heat is active or when vacuum is removed) with vacuum activating the diaphragm and closing the valve (blocked when HVAC controls are set to cool or turned off). This is installed near the heater core.

Four_Seasons_74671.sized.jpg


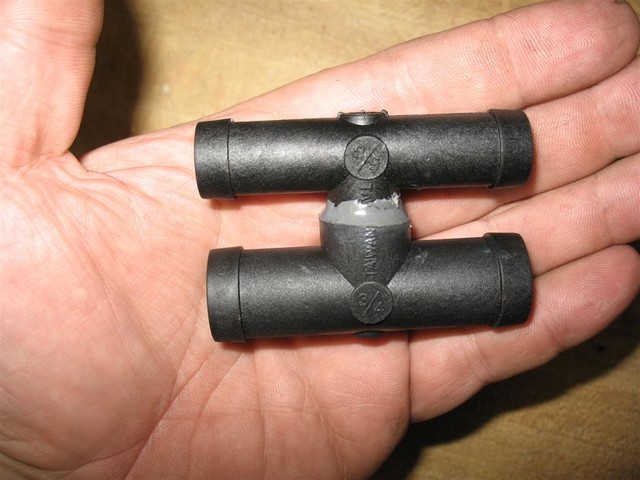
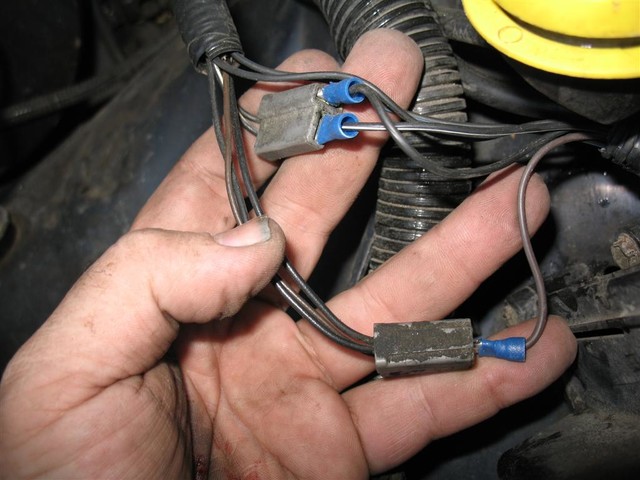
Then I rigged up a little bypass from some plastic radiator flush tees, one 3/4" for the supply and one 5/8" for the return. The tees have garden hose fittings but I cut those off with a hacksaw and used JB Weld to form them together (the high-temp stuff not the quick set). This is installed on the lines at the valve cover a little after the pump return tube sticks out.

Plastic_H_Valve_Test.sized.jpg


Installed... When the HVAC controls are set to Heat the valve opens up and coolant flows from the thermostat housing, straight through the 3/4" tee, and through the valve into the heater core. When the HVAC controls are set to Cold or Off, the valve closes and prevents coolant from entering the heater core. At that point the 5/8" bypass channel becomes the low-pressure path and coolant returns directly to the pump intake.

Simplified_Heater_Valve.sized.jpg


Observations so far:

1) It works

2) AC is much more effective. After a while the heater core gets hot anyway (heat transfer) but the rate of transfer is reduced enough for the AC to overcome. I need to take a long drive to fully measure temperature at the AC vents but short trips are obviously better.

3) Heat is still strong but takes a little longer to build up. Some of the hot coolant always escapes through the bypass, so there is less heat transfer, however the lines do build up to full heat eventually, it just takes a couple more minutes.

4) The short coolant return path in bypass mode means the engine reaches operating temperature MUCH faster when the bypass is active. This also makes heat more effective sooner! This is why the delay is short but still works--when the hot coolant enters the core, cabin heat picks up immediately.

4) There is some lag switching from hot to cold. The OEM design is faster (but much less reliable). When you go from cold to hot, the heater core is flooded with hot coolant and transfer happens pretty quick. When you go from hot to cold, the hot coolant that is trapped has to have its heat sucked off by the blower motor before the AC can overcome, which takes a little longer.

5) You have to bleed the air from the heater lines, same as with the stock setup, which can be difficult versus the straight through hoses.

6) Its cheap. Total cost was $18ish for the valve, $5 for the two tees, and I had the JB Weld on hand. I made another bypass and put it in my emergency bag in case the JB Weld doesn't hold, total cost around $30 I suppose

Will test more over the next few months and see how it goes.
 
Last edited:
Earlier in the year I bought a Spectra Premium fuel pump and sender assembly that turned out to be crap, so I reinstalled the original sender assembly with my emergency spare pump from a part-out. Although it seemed to work alright, it was just supposed to be an emergency spare, so I meant to replace it with a real one.

Next I bought a Delphi pump, thinking it was GM so probably spec'd pretty well, and the picture I found looked like it had the right terminal adapters instead of generic screw-on posts with adapter blades. When it arrived, it was actually a generic Walbro pump, and the physical dimensions were all wrong. In particular the pick-up mouth was shorter and fatter than the stock pick-up, and required a special sock filter (not included, ofc--extra purchase). Worse, the pump was too short for the top clamp of the sender assembly to reach, so instead you have to use a hose clamp on the side of the bracket and hope that it never vibrates free.

Delphi_FE0108_Fuel_Pump.sized.jpg


A couple of months ago, I bought a Carter P74155, which is listed as Bosch OE-style. Even though it has generic screw-on posts and the wires are backwards, at least it looked like the right physical shape. The pump itself is not exactly the same as stock, but it is pretty close. I had to trim the stock rubber isolator on top to fit, and use a rubber spacer on the bottom to get the height right, but the pickup sock is the same style and the pump is secure in the sender assembly.

Carter_P74155_Fuel_Pump.sized.jpg


After all that I was kind of getting peeved about it and just left the stock pump in place for a while. I spent a few more weeks looking but could not find anything that was exact match for the fuel pump in my XJ. It looks like it was only used for XJ/MJ 91-93 and nobody bothers. Some of the pumps that are offered are not even the right generation and are for 94+ instead.

Trying to get prepped for winter so today I installed the Carter and ... it seems to work alright. Pressure at the rail shows 39 PSI, which is a little low for the 50 PSI FPR, but its within spec. Car is smoother at higher RPMs (I had not noticed any barking before but it is definitely smoother) so I guess it is providing more consistent pressure. However I am keeping the old stock as a spare, and the Delphi/Walbro as a backup spare.
 
Will test more over the next few months and see how it goes.
I did some extended testing over the past couple of days.

Yesterday, 80 degrees ambient temperature with the AC on cold (heater valve closed), temperature at the vents dropped almost 10 degrees, measured with a probe; it used to be 54ish now its 45 at 2k RPMs on the highway. The FSM specs 45f as desired temperature so this is right on the money, although I have to run on the highway to hit it and don't get it at idle (old compressor). The temperature from the thermostat housing to the heater core showed a drop of 100f (!), measured with an IR gun; tstat housing was 210f, valve inlet (far end of the 3/4" hose) was 160, valve outlet to the heater core was 110. The valve really shuts off the thermal transfer (surprisingly effective), which is why the AC works so much better (a lot easier to overcome 110f in the core than 210f).

This morning, heater on Hot (heater valve open), temperature at the vents showed approx 150f (+/- 5 degrees), measured with the probe. I didn't measure heater temperature before so no comparison, and I can't find a reference in the FSM, but I seem to recall people getting 150ish from the vents in other tests. The temperature at the thermostat housing was around 200, while temperature at the valve outlet to the heater core was 190s (engine fan was turning off and on so I did not get reliable readings). The big observation: the effectiveness of the heat depends largely on engine RPMs--when engine was running at 2k the vent temperature climbed to around 154, but sitting at a light with low RPMs and the vent temperature dropped to around 147.

Now I'm curious how well the stock valve performs, but based on readings alone I am calling this a big win
 
One of my ongoing projects is trying to make room on the drivers side of the engine bay for more accessories. A month ago I picked up a late-model washer bottle with the wiring and tubing from a local part-out. I ended up having to buy a new fluid level switch and some misc small parts, but finally got around to messing with it. I basically just copied the fender cuts that were on the donor. Took a long time but it wasn't hard.

Washer_Bottle_Conversion.jpg


First I pulled the grille and the drivers fender, then I traced a template of the washer bottle onto some cardboard, then started measuring and marking on the body. I made two small slits in the top of the inner fender for the tabs to hang onto, then drilled two holes for the support screws. Then I used a hole saw and my Dremel to carve out a hole and slot for the filler neck.Interestingly the inner fender was properly formed for all of this already, like they planned to put the bottle in the fender all along and just didn't take the last steps of punching the holes. Lastly I cut two pieces out of the fender to clearance the tabs.

Washer_Bottle_Fender_Notches.sized.jpg


The wires were the same colors for the pumps, and only slightly different for the level sender. Rather than cut and splice the wires, I bought some cheap male terminals and attached them to the end of the wires on the late-model bottle, and then inserted the tabs into the stock connectors. So it is completely removable with no penalty.

Washer_Pump_Wiring_Connects.sized.jpg


Buttoned it back together, bottle is nice and high above the tire, even above the fender brace.

Washer_Bottle_Hidden.sized.jpg


With the bottle out of the engine bay, I have enough room to install a second battery and an accessory PDC. Originally I was thinking about putting an air compressor where the old airbox used to be, but instead I'm now planning to mount it in the rear somewhere, either under the cargo pan opposite the muffler, or inside the driver side quarterpanel (behind the spare tire mount).
 
I got the front bumpstopping done today, which checkpoints another project arc.

Hockey_Puck_Test.sized.jpg


The top jounce bump is from a TJ in the junkyard, and is much larger than the stock XJ jounce bump. The bottom is a stack of 3 hockey pucks. The gap between them is 3". The top and bottom shock mounts are 21" apart at rest, so with 3" gap the bumps will hit at around 18" compression. The suspension binds at 17" (shocks at 16") so this should be enough, although the tires may still end up in the fender (no idea).

I might replace the jounce bumps with something else, not sure. I have been looking at the Timbren kit for load support if/when I ever get a plow on the front, but with the gap it would not work for load support. Probably smarter to use the Prothanes for bumps and airbags for load support, and deflate the air bags when I'm not plowing.

Still have to set the rear, but have to wait until axle modifications are finished due to changes in position. I hope to do those soon.

Starting a new job on Monday, will have a lot more money and a lot less time.
 
Found some rust had started to eat through the rockers and floor boards. Couple of quarter sized holes in the rockers, and some pinholes in the floorboard. Not sure yet what I'm going to do about it. I bought some materials to patch some of it but at this point I think I need to rip and replace the rockers and large sections of the floor to get ahead of the problem.
 
Back
Top