mk153smaw
NAXJA Forum User
- Location
- Fort Lee, Va
Here is my first part of the easy 14b thread. I now have all my parts the total cost of this build is :
1986 14b SRW axle from yard $29 (with shafts and 4.56 gears w/noslip)
JKS Shock relocators $75 (with shipping)
RuffStuff Stupid strong spring perches $65 (with shipping)
C&C hubs converted to 5 on 5.5 $340 (with shipping and disc brake adapters)
1984 Cadillac Eldorado disc brake calipers with e-brake $20
Spankin new rotors from Mineke for the 5 on 5.5 $30 for the set
Assorted welding $300 (use of high nickle rods drive up cost)
1989 front XJ driveshaft $5
RE Hack and TAP $140 (ebay) for the NP242
So far $1004.... not bad for almost an idiot proof rear.
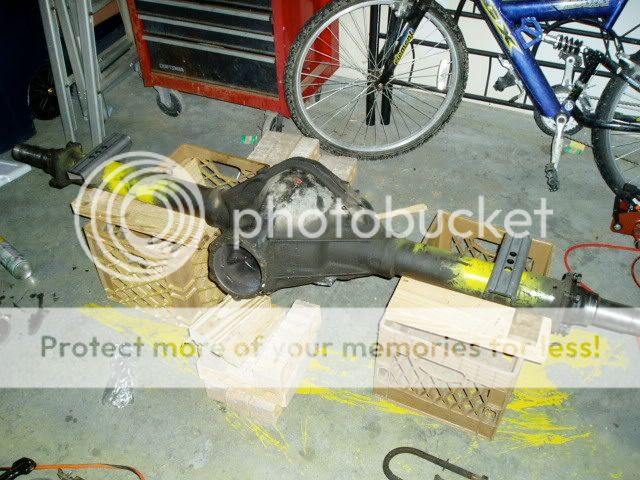
Ok this is what was started with

I set up the working jig to be at the same height as the D35C so anyone looking at this thread who had a dead basic XJ could see how it would change the stock setup. So an XJ with a D35C sitting on 31", which is usually where one starts thinking bigger axles because they want bigger tires safely, is at 14 1/2" from ground to center of axle shaft with 33lbs psi (@70deg F) with BFG AT KO's.
I am going to skip the tear down phase. If you cant figure out how to tear down the axle and clean it up, this build may be beyond you.Not a slight to anyone, just a decent measure of what you need to know to do this.
Ok the first thing I did was create a jig for my circular saw out of a framing truss support that I bought from Home depot and attached it to a piece of 1/2" MDF so I could bolt it to the housing. I measured where I wanted to cut, screwed the board to exactly enought to guide the saw and mounted it to the pumpkin.

Once attached, I made a few passes with the saw going about 1/4" each time to keep it easy. It is slow but it saves on the blade as evidenced by my first try at just trying to cut it all and the blade in the photo breaking up.
The 7" blade will not cut all the way, leaving about 1" to go. I took my 4" angle cutter and finished off the rest with a 90deg cut. I did that because I figured once the pinion angle is set up that portion will be raised at a safe angle and the new metal will be in the "slide" area which rocks will hit.
Here is where I spend money. I have no welder so I went over to M3 welding in Fort Worth to have them attach my 1/2" metal stock to the bottom of the pumpkin. It is welded on the outside and the inside.

The cut you see is what I put in there after it was welded with my 4" grinder. This axle build is the one I am doing for bottom budget that anyone can do. My other build I am having the ring gear shaved 1/4" or more to allow for no cut in the new piece. With that being said the cut leaves a 1/4" or so area of metal left for gasket seal. That is not bad considering that is all you get around the other bolt holes also, so no biggie there.
Currently I have the kit set up on the jig for measurement of the spring perches and confirmation of the pinion angle to be used.
NOTE I just finished an MS Excel file that calculates driveshaft angles for any setup.
I am too lazy to keep going and trying test angles so I sat down with the tape measure, graph paper, and the trusty calculator. I used the measurment from the ground to the TC output center and the measurement to the Pinion center. I use the good old Pythagorian Theory to calculate angle, yay Algebra actually does get used in life?! The TC only has two angles which most will deal with, stock or 1" drop. My pinion calculator has a +/- 5deg arc to give option for Dbl cardon or Stock type. It does require the user to input DS legnth.
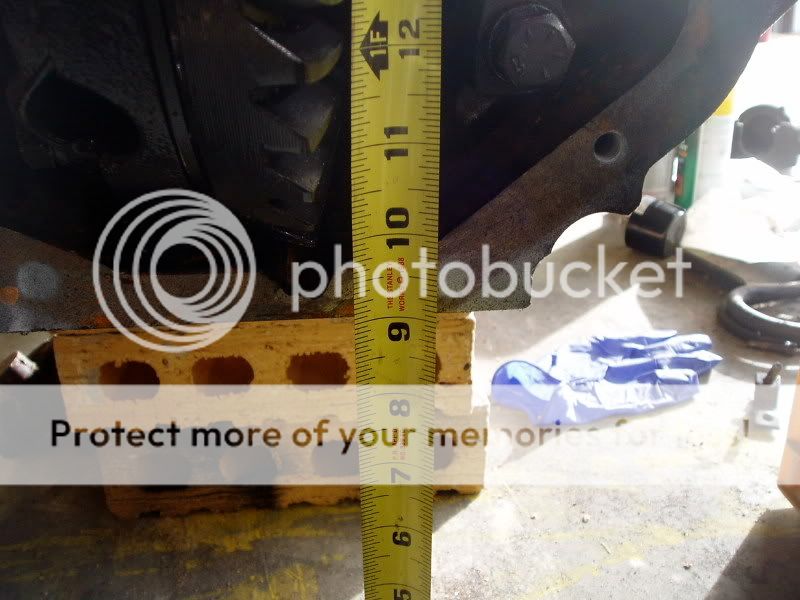
In the current configuration it has a clearence of almost 9"!!! and that is at the measurement with 31" tires! imagine what you have with bigger.
The WMS is 63". So for those of you who are asking, that is only 1.5" bigger than the stock D35C with 61.5" (measured off of a D35C carcass in a junk yard) which means I only need a 1.5 spacer up front to even things out or.......... BTW the Rubicon D44 front is 61.5 WMS. Now that sounds like a nice combo.
This is then end for the first part of the build. I just broke my hand (something stupid with a wrench on another project) and will be getting it casted tomorrow morning. I will be back on it Thursday and should have it finished welded (to include the tubes to the pumpkin) and painted this weekend.
1986 14b SRW axle from yard $29 (with shafts and 4.56 gears w/noslip)
JKS Shock relocators $75 (with shipping)
RuffStuff Stupid strong spring perches $65 (with shipping)
C&C hubs converted to 5 on 5.5 $340 (with shipping and disc brake adapters)
1984 Cadillac Eldorado disc brake calipers with e-brake $20
Spankin new rotors from Mineke for the 5 on 5.5 $30 for the set
Assorted welding $300 (use of high nickle rods drive up cost)
1989 front XJ driveshaft $5
RE Hack and TAP $140 (ebay) for the NP242
So far $1004.... not bad for almost an idiot proof rear.
Ok this is what was started with
I set up the working jig to be at the same height as the D35C so anyone looking at this thread who had a dead basic XJ could see how it would change the stock setup. So an XJ with a D35C sitting on 31", which is usually where one starts thinking bigger axles because they want bigger tires safely, is at 14 1/2" from ground to center of axle shaft with 33lbs psi (@70deg F) with BFG AT KO's.
I am going to skip the tear down phase. If you cant figure out how to tear down the axle and clean it up, this build may be beyond you.Not a slight to anyone, just a decent measure of what you need to know to do this.
Ok the first thing I did was create a jig for my circular saw out of a framing truss support that I bought from Home depot and attached it to a piece of 1/2" MDF so I could bolt it to the housing. I measured where I wanted to cut, screwed the board to exactly enought to guide the saw and mounted it to the pumpkin.
Once attached, I made a few passes with the saw going about 1/4" each time to keep it easy. It is slow but it saves on the blade as evidenced by my first try at just trying to cut it all and the blade in the photo breaking up.
The 7" blade will not cut all the way, leaving about 1" to go. I took my 4" angle cutter and finished off the rest with a 90deg cut. I did that because I figured once the pinion angle is set up that portion will be raised at a safe angle and the new metal will be in the "slide" area which rocks will hit.
Here is where I spend money. I have no welder so I went over to M3 welding in Fort Worth to have them attach my 1/2" metal stock to the bottom of the pumpkin. It is welded on the outside and the inside.
The cut you see is what I put in there after it was welded with my 4" grinder. This axle build is the one I am doing for bottom budget that anyone can do. My other build I am having the ring gear shaved 1/4" or more to allow for no cut in the new piece. With that being said the cut leaves a 1/4" or so area of metal left for gasket seal. That is not bad considering that is all you get around the other bolt holes also, so no biggie there.
Currently I have the kit set up on the jig for measurement of the spring perches and confirmation of the pinion angle to be used.
NOTE I just finished an MS Excel file that calculates driveshaft angles for any setup.
I am too lazy to keep going and trying test angles so I sat down with the tape measure, graph paper, and the trusty calculator. I used the measurment from the ground to the TC output center and the measurement to the Pinion center. I use the good old Pythagorian Theory to calculate angle, yay Algebra actually does get used in life?! The TC only has two angles which most will deal with, stock or 1" drop. My pinion calculator has a +/- 5deg arc to give option for Dbl cardon or Stock type. It does require the user to input DS legnth.
In the current configuration it has a clearence of almost 9"!!! and that is at the measurement with 31" tires! imagine what you have with bigger.
The WMS is 63". So for those of you who are asking, that is only 1.5" bigger than the stock D35C with 61.5" (measured off of a D35C carcass in a junk yard) which means I only need a 1.5 spacer up front to even things out or.......... BTW the Rubicon D44 front is 61.5 WMS. Now that sounds like a nice combo.
This is then end for the first part of the build. I just broke my hand (something stupid with a wrench on another project) and will be getting it casted tomorrow morning. I will be back on it Thursday and should have it finished welded (to include the tubes to the pumpkin) and painted this weekend.

")