• Welcome to the new NAXJA Forum! If your password does not work, please use "Forgot your password?" link on the log-in page. Please feel free to reach out to [email protected] if we can provide any assistance.

HP44 full width and TnT truss

87xjco

NAXJA Forum User
Location
Denver, CO
Daniel's (xjeepers2) XJ
Dsc01149.jpg


is getting this full width HP44 and a Ford 9"

He has a Full Traction 6" lift kit and 33" tires and he plans to go to 37"

He brought me the axles for the gear install and the rest of the build.

The build will get

5.13 PORC gears
Lockrite locker
Parts Mike 1 ton TRE's and 1/4" wall dom tie rod and drag link , mounted over the knuckle
TnT truss, spring perches, control arm brackets, and over the knuckle track bar bracket
New Ball joints
New spicer u-joints
Knuckle rotation
New rotors pressed on the existing hubs

First I did some teardown so I can start determining how far to rotate the knuckles

Daniel found a leaf sprung HP44 from probably a 78 or so F150 Ford truck
Dsc00928.jpg


TnT now makes the truss that works with this center section that has the cast leaf spring mount integrated into it
Dsc00927.jpg


I pulled the caliper and rotor off, the Ford spindle is a 5 bolt spindle unlike Chevy and Waggys that have 6 bolt spindles
Dsc00931.jpg


Knocked the spindle off and now the axle can slide out
Dsc00932.jpg


Then the ball joint nuts were removed and a few whacks with a big hammer and the knuckle is off
Dsc00933.jpg


So I'll start checking some angles. First I made sure the housing was level on my cart
Dsc00934.jpg


And at the same time I set the pinion angle to 7 degrees (o/k 7.1 degrees, 90 degrees vertical minus 82.9 degrees equals 7.1 degrees) This will be close for now until I figure out exactly what pinion angle is needed.

Edit - it ended up being 7.2 degrees

Dsc00936.jpg


Then I measured at the flat surface of the inner C on both the upper and lower ball joint areas
Dsc00937.jpg


Probably the lower is the most accurate, + 1.9 degrees caster
Dsc00938.jpg


Then I made an index mark on the tube and the knuckle
Dsc00939.jpg


I'm going to use that index mark as a crude measurement to help me position that inner C, and I'll confirm it with the digital level

I've done the math (probably wrong though:scared: ) and one degree of rotation equals .0026175"

So 4 degrees rotation will equal .0104" or just over 1/10"

I guess that shows why it's so easy to be off a degree or so when doing a knuckle rotation, when 26 thousandths equals 1 degree


I always like to refresh my memory and make sure I have positive and negative caster right in my head
diag_caster.gif


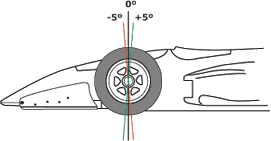
I'll talk more later about how I figured out that I need 7.2 degrees pinion angle

With the pinion at 7.2 degrees, I know the inner C's need to be rotated about + 4.0 degrees, I want them to end up at somewhere around + 6 degrees +/- 1 degree.
 
I started cutting off the inner C's this morning

First I used a cut off wheel and cut a groove just a little bit outboard of the weld, I could tell when I was thru the inner C and into the tube because the grinder felt and sounded different
Dsc00942.jpg


Then I very lightly tapped on the inner C with a TEN LB SLEDGE hammer. I took care to hit the C as close to the center as I could and worked it off of the tube
Dsc00944.jpg


Then I used my little 7" finish :laugh: grinder to grind off about half of the old weld, I know some feel that the old weld should be totally ground off, I don't like to, I grind enough that the new bead fills from the inner edge of the old weld to the edge of the cut on the C.
Dsc00945.jpg


Daniel came by with his XJ today and I was able to get some measurements to help me figure out the pinion angle.


I measured a few things....

Center of axle to ground 16"

Center of transfer case yoke to ground 24"

Driveshaft length center to center of u-joint 33" But this yoke will set about 1" closer than the HP30 yoke does

So I know the yoke center on the transfer case is 8" higher than the axle center is


So here's what I did to figure out the pinion angle...

First I rolled my cart with the differential up next to the wall of my garage, I made sure the axle was level on my cart and made sure the center of the u-joint was 32" from the wall

Then I used my laser level and shot a level line from the center of the axle tube to the wall, and marked a level line on the wall at that point, then I measured up 8" and made another level line

Then I adjusted the differential on the cart so that the yoke points at the line for the transfer case yoke center

I used my laser level and a flat piece of stock against the diff. yoke and centered the laser level light on the yoke

Dsc00946.jpg


That worked out to be 7.2 degrees pinion angle, so my initial guess was pretty close
Dsc00951.jpg


So then I started knocking on the right side inner C and kept checking it's angle as well as the yoke angle as I worked the Inner C on the tube.

It started and ended up to be +5.8 degrees
Dsc00952.jpg


Then I did the same on the left side, it's hard to see but it ended up +5.7 degrees
Dsc00954.jpg


And final measurements are

Pinion angle 7.2 degrees
Left caster +5.7 degrees
Right caster +5.8 degrees

I think that will work out pretty good, there is still about a degree to play with for Daniels final adjustments

Now I have to just go see my GOOD buddy Ryan and his 220 volt welder, my 110 volt welder at home just won't do the job :nosmile:
 
well looks like it's moving along. how did the ordering go?
 
xjeepers2 said:
well looks like it's moving along. how did the ordering go?

Almost everything except the TnT parts ind a few brake parts that I'll get local have been ordered, so the build will slow down for awhile now, I'll keep trying TnT and let you know when that is ordered.
 
nice sounds good to me hope the tnt stuff come through quick.
 
:yelclap::yelclap::yelclap::yelclap::yelclap::yelclap::clap::clap::clap::clap::clap:
 
Took a drive up to TnT in Cheyenne today to keep this project rolling (and to get some fireworks :gag: )

Got the truss back and did a test fit
DSC00971.JPG


DSC00972.JPG


This is their new design for upper control arm bushings. They say the stock ones fail quickly and this design is alot more durable
DSC00974.JPG


I'm wasn't sure what to do about this gap on the left side tube.
Dsc00965.jpg


Dsc00966_001.jpg


I thought maybe I need to trim where I've marked to get a better fit.

It's a pretty big gap and I wasn't sure that trimming the truss is the answer though
Dsc00967.jpg


So I talked to Bob at TnT and he said what I need to do is cut a groove in the cast spring perch so that the truss can fit down into it

I like that solution better then trimming the truss, the truss would have been pretty thin if I cut off that much material

He also said not to weld to the cast center section at all, just to the tubes

So I'll work on cutting a groove in that perch and see how it fits then
 
That's a nice looking truss. Am I seeing things right, are the coil buckets, trackbar mount, and shock mounts all part of the truss? That would make installation very, very easy. Weld that on, some lower control arm mounts, and swaybar mounts if you want them, and be done.
 
Dave41079 said:
That's a nice looking truss. Am I seeing things right, are the coil buckets, trackbar mount, and shock mounts all part of the truss? That would make installation very, very easy. Weld that on, some lower control arm mounts, and swaybar mounts if you want them, and be done.

Yep, the mounts are all priced seperate, but when you order it all from TnT, they already have it all welded up for you. The LCA mounts are designed to butt up against the truss so correct placement of those mounts is easy too.

I just specified over the knuckle track bar bracket since that is the steering we are using. They have trusses available for High Steer, stock, etc..

This is real nice on this build, Daniel is not going to be able to let me have his XJ and test fit the housing, So this TnT set up is a nice solution for building a bolt in axle and hopefully have everything in the correct position.

Of course I have a couple XJ's here right now so I am able to verify some measurements that way.
 
I used a couple of different grinder/cutoff discs and made some slots in that cast spring perch
DSC00975.JPG


Then tonight before I quit working, I got a coat of paint on the area of the diff. that will be covered by the truss
DSC00978.JPG


I also painted the underside of the truss. Tomorrow I'll be ready to weld it on
DSC00979.JPG
 
87xjco said:
I've done the math (probably wrong though:scared: ) and one degree of rotation equals .026175"

So 4 degrees rotation will equal .104" or just over 1/10"

Fixed. One decimal off.
 
Thanks Dirk!

This morning I cleaned off the weld areas, set the pinion back to 7.2 degrees and then made sure the top of the truss was level, and I tacked it onto the housing
Dsc00982.jpg


I believe TnT recommends setting the pinion angle at 5 degrees for use with their Y-links. That gives the best clearance for the yoke and the left upper arm.

I set this pinion to 7.2 degrees to give the optimum driveshaft angle as well as having a good caster angle with the rotated knucles, and so I had a small issue with clearance on the truss with the center section, in order to get the truss setting level, I had to grind a few spots.
Dsc00988.jpg


The truss has a nice tight fit to the tubes on both ends now
Dsc00980.jpg


Dsc00981.jpg


The I went ahead and tacked on the lower control arm mounts. I found that to get the same seperation between the upper and lower arms as there is on a stock housing, I had to space those mounts about a 1/4" away from the truss
Dsc00985.jpg


I did the same with the left mount
Dsc00986.jpg


Everything is just tacked on with my 110 volt welder, I'll haul it up to my buddy Ryan's and use his 220 volt welder again, to burn it home
Dsc00987.jpg
 
OOPS, I just noticed the right LCA mount is mounted further inboard then the left LCA mount. But that was the location that gave me stock width on those mounts, so I'm gonna be quite a bit wider if I move the right outboad.

I'll have to try and figure that one out, scratching bald head!
 
O/k, Bob says some of these center sections are stupid wide, and I am gonna have to trim some of that casting away on the left side.

He says if I end up a little wider then stock, and I think I will be about a 1/2", thats actually a good thing.

So off I go to the shop that I just cleaned up all the metal dust in, to do so more grinding :rattle:
 
Well that wasn't too bad to cut out, started with a couple different sized cut off wheels, drilled some holes in the corners, used a rotory tool a little, and a chisel and hammer to wedge in between the tube and the cast and break it out of there
DSC00989.JPG


DSC00991.JPG


6 1/2" to the outer end of the tube on the left side
DSC00993.JPG


Same on the right
DSC00994.JPG


But I was starting to worry, the way that bracket lines up with the spring seat bracket, wasn't the same on the right side as the left
Dsc00995.jpg

Dsc00996.jpg


So I measured from upper ball joint center to spring seat center on both sides

Lt side 9 1/4"
DSC00997.JPG


Rt. side 8 3/4"
DSC00999.JPG


Humm

So I measured the position of the UCA brackets

Rt side 16 1/2"
DSC01000.JPG


Lt side 16 1/2"
DSC01001.JPG


So the important things, the control arm measurements, are all equal lengths from the knuckles.

The spring seats are slightly off side to side but I don't think that is a problem.

Last I measured from inner edge to inner edge of the lower control arm brackets. On a stock axle I get 30".

With this placement I'm getting 31 1/4"
DSC01003.JPG


That might be a problem if anyone wanted to use stock arms on this axle

But any adjustable arm should be able to handle that difference in width

What do you guys think?
 
87xjco said:
But any adjustable arm should be able to handle that difference in width

What do you guys think?
that shouldnt be a problem - especially if the lower arms have spherical joints on the axle end. I know that my LCA mounts are 2"? wider than stock, and when I was running stock style suspension, it wasnt an issue, and became less of an issue when I cut off the poly bushings from my pro-comp LCA's and welded on RE joints, and then later even less of an issue when I cut the arms in half and added some tube to them to make them longer when I made my 3 link...

it is interesting that the spring buckets arent the same length apart when the UCA's are... maybe throw a tape measure on a d30 and get some rough numbers?

also - I know you already burned in the knuckles, but on the Ford axles, both Jes and I noticed that after welding our knuckles back on, that our camber was positive - him with parts mike knuckles, and myself with the stock ford knuckles... Dedenbear makes aftermarket ford stlye d44 knuckles that account for the 'camber issue' by changing the ball joint locations ever so slightly...
http://www.reidracing.biz/DANA44.php
(they dont list it as a feature there, but I read somewhere that the ford knuckles were weird, and the dedenbear are designed to have different camber than the stock Chevy and the like)
I now run the dedenbears and no longer notice my camber being 'odd' - but didnt measure it either... before putting them on I could visably see the bad camber...

offset ball joints are available as well.

both Jes and I atribute that to the way we aligned the knuckles to weld them back on - though mine have significant hammer marks on them and could be deformed - so I also atribute that to causeing some of the issue...
 
Looking good! Mine is just about finished but I used a radius arm D44. I just had the gears set up and i'm waiting for some machining to be finished for the steering. If all goes right I should be installing Thursday.
 
I set my pinion angle to allow for proper drive shaft angles, and had to clearance my truss the same way you did. I'm running RE short arms and drop brackets, the pinion yoke gets pretty close to my upper control arm when I have the front left wheel stuffed. I have been thinking about making a new control arm for that location with a slight bend to clear the yoke, but I would only gain another 1/2" of uptravel.
 
XJ_ranger said:
also - I know you already burned in the knuckles, but on the Ford axles, both Jes and I noticed that after welding our knuckles back on, that our camber was positive - him with parts mike knuckles, and myself with the stock ford knuckles... Dedenbear makes aftermarket ford stlye d44 knuckles that account for the 'camber issue' by changing the ball joint locations ever so slightly...
http://www.reidracing.biz/DANA44.php
(they dont list it as a feature there, but I read somewhere that the ford knuckles were weird, and the dedenbear are designed to have different camber than the stock Chevy and the like)
I now run the dedenbears and no longer notice my camber being 'odd' - but didnt measure it either... before putting them on I could visably see the bad camber...

offset ball joints are available as well.

both Jes and I atribute that to the way we aligned the knuckles to weld them back on - though mine have significant hammer marks on them and could be deformed - so I also atribute that to causeing some of the issue...

Same thing happened to me on my passenger side. We (Lawncher and I) had a hard time getting that knuckle to move and probably got a little too aggressive with the BFH.

I used a wedge shaped spacer, that looked more like a gasket, between the spindle and knuckle to straighten it back out. I got it from rockauto.com, and it worked out great.
 
Back
Top