xjbrian
NAXJA Forum User
- Location
- California
I have a 1999 XJ with a 4.0L engine, automatic, NP231 transfer case, Chrysler 8.25 rear axle, and a new 3 inch budget boost. I had vibes so I tried a transfer case drop. It didn’t work, so I decided I needed a SYE. I started looking at how to do it cheap. I found lots of discussion about home brew SYEs using the 3103-27CV yoke and front drive shafts out of XJs, but I couldn’t find guidance where to cut the yoke and transfer case output shaft. I hope this post helps others.
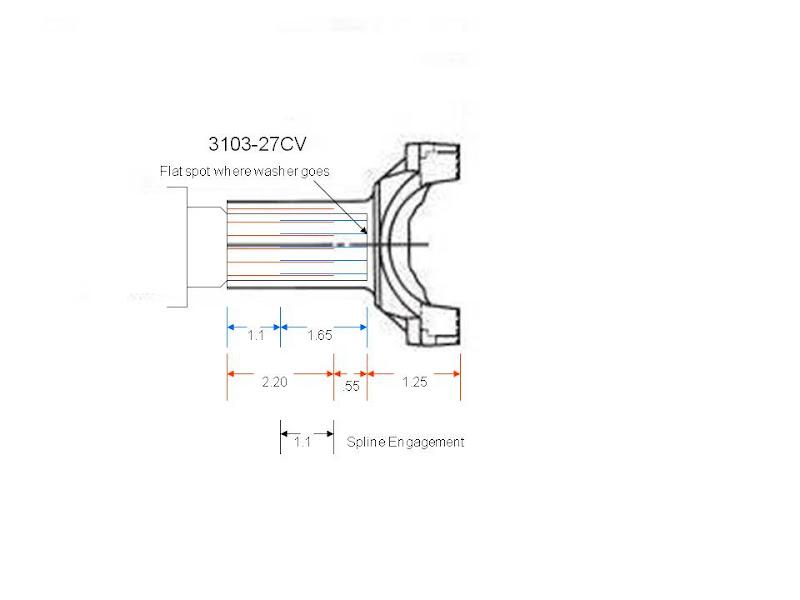
I bought my yoke from drive-lines.com. They were much cheaper than anyone else I found, $88.42 delivered. When I got the yoke, I knocked the cap out of the end of it, and noticed the splines did not go all the way to the end. I also noticed that the splines on the transfer case output shaft do not go all the way to the transfer case seal. It worried me that the shorter I cut the transfer case output shaft the less spline engagement I would have. I asked some of my mechanical engineering friends at work how long the splines need to be. They looked it up in their old text books and told me that the spline face only needs to be as long as the pitch diameter, which in our case is roughly the diameter in the middle of the face of the spline. This means you need about 1.1” of spline engagement.
I pulled a front driveshaft out of a 1990 XJ 4.0L automatic with NP231 transfer case at the junk yard. It was $29.57 with the entrance fee, 3 different taxes and the core charge.
I also bought a grade 8 ½” washer that just fits the flat spot in the yoke if you pound it in with a drift. I also used a 3/8” fender washer on top of that then a 3/8” grade 8 washer then a 3/8” grade 8 split washer and a 1” long 3/8” 16 bolt. With a few dollars for a bolt and washers it cost a total of $121 for my SYE.
I started looking online for measurements of the yoke, driveshaft, and output shaft. It wasn’t going real well, so I measured everything myself. The attached pictures show all my measurements.
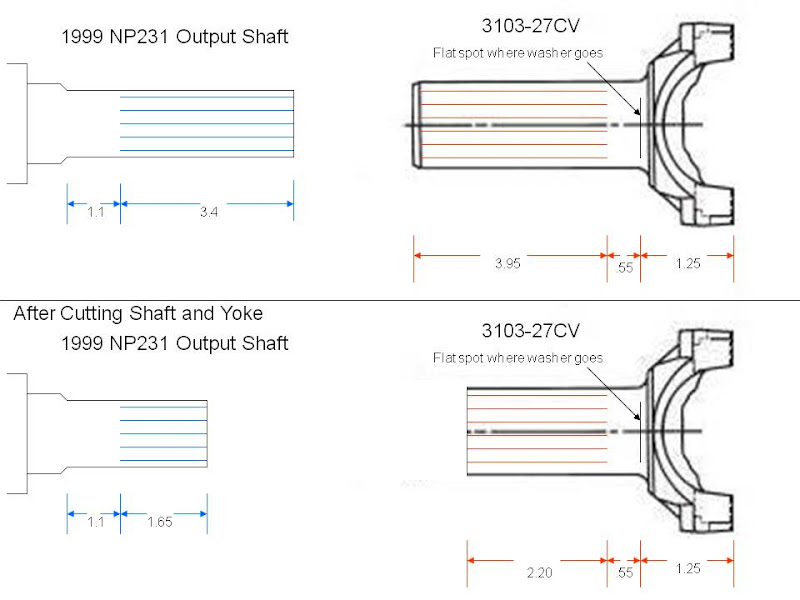
When I put it all together I wanted the back of the yoke to rest on the shoulder of the transfer case output shaft to add some stability and so I would not have to weld the washer to the yoke to keep the yoke from sliding forward on the transfer case out put shaft. Most of the write ups I have seen have not talked about that issue for the newer sealed transfer cases. When I slid the yoke onto the shaft I ground the shaft down just a little, about 1/64” shorter than the yoke, so that when I bolted it down there was pressure keeping the yoke pressed up against the shoulder on the shaft.
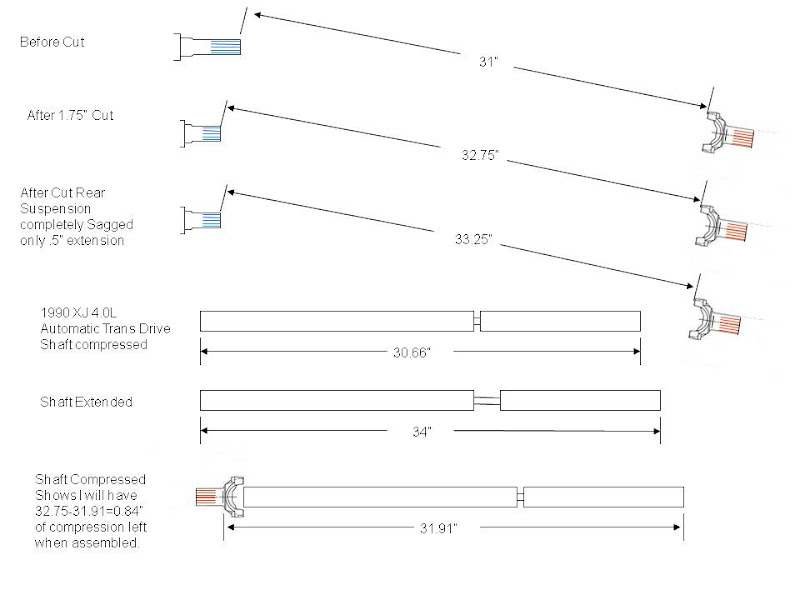
The next measurement is critical. The driveshaft must not over compress or extend. I measured the drive shaft and fully extended it is about 34”, fully compressed the catalogs say it is 30.66” and my measurement confirmed it. I sagged my rear suspension and the drive shaft only needed to extend 0.5” so I wasn’t worried about how long it would get. As a matter of fact I can lift it another 3” and still not worry.
In compression the numbers get a little tighter. With 1.75” cut off the output shaft there was 32.75” from the pinion yoke to the output shaft. The drive shaft is 30.66”, add 1.25” for the distance from the end of the yoke to the flat spot on the yoke where the washer will rest on the end of the output shaft. That gives you 31.91” total length. That only leaves 0.84” to compress. Using a little trigonometry it shows that I will only compress about 0.35” with the suspension fully compressed to the bumpstops. That leaves me with 0.49” of clearance in compression and lots of room to extend.
To cut the output shaft I removed the old driveshaft started the engine put the car in reverse and used an angle grinder to cut. It worked great. I cut it a little long and the used the grinder to trim it. To cut the yoke I did it the same way. I slipped the yoke on the output shaft backwards and used the angle grinder to cut the end of the yoke off. I had to put a hose clamp on the output shaft when cutting the yoke to hold the yoke out a little so when I cut through the yoke I didn’t hit the output shaft.
I bought my yoke from drive-lines.com. They were much cheaper than anyone else I found, $88.42 delivered. When I got the yoke, I knocked the cap out of the end of it, and noticed the splines did not go all the way to the end. I also noticed that the splines on the transfer case output shaft do not go all the way to the transfer case seal. It worried me that the shorter I cut the transfer case output shaft the less spline engagement I would have. I asked some of my mechanical engineering friends at work how long the splines need to be. They looked it up in their old text books and told me that the spline face only needs to be as long as the pitch diameter, which in our case is roughly the diameter in the middle of the face of the spline. This means you need about 1.1” of spline engagement.
I pulled a front driveshaft out of a 1990 XJ 4.0L automatic with NP231 transfer case at the junk yard. It was $29.57 with the entrance fee, 3 different taxes and the core charge.
I also bought a grade 8 ½” washer that just fits the flat spot in the yoke if you pound it in with a drift. I also used a 3/8” fender washer on top of that then a 3/8” grade 8 washer then a 3/8” grade 8 split washer and a 1” long 3/8” 16 bolt. With a few dollars for a bolt and washers it cost a total of $121 for my SYE.
I started looking online for measurements of the yoke, driveshaft, and output shaft. It wasn’t going real well, so I measured everything myself. The attached pictures show all my measurements.
When I put it all together I wanted the back of the yoke to rest on the shoulder of the transfer case output shaft to add some stability and so I would not have to weld the washer to the yoke to keep the yoke from sliding forward on the transfer case out put shaft. Most of the write ups I have seen have not talked about that issue for the newer sealed transfer cases. When I slid the yoke onto the shaft I ground the shaft down just a little, about 1/64” shorter than the yoke, so that when I bolted it down there was pressure keeping the yoke pressed up against the shoulder on the shaft.
The next measurement is critical. The driveshaft must not over compress or extend. I measured the drive shaft and fully extended it is about 34”, fully compressed the catalogs say it is 30.66” and my measurement confirmed it. I sagged my rear suspension and the drive shaft only needed to extend 0.5” so I wasn’t worried about how long it would get. As a matter of fact I can lift it another 3” and still not worry.
In compression the numbers get a little tighter. With 1.75” cut off the output shaft there was 32.75” from the pinion yoke to the output shaft. The drive shaft is 30.66”, add 1.25” for the distance from the end of the yoke to the flat spot on the yoke where the washer will rest on the end of the output shaft. That gives you 31.91” total length. That only leaves 0.84” to compress. Using a little trigonometry it shows that I will only compress about 0.35” with the suspension fully compressed to the bumpstops. That leaves me with 0.49” of clearance in compression and lots of room to extend.
To cut the output shaft I removed the old driveshaft started the engine put the car in reverse and used an angle grinder to cut. It worked great. I cut it a little long and the used the grinder to trim it. To cut the yoke I did it the same way. I slipped the yoke on the output shaft backwards and used the angle grinder to cut the end of the yoke off. I had to put a hose clamp on the output shaft when cutting the yoke to hold the yoke out a little so when I cut through the yoke I didn’t hit the output shaft.


