MrShoeBoy
NAXJA Forum User
- Location
- Cincinnati, OH
I finally had time to do the write up. I went back through My Dyno Results Post to get any questions and put them in the bottom of the write up. If there are any more questions or additions let me know and I will add them.
AARON
DISCLAIMER: I will NOT take responsibility for any damage, failure, or violations of the law by using the following information. I am not a mechanic or electrician and make NO guarantees that the following will work for you. YOU are responsible if anything goes wrong.
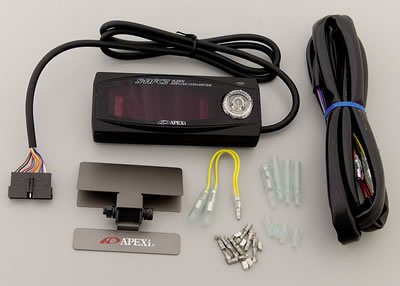
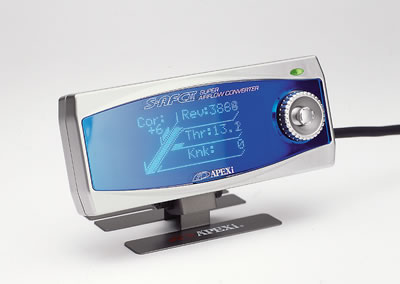
How to install an Apexi SAFC 2 into a 91-96 Jeep HO 4.0L.
What is an Apexi SAFC 2?
In simple terms it’s a very expensive adjustable Manifold Air Pressure or MAP sensor.
Long complex answer as quoted from the Apexi manual: “The SUPER AFC 2 is a fuel adjustment controller in which the pressure sensor signal can be modified in a 12 point RPM range by 1% increments to increase/decrease fuel in a range of +50% to -50%. The RPM to be corrected can be optionally set in 200 RPM increments, and corrections can be made according to throttle opening amounts.”
What this means is that you to tune the fuel curve by adding fuel at the RPM where it’s running lean, and removing fuel at the RPM where it’s running rich.
Now to merge the Apexi to the Jeep ECU or how to wire it in.
***Before you touch anything disconnect the battery as you don’t want to fry yourself, the ECU, or the Apexi. The Apexi is a universal device meant to work on a variety of vehicles with different sensor types. This means there are some extra wires coming out of the Apexi. Tape off the ends of these wires as you wont need them. The wires that we need to know about are the following and where they hook up to:
Apexi What it is Jeep ECU
Red Power Pin #9 Dark Blue
Green RPM Signal Pin #41 Grey w/light green tracer
Gray Throttle Signal Pin #22 Orange w/dark blue tracer
Brown Ground Pin #11 Black w/Tan tracer
Black Ground Pin #11 Black w/Tan tracer
Yellow MAP output (into ECU) Pin #1 Dark green w/Red tracer
White MAP input (into sensor) Pin #1 Dark green w/Red tracer
*None of the factory Jeep wires are cut in half with the exception of the MAP wire. Take the ECU wire you need and strip back about 3/8” of the insulation and wrap the wire from the Apexi around and solder them solid and rewrap with electrical tape.
*The power wire must be hooked up to Pin #9 Ignition circuit sense so that when the key is turned on, the Apexi gets power. If you hook the Apexi up to Pin #3, you will have direct battery voltage and the Apexi will be on all the time which you don’t want.
*The ground wires from the Apexi both go to the same ground wire coming out of the ECU. The directions state that the Brown wire must be closest to the ECU and the black wire is attached to the same ECU ground wire but about an inch from the brown ground wire. This is a key point in the directions so follow them exactly.
*The MAP wire (Dark green w/Red tracer) gets cut in half. The half that comes out of the ECU connects with the Yellow wire from the Apexi. The other half that goes into the wire harness and to the MAP sensor it self gets connected to the White wire from the Apexi.
Make sure all wires are connected correctly and safely wrapped to prevent any shorts. Connect the battery and read the rest of the Apexi manual. The manual describes how to set up the Apexi to use the sensor type, # of cylinders, throttle sensor voltage, and self learning throttle opening. The Apexi directions also state how to set the RPM points as well as adjust the fuel curve at each point. I have the Apexi in my XJ set up starting at 1000RPM and going in 400RPM increments. So the RPM points go 1000, 1400, 1800, 2200, etc…. The best way to tune the fuel curve is to have your Jeep on a chassis dyno and hooked up to a wide band O2 sensor. That way as you make pulls on the dyno, you can watch the A/F ratio and make any changes as needed. At the RPM points where it reads lean, adjust the Apexi to add fuel only in 1% or 2% increments or if its reading rich, adjust the Apexi to remove fuel in 1% or 2% increments until the A/F looks good. The shop that tuned my XJ said that for a naturally aspirated engine 13.5 A/F is good for WOT and when cruising 14.7 A/F is optimal. Any A/F more than 13.5 did not make any more power and used more fuel on MY naturally aspirated motor. YOUR RESULS MAY VARY. Forced induction A/F should be around 12.5 to 12.7.
Notes: This install was very easy in my opinion. About as difficult as wiring in a radio. The only weird thing I had happen was trying to calibrate the Apexi to read the RPM signal from the ECU. When setting the Apexi for 6 cylinders the RPM reading was off by 1500RPM or more. When the Apexi was calibrated for a 4 cylinder, the RPM was dead on or with in 100RPM or so. My guess is that the ECU was calibrated for a 4 cylinder and the factory never calibrated the ECU or the Tach gauge for a 6 cylinder. So long as the Apexi has a good RPM signal and it reads closely to the factory tach everything will be fine. My XJ has been running just fine with this setting.
AARON
DISCLAIMER: I will NOT take responsibility for any damage, failure, or violations of the law by using the following information. I am not a mechanic or electrician and make NO guarantees that the following will work for you. YOU are responsible if anything goes wrong.
How to install an Apexi SAFC 2 into a 91-96 Jeep HO 4.0L.
What is an Apexi SAFC 2?
In simple terms it’s a very expensive adjustable Manifold Air Pressure or MAP sensor.
Long complex answer as quoted from the Apexi manual: “The SUPER AFC 2 is a fuel adjustment controller in which the pressure sensor signal can be modified in a 12 point RPM range by 1% increments to increase/decrease fuel in a range of +50% to -50%. The RPM to be corrected can be optionally set in 200 RPM increments, and corrections can be made according to throttle opening amounts.”
What this means is that you to tune the fuel curve by adding fuel at the RPM where it’s running lean, and removing fuel at the RPM where it’s running rich.
Now to merge the Apexi to the Jeep ECU or how to wire it in.
***Before you touch anything disconnect the battery as you don’t want to fry yourself, the ECU, or the Apexi. The Apexi is a universal device meant to work on a variety of vehicles with different sensor types. This means there are some extra wires coming out of the Apexi. Tape off the ends of these wires as you wont need them. The wires that we need to know about are the following and where they hook up to:
Apexi What it is Jeep ECU
Red Power Pin #9 Dark Blue
Green RPM Signal Pin #41 Grey w/light green tracer
Gray Throttle Signal Pin #22 Orange w/dark blue tracer
Brown Ground Pin #11 Black w/Tan tracer
Black Ground Pin #11 Black w/Tan tracer
Yellow MAP output (into ECU) Pin #1 Dark green w/Red tracer
White MAP input (into sensor) Pin #1 Dark green w/Red tracer
*None of the factory Jeep wires are cut in half with the exception of the MAP wire. Take the ECU wire you need and strip back about 3/8” of the insulation and wrap the wire from the Apexi around and solder them solid and rewrap with electrical tape.
*The power wire must be hooked up to Pin #9 Ignition circuit sense so that when the key is turned on, the Apexi gets power. If you hook the Apexi up to Pin #3, you will have direct battery voltage and the Apexi will be on all the time which you don’t want.
*The ground wires from the Apexi both go to the same ground wire coming out of the ECU. The directions state that the Brown wire must be closest to the ECU and the black wire is attached to the same ECU ground wire but about an inch from the brown ground wire. This is a key point in the directions so follow them exactly.
*The MAP wire (Dark green w/Red tracer) gets cut in half. The half that comes out of the ECU connects with the Yellow wire from the Apexi. The other half that goes into the wire harness and to the MAP sensor it self gets connected to the White wire from the Apexi.
Make sure all wires are connected correctly and safely wrapped to prevent any shorts. Connect the battery and read the rest of the Apexi manual. The manual describes how to set up the Apexi to use the sensor type, # of cylinders, throttle sensor voltage, and self learning throttle opening. The Apexi directions also state how to set the RPM points as well as adjust the fuel curve at each point. I have the Apexi in my XJ set up starting at 1000RPM and going in 400RPM increments. So the RPM points go 1000, 1400, 1800, 2200, etc…. The best way to tune the fuel curve is to have your Jeep on a chassis dyno and hooked up to a wide band O2 sensor. That way as you make pulls on the dyno, you can watch the A/F ratio and make any changes as needed. At the RPM points where it reads lean, adjust the Apexi to add fuel only in 1% or 2% increments or if its reading rich, adjust the Apexi to remove fuel in 1% or 2% increments until the A/F looks good. The shop that tuned my XJ said that for a naturally aspirated engine 13.5 A/F is good for WOT and when cruising 14.7 A/F is optimal. Any A/F more than 13.5 did not make any more power and used more fuel on MY naturally aspirated motor. YOUR RESULS MAY VARY. Forced induction A/F should be around 12.5 to 12.7.
Notes: This install was very easy in my opinion. About as difficult as wiring in a radio. The only weird thing I had happen was trying to calibrate the Apexi to read the RPM signal from the ECU. When setting the Apexi for 6 cylinders the RPM reading was off by 1500RPM or more. When the Apexi was calibrated for a 4 cylinder, the RPM was dead on or with in 100RPM or so. My guess is that the ECU was calibrated for a 4 cylinder and the factory never calibrated the ECU or the Tach gauge for a 6 cylinder. So long as the Apexi has a good RPM signal and it reads closely to the factory tach everything will be fine. My XJ has been running just fine with this setting.
Last edited:
")