• Welcome to the new NAXJA Forum! If your password does not work, please use "Forgot your password?" link on the log-in page. Please feel free to reach out to [email protected] if we can provide any assistance.

Narrowed D44/9" Swap

John D

NAXJA Member # 788
Location
Rockford, Mi
About two years ago a friend put a 5.7L Hemi in his JK and another friend John B (96 Classic on NAXJA) put an LS1 in his XJ. I drove and rode in both of these Jeeps and immediately had engine envy. Prompted by this envy I began an 18 month quest to put a 5.3L in my XJ. Frank Z was doing the swap at about the same time as me http://www.naxja.org/forum/showthread.php?t=1007477). And my Instrument Cluster Swap to Auto Meters http://www.naxja.org/forum/showthread.php?t=1027402

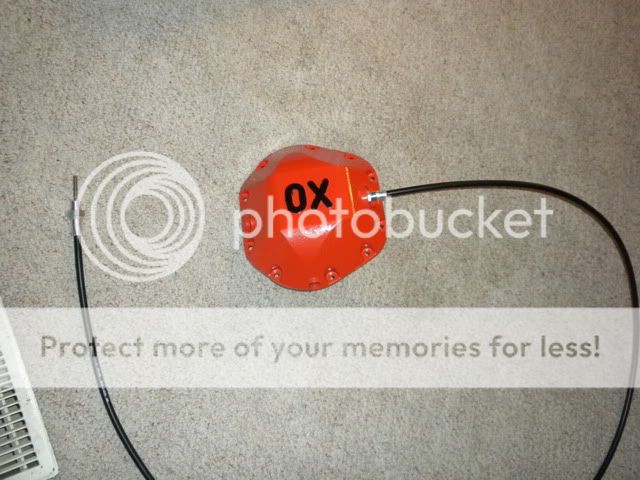
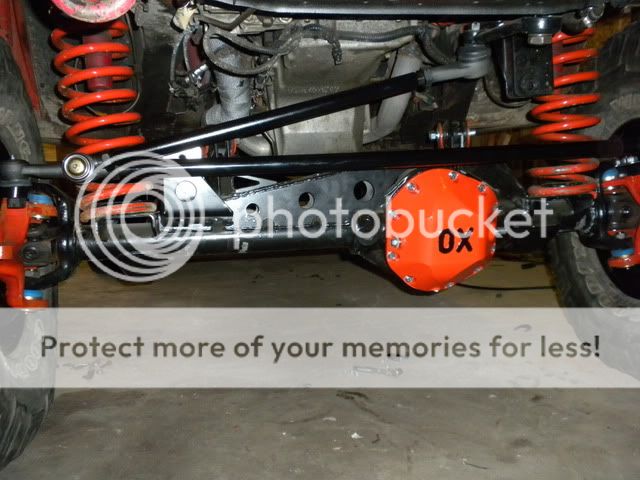
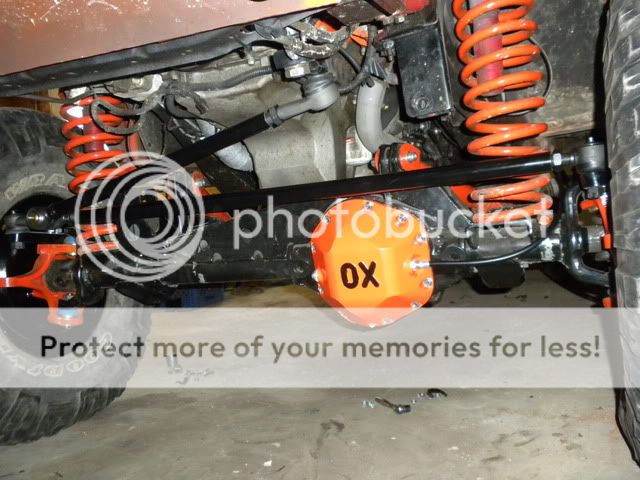
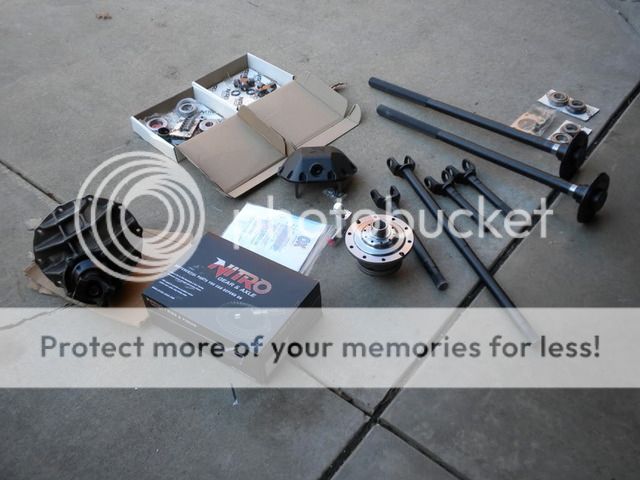
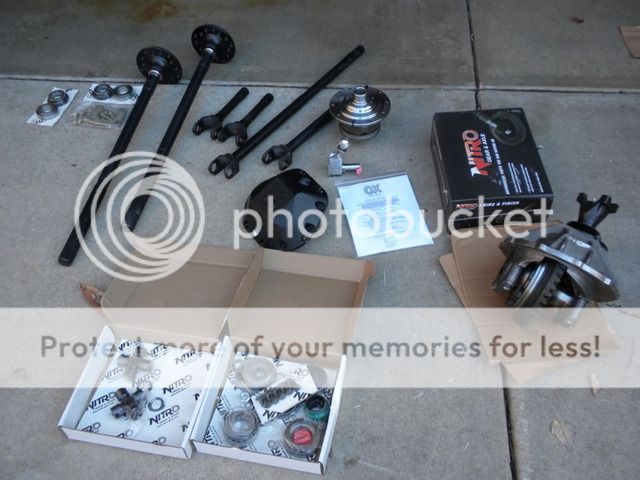
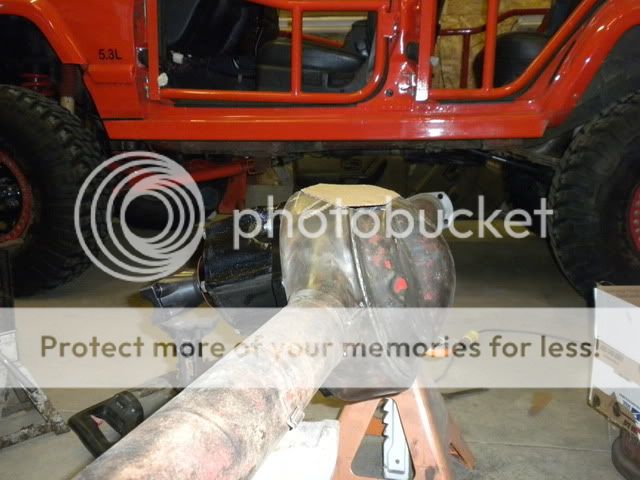
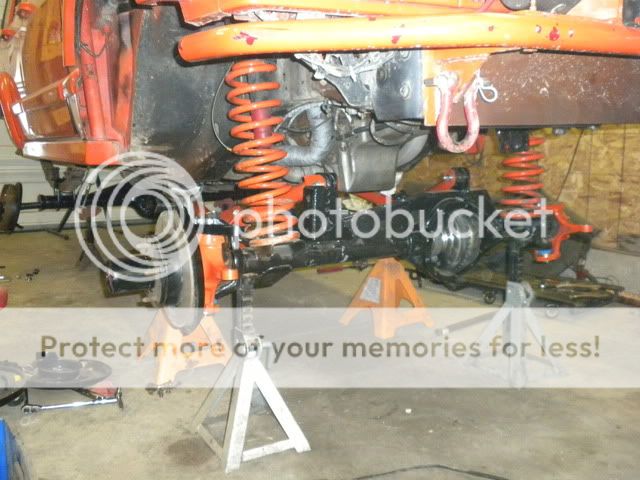
About 6 months into the 5.3L quest reality started to set in and I started thinking there would need to an axle upgrade to go along with it. I was running a D30 with an OX and 4.56 gears and an 8.25” with a No Slip lunchbox locker. Stock shafts were in both axles.

I studied a couple threads here on NAXJA, some on Pirate and few other sites I could gather information from. Many thanks to:
Cruzin Illusion http://www.naxja.org/forum/showthread.php?t=907435
Starboard M http://naxja.org/forum/showthread.php?t=993467
Mr. N http://77cj.littlekeylime.com/web_rs44.html
And a bunch of others who have taken the time to document what they did.

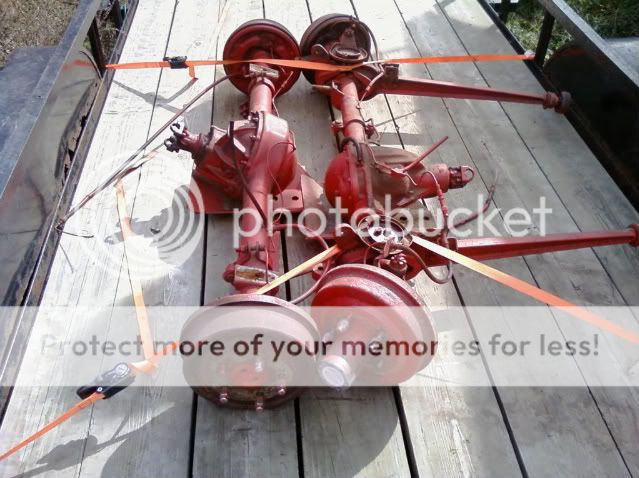
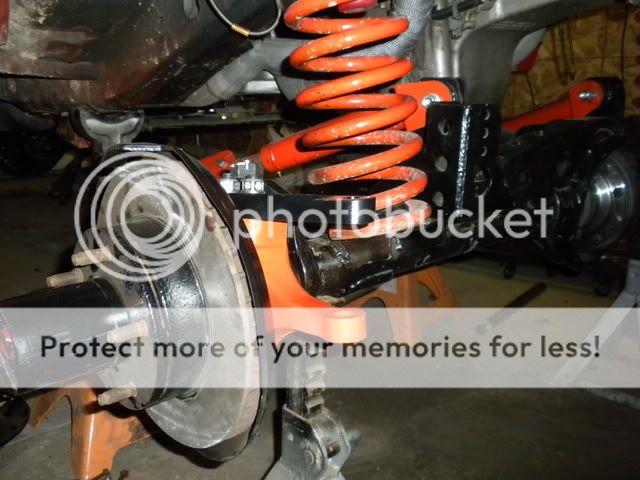
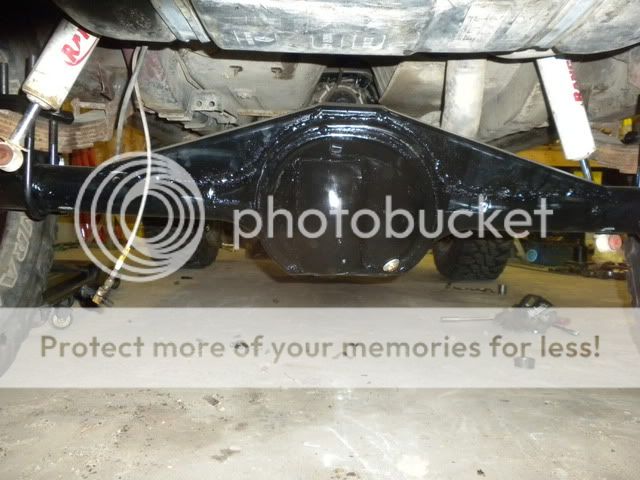
My intention was to narrow the axles and run them at XJ width. I decided I needed a pre-’78 F150 or F100 as a donor. Up to ’75 has the drum brakes and ’76-’77 has the disc brake D44 and both have the weld on wedges. I started cruising Craig’s List and there were tons of the ’78 up stuff around here and quite a few of the ’75 down stuff. I kept looking for the years with the disc brake front. In the end it turned out to be time wasted because I decided I was going to use the Chevy D44 Flat Top Knuckles for this swap. I found a pair from a ’75 F100 I found on Craig’s List for $250. Aren’t they sexy? Bright red and GIANT skid plates!

1011091406-1.jpg


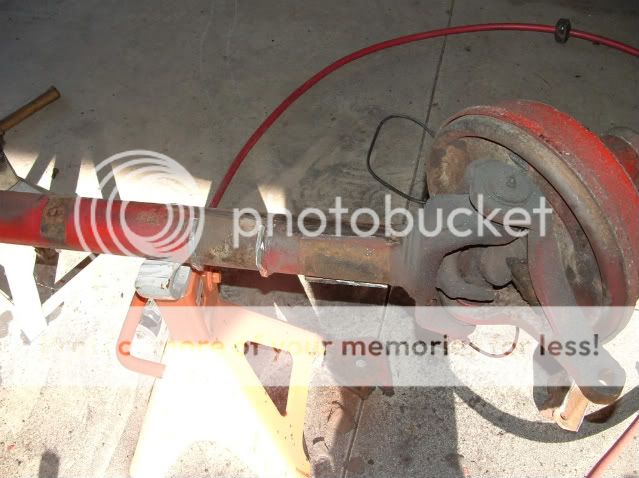
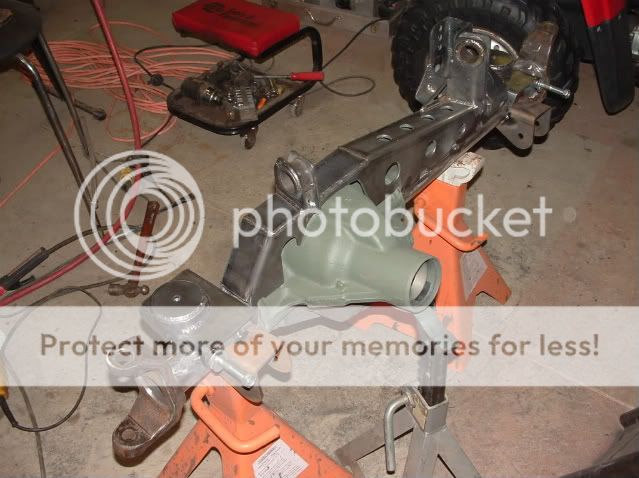
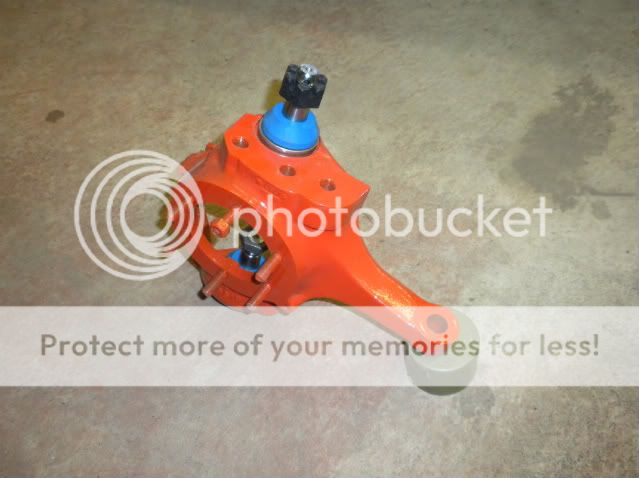
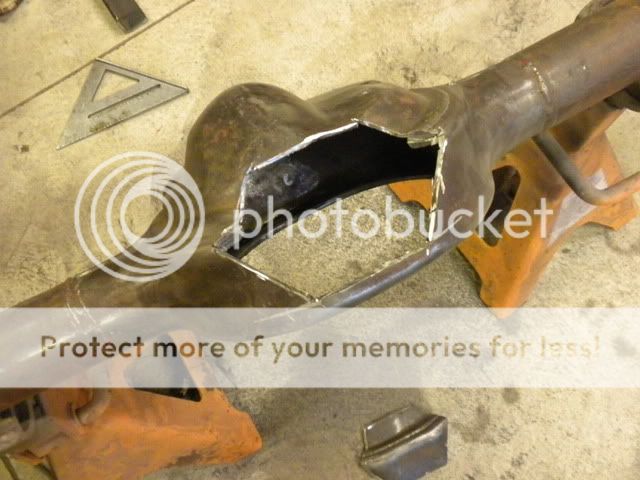
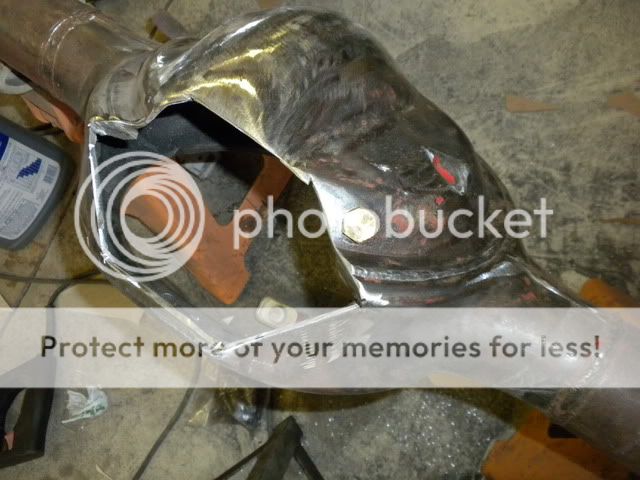
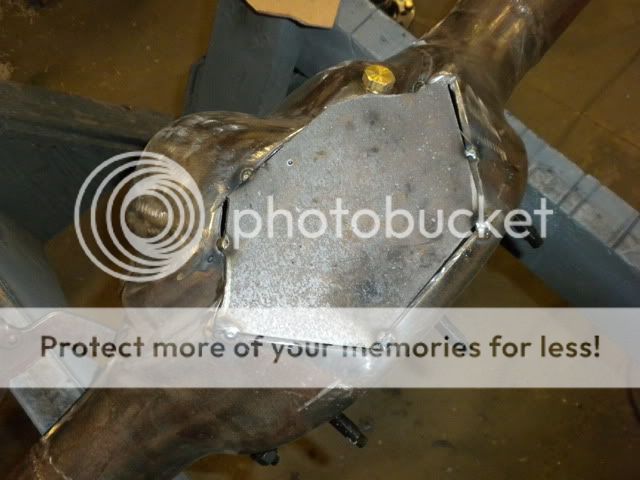
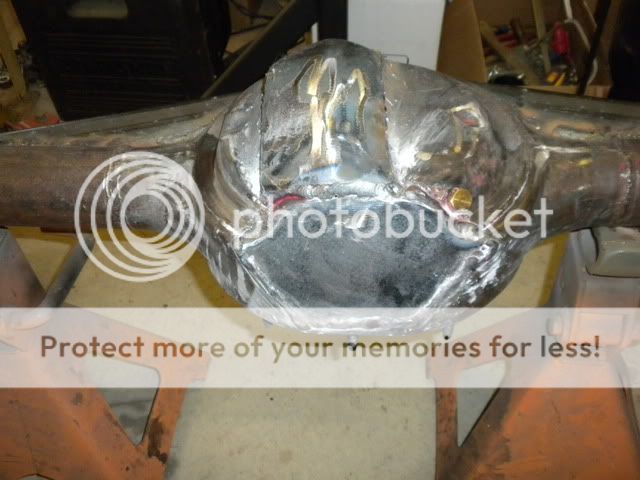
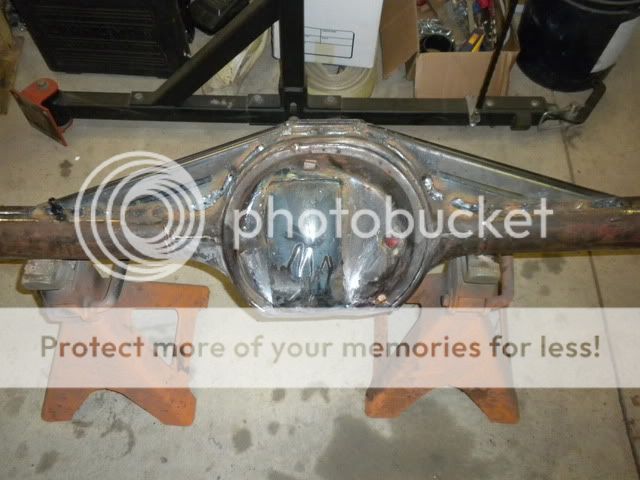
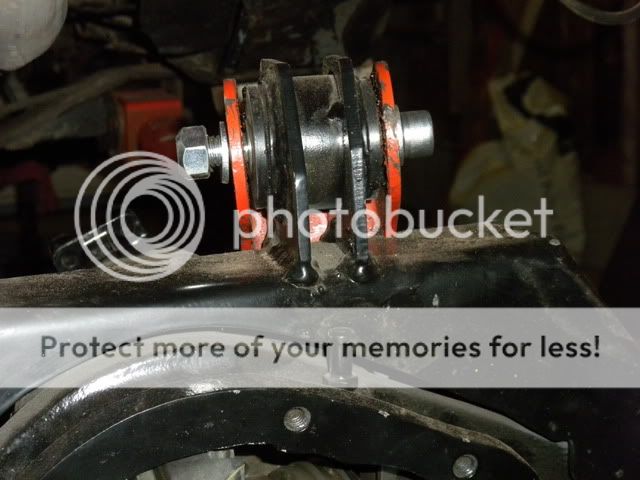
I figured the D44 was going to the challenge so I started on that first. I cleaned it up and stripped all of the mounts off of it.

DSCF0151-1.jpg

DSCF0155-1.jpg


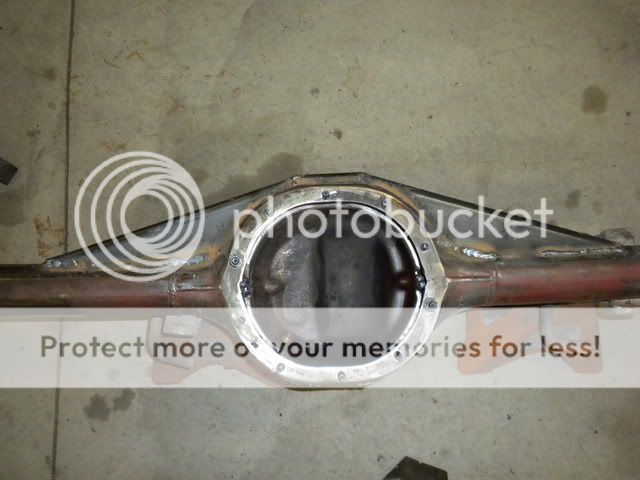
I was really worried about my abilities to cut and turn the knuckles. I studied and stayed awake at night thinking about it! I ended up following Cruzin’s thread to get the XJ width I wanted. I would spend a lot less time and worry on it the second time around. It really was not that difficult to do. You just need to take your time and measure everything to ensure it is correct. My Jeep gets less than 3000 road miles a year so it becomes even less critical that it’s perfect.

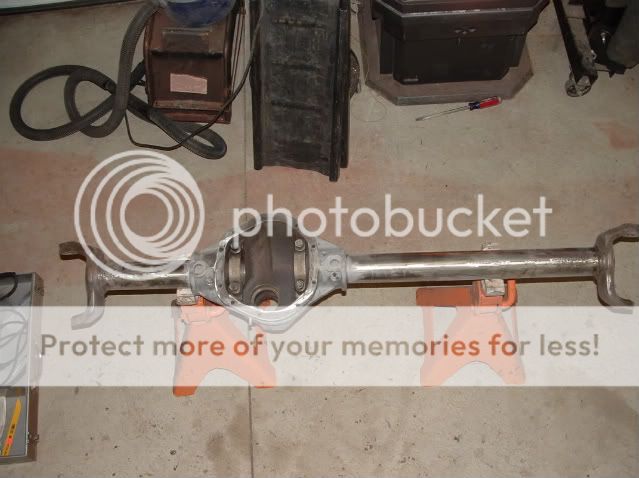
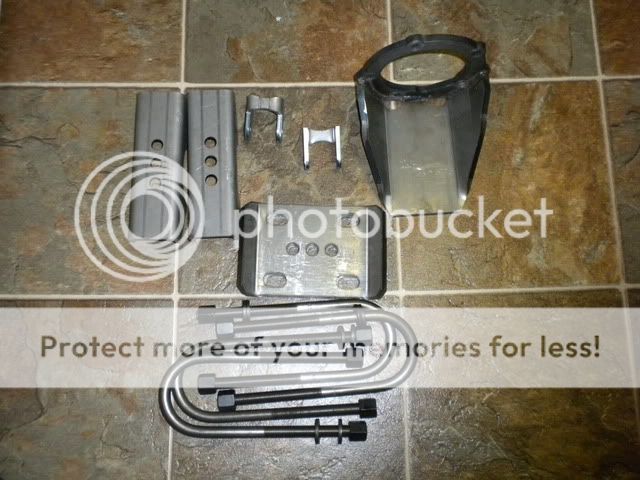
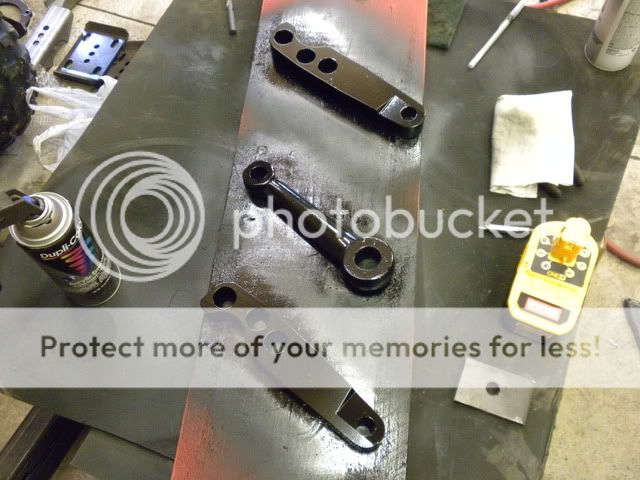
I wanted to use the TNT truss for the D44, it seems like a good product and it includes everything you need. A little pricey? Yeah. But I do think it was worth it.

DSCF0160-1.jpg

DSCF0161-1.jpg


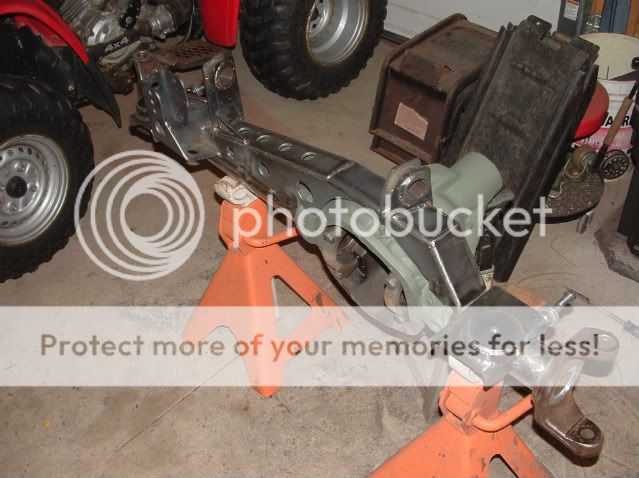
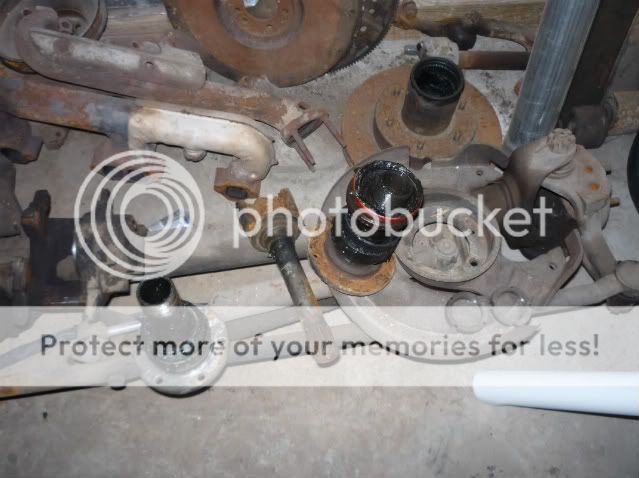
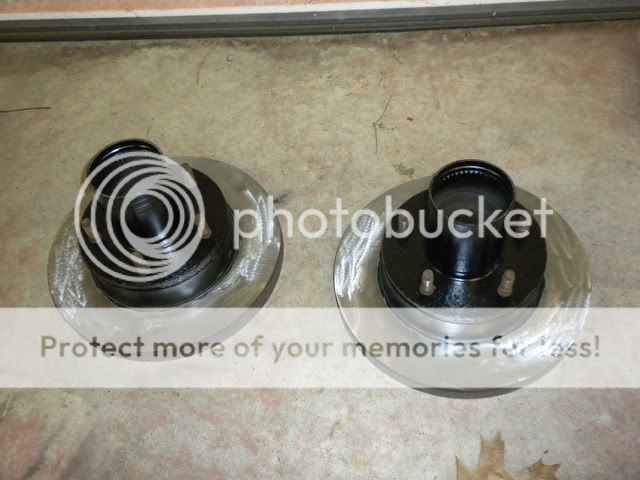
Now it was time to start searching for my Chevy Flat Tops. There are several possibilities to use depending on what you want (see Mr. N’s page), but for my case I was looking for a ’73 to ’76.5 K5 or K10. I am very patient when it comes to waiting for the right deal to show up on Craig’s List. However, this endeavor took me three months; I wasn’t sure I would ever find the knuckles. Then one day they popped up and it was only 20 miles away. I ran right over with my money in hand. The guy wanted $100 for the whole thing; it had no axles, no rotors, and only 1 caliper. What it did have was the knuckles I wanted, the caliper mounts and the spindles. I was able to talk him down to $50 and I turned the housing into a 12 pack of Miller Lite.

P1010251-1.jpg

P1010254-1.jpg

P1010255-1.jpg

P1010249-1.jpg


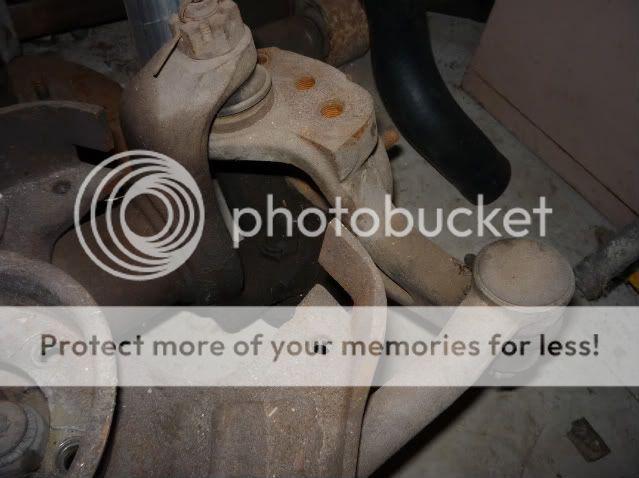
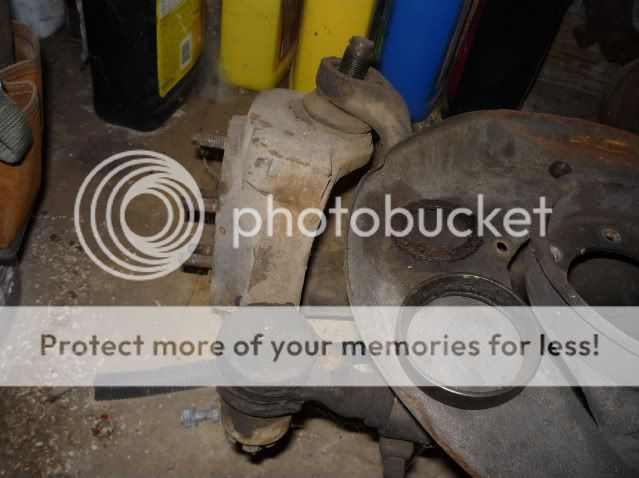
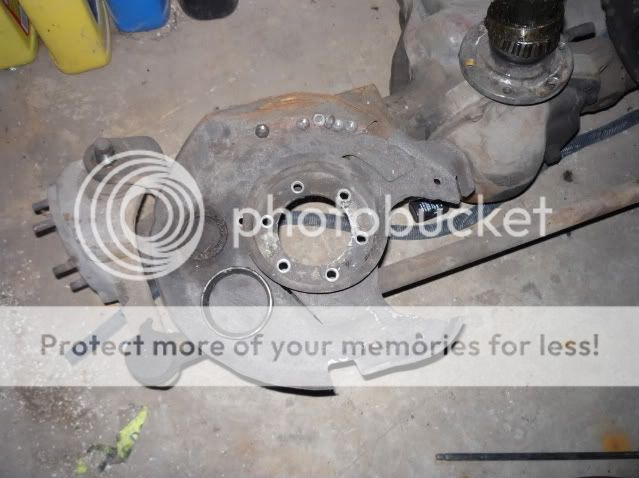
The way to run the Chevy Flat Tops with Ford 5 on 5.5 outers was the most difficult information to find/decipher. With the help of Mr. N’s website I did prevail, but even so when I bought these I wasn’t 100% sure this was what I needed.
 
I sent to knuckles off to John Nutter http://www.jnutter.com/index.html to have the passenger side machined and drilled/tapped to accept the Hi-steer arms. It looks like he is out of the business for now, so I don’t know where you can get it done. Maybe he will start back up, he had great service, fast turnaround and the price was great. I think I paid him about 60 bucks including the return shipping to machine it.

DSCN4374-1.jpg


I painted it orange because all the cool kids on the playground have orange ones; just kidding, the Jeep is Hemi Orange and several of the parts/pieces are painted orange to accent it. It’s the little things that make the difference.

I also found a pair of ’78 Ford Bronco rotors and hubs with all the bearings for 40 bucks. Yeah you guessed it, Craig’s List. Took them over to my buddies shop, sand blasted, turned and painted them to look like new.

DSCN4375.jpg


I had a big bonus coming in from work so I figured I better hurry up and spend it. I started talking to the guys at JT’s http://www.justdifferentials.com/ They are a NAXJA Vendor so I figured I would see what they could do for me. I got in touch with Carl Montoya and we started talking. Basically we went back and forth for about a month (remember I said I was patient?) and we came up with a deal. Carl asked me not to post the price I paid, but these guys are willing to deal. As with many companies the more you buy the lower the prices go, these guys were awesome! Here is the list of parts I ordered from them:
1. D44 chromo axle kit
2. 300M joints
3. 5.13 gear set
4. Master kit
5. Nodular 3rd member w/ pinion support, 35 spline Detroit Locker and 5.14 gears set-up.
6. Cut-to-length 35 spline chromos
7. Bearings, seals, plates and studs

DSCN4341.jpg

DSCN4340.jpg


I put the OX together, gathered all the D44 stuff with housing and dropped it off at a buddy’s house to get the gears set-up.

Then I was looking at the 9” thinking, “what am I going to do with this?”
I didn’t have any trouble finding stuff about shaving it and trussing it Thanks to:
87xjco http://www.naxja.org/forum/showthread.php?t=936456&highlight=shaved+ford
XJ_ranger http://www.naxja.org/forum/showthread.php?t=936456&highlight=shaved+ford

But what about narrowing it? I will admit I am not the best at searching these threads, but I found very little. Seems like most people avoid this and just run it full width. But like I said, I really wanted to run them XJ width. While measuring I discovered the center section was offset 2”. Again, this is something that doesn’t seem to be covered by anyone. Eventually I came across this thread http://www.garagejournal.com/forum/showthread.php?t=46025 which answered my questions about the offset, but left me wondering how I was going to turn down the ends of the housing for the narrowing process. I could have spent a lot of time finding a local machine shop to do it. I talked to Moser and for $125 they would narrow it to the width I wanted. I was going for 5” to match the front so I had them do 1” on one side and 4” on the other, centering the center section.

Here is some good tech from the garagejoural.com website:
I am going to show the steps involved in narrowing a 9" Ford rear end housing. I am narrowing the following housing to accept Maverick 8" Ford 28 spline axles and housing ends to end up with a 56 3/8" wide 9" Ford rear end that will bolt in to a '65 Comet.

-First off, to clear up some mis-conceptions, a rear end is NEVER measured from backing plate to backing plate. That measurement tells you absolutely nothing because there are so many different backing plates, brake offsets and brake shoe widths. ALWAYS measure a rear end from the outside of the axle flange to the outside of the axle flange.

-Here are some terms, vital measurements and facts:

-28 spline 8" and 9" Ford axles are the same spline.

-You have to cut at least 4" out of 8" or 9" Ford OEM axles in order to shorten and re-spline them. Some of the older axles cannot be shortened at all. You cannot remove 1", 2", or 3" from any stock Ford 8" or 9" axle.

-Axles are always measured from the outside of the axle flange to the end of the splines.

-Brake offset is the measurement from the outside of the axle flange to the inside edge of the bearing retainer flange + 1/8". (the 1/8" is the thickness of the brake backing plate)

-Most small bearing 8" and 9" Fords have a 2 1/2" brake offset.

-Most big bearing 9" Fords have a 2 3/8" brake offset.

-These brake offsets are the most common, but there are always exceptions, so your best bet is to measure what you have.

-Centered pinion rear ends will ALWAYS have a left side axle that is 4" shorter than the right side axle.

-Rear ends that have the same length left and right side axles ALWAYS have the pinion offset 2" to the right.

-The "dogbone" is a tool that shows where the edge of the axles end up when bolted in the housing. It allows measurements to be taken with a bare housing when narrowing a housing.

-The space between the two axles is ALWAYS 1 1/8" on 8" and 9" Fords whether the rear end has an open diff, posi, locker, spool etc. This measurement is the same throughout all years of production.

I dropped the D44 off at a buddy’s house so he could do the gear set-up for me. I also dropped off the 3.50 3rd member that came with the F100 axles. He’s a dirt track racer and turns out he was looking to buy a 3.50 3rd member to have for certain tracks. We made an even swap; the 3.50 3rd member for his D44 set-up labor. My lucky day!

Did some reading on shaving and trussing the 9”:

http://www.naxja.org/forum/showthread.php?t=936456&highlight=shaved+ford
I liked what he did with his truss, but the shave wasn’t deep enough.

http://www.naxja.org/forum/showthread.php?t=934582&highlight=shaved+ford
This is more like what I had in mind for the shave.

So I marked it out and hit it with the cut-off wheel. Talk about a “no turning back now” feeling. Believe it or not you could go even deeper. I still have 3/8” between where the plate is going to be and the ring gear.

DSCN4365.jpg

DSCN4369.jpg


Here’s about what it will look like when I weld the plate on.

DSCN4367.jpg


I started thinking about a drain plug. Poked around a while and all I could find was:
1. Tap the lowest 3rd member stud hole and put a bolt in there.
2. Remove the 3rd member when you want to change oil.
3. Put a plug in the plate in the bottom.

None of these were the option I wanted so I decided to XXXX, tap and install a plug in the little crease just above the plate. It will still have a little oil in it when I drain it, but it will get most of it. I’ll probably cut a ½” piece of schedule 40 pipe and weld it around it to help protect it.

DSCN4377.jpg


Gave Dan a call at Ruff Stuff and ordered a few goodies. 9” pinion guard and a 9” axles swap kit.

DSCN4379.jpg
 
Spent the day at a friends welding shop and got a lot done on the 9”.

Closed up the gaping hole in the bottom.

DSCN4383.jpg

DSCN4387-1.jpg

DSCN4386.jpg


Used a dye penetrate to expose two tiny leaks and sealed them up.

Made up the truss, used a big torch and a 3# sledge to form a piece of 3/16” over the ring gear hump and ended up with this; I am pleased with it. Should be able to smash it into anything.

DSCN4385.jpg

DSCN4384.jpg


The Parts Mike arms and re-tapered Waggy pitman arm showed up yesterday. A little paint to make them pretty.

DSCN4435.jpg


Pulled the rear axle out and while I was taking the bolts out of the springs I snapped the front hanger bolt on the driver’s side. Not a huge deal, just going to have to fix it before I can move forward.

DSCN4432.jpg


Ran into a snag with the TNT truss. The driver’s side upper mount is off a little. The angle would not line up with the upper arm. I was able to modify the hole on the arm to make it work. Seemed easier than cutting off the mount and re-welding. Hard to see, but the angle compared to the arm is different. Eventually I will cut it off and reattach correctly.

DSCN4441.jpg


Made some good progress, here’s where it’s at now.

DSCN4437.jpg


These arms are going to give a ton of clearance and should make the steering angles almost nothing.

DSCN4443.jpg
 
looking really good man! looks like you are making some nice headway. are you planning on running a sway bar? i would love to drop down and see this thing sometime soon, but right now i am having some serious T-case issues so i have to address that first.
 
Progress this week has been slow. Lots of other things to do besides the Jeep L

After screwing around with my junkyard lockouts for 3 days I decided to buy a new set. I should have done that from the start. 90 bucks from Advance for a set of metal Mile Markers. Nice and shiny.

DSCN4444.jpg


I also discovered that one of my wheel bearing hubs was slightly deformed. I picked up one of those from Advance too. They are 41 bucks at Advance and 101 bucks at NAPA. The computer at Advance doesn’t list the part, I had to find it online and then they could find it in the store. Weird. YH141951 Hub PN.

I have been trying to decide what to do about the clearance, Clarence (Airplane movie). The 5.3L takes up a lot of room and it looks like where it currently is I will only have 3.5-4” of up-travel before my control arms and D44 yoke make contact with either the engine or the exhaust.

I could push the axle forward 1-2” to gain some clearance or limit the up-travel. Maybe both would be best, but the TREs and track bar are lined up perfect where the axle sits now.

Opinions anyone?

Here are some pics of the clearance.

DSCN4445.jpg


It looks like it will hit the oil pan, but that clearance is OK.

DSCN4447.jpg


DSCN4446.jpg
 
Kinda hard to tell from the pics, but if a simple 1-2" stretch will help you then I'd go for it.

I'd just be leery of the tie rod colliding with the draglink on uptravel with that much of a stretch.
 
Yeah! Back on all fours. Tires nicely tucked under, just the way I wanted.

DSCN4470.jpg


Here's how the 9" shave turned out.

DSCN4471.jpg


Ordered the steering from Parts Mike, threaded inserts for my track bar and an OX cable. They should all be here Monday and Tuesday.

I decided I can stretch the front at least one inch without issues. I am going to wait until the steering is on to see if I can get two. Then I'll just bump stop whatever else I need to keep it away from the engine.

I was hoping I wouldn't have to do anything to the driveshafts, but the front is just too long now. Going to have to shorten it.
 
Yeah! Back on all fours. Tires nicely tucked under, just the way I wanted.


Here's how the 9" shave turned out.


Ordered the steering from Parts Mike, threaded inserts for my track bar and an OX cable. They should all be here Monday and Tuesday.

I decided I can stretch the front at least one inch without issues. I am going to wait until the steering is on to see if I can get two. Then I'll just bump stop whatever else I need to keep it away from the engine.

I was hoping I wouldn't have to do anything to the driveshafts, but the front is just too long now. Going to have to shorten it.

is that taking into account the possible front stretch?

looks good.
 
is that taking into account the possible front stretch?

Actually was thinking of that while I was staring at the ceiling last night. I think the stretch will fix the front d-shaft length.

Hmm a modification (the stretch) that actually saves money instead of costing money? That will be a first for me!
 
dude that turned out great! do you know how much clearance was saved with the shave?
 
Good job and nice upgrades. You will love the shave on the 9''. I drug mine over everything before shaving it, that 2'' makes a huge difference.
 
Update, making a little progress this week.

1 ton steering kit from Parts Mike.

DSCN4510.jpg


Making the OX cover pretty.

DSCN4509.jpg


I am really happy with the way the steering turned out. It is super beefy and the ground clearance with the high steer arms is awesome. The angle from the pitman arm to the TRE turned out really nice too. That is a flat waggy pitman arm and it still has an angle that low.

DSCN4511.jpg


DSCN4512.jpg
 
Last edited:
This friggin banjo bolt feasco is making me nuts! I finally have the correct banjo bolts and they won't fit into my brake line adapter thingies. What do you call the end of this brake line where the banjo bolt goes through and where do you buy them?

Maybe I should just get some extended lines for a K5 Blazer (that's where the cailpers are from) but there is nothing wrong with these if I can find the correct end.

BanjoBoltAdapter.jpg
 
John nutter was a great guy to deal with, he did my knuckles too a few years back. Sorry to see he is no longer doing it.

I just drilled my lines out, and I haven't had any problems with the two different sets of lines I've done it to, in the 3 years I've had my front installed. The copper washers are sealing the banjo anyways, so.
 
Back
Top