• Welcome to the new NAXJA Forum! If your password does not work, please use "Forgot your password?" link on the log-in page. Please feel free to reach out to [email protected] if we can provide any assistance.

Grease up ball-stud end?

FlyNNN

NAXJA Forum User
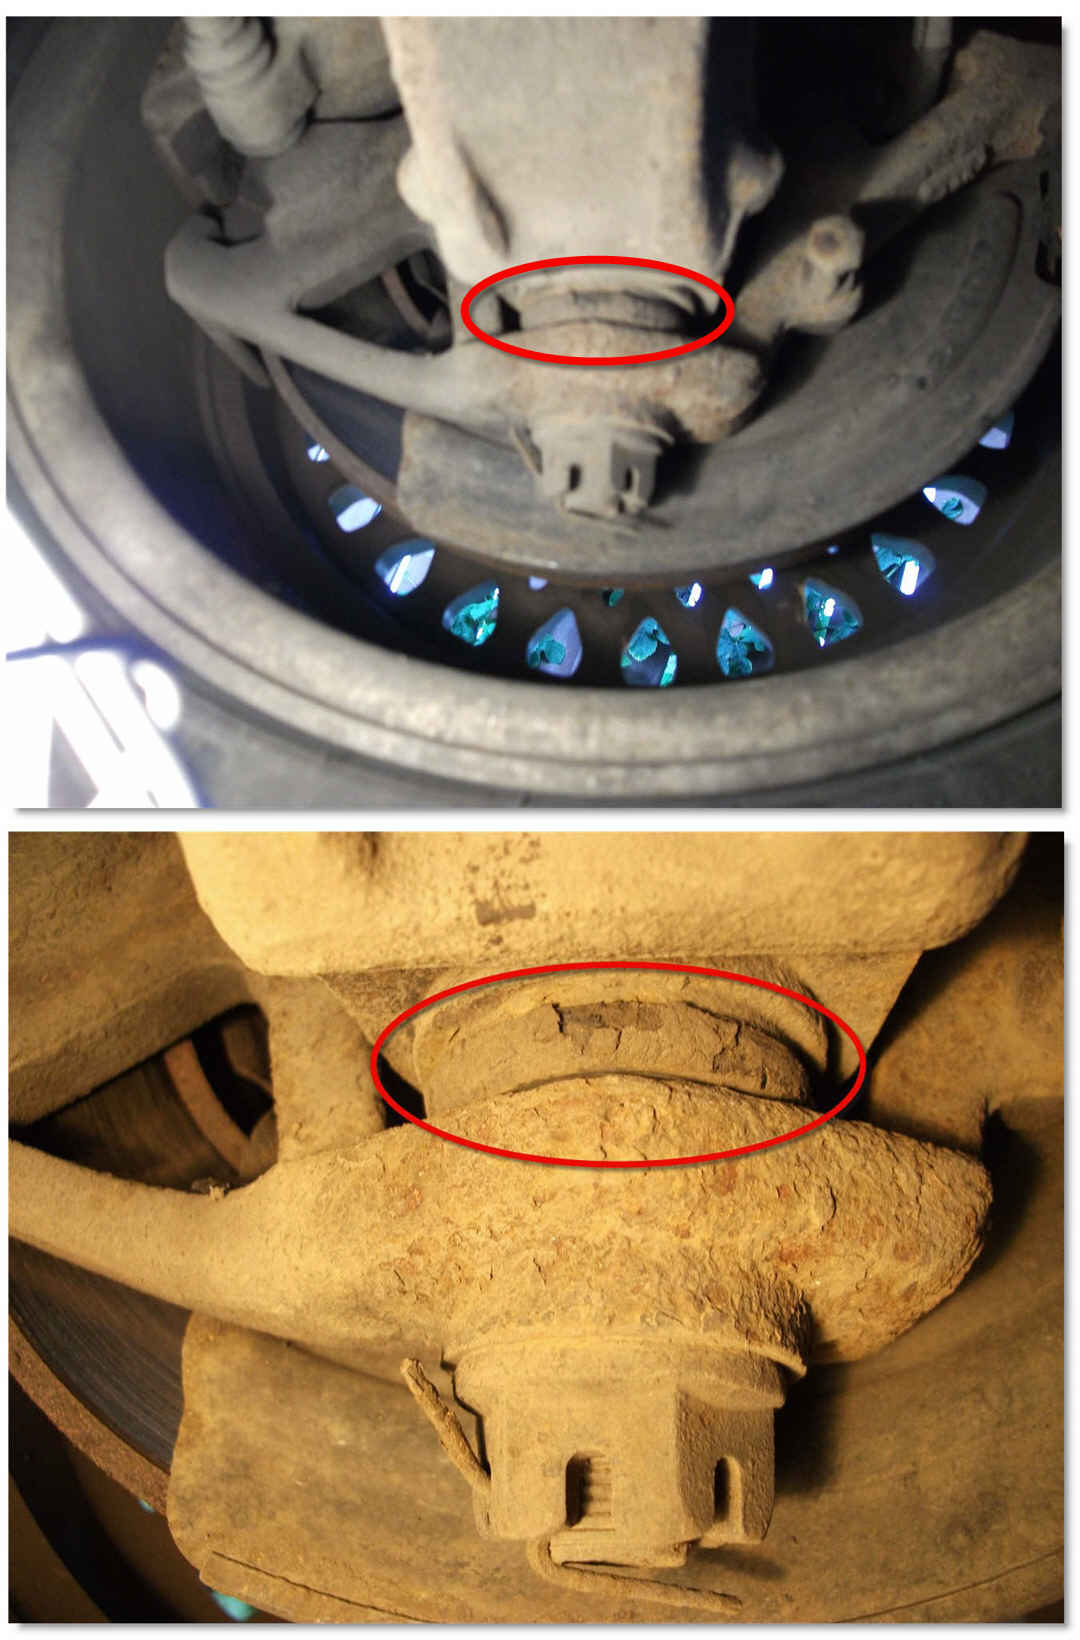
I got under the vehicle to grease up the steering linkage and spotted this on the front left wheel. 1990 XJ. Not sure if I have the terminology down correctly, but the ball-stud end looks like it could use some grease but I don't see a fitting. Can I simply install a fitting up top? The grease boot doesn't look to be in good shape either. What should I do?

ball-stud4.jpg


That's the lower balljoint. The grease fitting, if it has one, will be right between the top of that part and the bottom of the U-joint inside the steering knuckle. Most lower balljoints don't have one because there isn't much room between the U-joint and the top of the balljoint.
 
Re: how to grease an non-greasable lower ball joint?

That's the lower balljoint.

Oh, boy! ... looks like I opened up a can of worms here. I had a restless sleep wondering about what to do. Not a problem as of yet but a storm on the horizon is approaching. Trying to be pro-active here.

Thanks for putting the proper words to what I see. I checked and don't have a grease nipple on the top of these stock lower ball-joints. The title of this post should read "how to grease an non-greasable lower ball joint".

Is there no way to get grease in there? Is the only solution to replace the ball joints (upper & lower) with greasable units? Should you also replace the u-joints while you are in the area? I watched some video's on YouTube and do not feel comfortable with such a job by myself with no experience.

I need some help. This is my daily driver. I just spent thousands taking my jeep into a service centre and am tapped out. I can afford the replacement parts but I can't afford the thousands I'm sure to get charged for labour. I don't want to attempt this job myself. Any Jeepers in Edmonton with the experience to help me out?


There shuold be a small bolt on the topside. You will need to pull the axle out, install a grease fitting, grease it, then replace the bolt and reinstall the axle. Should not take more than an hour.
 
There shuold be a small bolt on the topside. You will need to pull the axle out, install a grease fitting, grease it, then replace the bolt and reinstall the axle. Should not take more than an hour.

this.

if there is not hole for a grease zerk, many "maintenance free" balljoints are solid, then you can use a needle fitting and poke it into the boot, but this will not properly grease the ball and socket.

also, the outside rubber boot is no indication of the ball joints health. I've seen somet htat look nasty as hell go for a long time, and some that look brand new fail in a month.

Check the ball joint for play with the wheel up in the air, if it's tight and you don't feel any stiffness in the wheel then don't worry about it.

When it comes time to do the balljoints it's easy enough to DIY in the driveway.
 
unless you have some play in the lower ball joint i wouldn't mess with it. its not the hardest job in the world replacing ball joints. but if there is no need then save your self the hassles.
 
Re: how to grease an non-greasable lower ball joint?

...if there is not hole for a grease zerk, many "maintenance free" balljoints are solid, then you can use a needle fitting and poke it into the boot, but this will not properly grease the ball and socket.

also, the outside rubber boot is no indication of the ball joints health. I've seen somet htat look nasty as hell go for a long time, and some that look brand new fail in a month.


Check the ball joint for play with the wheel up in the air, if it's tight and you don't feel any stiffness in the wheel then don't worry about it.


When it comes time to do the balljoints it's easy enough to DIY in the driveway.

In the short term, I'm going to attempt using a needle nose grease gun adapter. Long term, prepare for ball joint replacement. Vehicle has 130k miles.


unless you have some play in the lower ball joint i wouldn't mess with it. its not the hardest job in the world replacing ball joints. but if there is no need then save your self the hassles.

I don't believe there is any play because the mechanic at the recent service center would most likely have mentioned it because he was working in that location. I will jack up and confirm.


There shuold be a small bolt on the topside. You will need to pull the axle out, install a grease fitting, grease it, then replace the bolt and reinstall the axle. Should not take more than an hour.

You guys say DIY. Tools I need? pickle fork, ball joint separator? Don't have and I don't believe I can rent them around here. I'll have to do some discovery on that.

 
a pickle fork some wrenches a 3 pound sledge and a ball joint press should be all you need to do it. you can order all of it at harbor freight tools. or if you have a auto zone or decent auto parts place around you they should have it all there as well. i would suggest watching a few you tube videos on how to change them before tackling the job if you need to do it.
 
All you need is stuff to remove the wheel and brake caliper (what year?), a 13mm 12 point socket, a breaker bar, a 1/2 to 3/8 adapter if its a 3/8 drive 13mm 12pt socket, a rented or harbor freight balljoint press and the 4wd adapter cup set for it, the sockets to fit the upper and lower alljoint nuts (I want to say 7/8 for the upper and 30mm or similar for the lower, but measure/check), a 3lb hammer, and either a large nut and bolt or a 1/2 extension bar to separate the hub from the knuckle. Oh, and a big box wrench to fit the balljoint press, iirc a 7/8 fits.

Jack it up, take the wheel off. You want the wheels pointing straight ahead, maybe slightly away from the side you're working on but not much.

Remove the caliper. Depending on year this will be a 12mm or 13mm hex bolt, in some older years it is an allen key. Slide the rotor off.

Now the worst part. Unscrew the 3 12pt 13mm bolts holding the hub in. One over the ujoint, one each slightly below and in front of / behind it. If they are badly rusted, make sure you scrub most of the rust off and get the socket all the way on. This WILL require a breaker bar.

Turn the steering till you can fit your 1/2 drive extension between the ujoint ears and cross, or set your large bolt and nut up between the inner C by the axle tube and the ujoint ear, then turn the wheel slightly in the direction that will try to compress the bolt or extension bar. This will force the hub out of the knuckle with no fuss. Make sure not to knock the jeep off the jack/jackstand in the process.

Remove the cotter pins from both balljoints if possible, spray the nuts with penetrating lube, and unscrew the nuts. The upper one is easiest to get at through the hole the hub bearing just came out of.

Once they are off, put the lower back on about a turn by hand. NOT to the point that it is hard to turn, it should thread on freely or your life will be hell in 5 minutes!

Get your big hammer out and whack the steerin knuckle on the side, right where the balljoint stud passes through it. Repeat with increasing levels of violence until it pops loose. You'll need to do this on both the upper and lower most likely.

The knuckle should drop down a bit when both balljoint tapers pop loose. If you didn't put the lower nut on too tight 5 minutes ago, unthread it by hand and the knuckle will drop off, held only by the steering linkage. If you did put it on too tight... have fun!

Now you can actually get to the part you're after. Grab your balljoint press, 4wd adapter set, 7/8 box wrench, and big hammer. I always forget which one comes out first, but you need to at least get the lower out of course. One you have figured out the appropriate set of cups, angled cups, press drive pins, and sockets for this, get the press on there and crank it down pretty tight. Remember that the lower balljoint presses out downwards and in upwards so you don't try to push it further in. So get the press as tight as you can with the box wrench and one hand, then whack the inner c right where the balljoint presses into it with your big hammer. Repeat with increasing violence until you hear a bit of a crack/pop and the balljoint should pop out a few mm. Now tighten the press down as much as you can with one hand again... repeat till the balljoint falls out.

Installation is the reverse of removal, except you curse at different points. I would suggest replacing the upper as well "while you're in there" - and I always forget which goes in first, it matters, think it through and make sure you don't put the wrong one in first. The upper balljoint presses in from the top and out from the bottom, opposite from the lower.

Edit: I missed that you said 1990 XJ, sorry. You're going to need an allen / hex key driver of some size to take the calipers off, I forget what size and if it is metric or SAE.
 
Last edited:
pickle forks are for butchers... the hand sledge trick will pop the knuckle off without damaging either the knuckle or the balljoint.
 
...All you need is stuff to remove the wheel and brake caliper (what year?), ...

Wow! ... great detailed instructions, just what a newbie needs. Almost as good a you being here looking over my shoulder ... that would be nice too! You proved a lot of information and I will have to re-read a few times to digest. Thank you.


... Do you have a Canadian Tire around? Using the pickle fork will destroy the boot, but it should get it off eventually.

Yes I do. High prices though. I also visited another retailer yesterday and saw same. No Harbor Freight Tools around here. I'm adverse to buying the tools if I'm not going to use them frequently.


pickle forks are for butchers... the hand sledge trick will pop the knuckle off without damaging either the knuckle or the balljoint.

Thanks for the alternative. Pickle forks are cheap but if I'm going to damage a component ... do no harm, I'm trying to repair.


Having said that, I jumped in and attempted the "needle nose" grease gun injection. Didn't achieve the results I was hoping for. In the process,
I have come to the conclusion that for the time being the ball joint should be OK and not require replacement at this moment. The storm on the horizon has fizzled out for now. Although, I will start preparation for replacing the ball joints in the future, something I would not have considered before my inspection and this post.

I have posted a YouTube video of my initial inspection to assist other newbie's that come across this thread in the future. Not trying to show off, I just find that the simple basic videos are lacking on YouTube. I can do the simple basics. If you watch the video and see something of concern, please let me know. See link below;


http://youtu.be/UN17gqmYpqw

Thanks ALL for your input.


No problem. I've got plenty of practice doing balljoints now :gee:

Here's a video of the hammer method:


This shows it used on a tie rod end on another type of car, but it works equally well on balljoints. Same exact method for getting the balljoint out of the inner C where it's pressed in, except you have to tighten the press down between blows.
 
There isn't an icon for it - what you do is use [ youtube] and [ /youtube] tags around the video id string from the url (the part between v= and the next &, if any.)
 
Back
Top