• Welcome to the new NAXJA Forum! If your password does not work, please use "Forgot your password?" link on the log-in page. Please feel free to reach out to [email protected] if we can provide any assistance.

Anyman's build

Looks like all the pics are working now so I'm snagging a few of them. Thanks for that info. I'm cutting mine up in the next week or so and will be following that design. It's pretty slick. So he is a Reno guy? The Sierra chapter is doing a Reno run on Memorial Day weekend. There will be quite a few of us up there that weekend. It would be cool to meet up with him.

The middle seat mod is probably one of the favorite interior mods that I've seen. Turned out way better than I thought it would. Nice work on your rig.
 
Thanks, the middle seat has been a great mod for me. I plan on getting a lot of use out of it this year with some expo type trips.

So, quick update from the end of last year: I've been fighting some vib issues which I tried to resolve with dynamic balancing beads. That seemed to work somewhat, but while in Moab the situation seemed to be worse and any speed above 50 mph produced a violent shimmy from my front end. (I may have tweaked another rim when I lost my bead on that first trail...)

Well, with 3 bent wheels it seemed like it was time for a new set. However I wanted to take precautions against the same issue happening again. I considered bead-locks but didn't want to deal with the hassle of safety inspections with them. I looked at stronger rims but most are cost prohibitive. I tried for used aluminum but in my rim size (15") there were none to be found (my 37" MTRs have about 90% tread left so no sense getting new tires.)

So, as luck would have it, my in-law picked up a new-used set of tires which came with wheels in my bolt pattern (5 on 5.5). So I grabbed those for $100:


With regards to added strength, I opted for rock-rings on the outer lip. A local guy has a CNC plasma table and cut these up for me for great price:


I removed the weights and valve stems - I needed to relocate these:


I welded up the old stem holes:


I wasn't 100% confident that they all would be air-tight, I've had mixed results in the past... So I ended up hauling them to another NAXJA member's house for verification. he ended up re-welding 3 of the 5.

Then I welded up the rings - pretty straight forward, just drop them in and tack them in place, then weld about an inch at a time along each mating surface. I only took this pic though for some reason:


I also wanted to strengthen the inner-lip but a ring wouldn't work inside. Another local NAXJA guy works at a rebar fabrication company and he bent me up some 1/4" rings. Those worked great - I started by clamping them into place:


Then I tacked them around, moving the clamps as I went:


I read online that you should leave them long and overlapping until the end, then cut it down and complete it, which worked well for me:


Then it was connect-the-dots:


(It's not what it looks like - I pulled it back inside the garage to take the pic because the light was getting bad outside. I don't weld next to gas cans!)

Finally, I relocated the valve stem holes to line up with the cutouts on the rings:

 
I tried using weld-through primer on this project because I was sure there would be little spots I wouldn't be able to get paint into after the rings and bar were in place. Some of my welding was rough, and I think it may have been a result of putting that primer on too thick. I guess we'll see if it was worth it in the long-run.

For painting the wheels I went with this stuff:


Of course, I had to do something with the rings...


I opted for my standard accent color. It was getting nice and cold in the garage at night, so I slipped them into the half-bath after my wife went to bed... She likes surprises like that. :D


Funny story... when it came time to re-mount my tires I wanted to ensure I was able to re-claim my balancing beads so I opted to dismount them myself. I was having a tough time with the inner beads and I may have gotten a little anxious at one point:


Yeah, I'm an idiot. While using the rear bumper and my hi-lift jack the jeep fell to the side and off the rear jacks. Luckly no one and nothing was hurt. I tried different methods for breaking the bead - I put a 2x4 on the tire and drove the mini van on it, no luck. In the end I went back to the jack, though I switched to the front bumper (more weight on that end).

I was finally able to break them all and use the shopvac to get the beads out. I took the wheels and tires to a shop and had them mouted (and beads inserted). I love using the mini van for stuff like this, people always look at me a little sideways when I open my trunk and it looks like this:


New shoes and we're looking good!


The shimmy is gone! :party:

I have a spot around 60-63 where I notice some mild vibes. I know my transmission mount is shot, so I plan to replace that soon, we'll see if this resolves that. at 75 mph it's smooth at butter though. :thumbup:
 
Thanks Brandon.

Yeah, you should have seen the look on my wife's face when she bolted into the garage after the XJ fell of the stands ... made me feel like a teenager again!
:anon:
 
Not that you can do anything about it now but there is absolutely nothing in the Utah safety handbook that forbids beadlocks. There is a thread on RME where Kurt from Cruiser Outfitters has challenged anyone to prove otherwise with a bounty. 5+ years and no one has been paid yet.

Very cool build though. Too bad about all the pics being deleted. See if you can have a mod help you fix them.
 
I absolutely agree regarding the Utah Safety handbook and beadlocks... However, in practical application that hasn't helped too much! When the inspector wants to know if they are beadlocks and then tells me he won't pass me on safety if they are, I'm SOL regardless of what the handbook says. I get asked about it everytime I drive up with faux beadlock wheels. Sure, I could argue with him and even show him the handbook, but I still need his stamp and he can say no. (I'm pretty sure the follow-up will be asking me if they are DOT approved or something of the sort.) I mean, good hell, the lift-law specifically states your bottom frame rail cannot be taller than 24" off the ground and mine is just under 20" but I'm constantly being told, "Your lift is too tall, I'm going to let it slide but if you get pulled over just tell them you had other wheels on when it was inspected!" Like he's doing me a favor ... I just play along and act appreciative.

At the end of the day, when I do actually get some beadlocks and deal with the headache, they'll be double-bead style. I've read very mixed reviews about Staunz, but inserts like those or what the military hummer wheels use are appealing. There's a DOT approved version out there, I forget who makes them.

Thanks for the heads-up on the pics, looks like the first page or so are broken. When I have time I'll transfer those to my new holding location and see if the MODs will unlock it and let me update the links.
 
Last edited:
Well, I suppose I'm overdue for an update or two...

So shortly after I installed my rock rings our chapter went for a snow run up Providence Canyon near Logan, Utah. Unfortunately it had snowed much too early in November and then a warm spell melted much of it and then we had cold and a little more snow after. The result was some light fluffy stuff on top of a sheet of ice. Needless to say we didn't make it far up the trail!

Here we are getting started:


IMAG0675 by G2WANIT, on Flickr

And this is about as far as we went, I was one of the only ones with a winch and after I got past this section I was able to use the skinny pedal and get pretty far up the trail but we didn't know how we would get the rest up... If we could have gotten past this we could have made it to the top. I couldn't winch everyone up one-by-one because most of it is a narrow trail and after you get going you need to GO.


IMAG0682_ZOE017 by G2WANIT, on Flickr


IMAG0681_ZOE007 by G2WANIT, on Flickr

So we turned around and parked near a stream and small water fall for lunch.


IMAG0685 by G2WANIT, on Flickr


IMAG0689 by G2WANIT, on Flickr

The wheels were in top form!


IMAG0684 by G2WANIT, on Flickr

There is a trip report on the Intermountain Chapter and XJeeper's pics are MUCH better than mine...

That winter my family moved into a house that needed an overhaul, so work on the XJ has been pretty much non-existent since then, but I have done a couple things here and there.

First, we attended another chapter run where we met up with Dr Moab as he returned from his adventures in Nevada and western Utah with FlexedXJ. That was the only time I met Aaron but he was a cool cat - I was very sad to hear about his passing.

Here are some shots of camp (most of these are someone else's pics, but can't remember who to give credit to...):


IMG_29913185767430
by G2WANIT, on Flickr


IMG_30045396937870
by G2WANIT, on Flickr

Our camp friend


IMG_29886912762702
by G2WANIT, on Flickr

What could be better that wheeling and shooting with friends?


IMG_29880975756751
by G2WANIT, on Flickr

Trip report in the IC area.

We had our annual IC BBQ at DrMoab's place. It's always fun to see everyone and their rigs.


20140920_152013 by G2WANIT, on Flickr

DrMoab had a ramp setup, FloydXJ has a rig that looks JUST like mine... except it's better in every way:


20140920_154445 by G2WANIT, on Flickr

Then DrMoab put us all to shame with his latest build:

20140920_160247 by G2WANIT, on Flickr

At one point I went home to attend a soccer game and brought the minivan back to take some tables home in, I threw that up on the ramp but I can't find a picture of it to save my life - bummer.
 
So fast forward to Fall Fling 2014 and I was headed down to Moab to participate in the activities. The XJ had been overheating on the highway (I've never had a problem on the trail...) so I started replacing some items. started easy with the thermostat and new housing - I opted to drill a hold in my T-stat, still not sure if that does me any good with my 2000 cooling system, I think it's more critical for the Renix era engines...


IMAG1047 by G2WANIT, on Flickr

The housing was in and out a couple times in this process, it's a PITA to get this thing clean every time!


IMAG1049 by G2WANIT, on Flickr

Not to mention the engine, it's still crazy to me how the metal gets eaten away...


IMAG1050 by G2WANIT, on Flickr

The new T-stat and then the added hole did not resolve my issues... neither did the new radiator cap. As you may have noticed in the pic above, I ended up throwing a new water pump at it as well - I've never changed it and had no idea about the prior owner, and with 160k+ on the clock figured it was good insurance either way. The old pump seemed pretty solid though so I'm assuming it had been done previously.

I couldn't loosen the bolts on the pulley with only the tension of the belt, so I found it was pretty easy to break them free using a long flat head screwdriver to keep it steady:


IMAG1051 by G2WANIT, on Flickr

I've been using this stuff lately with my gaskets - it holds them in place while you install your parts. I've had pretty good luck with it so far:


IMAG1048 by G2WANIT, on Flickr

The XJ is still getting hot on the freeway... I think it may be time for a new radiator, and possibly a new catalytic converter... it's the original cat, and I think it may be getting clogged and making the engine work harder than necessary...

Well, no time for that and I needed some easy wins! So I turned my attention to some other issues.

I've been having some air leaks in my OBA system and one of my fittings was popping out under top preassure. I quick fix resolved this for now - I smeared RTV on the threads and let it sit for about 10 min the shoved it into the hose and let it dry overnght before tightening the hose clamp back down:


IMAG0999 by G2WANIT, on Flickr

Another not so quick fix, I've been repeatedly getting play in my trackbar. I've come to the conclusion that my flex joint was just not up to the task. I cut it off and went to a Heim joint - now I'm running heims atboth ends:


IMAG1116 by G2WANIT, on Flickr


IMAG1117 by G2WANIT, on Flickr

This upgraded me from the 10mm bolt to a 5/8 bolt and it is the same joint that is in my steering setup so with two spares I'm covered for the tie rod, drag link and track bar.

My brother in law decided to come to Fall Fling with me so we just towed the Jeep with his truck and I paid gas - was cheaper than driving the XJ! :looney:
 
Fall fling (2014) was a blast. A total blast. Rode some great trails with some great guys and had a lot of fun. It just started a little rough for me...

So on my first trail day there was a group running Pritchett Canyon and they wanted me to jump in with them. That sounded good to me and things started out great!

Pritchett starts out like this:


IMAG1163 by G2WANIT, on Flickr

And quickly turns to this:


IMAG1165 by G2WANIT, on Flickr

and this:


IMG_3922 by G2WANIT, on Flickr

and some of this:


IMG_3924 by G2WANIT, on Flickr

Then this:


IMG_6483 by G2WANIT, on Flickr

and a WHOLE LOT of this:


IMG_3927 by G2WANIT, on Flickr

I hate off-camber stuf... And then someone looses a spring (no limiting straps):


IMAG1166 by G2WANIT, on Flickr

No big deal, just a minor delay. Then we get here:


IMAG1171 by G2WANIT, on Flickr

Good ol' Rocker Knocker. I don't even like that obstacle. So it's my turn and things don't go so well... I'm already looking a bit tipsy:


Flop-01 by G2WANIT, on Flickr

But it gets worse:


Flop-02 by G2WANIT, on Flickr

AND WORSE!!


Flop-03 by G2WANIT, on Flickr

The worse part is waiting patiently on your side while they strap you up and flip you back on your tires... then the cleanup and clear the oil out of the pistons:


Flop-04 by G2WANIT, on Flickr

So you can get right back to it! (This time with a strap... just in case - can't find that pic...)

Anyway, such is life. I'm not that broken up about it, I mean sure I'd rather it didn't happen, but if you're going to wheel in places like Pritchett, you have to be okay with the possibility of ending up on your side!

Some pics of the final aftermath:


IMAG1179 by G2WANIT, on Flickr


IMAG1180 by G2WANIT, on Flickr
 
But there's no time for BS-ing about it, we had a lot of trail left! Time to carry on:


IMG_3941 by G2WANIT, on Flickr

We finally pulled out of Pritchett and I snagged the obligatory "You made it!" shot:


IMAG1182 by G2WANIT, on Flickr

Funny thing is you're still a LONG WAY from a real road! So we chose to run Behind the Rocks backwards to get out... it takes about the same amount of time as taking the long dirt road - but it's more fun!


IMG_3948 by G2WANIT, on Flickr

The next day we ran Moab Rim with a group - this is a pretty quick trail but always fun - it has become one of my must do's in Moab, as much for the scenery as anything. Coming back down the scenery is the best:


IMAG1189 by G2WANIT, on Flickr

Personally I think the parts where you are skirting the drop-off next to the highway and river can be a little nerve-wracking if you think about it too much.


IMAG1191 by G2WANIT, on Flickr

Anyway, no major drama on that one and later that night we had our dinner and raffle, we had a decent turnout.


IMAG1199 by G2WANIT, on Flickr


IMAG1196 by G2WANIT, on Flickr

On my last day my alternator started squealing on me and I was tempted to call it a trip but a couple guys wanted to run Rusty Nail and they wanted a third Jeep to be safe. I had never ran that trail before, and I wanted to help out, so we stopped by a parts store and I bought a couple different types of spray lubricant and I was able to lube the bearing enough that it was nice and quiet. Well, worse case scenario, we have to come off the trail to buy me a new alternator, right? Anyway, that was a great trail, very technical.


IMG_3966 by G2WANIT, on Flickr


IMG_3965 by G2WANIT, on Flickr

One of the great things about this trail is it dumps you out right by Golden Spike, so we ran and played on that a bit.


IMAG1204 by G2WANIT, on Flickr


IMG_3970 by G2WANIT, on Flickr

We had lunch on a ledge overlooking the highway ... I love and hate heights.


IMG_3972 by G2WANIT, on Flickr

The lube on the alternator bearing actually lasted, I was pretty surprised! I didn't even have to re-apply any.
 
So, after I got home I parked my Heep in the garage and it pretty much sat there for the next 12 months while I finished a kitchen remodel and put in a hardwood floor...

Coming up next month I'm committed to taking a rock crawling club from work down to Moab so it's time to get back to some Jeep projects!

Last year when I was coming home from the shooting overnighter I was having two problems: the Jeep was getting pretty hot on me and about 10 miles from home my speedo stopped working (which of course turned on my CEL).

The next month I had to do my inspection so I pulled my speedo gear and this is what I found:


IMAG1057 by G2WANIT, on Flickr


IMAG1058 by G2WANIT, on Flickr

Apparently this is what happens when you install your speedometer pinion gear in the wrong position! I bought a new one but that was when I realized that the internal gear is also ... plastic. Why on earth?!

At the time I just finagled it so that it lightly touched the shredded gear, just enough to register my speed, clear my CEL long enough to get my car registered. This year I figured it's time to fix it so I called Advanced Adapters and ordered a new gear, yoke nut and rubber washer.

Looks like I totally neglected to get pics of the disassembled housing, but here is what I'm working with after I removed the rear drive shaft:


20151010_130921 by G2WANIT, on Flickr

Here is the old drive line gear and the new gear:


20151010_132824 by G2WANIT, on Flickr

Looks like I probably could have tried flipping that gear around and used back half... but it was less than $10 so better safe than sorry I suppose.

Aright, I've also started to address the body damage. Of course I want it "Good as new" or ... like it was anyway. But I don't have time right now to replace that rear quarter panel. So I picked up a used rear hatch that was the same color and straightened out the body just enough to fit some glass it which I pulled from the salvage yard:


20150925_125631 by G2WANIT, on Flickr


20150925_170359 by G2WANIT, on Flickr

The day I put her on it's side I drove back into camp and within 5 min DrMoab came walking over with a replacement taillight - what a guy! I installed that right after I took this pic.

I couldn't find a door that was the same color, so I picked up a clean one in maroon and decided to paint match it myself. I started out with some sand paper that was a tad too aggressive so ended up taking it down to the primer and metal. I was just thinking I would scuff it and paint over... which is what I did in the jam area:


20151010_084006 by G2WANIT, on Flickr


20151010_085826 by G2WANIT, on Flickr

Primered:


20151010_173210 by G2WANIT, on Flickr

Painted:


20151011_142537 by G2WANIT, on Flickr

It looks black in the picture, but it's not. It's "Patriot Blue" - you can actually get the factory Chrysler paint at O'Reilly's Auto Parts:


20151011_142634 by G2WANIT, on Flickr

The guy at the store said one of these cans would be MORE than enough for a door... I bought two cans and I should have made it three. Now I need to go get another can and grab some clear coat while I'm at it to finish the job up.

Once I have the door painted I'll reinstall everything and slap it back on and I should be ready for inspection.
 
Last edited:
Thank you, the setup works pretty well for me - I'm sure it does for you too!

So I'm having trouble hanging this new used door and getting it to line up right with the striker and door jam... I can't see that the body is tweaked and the door is straight. My old door was working perfectly and really didn't take a hard hit. I'm missing something...

Is there a trick to aligning these doors? I've been searching for a guide or something but have come up empty so far.
 
Not to familiar with the newer style doors (97+ ) but I don't believe there to be any shims so maybe the body is a bit twisted?
 
Yes, there are shims, sorry, I'm a little behind on my posts, but the shims look like this:


20151017_091353 by G2WANIT, on Flickr

With this new door aligning so poorly I ended up putting both of my old shims on the bottom hinge and that worked pretty well.

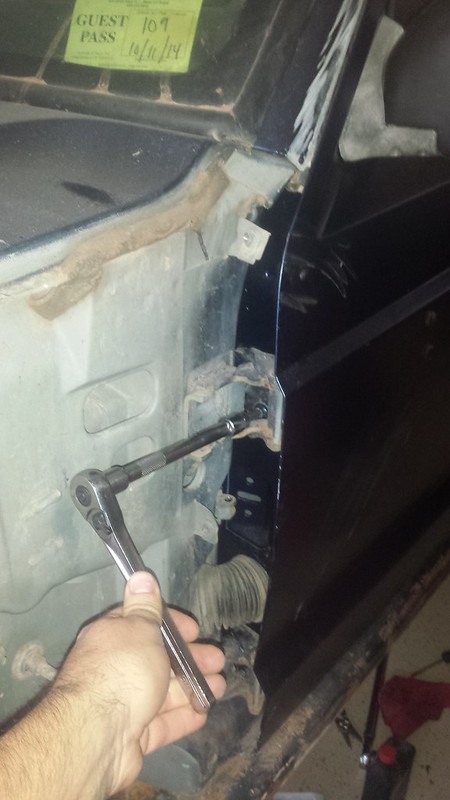
I also figured out if you remove the front fender you can access a window in the hinge so that you can keep the screws loose while you shut the door and then tighten them with it shut:


20151017_091121 by G2WANIT, on Flickr


20151017_091051 by G2WANIT, on Flickr

Doing this made adjusting the door a breeze and I was able to get it pretty close very quickly, the top looks good but the bottom is still slightly off:


20151017_091927 by G2WANIT, on Flickr


20151017_091913 by G2WANIT, on Flickr

The only downside is taking off the front clip to get the fender off... I didn't want to move my winch so I finagled it...


20151017_094514 by G2WANIT, on Flickr
 
Back
Top