• Welcome to the new NAXJA Forum! If your password does not work, please use "Forgot your password?" link on the log-in page. Please feel free to reach out to [email protected] if we can provide any assistance.

5.3L Vortec V8 Conversion

Remove the snap-ring that retains the input shaft. Carefull! The input shaft and low range gear will fallout as soon as the snap-ring is removed.
IMG_3947.jpg


Remove the large lock-ring in the low range housing in order to remove the input shaft.
IMG_3949.jpg


At this point I had to use the pin and planetary gear as a makeshift jig so I could reinstall the two rows of needle bearings in the planetary. The two rows are seperated by a small washer.
IMG_3950.jpg


After installing the planetary gears into the low range housing, use a cold chisel to stake the pins in place. Now you've got your own homebrew booty fab 6 planetary low range gear!
http://i55.photobucket.com/albums/g138/FrankZ_2006/Vortec/IMG_3951.jpg[img][/FONT][/COLOR]


[COLOR=black][FONT=Verdana]Comparison pic of the OEM Chevy 32 spline main shaft and the JB Conversions short main shaft.[/FONT][/COLOR]
[COLOR=black][FONT=Verdana][IMG]http://i55.photobucket.com/albums/g138/FrankZ_2006/Vortec/IMG_3953.jpg


Remove the snap ring that retains the drive sprocket and the mode hub. Slip them off the the old shaft and onto the new short shaft.
IMG_3954.jpg


Reinstall the input shaft into the lowrange, and then install those into the forward case half followed by the snap ring.
IMG_3955.jpg


Re-install the mode fork, range fork, and the rail, followed by the front output shaft, chain and main shaft.
IMG_3957.jpg


IMG_3958.jpg


IMG_3961.jpg


Re-install the magnet.
IMG_3960.jpg


Don't forget that the oil pump goes on the outside of the rear half.
IMG_3961.jpg


Hopefully you've been using a brass wire wheel in a drill to clean all of the mating surfaces. DO NOT USE STEEL WIRE WHEEL!!
Once your surfaces are clean it's time to add a little gasket maker. I strongly recommend.....
IMG_3963.jpg


Re-assemble the two case halves.
 
Install a snap-ring once the oilpump is in the proper position.
IMG_3964.jpg


Now install the reluctor ring and the second snap-ring.

IMG_3965.jpg


The JB kit comes with a new sealed bearing the replaces the OEM bearing in the outputshaft housing. Drive the old bearing out from the inside toward the outside.
IMG_3966.jpg


The new bearing is easy to install but it must be installed with the protruding inner race towards the inside of the case.
IMG_3967.jpg


IMG_3968.jpg


IMG_3969.jpg


The new bearing will protrude from the tailcone after it's driven all the way in.
IMG_3970.jpg


Apply a liberal coat of grease to the new seal and then install the new seal housing onto the tail cone.
IMG_3970.jpg


Install the new rubber gasket on the mainshaft, followed by yhr new yoke.
IMG_3972.jpg


Finally, I re-installed my clocking ring onto the case and then re-installed the case in my heep.
IMG_3973.jpg


IMG_3974.jpg


After trading a few PM's with JohnD regarding his shifter/cable I opted to use a longer cable from a '01 Blazer. $10 at the JY. The cable is routed thru the firewall and makes a 180Deg turn near the bellcrank for the t-case. Once my shifter knob gets here I'll be able to bolt down the shifter. I'll post pics when thats done.

Finally got the exhaust pieced together.....it looks like ass, but I think it'll work.

Installed a front driveshaft from a V8 WJ onto the rear axle/t-case. Not sure if it's gonna work out though. It seems a bit short. I'll peel the rubber boot back tomorrow and have a closer look at the amount of exposed splines.

Found out my $25 dollar Engine Shield won't work on an 03 motor. Too bad, cuz it looked sweet proped up on the motor.
 
Got the headers on Thursday evening. They are made by Sanderson Headers. I've looked on the Sanderson website and cannot find an exact match.

IMG_3890.jpg


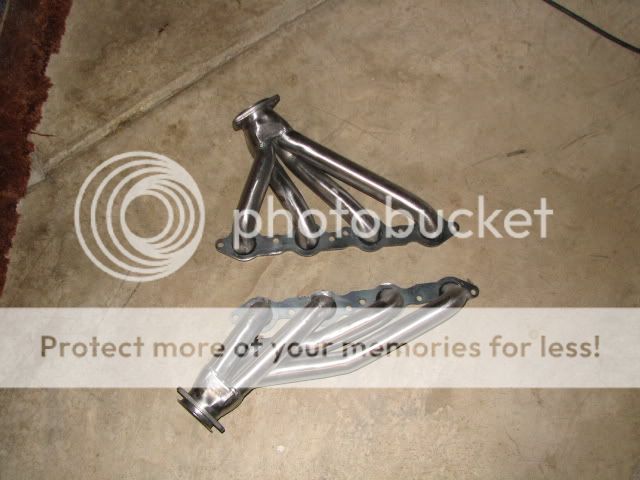
I'll be painting them in a day or two and then I'll get 'em bolted in so I can start fabbing up the rest of the exhaust.

Yes I'm going to run all 4 O2 sensors for proper fuel management in the closed loop mode.

I was just digging around on pirate and found this link: http://www.sandersonheaders.com/pro...d=191&osCsid=7a62562191aedf56fa121a09844c66b9

$285 uncoated. They are for an S10 conversion CSLS1.
CSLS1.jpg


Edit: never mind, they do look a bit different. Quite close though. Perhaps they would work? Jeff
 
Last edited:
If you didn't notice, I did add a comment below the picture stating that I had in fact noticed that they were a bit different. They still look pretty close though. Have you actually tried a set of these on your installation? I wonder what the issue would be? Perhaps the passengers side outlet angles out more than the Novak sourced ones? BTW, do you have pictures you would share detailing the install of the Novak ones? I would like to see how they dump and how the rest of the exhaust is able to be routed. As I think you are aware, I opted to use a modified set of early vette LS1 exhaust manifolds on mine. They hug the block very tightly, turn down and all come together in a row. I'm then running the drivers side in front of the oil pan (swapped to a Caddilac CSV oil pan) and around to meet with the passengers side. I'm trying to use 2.5" pipe until they join and then either 3" or stick with 2.5" out the back. I'm VERY slow on this project though so I'm sure yours will be up and running way before mine. Jeff

Speedway Motors LS1 block huggers almost fit:

P1010384-1.jpg


P1010383-1.jpg


My modified Vette units fit quite well:

P1010457.jpg


Drivers side with start of crossover:

P1010003.jpg


Ok, enough of my pics. For anyone wanting to see my long drawn out project, it is in the Advanced Fab section. http://www.naxja.org/forum/showthread.php?t=945920
 
A little more progress.
Got some more of the wiring cleaned up and the power stering lines connected. The module and harness for the DBW is also permanently mounted now as well.
090.jpg


091.jpg


092.jpg


094.jpg

Dual electric fans are installed and the radiator is back in place. I'll be picking the mating connector for the passenger side fan this week and fnishing the wiring for it.
095.jpg

Exhaust is done, extra booger welds enhance under vehicle turbulance......:D
096.jpg
 
Back
Top