• Welcome to the new NAXJA Forum! If your password does not work, please use "Forgot your password?" link on the log-in page. Please feel free to reach out to [email protected] if we can provide any assistance.

beater!

Got some extra coins so did some work to get the beater a little smoother and quieter. First was to replace the rear u-joints and reinstall the YJ slip yoke. I was afraid it would be too long with the 8.25 driveshaft (on my D35 yoke) but it sets up fine and the ride is much much smoother. There is still a hair bit of vibes when I reverse quickly, which is due to the pinion turning down I suppose. Not much to worry about (I don't do much racing in reverse) and not much that can be done about it so whatever.

Rear_U_Joint_New.jpg


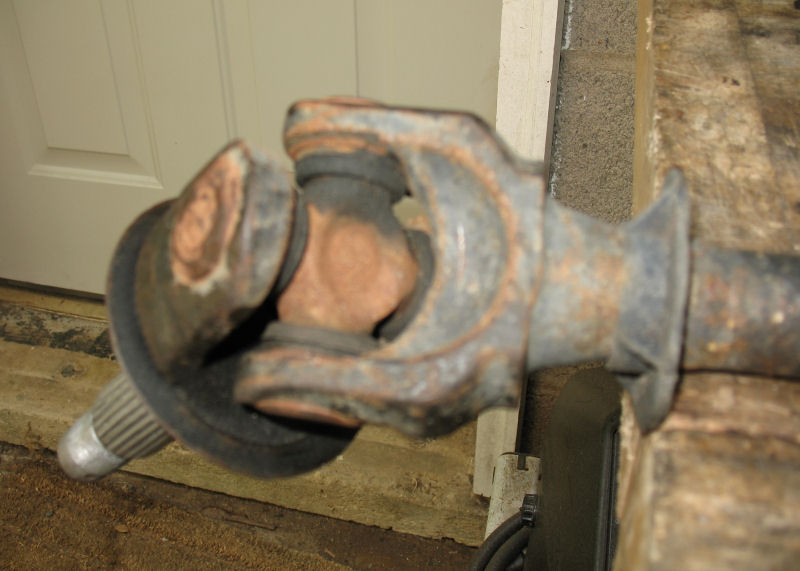
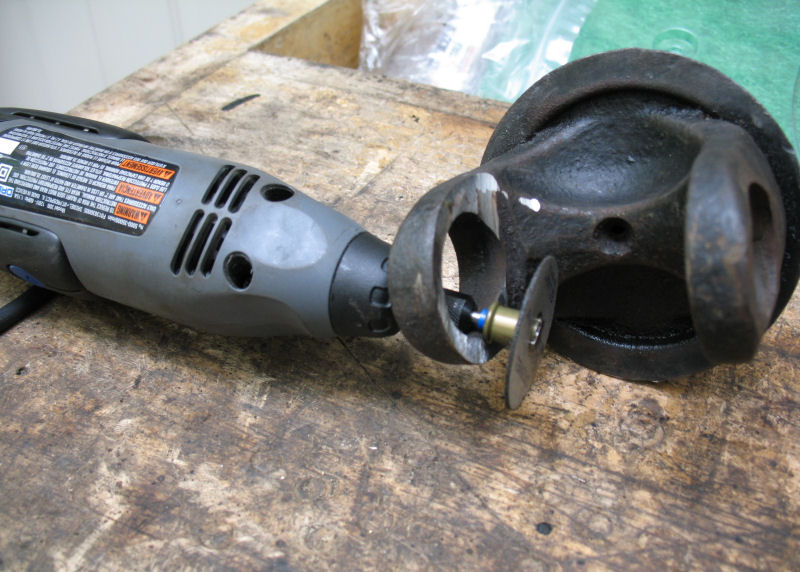
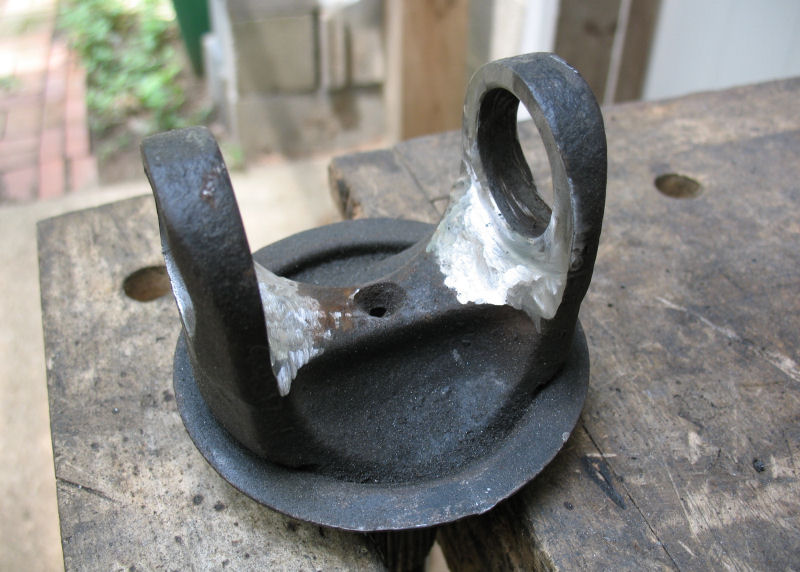
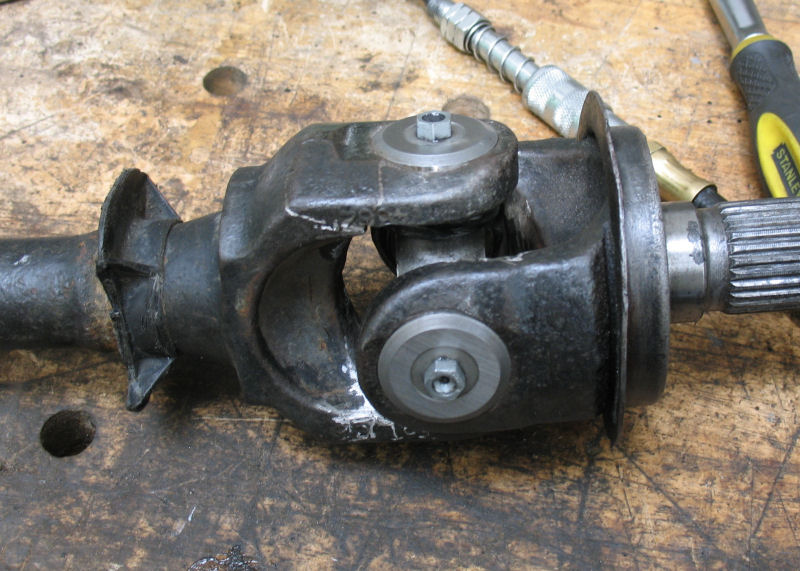
After that I replaced the u-joints and centering ball on the front driveshaft too. I thought they were probably originals but after I got the parts cleaned up I found junkyard paint marker on it, so I guess it's something else that my brother broke. The front parts were pretty nasty and one of the joints had a broken spacer ring in the cap, but it all cleaned up well. The new centering ball is greasable too, which is another plus. I need to find low-profile needle fittings to use instead of the zerks that came with the u-joints but for now it's installed and working, and the jeep got smoother and quieter again.

Front_CV_Joint_New.jpg


Also got two new tires for the front to replace the cupped and cracking BFG ATs. I had planned to run the used ones until I got the axles swapped but the economy isn't improving quickly enough for that so I had to do something. I looked for two more Dunlop Radial Rover RVs to match the ones in the rear that are still good, but the RV is discontinued and the replacement models don't have the same tread pattern. Looking around I found the Goodyear Wranger GS-A was almost identical (Goodyear maybe owns Dunlop?) but it was also discontinued. I was going to punt and get a couple of Grabber AT2 (I loved the Grabber AW set I had before) but found these Delta Sierradial AT locally which is a Cooper knock-off like the Definity tires that Pep Boys sells. The tires are soft and feel good on the road so far, and $300 even for the pair of them installed so that's a pretty good deal if they don't explode on the highway. Anyway ride is smoother and quieter once more so it's an improvement.

Delta_Sierradial_AT.sized.jpg


I still need to replace the axle u-joints with greasable ones since I still hear some whistling going down the road, but otherwise I am about done with the suspension work until I can replace the axles entirely. Assuming the ball joints don't blow out anyways
 
More problems with the electric fan setup. When I'd left off on that, I had a variable temperature switch with a probe that was inside the upper radiator hose. This gave me really good control over the temperature, and I was able to lock it in to exactly where I wanted it to come on and go off, so from that perspective it worked great.

However there are also a few problems with the setup. Most significantly, the probe wire makes it really hard to get a solid seal on the radiator hose at the neck. The stock constant tension clamp would drip and steam, so I replaced it with a worm clamp and it did the same thing. Then I doubled the clamps and that worked but eventually one of them would come loose and I'd find a puddle of coolant under the front-end. I also had problems with the dial on the "controller" moving itself due to engine vibration, and so I periodically had to move the dial back where I wanted it, but this was minor compared to the potentially fatal leaking.

Now that I know the overall setup works, I am trying to find a simple on-off switch that can be used instead of the adjustable controller. My intention is to try and use the block drain plug for this since it's tapped for 3/8 NPT already, but I may eventually move to using one of the heater hose adapters if I can't get this working reliably.

The first candidate is the Painless 30110 fan switch, which is listed at 200 on/180 off. It's 3/8 NPT and includes a 1/2 NPT adapter that I don't need. Summit got it here for slightly less than $50 after shipping. Here's a pic of the thing installed--the hardest part about this is routing the wires so that they don't get to close to the exhaust headers.

Painless_30110_Drain_Plug.sized.jpg


Test drive shows that it first comes on at the right point (about 215 on the gauge), but then stays on forever after that. My guess is that the block changes temperature very slowly, which keeps the coolant temperature very stable down there, even though the coolant is coming from the cold side of the radiator. So I will probably need to move a switch to the heater hose to get a more responsive reading, unfortunately the temperature on this switch is going to be low for that and the fan will probably still stay on.

Supposedly the 81-82 Corvette fan switch is 215 on/195 off but it is discontinued (BTW, Standard owns everybody that makes switches). I may grab one of those in the discount bin for $10 just to try it. I don't think I'm going to be happy until I buy a SPAL controller and convert the whole system to that.
 
I put a "T" in my upper radiator hose to put in a temp gauge. I used brass fittings (used them as barb fittings and just pushed the rad hose onto the fittings and clamped them in place) and set the "T" up so the sensor is in the flowing stream. It looks a little hokey, but it doesn't leak and I get VERY accurate readings with this setup.
 
I looked through the plumbing aisle at Lowes for a good half-hour but couldn't find the parts to make a tee fitting. The upper hose is 1.25" ID and they only had hardware for up to 1". They had parts that would fit the .75" heater hose but they didn't have a 3/8 NPT adapter that would mate with any of it. I was going to head to another store but quick math showed that even if I found all of the parts I would be looking at ~$30 and at that point I am should just buy the Hesco heater hose adapter. I bought one of the Corvette switches, so if that doesn't work in the block I'll buy the Hesco and move it to the heater hose.
 
Personally I would make the tee myself from copper water pipe - buy an NPT fitting of the appropriate size for the sensor, measure the outside diameter of the water pipe that'll fit into the hose you want to put the sensor in, then use a hole saw of the same size to cut the fitting to match and solder/braze it on.

Either that or use it as an excuse to pick up a lathe on CL and some taps at a local discount used tool shop.

EDIT: I'm having a real hard time reading this thread as the images load slowly and the page keeps jumping around as they load... seems like your personal web server performs about like mine does, I've given up on hosting images on it.
 
EDIT: I'm having a real hard time reading this thread as the images load slowly and the page keeps jumping around as they load... seems like your personal web server performs about like mine does, I've given up on hosting images on it.

once you load the text hit the stop button in the browser it will stop jumping around.
 
I got the Corvette switch from rockauto. Plugged it up and took it for a test drive... came on once, went off a couple of seconds later, and hasn't come on again since. Ahhh maybe the block is causing problems or wiring is perilously close to the exhaust so I broke down and moved the mount to the radiator hose.

I ended up buying a 4" piece of 1" brass pipe that is 1.25" OD, and then giving the local mechanic a couple of bucks to drill and tap for 3/8 NPT, total cost was about $25 and the pipe was half of that. Wiring is simplified, since everything is all right there (you can see the relay on the fender wall). I will pickup a couple of constant tension hose clamps at the junkyard next visit.

Corvette_Switch_Upper_Hose.jpg


Tried the Corvette switch but it didn't come on here either. The switch is either broken or lazy. I can't find specs on the thing (Standard removes database entries when parts are disco), so I'm tossing it rather than trying another. I grabbed the Painless switch and it comes on about 205 and stays on, as expected. I have looked at almost every fan switch out there and the only candidate left is a 1-wire switch from the 1986 Buick Regal T-Type (the GNX) which comes on around 210 but 1-wire makes it hard. It looks like all the good switches are metric nowadays so I may get a set of taps and go with one of the 3-wire switches--1994 BMW 325i dual switch (NAPA), #1 on at 195 and #2 on at 205 would be perfect to wire up a secondary low-speed circuit on this fan.
 
Last edited:
Just a reference note here for future readers, I was flipping through the Four Seasons catalog (another subsidiary of Standard) and noticed that they listed a two different single-wire switches for the 81 'vette: 35946 is a 5/16 thread switch that comes on at 212, while 35930 is a 9/16 thread switch that comes on at 230. Of course I have the two-pin mystery switch that is unknown temperature but I'm guessing it's for 230. For other people who are looking though the one-wire 212 switch would probably work well, although you would have to drill and tap something that was grounded (it's not NPT thread).
 
it's easy to find the temp rating on a thermostatic switch. attach the 2 leads from a volt meter and set it to read resistance. put a meat or oven thermometer in the water and hang the thermobulb in the water as it nears the boiling point. when the switch "opens" the reading on the meter will change and just make a note of the temp on the thermometer when it happens. and it's a clean enough operation you can usually do it in the kitchen without the old lady bitchin at you about it.
 
Yeah I've been thinking about that but then again it's one of those things easier said than done--you pretty much need 3 hands to keep the sensor leads from shorting in the water or to keep the wires from shorting against the pot. Also if this is a 230 switch then it'll be higher than the boiling point of water, which may be a problem. Maybe I'll rig up a coathanger and see what happens.

In the meantime I've looked at other switch options and decided to get the two-pin switch for the 85ish to 95ish BMWs. Most of these use the 3-pin switch I mentioned earlier but there is apparently a 2-pin on/off version that is supposed to come on at 203F (95C) and go off at 194F (90C). Four Seasons part number is 36511, the one I bought from NAPA was ATM part number 1435033. It's a basic 2-pin switch like the others except it is 14mm thread instead of 3/8 NPT.

I had a 3/8 to 1/4 NPT converter laying around so rather than buy another pipe I just drilled out the adapter to 1/2 inch and then used a M14x1.5 bolt to cut a thread in the adapter, then put the adapter into the existing hole in the tube. I also had to get a $2 tube of high-pressure/high-temperature pipe sealant from Lowes, since the thread on the pipe is getting worn from all my swapping switches.

BMW_Switch_Upper_Hose.jpg


It seems to work a little bit higher than the stated temps but it works great where it is--the switch comes on right when the gauge needle goes to the top of the 210 hash mark and then goes off again when the gauge drops below the hash mark, so basically it comes on after a couple of minutes at a red light then goes off as soon as I start moving again, or after the fan has wicked enough heat off the hose and pipe. Basically that's perfect. I still want to do the 3-pin switch or the SPAL controller but both of those will require some wiring work and I want to get my relay/fuse box done first, as of now I'm very pleased with the way this is working.
 
Last edited:
just make a couple jumper lines that will plug to the spade connectoers on the switch and make them long enough to keep the meter away from the heat source and attach them to the probes. then suspend the switch by a string from a stick or coat hanger that goes across the top of the pan. the temp of the switch doesnt matter, just keep boiling the water and it will keep geting hotter if you keep adding heat.
then stand back and have a beer.... you'll actually have one hand free :)
 
A couple more issues came up. I had some leaking around the adapter bung and when I pulled it out noticed that some of it stayed in the tube--cutting the threads on the inside of the bung stressed out the brass to the point that the bung was splitting at the thread lines. Also had some minor leaking on the ends of the tube where the hose was clamped onto the pipe threads--pressurized coolant was riding the pipe threads under the hose and lifting the hose against the clamp enough for some drips to get out, not much but clearly a loss of pressure. Fixed both problems by getting a slightly longer piece of brass pipe, chopping off the threaded ends so that the hose clamps were against solid metal, and then drilling and tapping for M14x1.50 into the pipe directly so that I did not need an adapter bung. Seems to be holding well
 
A couple of years ago I put some Class-III receivers on the front of my jeep for use as recovery points and also with the intention of eventually getting a tow bar so that I could flat-tow the jeep if I ever needed to. Today I was helping the 90-yr-old widower next door with his car and noticed a tow bar in the corner of the garage. He said that he and his wife used to flat-tow his Bronco II, and he wasn't doing anymore of that so I could have it as thanks for helping him out.

Reese_Tow_Bar.jpg
I got a hair to figure out what was needed to make this work so started some measurements, $40 and a few hours later and the damn thing is installed.

The tricky part was figuring out how the knuckles would have to work. Since I don't know the height of the vehicle(s) that may end up dragging my ass home, and there is no federal standard for hitch height, I needed to be able to go up and down a fair bit. Another factor there is that the bars needed to spread out a bit as well, which meant the knuckles also needed lateral play. The knuckles that were on the hitch already provided lateral movement on their own by the way they were bolted to the arms, but I needed to provide vertical movement when interfacing the knuckle to the receiver inserts.

The easiest way to do that was to notch the end of some square tube so that the knuckles could rotate up and down as needed, while still having a firm connection. With that in mind I bought some square tube and knocked up a couple of pieces. After I got the layout finalized I had the shop cut and drill so everything was square, and also had them weld some washers on the flaps to provide additional strength against bending.

Flat_Tow_Adapter.jpg


In order to do this however, the knuckles also had to be thinned down a bit so that they would fit inside the square tube "ears". As it was, the knuckle itself was already narrow enough, and I only needed to knock down the tube insert to be flush with the knuckle.

Reese_Tow_Bar_Brackets.jpg


And there ya go.

Reese_Tow_Bar_Installed.jpg


If I cut the ears back a little further I can probably get the tow bar to lay flat against the bumper, so I could just drive around with the thing installed and use it like a stinger :)rof:).

I have to get the wiring done before I can test it on the road, and that's probably going to take a while
 
Last week I greased up the caliper bolts and sliders and inspected the axle u-joints. The passenger side u-joint was clearly shot. As you can see below, they are all dry, while the black stain is what's left of a needle bearing that got pulverized somehow. These are the 5-760x that I installed new in Dec 2007, so that is 30 months of use with non-greasable u-joints (sorry for the fuzzy pic).

D30_5_760x_30_Months.jpg


I really need to have greasable joints if I'm going to be doing snow and mud so I decided to buy the Alloy X-Joints. They are solid center like the 5-760x but have zerk fittings on the caps to grease the local bearings. I think Begster runs these on his trail jeep.

I also decided to clearance for full-circle clips since the Alloys include them in the kit. It looks like the best tool for this is an ~8" bench grinder but I don't have one of those so I had to figure something else. The only thing that worked in the end was running the Dremel through the ears, and clearancing from behind. Slow going to do 4 ears, I probably used half a pack of the reinforced cutoff wheels, but the job got done

D30_Full_Clip_Dremel.jpg


D30_Full_Clip_Clearance.jpg


Here's a pic of the X-Joints installed. Smooth and quiet on the passenger side now.

D30_X_Joints_Installed.jpg


I have another joint for the drivers side, and will swap it out in a few days when weather clears up a bit.
 
Last edited:
Drivers side looked bad but was very smooth. One of the caps was getting rusty but had not died yet.

It's nice to be able to corner and park without grunk-grunk-grunk on tight turns. The constant whistling at speed is gone. OTOH I now hear all the noises that the constant whistling was masking. The pinion bearing on my D30 isn't very happy at all.
 
Inner or outer pinion bearing? At least the outer is easier, from what I've heard.

Me, I can't wait till my new unit bearings for my '91 come in the mail... sick and tired of hearing (and feeling, at 85mph! :gag:) them grind as I drive.
 
Inner or outer pinion bearing? At least the outer is easier, from what I've heard.

Me, I can't wait till my new unit bearings for my '91 come in the mail... sick and tired of hearing (and feeling, at 85mph! :gag:) them grind as I drive.

Ken, where did you order those bearings from? I don't have an SYE on my 98 and i've always had some nasty grinding at highway speeds when i am coasting. 4" of lift i probably need one but i feel if i change my bearings it might hep
 
Steve - rockauto. I paid $80something each after 5% discount.

Eric - agreed, at least if it has 3.55s or 3.07s in it. If you shake the pinion yoke, does it have any side to side or rotational play in it? That would tend to indicate blown pinion bearings, from what Ross (foxwar71) told me the outer one you can just swap and retorque the pinion nut for proper preload while the inner one may require pinion depth shim reset.
 
Did some simple work that has been bugging me forever. First up was relocating the horns. They stopped working so I figured do this while I fix whatever problems... one horn had a connector full of mud and was preventing solid electrical, the other horn just don't work and has a rattle inside. For relocation I folded the bracket in half and drilled hole in the side of the inner fender so the horn could be moved up behind the headlight. Seems like a good spot, although it may need to be moved higher when I go to bigger tires and move the axle forward

Horn_Relocation.sized.jpg


Next item was to replace the crossmember studs with bolts. I had been dreading this, since one of the bolts broke during the engine swap, but it turned out to be pretty simple. For one of the studs, I started taking off the nut and it caught on a rusty thread, and that was enough to drag the stud out. For the other, I had to resort to jamb nuts and welding, but the stud eventually complied with no hassles. All of the hardware was replaced with M10 body bolts that I had laying around from something; even though they are not class 10.9 I like the large captive washers, and I don't know if I will bother replacing them. I still have to fix the old broken bolt--I was going to drill and tap the old bolt, but the shop owner fished a smaller bolt through my starter hole while I was running an errand and I'm afraid of removing it. At this point I think I'm going to just leave it until I can cut a flap in the frame rail and replace the weld nut. Here's a pic of the new bolt (front) and the old repair bolt and nut.

Crossmember_Hardware.sized.jpg


Last thing was to replace the trackbar bracket hardware with new nuts and bolts. I have been having to periodically tighten the original hardware, and some of the threads on the originals were flattened from rubbing on the bracket, so I figured I would replace all of the old stuff with new parts and see if that helped anything. I found some class 10 flange nuts at True Value, and some class 10.9 bolts in my baggie, and larded them up the red loctite. I still have some popping noises that I need to locate, but I'm pretty sure the bracket isn't moving around.
 
Back
Top