stewie
NAXJA Forum User
I have seen a lot of posts saying that it was easy to make tube doors to fit our XJs using Chevy S-10 Blazer tire carriers. I searched through no less than 15 pages of results and all I was able to find useful on the topic was: http://www.pirate4x4.com/forum/showt...=572710&page=4 post #91. Since I was unable to locate a write up (or just missed it) I figured I would write one.
I started out by getting two tire carrier assemblies off of early 90s Chewy S-10 Blazers- well one off a Blazer and one off of a GMC Jimmy both from different U Pull It type yards. I got the first one for $7.99 and the second one ran me 24 bucks. Not bad considering the current price of buying tube doors. Sorry, I dont have a pic of the unmodified tire carrier, but there is one on the post listed above.
I did the passenger side first. I started out by removing the three bolts that hold the latch to the carrier. Then I removed the handle assembly- just remove the retaining clip and slide the pin out. the latch and handle assemblies include the latch, a rod that goes from latch to handle, handle, spring in handle, handle pivot pin, and the pin retaining clip. I saved these parts to re use later.
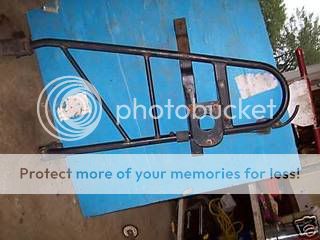
Then with a Sawzall I removed all the bracketry from the tube. This is what I had after I removed all the bracketry and cleaned everything up with a grinder. Use care when removing the tab that the handle attaches to I you want to reuse it. Its welded to the inside radius of the bend in the tube, so after cutting it off I used a grinder to get it mostly clean then I used a Dremel tool with a grinding drum to clean it up the rest of the way.

From there I cut the stock hinges off so that I could maneuver the tube into the area that the jeeps hinges are. I toyed around with placement and found that I thought It looked the best with the upper tube following the body line and the bend in the tube to extend just past the latch stud.

In the above picture I had to cut down the tube ends some more to get it to fit and I also have the latch piece mocked up as well. When you have the rear of door height where you want it, mark the latch and tube. I used a + sign with the - following the edge of the latch and the I extending on both the latch and the tube. This was done on the top and bottom of the latch and tube to enable me to get the latch back in the exact same place as mocked up.
Tack weld the latch piece in place and recheck for proper fitment.
Next up is the hinge. I looked at the above link and seen that the poster had used a piece of angle iron for the vertical support for the hinge. His was with the angle iron pointed with the opening toward the rear of the door. I used the same idea, but I put the opening of the angle iron forward. One of the edges of it is welded to the tube ends and the other side of it faces out, covering the vehicle side of the hinge. This provides some (limited) protection for the hinge on the trail, looks better aesthetically to me, and also serves as a stop when the door is opened. The angle iron contacts the vehicle side stopping the door at approximately 90*.
I used a piece of angle iron (1-1/2"x 1-1/2"x 4') to make both hinges. Each piece of angle was cut to 15-1/4" which leaves just a small lip on the ends of each tube. From there, I placed the angle iron in place along with the tube that has the latch tack welded on. I set the angle iron to the elevation I wanted it with the top of the angle 1/8" above the tube. I marked the top of the top vehicle hinge and the bottom of the bottom. I will use those marks for positioning the new hinge. The elevation of the door will effect the placement of the hinge pieces on the angle iron. The hinge itself I made out of a scrap of steel I had laying around. I cut it to 13/16" square and made a hole in the very center for a bolt to go through. I found it easier to drill before I cut the piece off. I also had the bolts laying around so I used what I had. Here you can see the hinge assembly. I had to shave the corners of on two corners diagonal from each other. The first was to clear the bend in the angle iron, the second was to avoid interference with corner of the vehicle side of the hinge.

And positioned on the XJ in a manner that it will upon final assembly.

The hinge in the opened position.

I did later find some round steel stock at Home Depot. In hindsight it may be better to go that route, although the way I did it I can put a nut on the bottom threads and further secure the tube door to the XJ.
When assembling the hinge, TACK WELD everything in place. If adjustments are needed its far easier to break a tack weld than it is to have to cut a full weld off. I made a total of 3 tack welds on each the upper and lower hinge- two on the top outside corner and the third on the center underside. When welding it up weld only the top section to keep the bead from interfering with the hinge movement.
Now that we have the hinge set up, we can now focus on getting the tube the correct length. With the hinge in place and the latch tacked on. Place the tube and latch assembly on the vehicle with the latch on the striker. Position the end tubes at proper elevation (I followed the body line). Mark the tubes to cut even with the rear section of angle iron. Cut the marks. I cut mine a little long to error on the side of caution. After cutting test fit. Since I cut mine a little long, I had to grind a little at a time until it was just right.
I knew that I had cut the angle iron 1/4" longer than the distance for the tube ends so I took the pieces back off and tack welded them up with 1/8" extending past the tube. After the tack welds test fit again. I'm starting to notice a trend here- tack weld and test fit... This is how mine test fitted:

If it doesn't quite fit the way you want it to now is the last chance to adjust before welding. Once satisfied, weld it up.
So we got the hinge done, the tube is cut the the correct length, and the latch is welded on. Now, how to use the latch. You could just pull the "arm" that comes out of the latch by hand or you can reuse the handle that was on the tire carrier as I have.
To do so, reattach the pull/push rod to the latch. I fumbled around with the handle for a while and came to the conclusion that I didn't quite like the position where the rod attaches to the handle. So I drilled a hole on the opposite side of the handle and up near the top. Reattach the rod to the new hole in the handle. Reassemble the handle, spring, mounting tab, pin and clip. Position in a manner that suits you and still allows use of the handle. Tack Weld. You guessed it, test fit and check the operation of the latch and handle. Once satisfied, weld it up. I was only able to put some beefy tacks on it as a full bead would interfere with the handle operation. Even then, I had to grind it down some to provide clearance for the handle.
Here is how it looks all welded up.

I have since painted them up with Hammered Black.
Drivers side is the same as the passenger side for the most part. I had to turn the hinge upside down compared to the pass side. And I mounted the drivers side handle to the opposite tube as well.,
I dont have any pics at this time of the doors mounted up, but I hope to have them in the next couple days.
I was wanting to add a cup holder to the doors by cutting a piece of pipe large enough to hold a can of soda or a soda bottle but I wasn't able to find one at the hardware store so I will have to try to get some from work later.
And some final notes:
I only had limited tools to do this project. I used a cordless reciprocating saw, cordless drill, 4.5" angle grinder with 1/4" grinding wheel, and a Lincoln 220V stick buzz box. I think that having a chop saw and a MIG welder may make things easier.
One of the latch assemblies I used was powder coated and the other was galvanized steel. When welding on galvanized steel BE SURE TO REMOVE THE GALVANIZED METAL from the area being welded and the surrounding areas. Fumes from welding on and near galvanized metals can be hazardous to your heath. I know some welders who refuse to weld on galvanized pipe for that reason. I removed the galvanized coating with a sanding drum on my Dremel.
Although I didn't completely strip all the powder coat off of the tube, if I was to make another set I would strip it down all the way. The smell of "hot" powder coat isn't too pleasant. Also, the hammered paint didn't quite cover the transition from powder coated to bare metal like I had hoped it would.
I started out by getting two tire carrier assemblies off of early 90s Chewy S-10 Blazers- well one off a Blazer and one off of a GMC Jimmy both from different U Pull It type yards. I got the first one for $7.99 and the second one ran me 24 bucks. Not bad considering the current price of buying tube doors. Sorry, I dont have a pic of the unmodified tire carrier, but there is one on the post listed above.
I did the passenger side first. I started out by removing the three bolts that hold the latch to the carrier. Then I removed the handle assembly- just remove the retaining clip and slide the pin out. the latch and handle assemblies include the latch, a rod that goes from latch to handle, handle, spring in handle, handle pivot pin, and the pin retaining clip. I saved these parts to re use later.
Then with a Sawzall I removed all the bracketry from the tube. This is what I had after I removed all the bracketry and cleaned everything up with a grinder. Use care when removing the tab that the handle attaches to I you want to reuse it. Its welded to the inside radius of the bend in the tube, so after cutting it off I used a grinder to get it mostly clean then I used a Dremel tool with a grinding drum to clean it up the rest of the way.
From there I cut the stock hinges off so that I could maneuver the tube into the area that the jeeps hinges are. I toyed around with placement and found that I thought It looked the best with the upper tube following the body line and the bend in the tube to extend just past the latch stud.
In the above picture I had to cut down the tube ends some more to get it to fit and I also have the latch piece mocked up as well. When you have the rear of door height where you want it, mark the latch and tube. I used a + sign with the - following the edge of the latch and the I extending on both the latch and the tube. This was done on the top and bottom of the latch and tube to enable me to get the latch back in the exact same place as mocked up.
Tack weld the latch piece in place and recheck for proper fitment.
Next up is the hinge. I looked at the above link and seen that the poster had used a piece of angle iron for the vertical support for the hinge. His was with the angle iron pointed with the opening toward the rear of the door. I used the same idea, but I put the opening of the angle iron forward. One of the edges of it is welded to the tube ends and the other side of it faces out, covering the vehicle side of the hinge. This provides some (limited) protection for the hinge on the trail, looks better aesthetically to me, and also serves as a stop when the door is opened. The angle iron contacts the vehicle side stopping the door at approximately 90*.
I used a piece of angle iron (1-1/2"x 1-1/2"x 4') to make both hinges. Each piece of angle was cut to 15-1/4" which leaves just a small lip on the ends of each tube. From there, I placed the angle iron in place along with the tube that has the latch tack welded on. I set the angle iron to the elevation I wanted it with the top of the angle 1/8" above the tube. I marked the top of the top vehicle hinge and the bottom of the bottom. I will use those marks for positioning the new hinge. The elevation of the door will effect the placement of the hinge pieces on the angle iron. The hinge itself I made out of a scrap of steel I had laying around. I cut it to 13/16" square and made a hole in the very center for a bolt to go through. I found it easier to drill before I cut the piece off. I also had the bolts laying around so I used what I had. Here you can see the hinge assembly. I had to shave the corners of on two corners diagonal from each other. The first was to clear the bend in the angle iron, the second was to avoid interference with corner of the vehicle side of the hinge.
And positioned on the XJ in a manner that it will upon final assembly.
The hinge in the opened position.
I did later find some round steel stock at Home Depot. In hindsight it may be better to go that route, although the way I did it I can put a nut on the bottom threads and further secure the tube door to the XJ.
When assembling the hinge, TACK WELD everything in place. If adjustments are needed its far easier to break a tack weld than it is to have to cut a full weld off. I made a total of 3 tack welds on each the upper and lower hinge- two on the top outside corner and the third on the center underside. When welding it up weld only the top section to keep the bead from interfering with the hinge movement.
Now that we have the hinge set up, we can now focus on getting the tube the correct length. With the hinge in place and the latch tacked on. Place the tube and latch assembly on the vehicle with the latch on the striker. Position the end tubes at proper elevation (I followed the body line). Mark the tubes to cut even with the rear section of angle iron. Cut the marks. I cut mine a little long to error on the side of caution. After cutting test fit. Since I cut mine a little long, I had to grind a little at a time until it was just right.
I knew that I had cut the angle iron 1/4" longer than the distance for the tube ends so I took the pieces back off and tack welded them up with 1/8" extending past the tube. After the tack welds test fit again. I'm starting to notice a trend here- tack weld and test fit... This is how mine test fitted:
If it doesn't quite fit the way you want it to now is the last chance to adjust before welding. Once satisfied, weld it up.
So we got the hinge done, the tube is cut the the correct length, and the latch is welded on. Now, how to use the latch. You could just pull the "arm" that comes out of the latch by hand or you can reuse the handle that was on the tire carrier as I have.
To do so, reattach the pull/push rod to the latch. I fumbled around with the handle for a while and came to the conclusion that I didn't quite like the position where the rod attaches to the handle. So I drilled a hole on the opposite side of the handle and up near the top. Reattach the rod to the new hole in the handle. Reassemble the handle, spring, mounting tab, pin and clip. Position in a manner that suits you and still allows use of the handle. Tack Weld. You guessed it, test fit and check the operation of the latch and handle. Once satisfied, weld it up. I was only able to put some beefy tacks on it as a full bead would interfere with the handle operation. Even then, I had to grind it down some to provide clearance for the handle.
Here is how it looks all welded up.
I have since painted them up with Hammered Black.
Drivers side is the same as the passenger side for the most part. I had to turn the hinge upside down compared to the pass side. And I mounted the drivers side handle to the opposite tube as well.,
I dont have any pics at this time of the doors mounted up, but I hope to have them in the next couple days.
I was wanting to add a cup holder to the doors by cutting a piece of pipe large enough to hold a can of soda or a soda bottle but I wasn't able to find one at the hardware store so I will have to try to get some from work later.
And some final notes:
I only had limited tools to do this project. I used a cordless reciprocating saw, cordless drill, 4.5" angle grinder with 1/4" grinding wheel, and a Lincoln 220V stick buzz box. I think that having a chop saw and a MIG welder may make things easier.
One of the latch assemblies I used was powder coated and the other was galvanized steel. When welding on galvanized steel BE SURE TO REMOVE THE GALVANIZED METAL from the area being welded and the surrounding areas. Fumes from welding on and near galvanized metals can be hazardous to your heath. I know some welders who refuse to weld on galvanized pipe for that reason. I removed the galvanized coating with a sanding drum on my Dremel.
Although I didn't completely strip all the powder coat off of the tube, if I was to make another set I would strip it down all the way. The smell of "hot" powder coat isn't too pleasant. Also, the hammered paint didn't quite cover the transition from powder coated to bare metal like I had hoped it would.