• Welcome to the new NAXJA Forum! If your password does not work, please use "Forgot your password?" link on the log-in page. Please feel free to reach out to [email protected] if we can provide any assistance.

First gear setup. Feedback?

Okay, so I shimmed the NRGS 0.001 to try and get the backlash set properly, and now it's at 0.0063, but the pattern doesn't look right. Seems I don't have enough pinion engagement seems a bit shallow.
My understanding (correct me if I'm wrong) is that if the pattern is roughly centered, and your backlash is correct, you should be good to go, but this seems like a really shallow pattern to me.
Pattern done with 60ft/lbs of torque on the ring gear, via e-brake.


umy8ujeh.jpg

8upeme3y.jpg

a5adatej.jpg
 
Last edited:
That does seem shallow to me. I would add .003" shim and see if that would make it too deep. Hopefully the pinion nut will play nice.
 
That does seem shallow to me. I would add .003" shim and see if that would make it too deep. Hopefully the pinion nut will play nice.

Dunno wtf happened. The first set of pictures was my third setup, and the pattern looked REALLY close. Close enough that if the backlash had been 0.001 wider, I'd have rolled with it.

So I checked the pattern against every picture I could fine, and a few people said it looked a tad shallow, so I added 0.001 and that destroyed my pattern (looked WAY too deep), so I figured I must not have seated the inner race fully, so took it apart, checked the race, it was good, decided to start with a new set of shims on the inner race, same thickness (0.033), set it back up, pattern was WAY too deep. Removed 0.003 and was way too shallow. Added 0.001, still too shallow, added another 0.001 and it's looking pretty good now, and my backlash is 0.0069 - 0.0071. I'm going to go with this, but waiting for a car so I can go pick up some neodymium magnets for the case, as that many setups and I'm sure there's metal shavings in there.
Start on the D30 tomorrow, maybe. Turns out my master rebuild kit doesn't come with a crush sleeve?

*edit* I'm an idiot. D30HP doesn't use a crush sleeve :p. So I'm all set for another day of furious anger (I really need a bearing splitter).
 
Last edited:
I'm no professional gear setup guru, but have setup my share. The only time I have had a problem getting my outer pinion bearing to seat,with a socket and wrench by hand, is when I bought a set of new Nitro gears for my rear Dana 44. I could tell there was no way the bearing was going to slid down the pinion without extreme force.
Contacted Just Differentials where I purchased,and was told they never have heard a problem with these gears. Gave them the bearing part number I was using and they verified it was the correct Timken.
He offered to exchange the set but I elected to take a couple thousands off the bearing to make it work.
And yes, I was useing a standard nut for just setup.
 
You should always have the pinion installed before installing the carrier.
I have a 4lb dead blow and I'll hold the pinion with my hand and then beat the yoke partway on and finally pull it down with the nut. The dead blow will let you get the yoke on far enough. Of course this is after you've set pinion preload and have an acceptable pattern. The yoke and seal are the last things to go on.

There are other things you can do like making a fake yoke with a piece of tubing and a non locking nut. Hone out your old outside pinion bearing with a flapper wheel and use that. for set up.

Watch this, his carrier has runout but you will see how easy he makes this. The whole video is full of shortcuts. The fake yoke is the best one. :)

https://www.youtube.com/watch?v=qixdveMbZ9Q&t=10m20s

Yea, I made setup bearings for the pinion depth setup, though I later realized I didn't need the inner setup bearing as it's just pressed on once and never needs to come off. Also created a setup inner race and outer bearing for ease of setup. The problem was with my final setup. I don't have a bearing press so it took a while to get the inner bearing installed, but the real problem was just the outer bearing. Everything I read says to just stick the pinion in the housing, throw the outer bearing in, and press it in with the yolk/nut, but this is what destroyed the pinion threads. That outer bearing just didn't want to go on.
It eventually went on, but the nut wouldn't come back off proper and destroyed the outer 3-4 pinion threads. I had to grind them off and grind out another 4-5 threads with a dremel to get a new pinion nut on.

For the next setup (my d30hp today) I'll do things a bit different.
1. Make a setup inner race and outer pinion bearing.
2. Press on inner pinion bearing and outer race.
3. Get my shim stack and backlash dialed in.
4. Press in new inner race.
5. Throw the pinion in the freezer for a few hours, and heat up the outer bearing in the oven.
6. Throw pinion back in the case and the outer bearing should just slide on.

The only problem I have with this plan is putting the outer bearing on the pinion while hot. I won't get an accurate backlash/depth reading until the two parts equalize in temp, so i'd have to let them sit for a few hours, but once they're equalized, that outer bearing may be on there really good and I'll undoubtably have to remove it again for a few more setups.

Should I just hone out the inner race of the outer bearing enough that it'll go on snug but neither loose nor tight?
 
It's really easy to gall or damage pinion threads. Especially if the pinion nut is a locking nut. You don't wanna spin a locking nut up and down the pinion too many times. I almost ruined my pinion on my d30 as well.

I now use the old pinion nut and grind the topped of the nut off where the locking threads are deformed, so that i can spin it freely by hand. Then I grease the threads to provide some lubrication if the nut is going on and off a lot.

Make sure you clean any grease or lubricans off the thread before final torquing of course.
 
Next question.
My d30hp had no shims under the inner pinion race and I can't find any build info specific to the d30hp.
Do the pinion depth shims go on the pinion, or behind the inner race like on a d44?
 
The depth shims go behind the race the inner pinion bearing race between the case and the race. You should've had at least a slinger and a baffle in there. Check the thickness of the slinger (big round washer between the head of the pinion and the bearing). It should be about .030, and the baffle is the full shim that has a hole just big enough for the pinion shaft. That is about .015 for .045 of stack height.

Now, what are the numbers on the old pinion and the new pinion. Get ready to do some math. The stock pinion will have a number on it and a sign. Ie +3 or -3 or something like that. The Master Housing Depth or MHD of the Dana 30 is 3.625" this is the distance from the centerline of the carrier/axle to the face of the inner bearing. The "head" on a Dana 30 pinion is 1.375, which in a 0 adjustment housing puts the "button" of the pinion at 2.250" from the centerline of the axle. Remember these numbers. Using the old stack will get you really close by doing some basic math.

If the new pinion has a +/- single digit number, it's easy. If the old pinion is +3 that means the face of it was 2.253" from the centerline. If it is a -3 then it was 2.247" from the centerline. + numbers are further away and - numbers are closer. Example is the axle I have here, old pinion is a 0, new pinion says 2.261 on it, so math says 2.261-2.250=.011. I'm going to start by pulling .010 of shims out of the original stack to place the race deeper in the housing than the factory gear I pulled out. Hopefully that will get me close, if not I've honed out the old outer bearing and made a fake yoke so changes will be quick.

https://www.youtube.com/watch?v=qNwUHUDtdT4

Here's the "tools" pinion depth gauge and the black thing is my "fake yoke"

http://s161.photobucket.com/user/markw365/media/tools/DSC07737.jpg.html
 
Last edited:
Yea. Old pinion was setup horribly. Had 48 thousandths too many preload shims.

What is the baffle? I got one in the master kit, but wasn't one on the old pinion. Just the slinger.
 
What do you mean .048 too many preload? What was the thickness of the slinger? Thickness of preload stack? There was absolutely nothing under the race?

Preload stack is generally .050-.060.

So you have starting at the pinion head:

slinger, bearing, race, housing?

It should be:

slinger, bearing, race, shims, baffle, housing.

From left to right, Slinger, Baffle, washer that goes between outer pinion bearing and yoke


If you think about it. The ring gear is picking up oil and throwing it forward towards the cover. If you look there's a passage under the pinion that leads up to outboard pinion bearing. The slinger and passage help direct oil up to the bearing gallery and the baffle slows down the return of it to the housing. Rear housings don't need this as the ring gear is acting like a pump and throwing oil at the pinion bearings.
 
Sorry, I've got my terms messed up.
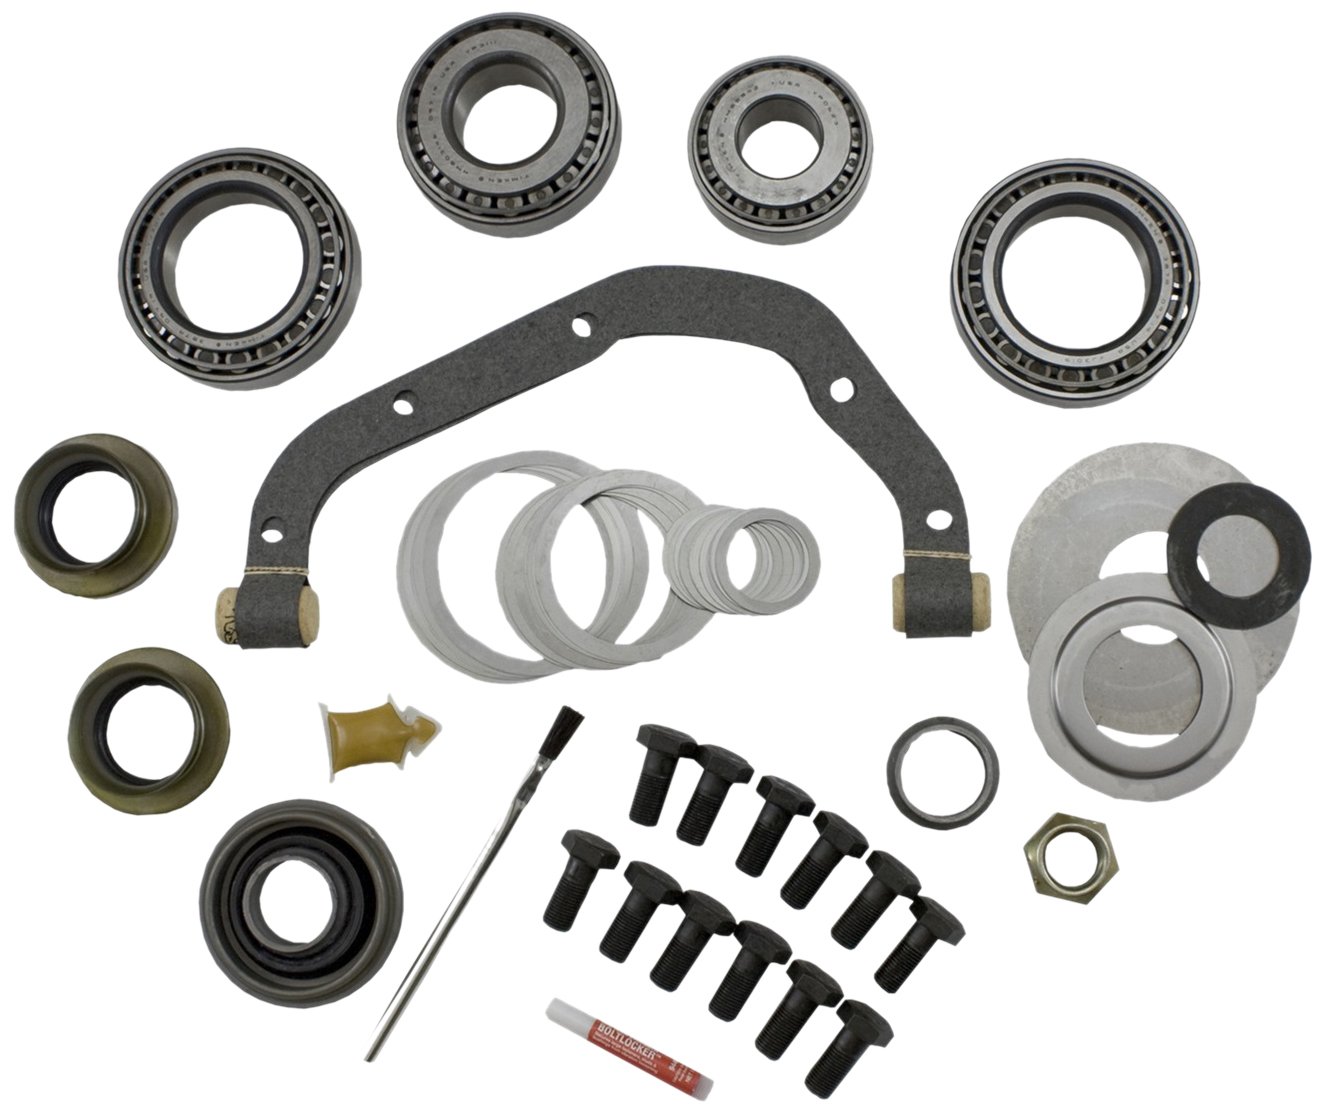
In the master kit I received, I've got the slinger, baffle, and another piece the same size as the baffle but it's stepped down ... like a hat?
I remember reading about this and some guys saying it's not necessary, some saying it is, but can't find the posts again to figure out why :)

At any rate, I can't go any further till I find a bearing splitter. The new R&P puts my backlash at 0.002 (old was 0.007), and I've got no way to get those carrier bearings off.

The other part I can't identify is the one right above (and right) the pinion nut.
71COUzECTqL._SL1500_.jpg
 
Part to the right and above the pinion nut is a crush sleeve, the HP d30 and the d44 don't use that. The stepped part is the baffle, that goes in with the stack of shims behind the inner bearing race. It is part of your pinion depth shim stack.

Yes, pulling the carrier bearings are fun, you have to pull both and shift shims from side to side.
 
Last edited:
What does that inner baffle do?. Old pinion didn't have it. Old setup was :
Carrier- inner race, no shims, outer race.
Pinion- pinion gear, slinger, inner bearing, outer shims, outer bearing, outer baffle, yolk, washer, nut. No inner race shims or baffle.

Edit. Never mind. I understand now. Is used to retain oil to the outer bearing longer.
 
Last edited:
Yup, creates a little cavity for gear lube to keep your pinion bearings alive.
 
Back
Top