• Welcome to the new NAXJA Forum! If your password does not work, please use "Forgot your password?" link on the log-in page. Please feel free to reach out to [email protected] if we can provide any assistance.

Busted Rear Shock bolt and thread nut, help!!!!

I responded with pics to this thread:
http://www.naxja.org/forum/showthread.php?t=915617

I switched my image host, so the pics are back online (hopefully for good).


Markos said:
Thought I would add to this post. I snapped 3 of the 4 rear shock bolts. I tried drilling one for an hour. The bolt drilled with ease but the nut was tough. I ran to the store and bought an air hammer, which removed the welded nuts with ease. There is a lot of mention of fishing bolts through holes in the frame etc, but few pics. Here are a few pics from my recent install.

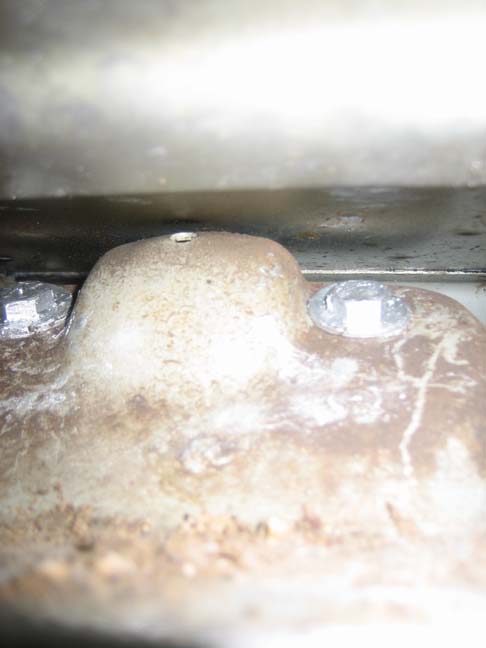
This is the nut inside the frame. Notice the tack welds. Removed with air hammer:
1611412266_dcef665752_o.jpg

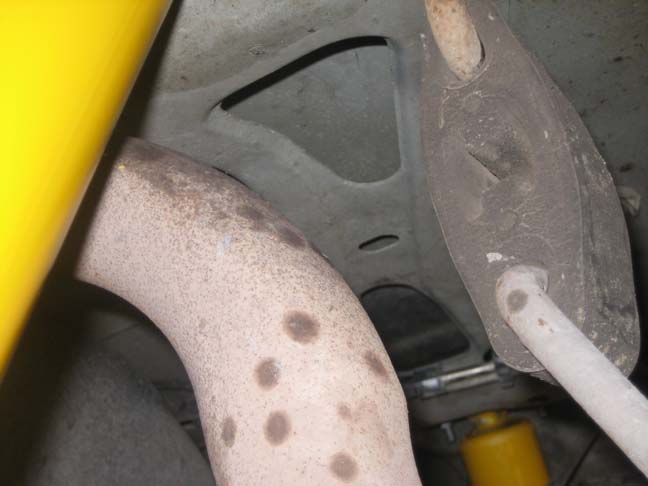
This is the area on the frame (above the axle) where you fish new bolts through. I could actually fit part of my weak hand on the passenger side. I had to use a socket and extension to fish the bolts through on the passenger side. I used anti-seize on the bolt head to keep it fixed within the socket.
1610525977_d5a7c244b6_o.jpg


I replaced the standard (edit: grade 10.9) bolts with 13mm (head) bolts and nuts. They are currently smothered with antiseize.
1610526323_e67ba6daf5_o.jpg


This is what it looks like 'behind the scenes'. Note that there is no way that you could actually see inside the frame in this manner, unless you were using a mirror.
1611411896_9df9741e9d_o.jpg
 
An air chisel is the most inexpensive air tool made. I got mine at the home improvement store for $27.00. Put on my safety glasses, snapped all 4 shock bolts on purpose, chiseled them out in less than 1 minute for all four. I slipped four new bolts into the frame, and was all done with no Jeep or owner damage. The air chisel also works great on mufflers and tail pipes.
 
yeah I have a air chisel someone before me has been in there as they cut the carpet to get to the nuts so we will have to see this weekend when I start this project.
 
I guess I don't understand why some would chop a hole in their floor when the simple solution is:
1-Take a large punch and hammer and knock the nut welds loose from below.
2-Buy 4 new 3/8" Grade 5 bolts and nuts at your local bolt and nut emporium. If they sell flange head, then snag 4 flat washers too.
3-Grab an open end wrench and some masking tape, tape nut to wrench.
4-Slide wrench/taped on nut combo into triangle shaped factory hole seen here.....
1610525977_d5a7c244b6_o.jpg


and then feed the bolt up into the hole.

5-Twist bolt clockwise until you feel it threading into the nut, then install shock and crank them down tight, stopping short of breaking the bolt.
6-If you break a bolt, tighten the other one less........you are a poor judge of "tight."
7-Remove wrench and tape another nut to the end.
7-Repeat until shocks are installed.

Cost-$1.00-$2.00 for new hardware, more if you need to buy tape too or if #6 applies to you.
Time-10 minutes per side, not including trip to buy nuts and bolts. Double the hardware run time if #6 pertains to you.
 
XJEEPER said:
I guess I don't understand why some would chop a hole in their floor when the simple solution is:
1-Take a large punch and hammer and knock the nut welds loose from below.
2-Buy 4 new 3/8" Grade 5 bolts and nuts at your local bolt and nut emporium. If they sell flange head, then snag 4 flat washers too.
3-Grab an open end wrench and some masking tape, tape nut to wrench.
4-Slide wrench/taped on nut combo into triangle shaped factory hole seen here.....
1610525977_d5a7c244b6_o.jpg


and then feed the bolt up into the hole.

5-Twist bolt clockwise until you feel it threading into the nut, then install shock and crank them down tight, stopping short of breaking the bolt.
6-If you break a bolt, tighten the other one less........you are a poor judge of "tight."
7-Remove wrench and tape another nut to the end.
7-Repeat until shocks are installed.

Cost-$1.00-$2.00 for new hardware, more if you need to buy tape too or if #6 applies to you.
Time-10 minutes per side, not including trip to buy nuts and bolts. Double the hardware run time if #6 pertains to you.

X2!

Done quite a few this way and it is the only way to go. The flange headed nuts work really well too. Just replaced a shock that was held in this way two weeks ago, and taking it out was simple. There is a reason Jeep put those access holes in the frame, don't cut the sheetmetal, especially at a structural crossmember!

Punching out the old weld nuts is really, just use a punch and hammer.
 
Blaine B. said:
So you're saying that it isn't difficult to punch out the nut welds?

I will not attempt to gauge the difficulty level, based on your unknown skill set.......

However, I find it safe to say that if you know what a ball peen hammer and punch are, and can swing the hammer and hit the punch with it, the end result will be that the nut welds will surrender quickly to your attack.
 
All I know is getting out the lower swaybar bolts were a biotch! They are keyed like wheel lugs. I didn't even think they were welded in, just pressed in! They required a big hammer, torch, cutting, grinding, and drilling to get them out.
 
I've read several instances where members mention that they couldn't punch out their upper shock bolts. I think most have a tacked bolt like the image linked above. I think in some instances, you may be forced to cut a hole. My air hammer removed the bolts in seconds. I spent a good 45 minutes drilling a single nut before I headed to the tool store to pick up the air hammer.


Blaine B. said:
All I know is getting out the lower swaybar bolts were a biotch! They are keyed like wheel lugs. I didn't even think they were welded in, just pressed in! They required a big hammer, torch, cutting, grinding, and drilling to get them out.

Blaine,

There is a smooth solution to that, and unfortunately it isn't an air hammer, or a torch (ask me how I know). This is what I ended up using in conjuction with a liberal coat of PB Blaster:

two jaw gear puller to remove swaybar bolts
 
It never occurred to me to use an air hammer from below on the welded nuts. At the time, my patience was done and another cherokee owner said it could be done by going in from above. Seemed like a good idea at the time (unfortunately it was the only idea at the time). The holes I cut are about 1 1/8 in diameter and should be easy to cover with a new plate. Where I went a little too far should be easy to weld. After cutting the floor, I tried to use an impact driver (700lb/ft) to break the nuts loose but only stripped them. They really didn't want to come off, so I simply drilled through them. The bright spot is that I won't ever have any trouble replacing the shocks again. Properly coated, rust should not be a problem either.

I did try to use an air hammer on the front sway bar mounts to no avail. Finally cut them off and drilled them. One came out while the other went off center a little. The new bolt went through without taking what remained of the old pressed in part. Cost me more than a few drill bits but it finally paid off. Wish I had thought of the puller.

As to the metal in the eye, it freaked me out more than anything. I had just recently been to the doctor for the same damn thing - except that time I had been wearing goggles and a respirator. A piece of the metal from what I was grinding on bounced on the respirator and went up under the glasses. On a side note, it didn't freak me out as much as when I lit myself on fire while welding through the floor subframes into my Mustang. Not all warm sensations are good. I miss that winter coat (though not as much as I would have missed the skin had it gone that far).
 
Last edited:
This may just be my experience talking. I replaced the rear shocks on my XJ today (98 SE, virginia vehicle=some rust) I had broken off one of the bolts on the rear bump stops (side note, using long handle ratchet) and it took me, my dad, and almost a whole can of PB blaster to get the PS rear spring bolt out due to the bolt rusting in the bushing sleeve. I had sprayed the bolts down with PB last night and was expecting problems. However, I didn't break any of the shock bolts. I did notice that all 4 bolts had a similar "marking" on them. On each bolt, the threads looked like they had been hit with something in 3 places. I'm guessing to make them lock in place? Anyway, the thing I think saved me is that I used a long 3/8" extension and a short ratchet that reduced my torque applied to the bolt and managed to turn them in the nut before twisting the metal in-two. Its my two cents being that I have quite a bit of mechanical experience and also some machine shop/metal fabrication back ground. Some times its better to struggle with a shorter lever than just get a bigger pipe.
 
This thread helped me out so much! I busted off both upper mount bolts on my '99 yesterday and then torqued a craftsman drill-out apart on the first try removing it. After I read this thread, I used my mom's air hammer and popped those two out easily. Then I worked some fishing line tied to the end of a thin branch through to the triangle-shaped hole next to the shock mount. Tied that end of the fishing line to a 1" long bolt with a lock washer and washer assembly, pulled it through and threaded the nut on from the bottom side. Finished mounting the shock on the driver's side. ;) Then busted the two upper bolts off on the passenger side shock mount too...that side is a little tougher with the exhaust pipe in your way. Either way, make sure you wear glasses or goggles or something. First time you punch with the air hammer you're going to get a face full of road crap.
 
I finally finished the installation. I welded up the small hole from where I over bored the hole through the floor and added a little metal around the factory nuts. I added Rusty's bar pin eliminators while I was in there so that I wouldn't have to go through all this again. The BPE's work OK, but I had to trim the shock bushings a little to fit them in. Torqued the grade 8 bolts down tight with Lotite Red and called it good. I then coated everything with POR 15 Rust converter (including the rust in the pass quarter) then primed and painted. The holes I bored were covered with new metal plates that I screwed and riveted in place after heavily smearing seam sealer. (Also applied this in the rusted quarter panel and in the wheel well so I won't find handfulls of mud in the Jeep again.) Painted everything on the top, then covered the whole rear floor and tha quarter with generic dynomat - mostly because I plan to add the subwoofer back there some time. Anyway, everything seems solid and its really nice to have the back half of my interior installed again. My new 235/75/15 BFG ATKO on 15x8 Ravine rim fits in the factory spot - barely. I might need to take the bracket out though. Glad I bought a Grand Cherokee spare cover- it was just big enough to cover it for a clean look. The pocket is a nice touch, too.


Just my ramblings.
 
Back
Top