• Welcome to the new NAXJA Forum! If your password does not work, please use "Forgot your password?" link on the log-in page. Please feel free to reach out to [email protected] if we can provide any assistance.

Yet another Bendix ABS thread...

sean87xj

NAXJA Forum User
Location
New York
Hi guys, first post here but I've been reading this board for a long time now and it's great.

I've just started ripping out my '89 Bendix-9 ABS for replacement with a WJ master/booster. I've read all the threads I could find on it and I know I'll run into some issues later on that I can probably figure out...but for right now, the big question is what proportioning valve should I use? I'm looking at the ABS one and it obviously isn't gonna work, should I grab one out of an XJ with a dual diaphragm booster or does it even matter?
 
The WJ has discs in the back right? I think you should stay with the prop valve meant for rear drums as it's designed to keep a little residual pressure in the back.
 
Alright, dragging this one back from the dead...

I haven't really had any time to work on Jeeps in the last six months and just started at this again. I've got an '04 WJ Booster (need to get an MC). I was wrong on the year of my Cherokee, it's a '91 and test fitting the booster, the rod seems to line up perfectly and fit on the brake pedal as long as I space it off the firewall about a 1/2 inch. Seemed odd to me because I've always read that you need a non-ABS pedal, but hopefully this works...

Anyway, from what I've read it seems that using the ABS prop valve will be OK but I'm getting hung up on the routing of the brake lines. Some things I've read say they need to be replaced entirely but that seems unneccessary to me....I know where both front lines come up into the engine bay, and though my memory is foggy because I chucked the Bendix MC/booster combo months ago, I seem to recall that these lines actually went into the MC/booster itself before hitting the prop valve. Also, I can only spot one possible brake line going to the rear set from the engine bay, shouldn't there be two or is this just the way it is?? I'm sure this is more of retardation on my part than anything else but it'd be helpful if somebody could point me in the right direction before I totally screw this science project up.

In a nutshell I'm looking for a diagram of what lines are supposed to go where on both the '91 prop valve and the '04 MC. Much obliged to anyone that can help!
 
OK, I may have answered some of my own questions.....tell me if this is right, I found this picture online but it looks almost exactly like the prop valve from my '91 ABS setup...

propvalve-abs.jpg


1) Front Inlet
2) Rear Inlet
3) Front Right Outlet
4) Front Left Outlet
5) Rear Outlet

#3 & #4 are plugged on mine. They're all the same sizes except #4 which is smaller, and also doesn't match up to my front left brake line fitting. The rear brake line on my Jeep has a female fitting on it, so that won't work either. I'm almost 100% positive the three brake lines first went into the MC, then back out to the prop valve, then back INTO the MC and finally out to their respective calipers....except vice versa in functionality....

Can anybody confirm that I've got this right and that I can use this particular prop valve? Thanks guys.
 
Here, I used this pic I saved from someone else's thread a while back to do my conversion:


Nice, thanks! Looks like I had the lines from the MC mixed up...

Did you have to swap pedals when converting yours? I think '90/'91 might be slightly different in that regard but I'm not sure. I'm pumped now, starting to see the light at the end of the tunnel. Next step is to switch those fittings over and actually get a master cylinder....anybody know what size the proper fittings should be?
 
I swapped in a '95 booster, so my advice will be of no use to you. I have no experience with the WJ booster.
 
OK! I finally finished this, everything went fairly smooth once I stopped being lazy...

Big problem, however....the front calipers appear to be dragging, BAD....as in, the car will come to a complete stop by itself very quickly from under 30MPH and accelerating is a noticeable chore. This only started happening after I drove it about two miles, it was fine at first. I bench bled the MC and bled the brakes two times. The pedal is very hard, too hard even. I'm fairly certain it's both front calipers that have pressure trapped in them, so my guess is that something between the MC and prop valve is not right....I'm very bummed about this, did anyone else run into similar difficulty?
 
Also, here's some tips for all the other poor saps trying this job who might stumble across this thread in the future:

1) Prior to doing this, I had never once cut brake line in my life and I was confused by the whole double flare/bubble flare situation, and didn't start to understand it until I ripped several pieces of brake parts out of my Jeep and the WJ at the junkyard. Do yourself a favor and get a brake line cutting tool off eBay, I got a set of them for $4... there are tons listed, use those exact terms. I couldn't find one anywhere else, including the big chain auto parts stores. Trust me, using a hacksaw or hedge clippers and trying to grind the edges even doesn't work - I TRIED! As far as the flaring tool, I recommend this one from AutoZone:

http://www.autozone.com/in_our_stores/loan_a_tool/tubing/flaring_tools.htm

You can rent it for a $24 deposit. I decided it might come in handy at some point so I just ate the cost, but I also ended up breaking it to pieces so maybe that's bad karma. Anyway, if you haven't done this before....DON'T FEAR THE FLARES! The directions are right on the box, it's a piece of cake. A bubble flare is just a single flare (ie: do half of a double flare, it'll make sense once you have this tool/instructions). For some reason, this wasn't documented on the interwebz very well and confused the hell out of me for the longest time. You don't need any special equipment to make a bubble flare as opposed to a double flare or vice-versa.

2) Going back a step here, after you cut the brake lines you NEED to clean the ends that will become flared up. First you need to run a drill bit back and forth down the piping to make the passageway nice, clear and even....then use a metal file to make the flat surface at the end nice and pretty, then round the edges ever so slightly with the file. If you look for directions online for this part, you will find big French words like CHAMFER and DEBURR....but they simply mean exactly what I just said. It's easier than it sounds. When you do get to flaring, PRACTICE PRACTICE PRACTICE! It's worth spending the extra ten minutes become a pro instead of destroying the brake lines under your hood at first. I didn't want to practice practice practice and it took me twice as long to do this because of that!

3) I used the original '91 ABS brake pedal assembley/pushrod with absolutely no modifications. It didn't look like it was going to fit at first, but once everything was out of the way and it was all lined up it clicked onto the brake pedal and sits there just fine. Maybe all XJs are made differently, but that's how it worked on mine. No more ABS lights on the dash after ripping all that junk out, tail lights work perfectly.

I'll take pictures of the install at some point (it's snowing right now). Hope that helps somewhat!
 
Excellent advice. Practice a few times on a scrap piece of line. Don't forget to slide the nut on before you flare it. :}

I also found that Napa sold lengths of brake line pre-flared with nuts in various configurations pretty cheap (like $2-$5). They had a few in the right lengths and ends that I just used outright. The others I only had to cut and reflare one end. Doing it that way also gave me a handful of new nuts which I would have had to buy anyway in my case.

Oh, another thing I should have mentioned.....when you yank out your old ABS master cylinder, hang onto it!! Every single nut I needed for the new setup was found on there....and I even had a few spares, which was good because I destroyed a few with a vice grips.

I had to buy one 2' section of brake line from AutoZone to use for the MC to prop valve lines because the original ABS setup doesn't have any lines resembling this. I reused all the other underhood lines, bent everything by hand. The whole thing cost about $85 in parts ($75 for the booster/MC from a local yard and about $10 worth of brake line, nuts and washers)

Has anyone else that's done this swap on a '91 with ABS had luck reusing the original pedal assembley? I had read nothing but "you need to swap the pedal" prior to doing this myself.
 
I can't believe I originally posted this thread in November of 2007 and this poor Jeep is still sitting in my driveway. I haven't really messed with it at all since the last update, brakes are still dragging, pressure is getting trapped in the system....I'm just not sure where.

If I wasn't clear enough earlier, these are the symptoms: When initially started (after sitting) the brakes operate somewhat* properly, in other words they stop fairly well. The problem starts after a couple miles of driving, pressure will start to build up and the calipers clamp tighter and tighter to the point where they're basically fully engaged. The brake pedal still comes all the way back up when this occurs.

It was suggested to me on another forum that it's possible the prop valve is holding too much pressure, and may be damaged from when I hooked it up backwards. I tested to see if any fluid would bleed out of the valve when it shouldn't and didn't get convincing results one way or another.....whatever, they're cheap enough - I'll go grab a new one tomorrow. I'm not very confident in that being the solution anyway.

There is another hiccup as well (the reason for the *): When the brake pedal is depressed, the first 2" or so of travel feel completely normal, however after that it becomes extremely hard. This one is a head scratcher for me....any ideas?

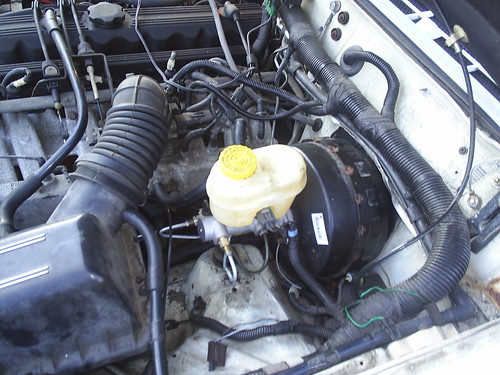
Here is the MC/booster sitting in the engine bay:
3264782270_04bb47eca3.jpg


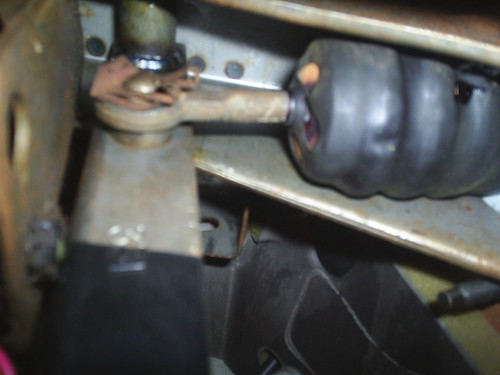
And here is the stock WJ booster rod fitted to the completely unmodified '91 XJ brake pedal:
3264782412_001a07a4be.jpg
 
Back
Top