I had the same problem after I installed my 5.5" RE Extreme Duty lift. Instead of adjusting the castor (cuz I liked the way it was), I went some taller sway bar end links from Poly Performance. A set of beefy end links will correct your problem for a few bucks.
I posted this procedure on Der Froggen Bloggen (Frog Blog).
http://www.naxja.org/forum/showthread.php?t=1025143
Here's a few pics from that thread...
Sunday was a busy day for the Frog. In addition to the TC skid, I also solicited welding help from Jeff and Stuart from my club (Boonie Bouncers) and got the new
sway bar brackets welded in place. After installing the RE 6200 Extreme Duty lift, I noticed rubbing on my right sway bar during right turns. This is something I failed to notice after the lift install, and I feel dumb and foolish for not spotting it right off. Before you ask about locating the end link to the outside of the bracket, I did that but the bracket protuberance still interfered with the drag link. Besides, the end link did not want to extend to the outward side of the bracket. So there.
Because the sway bar end link was making contact with my drag link, I disconnected if for the time being. Apparently, this is common with the 5.5" lift due to castor angle. My castor seemed perfectly fine, so I opted to purchase some taller
sway bar brackets from
Poly Performance. The following photos outline some key steps with the install.
This photo (above) clearly shows the sway bar bracket and proximity to the drag link ball joint. Imagine the end link hooked up and making a right turn. Not a pleasant sound.
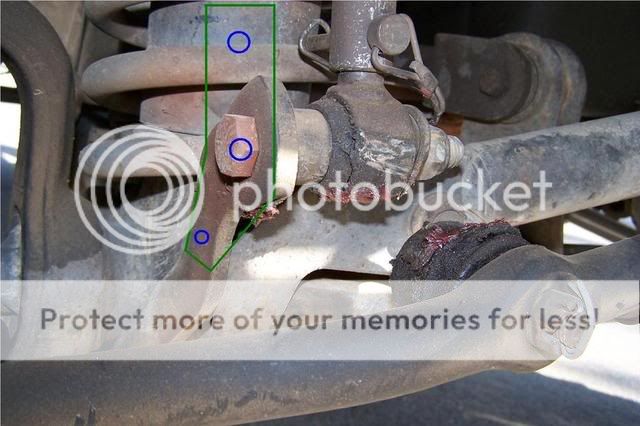
Here's the same bracket at a different angle. Take a look at yours and you will find an outward facing bevel pressed into the bracket. I'm assuming this is for strength, and not appearance.
A few minutes with my Makita grinder flattened out the bevel. A cutoff blade took the top couple of inches off the bracket in no time. This was done to prepare for the new bracket from Poly Performance.
Yes, I changed both sides for symmetry. Here's a shot of the driver's side. I'm thinking you could save 13 bucks and only do the passenger side, but who would do such a thing and risk upsetting the fine balanced nature of the Cherokee?
Now that the original bracket was ground smooth and cut to proper height, I clamped the taller bracket to it and prepped it for welding. I have not welded metal since high school a mete 28 years ago, so I solicited the help from some off-road buds. These guys don't even drink beer, so I don't know how to repay them.
Thanks to Jeff and Stuart, I am now a proud recipient of taller sway bar brackets and the freedom to steer left and right, during normal ride height or max flex. Oh, if you are looking for a final photo of the job, I'll need to post that at a later time. I totally forgot to take a pic of the brackets after I primed and painted them. Take my word on it...they are glorious!
http://www.naxja.org/forum/showthread.php?t=1025143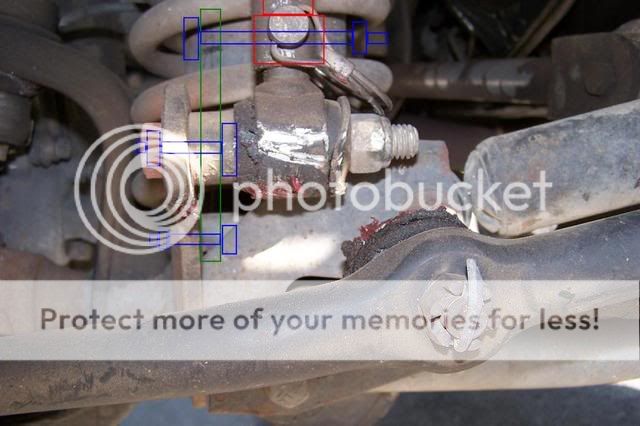
 atriot: