• Welcome to the new NAXJA Forum! If your password does not work, please use "Forgot your password?" link on the log-in page. Please feel free to reach out to [email protected] if we can provide any assistance.

99 XJ DD & Weekend Warrior

Now it was time to get the Spartan Locker into the diff of the D30. With the carrier and stuff on the work bench I went to task following the instructions I downloaded. I was hoping I wasnt going to have to remove the ring gear....
First to come out was the pin holding the cross pin in place:


With that out the spider gears came right out:


I started cleaning up the locker, getting it ready for its new home. Took it all apart, cleaned each piece real good, and noticed something that I really should have caught before.....


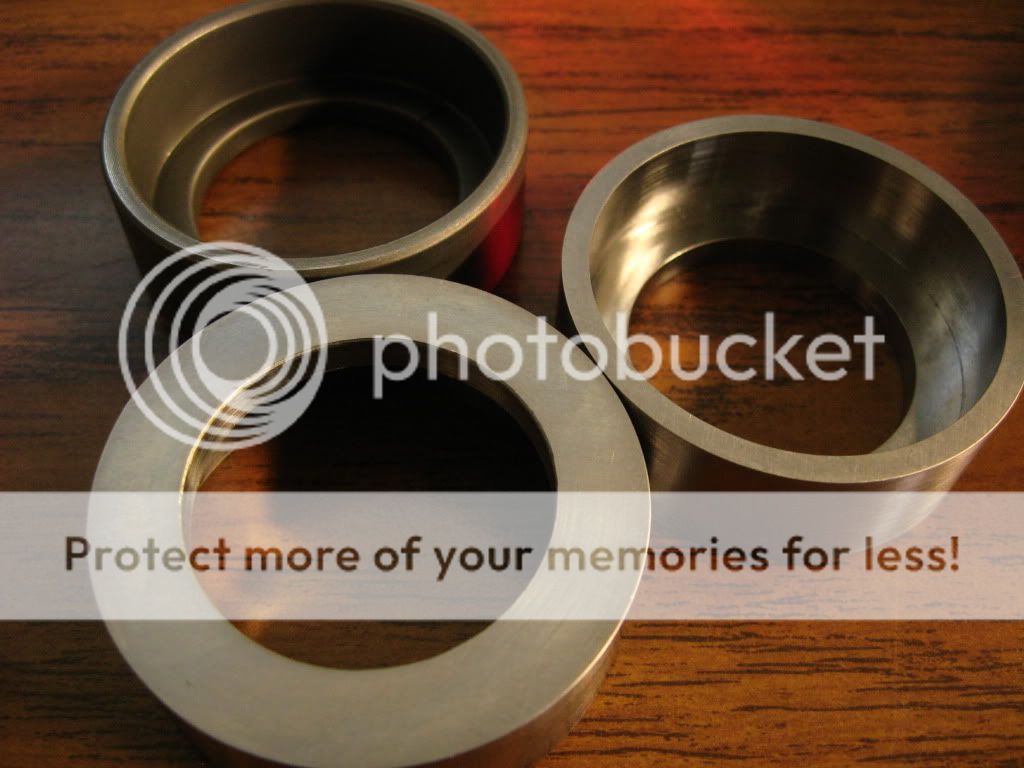
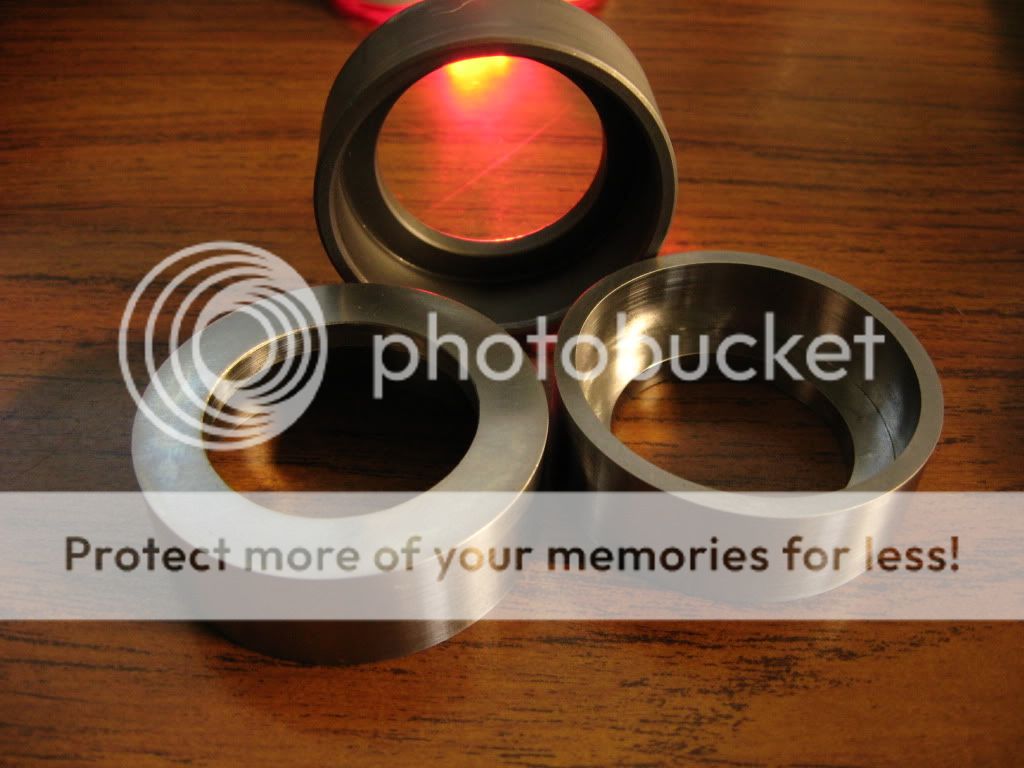
The spacers had been thru hell....The guy told me that he had incorrectly installed it... leaving the thrust washers in, when you're clearly not supposed to. It broke the cross pin he installed, and he just decided to off it to someone else, rather than deal with it. Hence the need for me getting a new cross pin shaft. I didn't mind spending the $20 for one of those, and the rest of the locker looks fine, but these spacers, are just shot. Some of these cracks go all the way thru, and there's no chance in hell i'm going to assume these wont grenade in my differential and take everything else out with it.


They're in just too bad a shape for me to install, so with a heavy heart, and an angry temper, I put my differential back together, and re-installed it. Re-checked the backlash (was only off by a couple thousandths than before.)
The axles went back in, and the diff was buttoned up and re-filled. Been a week now, and not a drop has leaked. So the seals are doing just fine.
>
In the mean time, i've ordered a new set of springs and pins for the Spartan, from Bell Offroad out of Bellingham Wa. (gotta support the NW!) -they came in three days flat, and the price couldn't be beat anywhere.
>
And since my day job is sitting in front of a computer, engineering and designing tooling solutions for the electronics manufacturing industry, I took it upon myself to mic-out the spacers, and draft up a design for a set of replacements. (I couldn't find a set anywhere to buy - so why not just make them!) - We have a machine shop here, and my cost is only going to be for the hardened tool steel. The design time is, well, mine, and the machining time is free. Cant argue with that, Here's the model I've got:


I should have the new set of spacers done sometime this week, and be ready to put them in before a (possible) shake down run this weekend.
 
Spartan Rebuild May_2012

PARTS ARE DONE!
Here's the new spacers to replace the cracked/broken ones that I got with the locker.
They spec'd out right on the money... less that .001" off of my design's measurements.
The old one is the one in the background.
IMG_1310.jpg

IMG_1311.jpg

The machining quality is perfect!
IMG_1312.jpg
 
Wheel Change_May 2012

Alot has happened this weekend, first off, I'm getting ready for 33's, and wanted to open my options for tire choice. My Ecco-5's being only 7" wide, would accept the only 33x10.50 mud terrain on the market, the BFG KM2's.
Not there's anything wrong with those tires, I just wanted more options.
So another forum member (thanks Jimmy!) hooked me up with his old set of 31x10.50 KM1's on Ravines......
OLD:


NEW:


The Ravines are 8" wide, and will allow me to run a 12.50 wide tire if I so choose. No Complaints here, they look great!
 
So its taken me another week or so, but I finally dove BACK into the D30 to install the newly refurbished Spartan Locker. I also decided to put on the Front SST Extended Brake Lines I've had laying around (for like a year) as well as put on a set of shocks I picked up a month ago or so.
I kind of rushed thru the install of most of this, so this isnt going to be as pic heavy and descriptive as most of my write ups. But here's how it all went:
>
The was parked, tires removed, and sitting on jack stands, the D30 cover was pulled, and the case was drained. The brake calipers were removed, and the axles/hubs/rotors were pulled as an assembly. The differential bearing caps were already marked from my last time in there, so they were pulled and the differential was removed.
Here's a familiar sight - on my bench, removing the cross shaft retaining pin:


And removing the cross pin/shaft/whatever:


The Carrier was then emptied of all of it guts, spider gears, shims, and thrust washers, etc....
At this point the Spartan was ready to go in.
Here's why I decided to replace the springs/pins in it:
[IMG=http://img194.imageshack.us/img194/8571/img1334ob.jpg][/IMG]

Once the new springs/pins were in, and the the new spacers were set in place the spartan was loaded piece by piece into its new home:


It stacked up easily, and the install went pretty smoothly.


I did have some trouble getting the new hardened cross pin/shaft installed. It was wanting to walk on me a little bit and not go in straight as I hammered it in. Between that and attempting to keep the two halves of the locker and the two spacers separated enough for the cross pin to clear, it took a little while, but in the end I won, and the newly loaded carrier assembly was ready to go back in.
The Diff Cover was cleaned up, and RTV'd and everything was reloaded and re-assembled/put back together.


After the diff was buttoned up I turned my focus to the brake lines. The old came out, and the new went in. The lines were bled, and I now dont have to worry about my brake lines doubling as limiting straps.


I had also picked up (a month ago or so) a set of nearly new Rough Country shocks from a 4.5-5.5 lift. The ProComp shocks I had been running served well enough, but were designed for a 2-3" lift, and I'm well beyond that now. My articulation has been limited (especially in the rear) by my shocks.
Here you can see the difference in travel between the new/old front shocks:


I have to give it up to ProComp though....their piston diameter was a bit beefier than Rough Country's (RC top / ProComp bottom)


Since I have Bar Pin Eliminators all around they needed to be disassembled, uninstalled and pressed into the new shocks. (the new shocks also had stock bar pins that needed to be pressed out) - Thanks to my handy dandy Harbor Freight Press Tool (i swear this thing has proved to be one of my most invaluable tools) - the job was easy.


The dust boots were transferred and all four shocks were swapped out.


____________________________________________________________
MY IMPRESSIONS:
The shocks offer a different kind of ride... cant say its better or worse, just different. Definitely not harder, but I'm not sure softer would be the right way to describe it either. The very next day (Memorial Day) was the shake down run. The Jeep preformed beyond my expectations, and I'm SUPER pleased with the Spartan up front. It allowed me to crawl over certain spots on some trails, where before I had to carry momentum or would have excess wheel spin. The shacks did great, and it seemed the jeeps tires were on the ground more often. And with the KM1's aired down, the jeep did quite well thru everything.
 
Looking really good! Digging the new Ravines! I run those and love the look of them.

Thanks man! Yea they're starting to grow on me... I had mixed feelings about them before I put them on, but once I stood back after getting 'em bolted up, I immediately fell in love with the look. I was so used to seeing the stock Ecco-5's on there, and these are such a huge change, I STILL do a double take every now and again. (and the occasional glance over the shoulder as I walk away in a parking lot for a second look...."yea thats right...its ALL MINE") lol
 
Disco Keepers_May 2012

:exclamatiBIG Thanks to He-Man for hooking me up with access to a welder, and some time in his driveway last weekend (meant to post this up right away but spaced it off). Gave me the opportunity to finally fab up some keepers for my quick disconnects. No more Whiskey Tango zip ties/rope/wire holding them up when out on the trails.... My welds aren't the prettiest, but they hold up. (sorry for the dirty pics - this is post trail use - and a little more mud than should be up there for picture's sake)
>
1/2" x 2.5" hex head bolts, welded to my front tow hook brackets.

>
 
I've made those exact same disconnects before, and you'll need to sleeve the all thread with something. Even pipe would work. But they will bend. I bent two sets in a short amount of time.
 
I've made those exact same disconnects before, and you'll need to sleeve the all thread with something. Even pipe would work. But they will bend. I bent two sets in a short amount of time.

Interesting... I'll look into that... I've been running these for at least a year or so now, (putting a ton of miles on em too) and they're still straight as an arrow.... but I'll keep an extra eye on em now.... thanks for the heads up.
 
NEW SHOES!!! June_2012

I got a screaming deal on a set of 33x12.50x15" Wildcat EXT Mud Terrains, with nearly 75% tread. I'll easily make up the cost of them by selling off the old KM1 M/T's that I had on there. Got them mounted and balanced, and it's lookin pretty good......


There of course was some clearance issues (expected)....and I'm pretty sur eI need to do something about the front control arms. With the size of the 33's its alot easier to see that the front axle isnt centered in the wheel well. The 31's and the stock fender trim didnt make it as apparent. So new control arms have made ot to the top of my short list. But for now, some easy mods are in order to allow more clearance.
So first to go was the inner plastic fender liner and the already modified front bumper end caps. (the jeep parts scrap pile grows)


Once the old fender trim was removed (sorry no pic of this process) and everything else was out of the way... i moved on to some things I figured might be in the way. The horns, and the vacuum canister were hanging low so they got relocated.


The bracket for the horns got a slight mod (the two locking ears were bent straight) to allow it to rotate.


Rotated about 45° towards the engine compartment this allowed the horn to be re-mounted right in front of the triangular opening of the fender bracket.
The canister was moved into the engine compartment.


I just so happened to have a couple pool noodles laying around, and one was already broken in half... so each of the halves went into the cavities of the fenders.


As you can see....there is a very prevalent need for longer control arms.


I'll be flexing this out later today after work at a nearby loading dock to see just how much needs to be trimmed, folder or otherwise dealt with. Glad to finally be on 33's....
 
That's what I was thinking too... I figure I'll fab up some extended bump stops of some kind or another to help, although I hate the idea of limiting up travel.... but I have to address the rear bump stops anyways, ...diver's side one is completely toast. We'll see how far I have to go with any potential trimming after my flex test later today.
 
Just sold the old KM1's....got full asking price too...
Payday is day after tomorrow.... Should be some goodies coming soon!
Bump stops are on the top of the list...
Gonna pick up the necessary supplies for the fender mods.
Not sure what else.... any suggestions?
 
First phase of OBA

Ordered this little goodie... (should be here by the 4th of July)
COMPRESSOR.jpg


Masterflow MF-1050 / 12v High Volume Air Compressor
-12 Volt
-1/3 HP oil-less motor
-Built-in serviceable air filter
-Easy-to-read gauge
-Alligator clip connectors
-Quick connect 16 ft. of coil hose included with easy twist screw-on brass inflator nozzle.
-150 PSI
-2.54cfm
-40% Duty Cycle
-Storage Bag & Accessories.
A little better specs than the Viair 400 series.... and at a fraction of the cost.
Seen it in action for years on various trips with another Jeeper. Airs up 33's form 10lbs to 32lbs in less than 4min....and plenty of power to do multiple rigs back to back. Never heat cycled, and still going strong after nearly a decade of use..... GOOD ENOUGH FOR ME!
 
Ideas for Phase 2 of OBA project

May have an option for an (easy to stash away) air tank....
This would be part of phase 2 of the OBA project. The location (potentially) would be between the panel and the body in the drivers side of the rear cargo area.... I think this would probably fit just fine....
3gal (Ø15" x 6" tall) $65.00
3galbluetank.jpg
 
June_2012

So this weekend I Seafoam'd it. (1/2 bottle thru the brake booster vacuum line, and the rest in the gas tank)
Didn't give me as much of a smoke show as I thought it would - guess thats a good thing.
I cleaned the carbon build-up on the cap and rotor too.
Then finally removed the track bar drop bracket that was on from the original lift. (actually made a difference- I was kinda surprised.)
I have a drop pitman arm i was going to throw on, but now I'm thinking no.....
Before:
IMG_1399.jpg


After:
IMG_1400.jpg
 
Fender Mods (front) - June 2012

So the 33's need a little more room. The rears will get a cut-n-fold, and the fronts are getting a trim. I may opt to do a relocation of the factory flares, but for now, they're staying off. I did a lot of research across many different forums, and blogs. I have to admit, cutting the body up had me pretty nervous...So I wanted to make sure I did this right.
Here's how it all went down.
Following the natural lines (very carefully) of the bends in the fender just above the holes where the flare mounts are, the metal was trimmed.
IMG_1406.jpg


After the trim was done, I took the angle grinder to the edge to knock down any burrs, and to help even out any imperfections in the cut. Then I took a long bastard file and really straightened any sways in the cut out. After I was satisfied with the finish of the cut, it was time to tape things off and prep for paint. I decided to go 1.5" out from the cut edge for my tape line.
IMG_1412.jpg


Once taped, I used some fine grit sand paper to rough up the surface to allow the paint (bed coating) to adhere better.
IMG_1413.jpg


After the surface was roughed, I dusted it off with a clean rag, then cleaned it with some alcohol.
IMG_1414.jpg


After that, the whole area was masked off, I used some paper I had laying around from when I last moved (the stuff thats used to wrap up glasses and plates with - news paper would work just as well.) The tire & wheel was masked off using a old tire bag from America's Tire.
IMG_1415.jpg


The product used to seal everything up was Duplicolor Bedliner.
IMG_1405.jpg


All coated:
IMG_1416.jpg


IMG_1417.jpg


My cuts didn't turn out dead-nuts perfect.... but they are pretty dang good. The finished results are pretty good, and if I decide to mod and relocate the flares, It'll look even better.
All finished:
IMG_1418.jpg


IMG_1419.jpg
 
Rear Fender Cut-n-Fold_July 2012

Some of you have already seen this in person, so my apologies for the delay in the official documentation of the mod.
The rear fenders got the infamous Cut-n-Fold treatment.
A little different technique than the fronts, but I was up for the challenge.
I had read what must've been a few dozen (literally) threads on this procedure.
The thread I came back to time and time again was from paraleyes from jeepforum.com and his thread "Cut And Fold Rear Lower Quarter Panels - The Right Way!"
http://www.jeepforum.com/forum/f11/cut-fold-rear-lower-quarter-panels-right-way-1007865/
It seemed to be one of the most comprehensive write ups out there, and had a fair number of pics to go with it. (still not enough though for my liking)
>
With all that and even seeing a few in person I STILL didnt feel 100% prepared (or ready) to start cutting in the Jeep in the way that is required to do this. Honestly - It seems like a simple enough procedure in concept, but in all actuality, it was one of the more difficult mods I've ever done. It didn't help much that I was on a deadline, working late at night, and had a wheeling trip in the morning.
What I should have done was take BPB and GoBlazers up on their offer to help, and driven my happy ass up there to get more heads and hands on this - call it what you will, i decided to go it alone.
Without any more excuses to throw around, I started in on it.
Passenger side was first. I backed it into the garage and the rear wheel came off (for more working room)
rearcut-n-fold001.jpg


The rear bumper came off, and I was ready (as I would ever be) to start in on the real work.
rearcut-n-fold002.jpg


FOUR FRICKING HOURS Later....
THREE FRICKING Cut Off Wheels,
TWO FRICKING different metal blade swaps in the jig saw,
and ONE MAJOR PAIN IN MY ARSE, (main reason for no pics of the procedure) I was done......
With ONE side.
rearcut-n-fold005.jpg


rearcut-n-fold003.jpg


rearcut-n-fold006.jpg


rearcut-n-fold004.jpg


rearcut-n-fold007.jpg


It's not perfect, I was tired, worn out, and A little high from all the fumes.... But I'm glad I did it, and I'm more or less happy with the results. My plan is to extend the rear bumper along the side similar to what paraleyes did in his write up but with a few differences. I'll tie into the frame, and may even have a small tube flare out that will double as a step (for when loading the roof rack) This will give me great armor protection for the rear quarter, and will strengthen the rear end as a whole.
 
Dammut Murphy's Law....

And of course as luck would have it...
The very next day, up in the Tillamook State Forest, on a trail called Saddle Up.......
(pictures courtesy of goblazers_6)


Yup, after all that work.....
Well hey if you cant take some body damage with some mud on your face and a smile.......


I've already got a replacement fender on. A fellow Jeeper (can't thank you enough Crazymoose) hooked me up with one he had laying around.
It's green, but lines up well and is already trimmed (not to match, but at least it clears).
I've found a replacement header panel, a good fiberglass one too, (not the cheapo Chinese plastic ones) at 205 Auto Salvage for 100 bucks. Both will need to get painted, and I haven't bit the bullet yet on the header panel. I HAVE replaced the corner marker light, the fender of course, and re-shaped the brackets underneath to their original form with a little help, again, from Crazymoose. Luckily the core support didn't see any carnage, so I lucked out in that its just cosmetic, and didn't touch the hood either.
 
Back
Top