oldmantompkins
NAXJA Forum User
- Location
- Denver
So I started installing some LF 140s using Lightforces wiring harness. I did some searching and from that and the instructions it seems this harness is set up to have the LF lights turn off with high beams using the brown wire to the back of the headlight.
Is there any way I can use this harness to control the lights separately (Can be used during high beams)? I dont plan on using them on the road or anything so I dont see the real need to have this safety? feature.
This is the harness and instructions:
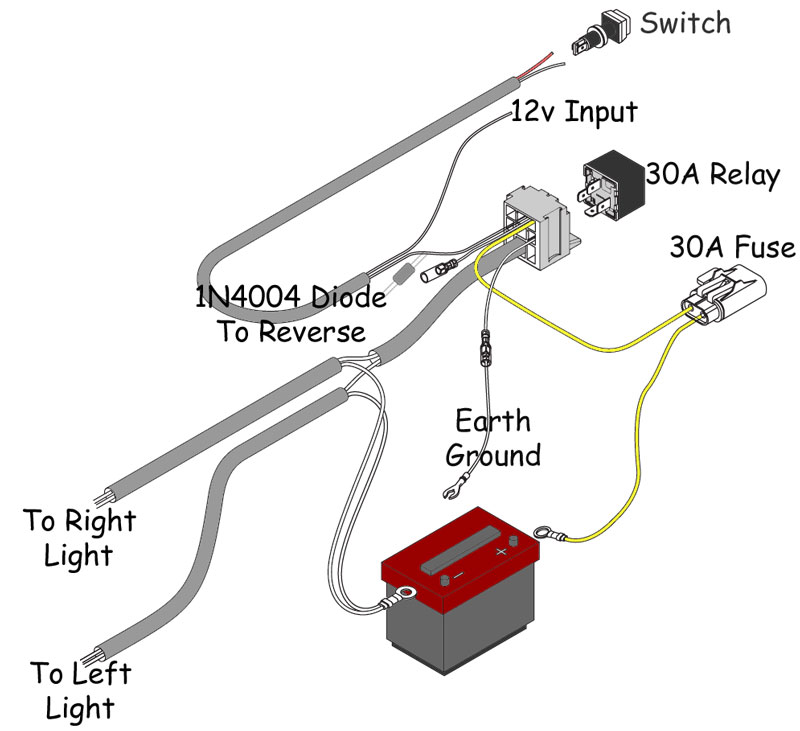
Instructions :
1. Remove the main ground wire from the negative battery terminal.
WARNING: This may result in loss of radio security code and clock settings. Please consult your owners manual
before disconnecting.
2. Install driving lights onto a suitable mounting surface.
3. Place all corresponding clear insulating terminal covers over the wires fi rst, fi t one female terminal and one male bullet
terminal to both auxiliary driving light wires.
NOTE: On the RMDL Series any one of the two wires can be used as positive with the second wire as negative. On the DL
series, strip 5mm of insulation and fi t the male terminal onto the red wire (+) and the female terminal onto the black wire (-).
4. Find a suitable place within the engine bay (i.e inner guard) to mount the relay and fuse holder. Ensure that the yellow (+)
and black (-) ring terminals reach the appropriate battery terminals.
5. Secure black with yellow stripe wire fi tted with tongue terminal to body frame obtaining a good earth.
6. Insert relay into base.
7. Mount the switch in a suitable position.
8. Locate a grommet through the fi rewall and pass the brown wire and black with red stripe wire through the pierced grommet
to the switch location.
9. Strip 5mm off the ends of the insulation of the brown wire and black with red stripe wire, then crimp a red terminal to each
end, connect to left and right terminals on the switch.
10. Route the two insulated white (+) and black (-) wires to each of your installed Lightforce driving lights, connect the
corresponding terminals together. Ensure your cables do not touch the radiator or come in contact with any sharp edges.
11. Secure all excess wire to the vehicle.
12. Using a multi-meter or test light fi nd the active high beam switching wire located on the back of the head light. Connect
“Ezy Tap” connector onto this wire.
13. Strip 5mm of the insulation from the brown wire and crimp pink blade terminal to the end, connect onto “Ezy Tap” terminal.
14. Connect the yellow ring terminal to the positive battery terminal.
15. Connect the black-wired ring terminal to the negative battery terminal then reconnect main ground (negative) wire to the
negative battery terminal.
16. Test.
If the lights do not operate correctly check the following:
• Recheck all installation steps.
• Inspect fuse holder for blown fuse.
• Inspect all ground wires for good earth.
• Check switch operation.
• Some automotive manufacturers use the negative circuit to activate the high beam, in this situation discard the open ring
terminal with black and yellow stripe wire (A). Connect the remaining male bullet terminal (B) with the female terminal (C)
on the black with yellow stripe wire taped to the yellow wire at the base of the relay.
NOTE: This wiring harness is designed for the use of two lights only - not exceeding 9amps per light. Should extra light(s) be
fi tted additional wiring harness is required.
Is there any way I can use this harness to control the lights separately (Can be used during high beams)? I dont plan on using them on the road or anything so I dont see the real need to have this safety? feature.
This is the harness and instructions:
Instructions :
1. Remove the main ground wire from the negative battery terminal.
WARNING: This may result in loss of radio security code and clock settings. Please consult your owners manual
before disconnecting.
2. Install driving lights onto a suitable mounting surface.
3. Place all corresponding clear insulating terminal covers over the wires fi rst, fi t one female terminal and one male bullet
terminal to both auxiliary driving light wires.
NOTE: On the RMDL Series any one of the two wires can be used as positive with the second wire as negative. On the DL
series, strip 5mm of insulation and fi t the male terminal onto the red wire (+) and the female terminal onto the black wire (-).
4. Find a suitable place within the engine bay (i.e inner guard) to mount the relay and fuse holder. Ensure that the yellow (+)
and black (-) ring terminals reach the appropriate battery terminals.
5. Secure black with yellow stripe wire fi tted with tongue terminal to body frame obtaining a good earth.
6. Insert relay into base.
7. Mount the switch in a suitable position.
8. Locate a grommet through the fi rewall and pass the brown wire and black with red stripe wire through the pierced grommet
to the switch location.
9. Strip 5mm off the ends of the insulation of the brown wire and black with red stripe wire, then crimp a red terminal to each
end, connect to left and right terminals on the switch.
10. Route the two insulated white (+) and black (-) wires to each of your installed Lightforce driving lights, connect the
corresponding terminals together. Ensure your cables do not touch the radiator or come in contact with any sharp edges.
11. Secure all excess wire to the vehicle.
12. Using a multi-meter or test light fi nd the active high beam switching wire located on the back of the head light. Connect
“Ezy Tap” connector onto this wire.
13. Strip 5mm of the insulation from the brown wire and crimp pink blade terminal to the end, connect onto “Ezy Tap” terminal.
14. Connect the yellow ring terminal to the positive battery terminal.
15. Connect the black-wired ring terminal to the negative battery terminal then reconnect main ground (negative) wire to the
negative battery terminal.
16. Test.
If the lights do not operate correctly check the following:
• Recheck all installation steps.
• Inspect fuse holder for blown fuse.
• Inspect all ground wires for good earth.
• Check switch operation.
• Some automotive manufacturers use the negative circuit to activate the high beam, in this situation discard the open ring
terminal with black and yellow stripe wire (A). Connect the remaining male bullet terminal (B) with the female terminal (C)
on the black with yellow stripe wire taped to the yellow wire at the base of the relay.
NOTE: This wiring harness is designed for the use of two lights only - not exceeding 9amps per light. Should extra light(s) be
fi tted additional wiring harness is required.