2DrXJRegulatorFix
NAXJA Forum User
- Location
- New York
2 Door XJ Window Regulator Fix (Driver's Side)
A big problem with the 2 door Cherokees are the window regulators. Once they go, it's almost impossible to find replacements. You're either stuck with a window that doesn't go down or (I assume) junk the whole car....
This regulator works as a replacement for the unavailable stock unit.
READ EVERYTHING FIRST!!
Parts Needed
- '04-10 Chevy Cobalt Passenger Window Regulator (2 Door)
- '04-10 Chevy Cobalt Window Connector - Door Harness Side (Junkyard)
- '97-01 Cherokee Window Connector - Motor Harness Side (Junkyard)
Get as much of the wire harnesses from the donor Cherokee motor and cobalt door harness.
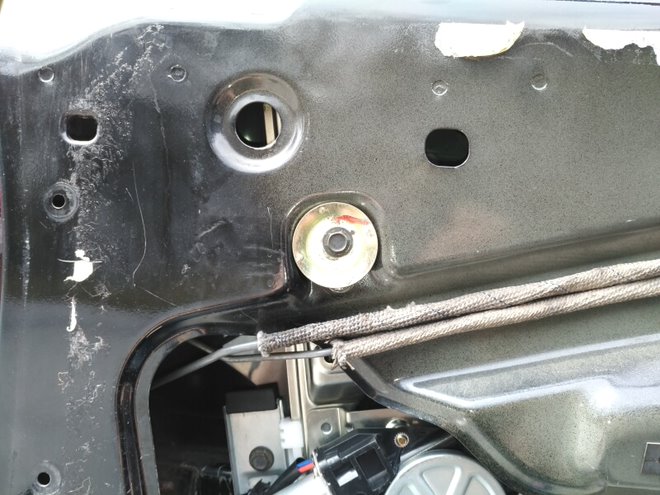
0. Preparation
Remove the old window regulator, toss in the recycling if you prefer. SAVE THE BOLTS HOLDING THE STOCK REGULATOR IN!!!
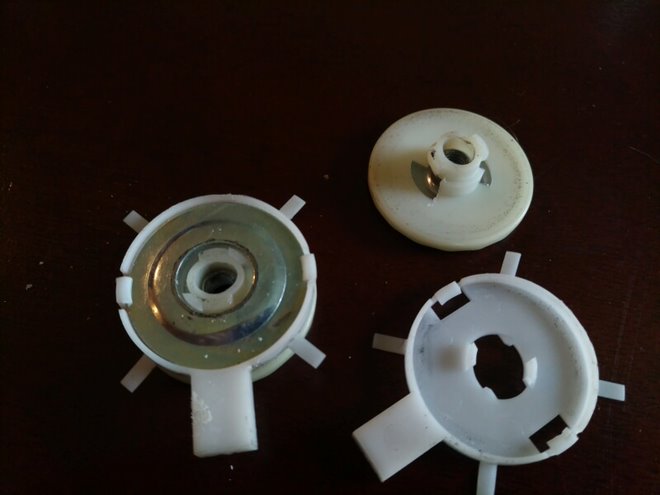
Remove the plastic window holds that attach the window to the stock regulator. The front and back twist apart to separate.
Tape the window up to the door frame safely. The last thing you want is for it to come crashing down and break.
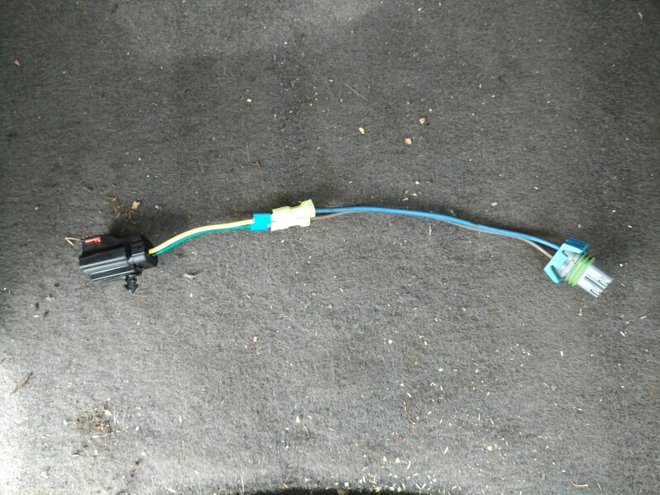
1. Create Harness Adapter
Create the harness adapter to connect your door harness to the window regulator harness. Solder the wires together, cover in heat shrink.
Blue > Yellow
Brown >Green
I used connectors so I didn't have to guess the operation direction when the switch is pressed. Be sure to do yours the right way.


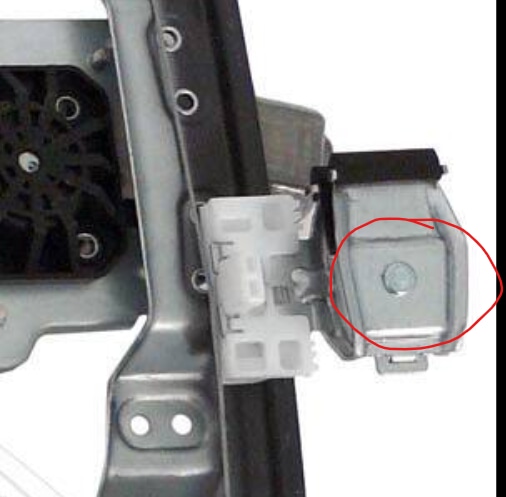
2. Prep the Window Regulator
The Cobalt Regulator JUST barely clears the horizontal supports in the doors. On the Cobalt Regulator, you'll need to replace the bolts for the window holds with a shorter bolt. You can reuse two of the bolts that held the old regulator to the door (threading is the same) and short enough to clear the door supports.
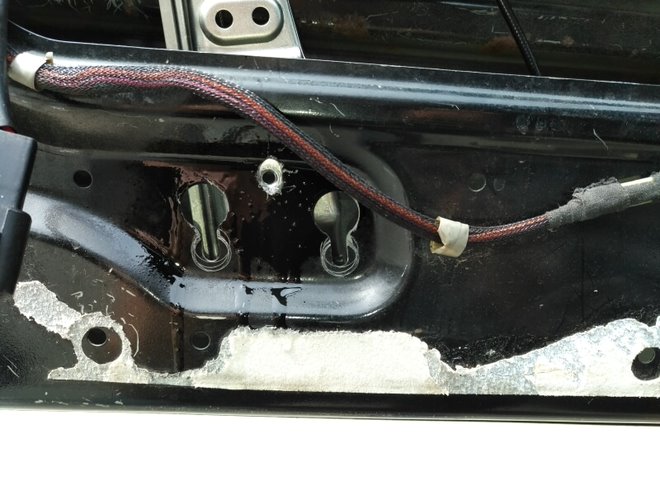
3. Rough Mounting the Regulator
We will be able to reuse two of the stock mounting holes in our door. Arrange the motor on the left side of the door.
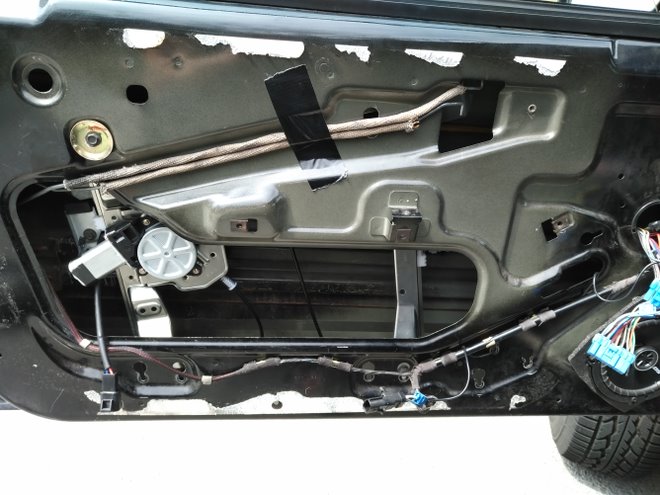
Use the upper mounting hole in the door to mount the upper part of the regulator. Use a large washer so it stays in place and mount it so it is as close to the top of the hole as possible. This way the bottom of the regulator doesn't touch the bottom of the door frame. Tighten slightly snung.
On the non-motor side of the regulator, use the lower regulator threads and mount it in the right bolt hole of the stock location. It should sit somewhere in the middle. Tighten slightly snug.

4. Connect the Wiring
Connect the door harness of your jeep to the adapter harness we made. Connect the adapter to the window motor. Tuck the wires into the door frame.
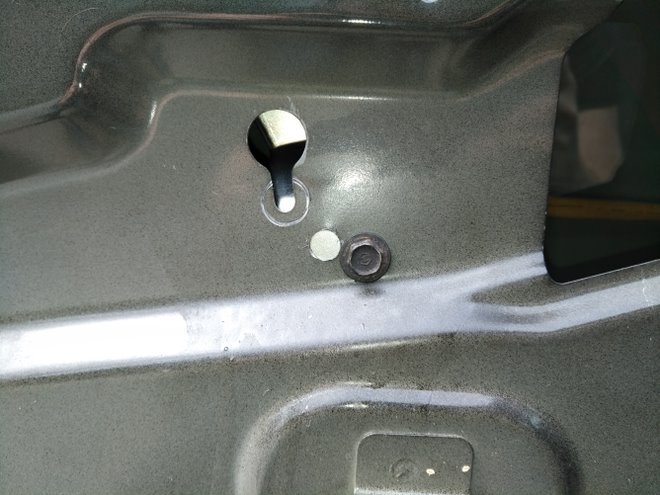
Reconnect your door switch and lower the window so you can easily access the window hold bolts we changed out earlier.
5. Attaching Window to Regulator
Carefully remove the tape holding your window up and lower it to our window holds of the new regulator. The right side will sit nicely in the window hold. The left side will not sit nicely, but about 1/4" will grab the window. Tighten both bolts slightly snug.
6. Window Tracking Adjustment
We need to make sure the window tracks correctly and that the window holds grab the window in the correct spot. As shown in step 3, the tops of the regulator should be angled toward the trailing edge of the door.
WORK SLOWLY!!
Your window should move up and down semi-freely with everything slightly-snug. Our goal is to find where we will need to drill new holes to mount the lower left and upper right portions of the regulator.
The clearance between the window regulator and the door supports is VERY close.
Move the window up and down. Most likely the lower left and upper right parts of the regulator will move as the window travels up and down.
Adjust where the rubber that holds the window grabs until there is minimal movement from the regulator as the window goes up and down. Tighten the bolts holding the window to the regulator. Tighten the bolts holding the regulator to the door.
7. Drilling New Mounting Holes
The window should move up and down with minimal shifting from the regulator. Mark where the bottom left mounting hole will need to be drilled. Mine was just below where the sheet metal bends about centered between where the stock mounting holes are.
Where you marked the center, start to drill a pilot hole with a 3/32" bit and finish with a 3/8" bit.Check that your window regulator doesn't move and your window tracks correctly after drilling the hole. Adjust if necessary and drill a new hole if needed.
Be sure to paint this exposed metal. Any paint is better than none. Use another one of the stock regulator mounting bolts to hold this in place. Tighten snuggly.
Repeat for the upper right portion of the regulator. Mark where the new mounting hole will be. Drill a 3/32" pilot. Finish with a 3/8" bit. Check for correct window tracking and no regulator movement. Drill a new hole if necessary (I missed drilling this one...). Paint exposed metal. Secure upper portion of the regulator with a stock regulator mounting bolt.
Tighten all the regulator mounting bolts and the bolts holding the window to the regulator. Reattach any door trim, reconnect your door switch, mount the door panel.
Fix 2 Door XJ Window Regulator Video
Fixing your jeep's passenger side regulator would just use the driver's side cobalt regulator.
While there aren't a lot of 2 Door Cherokees out there, opening and closing the windows is an important, underappreciated function. The biggest problem here is that there are no alternatives to 2 door regulators since the 4 door is a different design. Once they've gone, that's it....
The struggle with this project is that the XJ doors are short and thin, but are significantly longer than most doors. This made finding a suitable regulator very difficult. The height of the regulator NEEDED to be about 20" tall. This is very short for most modern cars. The cable design with the 2 lifts points of the 2 door Cobalt (G5 works too) allow it to be stronger than the pivoting arm design.
The clearance between the regulator and the door frame itself is very close so it was also a challenge finding a regulator that wouldn't get hung up on the supports. I've gotten the passenger side regulator from the cobalt to work, a driver's side regulator is unverified that it would work.
Enjoy a working window!!!!
A big problem with the 2 door Cherokees are the window regulators. Once they go, it's almost impossible to find replacements. You're either stuck with a window that doesn't go down or (I assume) junk the whole car....
This regulator works as a replacement for the unavailable stock unit.
READ EVERYTHING FIRST!!
Parts Needed
- '04-10 Chevy Cobalt Passenger Window Regulator (2 Door)
- '04-10 Chevy Cobalt Window Connector - Door Harness Side (Junkyard)
- '97-01 Cherokee Window Connector - Motor Harness Side (Junkyard)
Get as much of the wire harnesses from the donor Cherokee motor and cobalt door harness.
0. Preparation
Remove the old window regulator, toss in the recycling if you prefer. SAVE THE BOLTS HOLDING THE STOCK REGULATOR IN!!!
Remove the plastic window holds that attach the window to the stock regulator. The front and back twist apart to separate.
Tape the window up to the door frame safely. The last thing you want is for it to come crashing down and break.
1. Create Harness Adapter
Create the harness adapter to connect your door harness to the window regulator harness. Solder the wires together, cover in heat shrink.
Blue > Yellow
Brown >Green
I used connectors so I didn't have to guess the operation direction when the switch is pressed. Be sure to do yours the right way.
2. Prep the Window Regulator
The Cobalt Regulator JUST barely clears the horizontal supports in the doors. On the Cobalt Regulator, you'll need to replace the bolts for the window holds with a shorter bolt. You can reuse two of the bolts that held the old regulator to the door (threading is the same) and short enough to clear the door supports.
3. Rough Mounting the Regulator
We will be able to reuse two of the stock mounting holes in our door. Arrange the motor on the left side of the door.
Use the upper mounting hole in the door to mount the upper part of the regulator. Use a large washer so it stays in place and mount it so it is as close to the top of the hole as possible. This way the bottom of the regulator doesn't touch the bottom of the door frame. Tighten slightly snung.
On the non-motor side of the regulator, use the lower regulator threads and mount it in the right bolt hole of the stock location. It should sit somewhere in the middle. Tighten slightly snug.
4. Connect the Wiring
Connect the door harness of your jeep to the adapter harness we made. Connect the adapter to the window motor. Tuck the wires into the door frame.
Reconnect your door switch and lower the window so you can easily access the window hold bolts we changed out earlier.
5. Attaching Window to Regulator
Carefully remove the tape holding your window up and lower it to our window holds of the new regulator. The right side will sit nicely in the window hold. The left side will not sit nicely, but about 1/4" will grab the window. Tighten both bolts slightly snug.
6. Window Tracking Adjustment
We need to make sure the window tracks correctly and that the window holds grab the window in the correct spot. As shown in step 3, the tops of the regulator should be angled toward the trailing edge of the door.
WORK SLOWLY!!
Your window should move up and down semi-freely with everything slightly-snug. Our goal is to find where we will need to drill new holes to mount the lower left and upper right portions of the regulator.
The clearance between the window regulator and the door supports is VERY close.
Move the window up and down. Most likely the lower left and upper right parts of the regulator will move as the window travels up and down.
Adjust where the rubber that holds the window grabs until there is minimal movement from the regulator as the window goes up and down. Tighten the bolts holding the window to the regulator. Tighten the bolts holding the regulator to the door.
7. Drilling New Mounting Holes
The window should move up and down with minimal shifting from the regulator. Mark where the bottom left mounting hole will need to be drilled. Mine was just below where the sheet metal bends about centered between where the stock mounting holes are.
Where you marked the center, start to drill a pilot hole with a 3/32" bit and finish with a 3/8" bit.Check that your window regulator doesn't move and your window tracks correctly after drilling the hole. Adjust if necessary and drill a new hole if needed.
Be sure to paint this exposed metal. Any paint is better than none. Use another one of the stock regulator mounting bolts to hold this in place. Tighten snuggly.
Repeat for the upper right portion of the regulator. Mark where the new mounting hole will be. Drill a 3/32" pilot. Finish with a 3/8" bit. Check for correct window tracking and no regulator movement. Drill a new hole if necessary (I missed drilling this one...). Paint exposed metal. Secure upper portion of the regulator with a stock regulator mounting bolt.
Tighten all the regulator mounting bolts and the bolts holding the window to the regulator. Reattach any door trim, reconnect your door switch, mount the door panel.
Fix 2 Door XJ Window Regulator Video
Fixing your jeep's passenger side regulator would just use the driver's side cobalt regulator.
While there aren't a lot of 2 Door Cherokees out there, opening and closing the windows is an important, underappreciated function. The biggest problem here is that there are no alternatives to 2 door regulators since the 4 door is a different design. Once they've gone, that's it....
The struggle with this project is that the XJ doors are short and thin, but are significantly longer than most doors. This made finding a suitable regulator very difficult. The height of the regulator NEEDED to be about 20" tall. This is very short for most modern cars. The cable design with the 2 lifts points of the 2 door Cobalt (G5 works too) allow it to be stronger than the pivoting arm design.
The clearance between the regulator and the door frame itself is very close so it was also a challenge finding a regulator that wouldn't get hung up on the supports. I've gotten the passenger side regulator from the cobalt to work, a driver's side regulator is unverified that it would work.
Enjoy a working window!!!!