- Location
- Southern Maryland
One of my long-term objectives has been to relocate the air filter from the stock box to the cowl air chamber under the windshield. The primary motivation for this was to free up some space under the hood for other projects, but the secondary benefits such as a higher water line and potentially cooler air in the intake are also promising. Last year I opened the cowl to deal with some leaks, and today I got the intake installed.
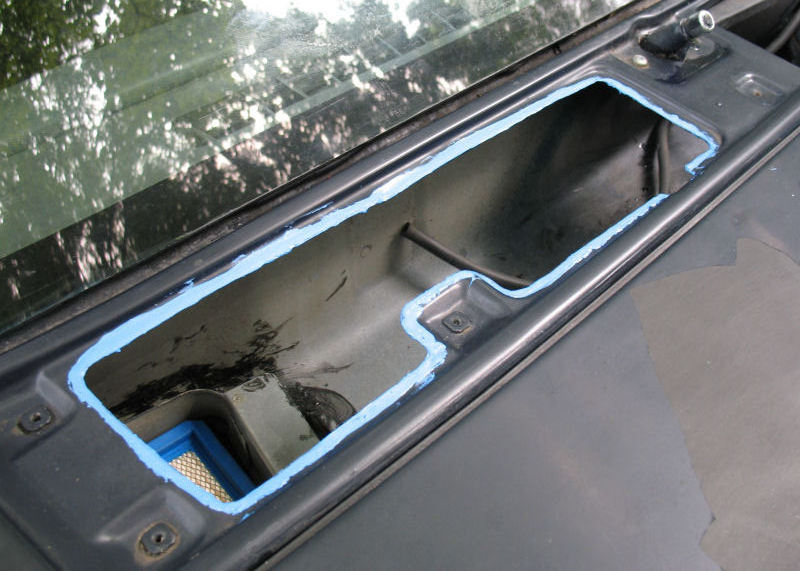
Here is a pic of the passenger side of the cowl opened up, with some blue RTV around the cut. You can also see a lawnmower filter in the cabin intake that I'm using as a cabin air filter. Recently I cut some sewer drainage pipe for use a splash shield over the cabin filter as well (link), since water was dripping into the A/C system.
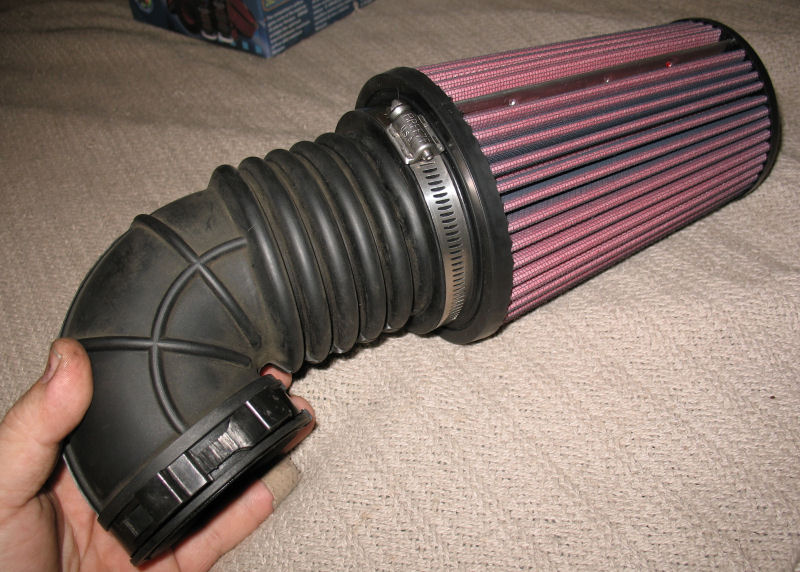
The opening is about 4" wide, and the cavity is about 5" deep by 7" wide in that area. This is really small area, and there are not many filters that will fit in that space. I really wanted an AEM filter but they are all 6" circumference at the base which is too large to fit in the cavity even if it would fit through the opening (unlikely). The other options were K&N which doesn't seem to filter well at all, a generic APC-brand filter which looked to be a hair too big, and a couple of Airaid filters. I ended up buying the Airaid 700-433 which is 4-5/8", and is just narrow enough to pinch through the opening and still have room for air to flow in the cavity. It also has a 3-1/4" opening at the mouth, which was needed for the plumbing I had planned. The other Airaid filter is the 700-430 which is identical to this one except it has a 3-1/2" opening.
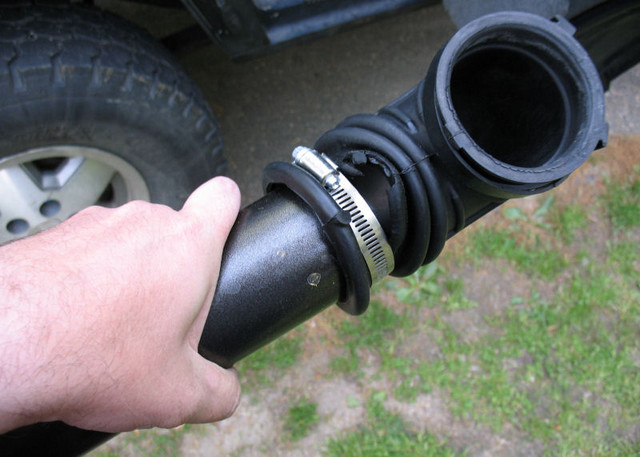
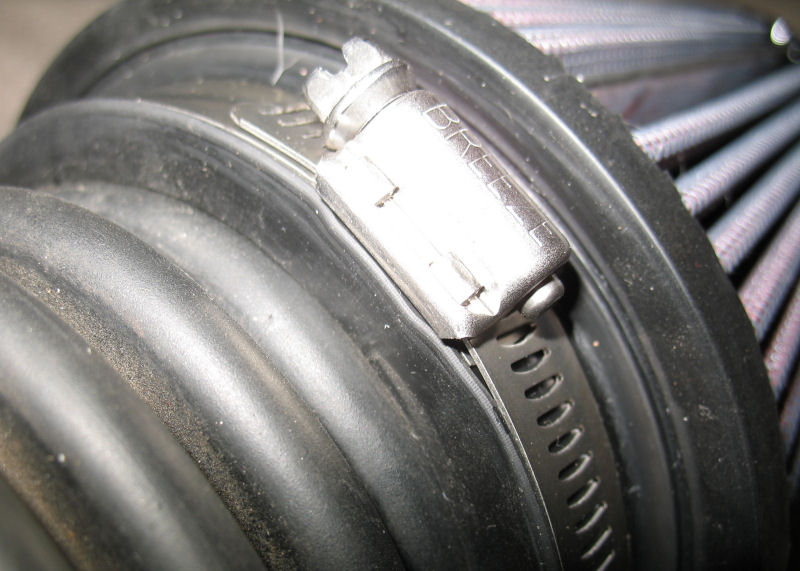
Essentially my plan was to use three of the stock XJ elbows with some exhaust pipe connecting them together, basically arranged in a reversed figure-7. I wanted to keep the design as simple as possible, and wanted to avoid getting into plumbing fixtures or flex hosing or any of that stuff. For the first bend from the filter through the firewall, I wanted to get a simple 2.75-3.25 exhaust adapter so I could butt the elbow to the filter, but while testing some fitment noticed that the flexible part of the stock elbow fit in the opening with some pressure, and once I cranked the hose clamp tight the hose fit perfectly in the opening. Here's a pic showing the initial test fitting (note that the large flange at the end of the elbow has been removed)
Here's a close-up pic of the seam. It's really tight in there. I can violently wave it around and it won't separate.
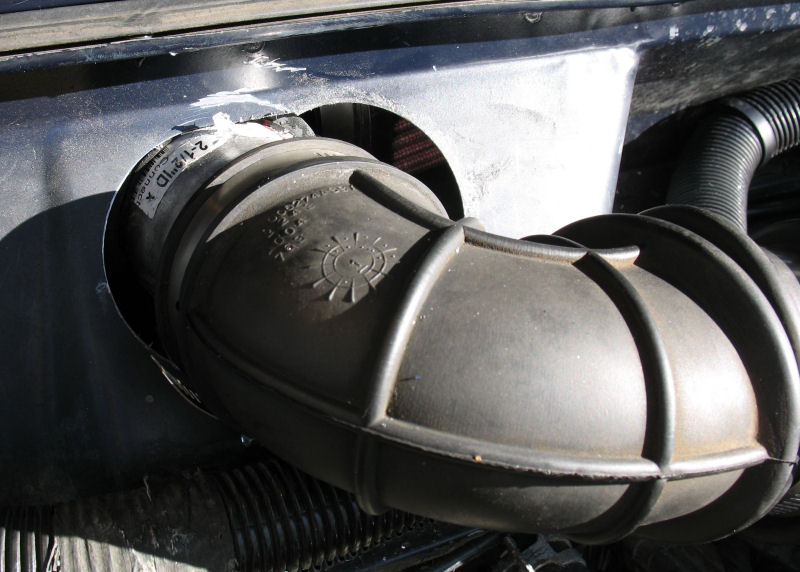
Next I got the assembly into the cowl cavity, measured for distances, cut and reassembled. As you can see in this pic the multiple installs caused some cosmetic damage to the filter, but since it's just cosmetic and the filter is hidden anyway I don't really care. You can also see how small the cavity actually is--a larger filter just will not fit in there.

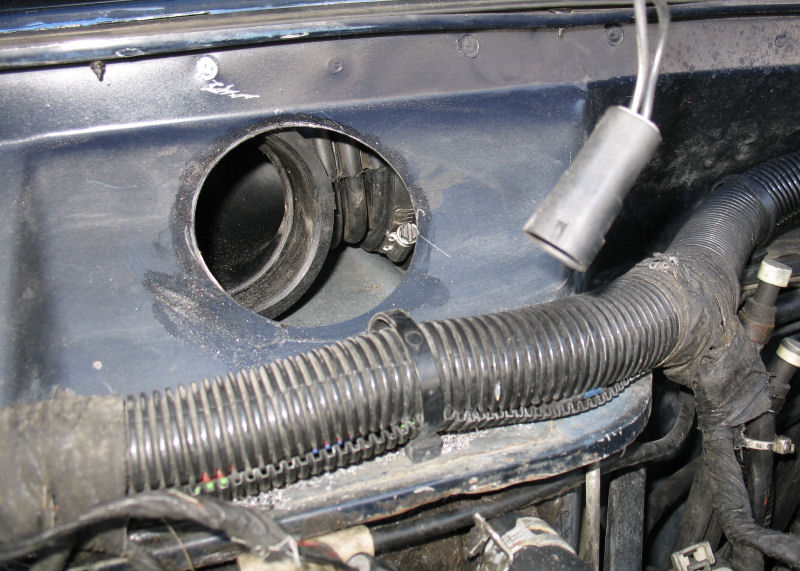
Once the filter seemed to be in a good spot, I used a 1/8" drill bit to make some probe holes in the firewall until I found the center of the elbow, then used a 3" hole saw with a pilot bit to center the hole over the winning probe. You can see the elbow behind the hole here
With the hole in place, I was able to put a piece of 2.5" exhaust pipe into the filter through the opening, and clamp it down.
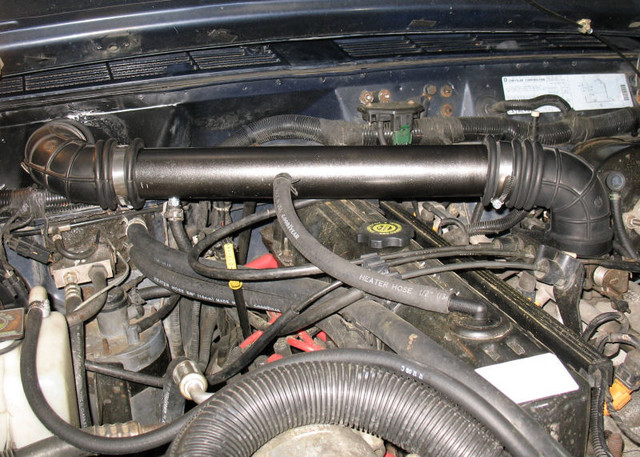
From there, I was able to test fit the other pieces, make measurements and cuts. I started with two stock elbows and a 24" long piece of 2.5" exhaust tubing inserted into the flexible parts of the elbows. The full 24" piece turned out to be about 4 or 5 inches too long (I haven't measured the final piece), and after a couple of cuts I was able to get the ends of the tube to sit at the very last pleat in the elbow just before the bends so that I could minimize turbulence. Another problem that cropped up was the hood light, which pressed into the rubber elbow when the hood was closed so I had to move it over a few inches. That was pretty much all of the fitment adjustments that were needed.
On my 91 there are also two lines that plumb into the filtered side of the airbox, which needed to be tapped into the filtered side of the tube. One is the CCV at the front of the valve cover, and the other is the charcoal fuel-evap canister by the HVAC blower. I looked at plumbing hardware options for a bit, but finally settled on a couple of air compressor fixtures. These are about 3/8" which is wide enough, and they were less than $2 each, so it was easier than the $20 worth of brass fixtures all around. They are threaded for 1/4 NPT so I punched a couple of 1/2" standard holes and forced them to thread, then cranked until the NPT got tight.
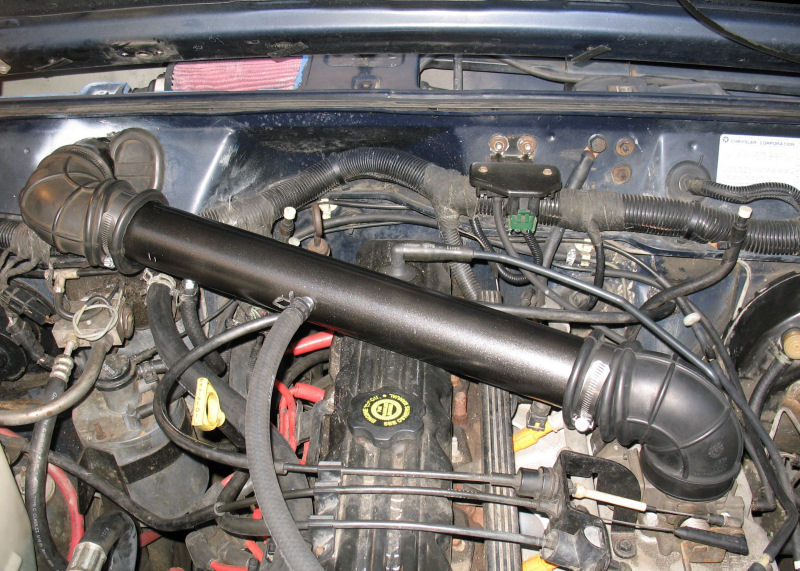
Here is the final result. Seems to work fine. Power has dropped off a bit but it's not sluggish or anything and some of it might come back after the computer learns the new air pressure (but probably not). Noise in the cabin does not seem to be any louder, but the cabin air filter may be blocking some of the noise (it has amplified some of the blower motor noise so that is logical).
And here is the big freaking hole in my engine bay where the airbox used to squat. I am planning to put on-board air compressor and plumbing parts there eventually. That's a little ways down the list yet, but I can get started on it now.
Total cost was about $70. The filter was $40 with shipping from a seller on Amazon, the hose clamps, exhaust tube, and heater hose for the air lines was about $25 at NAPA, and the two air fittings were another $5 (the junkyard did not charge me for the other two elbows). I need to buy something to use for a seal around the hole in the firewall, but haven't decided if I will just use junkyard weatherstripping or I may buy an actual flange of some kind. I also need to paint the exhaust tubing, but it was too cold today.
Here is a pic of the passenger side of the cowl opened up, with some blue RTV around the cut. You can also see a lawnmower filter in the cabin intake that I'm using as a cabin air filter. Recently I cut some sewer drainage pipe for use a splash shield over the cabin filter as well (link), since water was dripping into the A/C system.
The opening is about 4" wide, and the cavity is about 5" deep by 7" wide in that area. This is really small area, and there are not many filters that will fit in that space. I really wanted an AEM filter but they are all 6" circumference at the base which is too large to fit in the cavity even if it would fit through the opening (unlikely). The other options were K&N which doesn't seem to filter well at all, a generic APC-brand filter which looked to be a hair too big, and a couple of Airaid filters. I ended up buying the Airaid 700-433 which is 4-5/8", and is just narrow enough to pinch through the opening and still have room for air to flow in the cavity. It also has a 3-1/4" opening at the mouth, which was needed for the plumbing I had planned. The other Airaid filter is the 700-430 which is identical to this one except it has a 3-1/2" opening.
Essentially my plan was to use three of the stock XJ elbows with some exhaust pipe connecting them together, basically arranged in a reversed figure-7. I wanted to keep the design as simple as possible, and wanted to avoid getting into plumbing fixtures or flex hosing or any of that stuff. For the first bend from the filter through the firewall, I wanted to get a simple 2.75-3.25 exhaust adapter so I could butt the elbow to the filter, but while testing some fitment noticed that the flexible part of the stock elbow fit in the opening with some pressure, and once I cranked the hose clamp tight the hose fit perfectly in the opening. Here's a pic showing the initial test fitting (note that the large flange at the end of the elbow has been removed)
Here's a close-up pic of the seam. It's really tight in there. I can violently wave it around and it won't separate.
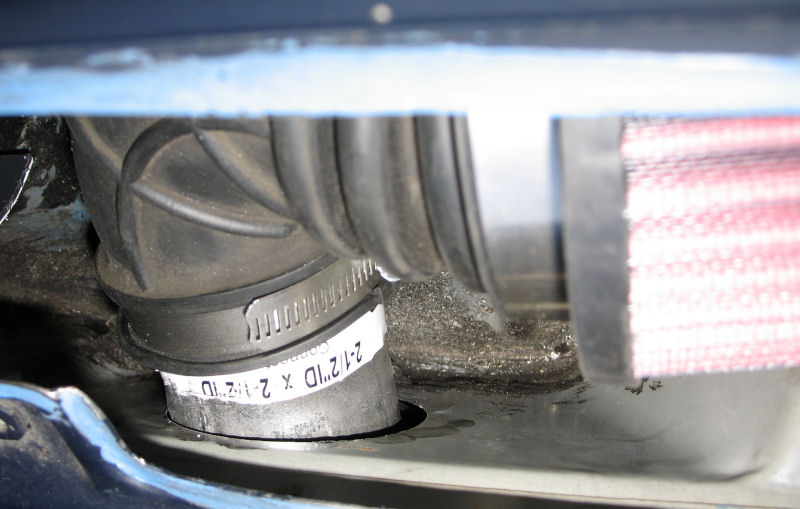
Next I got the assembly into the cowl cavity, measured for distances, cut and reassembled. As you can see in this pic the multiple installs caused some cosmetic damage to the filter, but since it's just cosmetic and the filter is hidden anyway I don't really care. You can also see how small the cavity actually is--a larger filter just will not fit in there.
Once the filter seemed to be in a good spot, I used a 1/8" drill bit to make some probe holes in the firewall until I found the center of the elbow, then used a 3" hole saw with a pilot bit to center the hole over the winning probe. You can see the elbow behind the hole here
With the hole in place, I was able to put a piece of 2.5" exhaust pipe into the filter through the opening, and clamp it down.
From there, I was able to test fit the other pieces, make measurements and cuts. I started with two stock elbows and a 24" long piece of 2.5" exhaust tubing inserted into the flexible parts of the elbows. The full 24" piece turned out to be about 4 or 5 inches too long (I haven't measured the final piece), and after a couple of cuts I was able to get the ends of the tube to sit at the very last pleat in the elbow just before the bends so that I could minimize turbulence. Another problem that cropped up was the hood light, which pressed into the rubber elbow when the hood was closed so I had to move it over a few inches. That was pretty much all of the fitment adjustments that were needed.
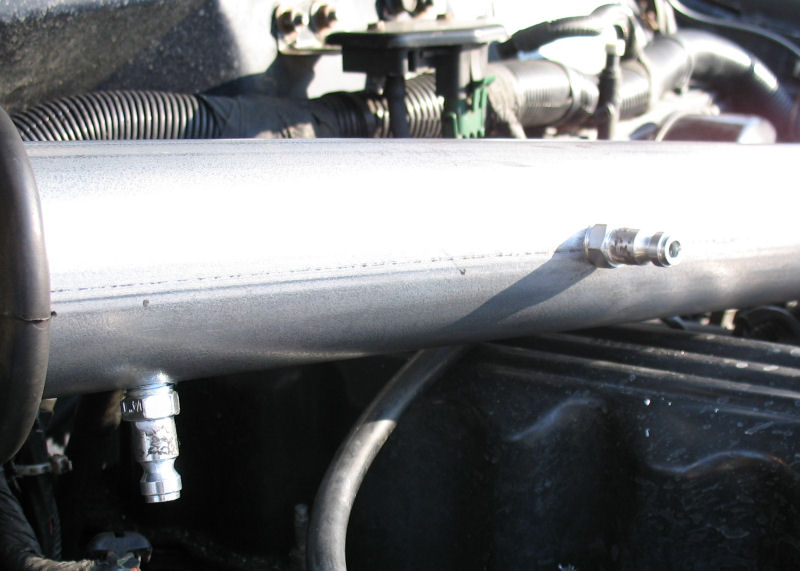
On my 91 there are also two lines that plumb into the filtered side of the airbox, which needed to be tapped into the filtered side of the tube. One is the CCV at the front of the valve cover, and the other is the charcoal fuel-evap canister by the HVAC blower. I looked at plumbing hardware options for a bit, but finally settled on a couple of air compressor fixtures. These are about 3/8" which is wide enough, and they were less than $2 each, so it was easier than the $20 worth of brass fixtures all around. They are threaded for 1/4 NPT so I punched a couple of 1/2" standard holes and forced them to thread, then cranked until the NPT got tight.
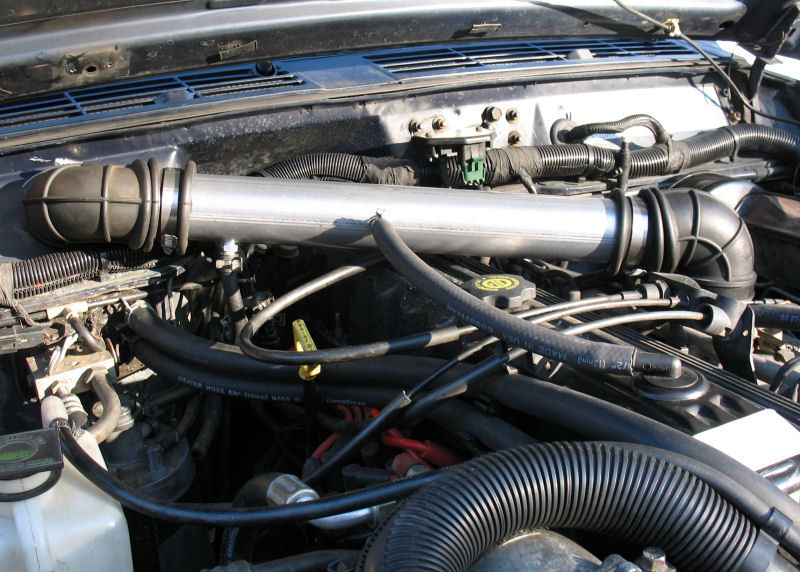
Here is the final result. Seems to work fine. Power has dropped off a bit but it's not sluggish or anything and some of it might come back after the computer learns the new air pressure (but probably not). Noise in the cabin does not seem to be any louder, but the cabin air filter may be blocking some of the noise (it has amplified some of the blower motor noise so that is logical).
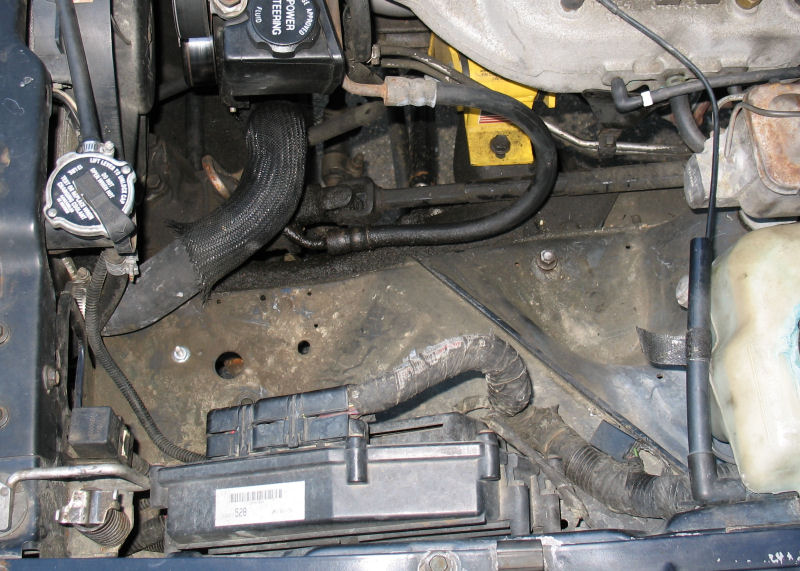
And here is the big freaking hole in my engine bay where the airbox used to squat. I am planning to put on-board air compressor and plumbing parts there eventually. That's a little ways down the list yet, but I can get started on it now.
Total cost was about $70. The filter was $40 with shipping from a seller on Amazon, the hose clamps, exhaust tube, and heater hose for the air lines was about $25 at NAPA, and the two air fittings were another $5 (the junkyard did not charge me for the other two elbows). I need to buy something to use for a seal around the hole in the firewall, but haven't decided if I will just use junkyard weatherstripping or I may buy an actual flange of some kind. I also need to paint the exhaust tubing, but it was too cold today.
") .
.