XJawgi
NAXJA Forum User
- Location
- cleveland ohio
My old man is building up his 95 XJ. One of the things he wanted to do is mount the alternator on top, because he has fried way to many alternators in the past. I did this modification last year, and he actually was the one who machined my bracket for me. You can see my method here:
http://www.jeepskool.com/board/viewtopic.php?f=3&t=291&p=2396
The reason why I'm posting his method is because he simplified this modification without making any special brackets what so ever and used only what he had. I think its genius, and honestly never saw this method before.
Also, before I start - this does involve removing the AC compressor - there are a lot of compelling arguments to keep the compressor for on board air, or to use a TJ or WJ ac bracket. Thats is fine if you wish to do that, im simply showing another EASY method without searching for new parts.
So here goes it'
My method involved using a pre 91 Renix style AC bracket. Basically the bracket has bolts that go through the front of the bracket to hold down the compressor. The 91+ 4.0 used an AC bracket that has bolts that go through the top to secure to the bracket. This is the style my dad had. I also had my old AC bracket off my 00 which he used for mock up and final installation.
You first start off with this:

This was the bracket off the 95. It has an idler pulley, in which my 00' did not have. The pulley will get in the way if when you move the alternator to the top. So if you have this style bracket, simply unbolt the pulley.
Next you take the actual factory alternator bracket that bolts to the side of the engine. It looks like this:

You will end up putting the alternator bracket on top of the AC bracket like this:

You also want to make sure the side rib of the alternator bracket lines up with the rib on the AC bracket like this:
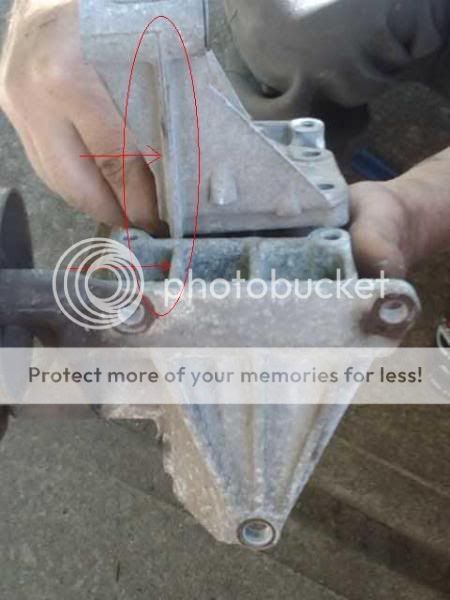
Before you do that, there are a few spots you need to grind down. Basically you want the factory alternator mount to fit flat on top of the AC bracket. The AC bracket has some webbing on top. You will need to grind down the spots shown here:

Unfortunately, I was not there to take a picture of the final bracket when it was ground down. So you just have to keep checking until everything fits smooth and flat.
Now you need to grind down a few spots on the bottom of the alternator bracket like this:
You dont need to grind everything completely away, just enough to make sure you have enough clearance to fit flat and smooth.
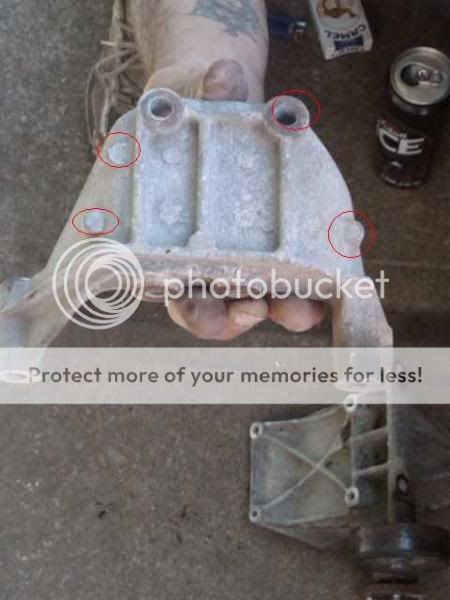
Once you have those brackets fitting smoothly, you will need to drill some holes to mount the two brackets together. So place the alternator bracket on top of the AC bracket (making sure the side ribs are lined up like mentioned before.) Mark and drill the rear two holes of the alternator bracket through the AC bracket. Then drill two more holes a couple inches below the holes you just drilled. Make sure you stay clear the webbing of the bracket to make things easier. I circled where he drilled his holes here:

After you completed that step, bolt the alternator bracket through the holes you just drilled to the AC bracket. I didnt catch what size bolts he used, but you can figure it out. Then simply bolt the alternator to the alternator bracket with the factory bolts like this:
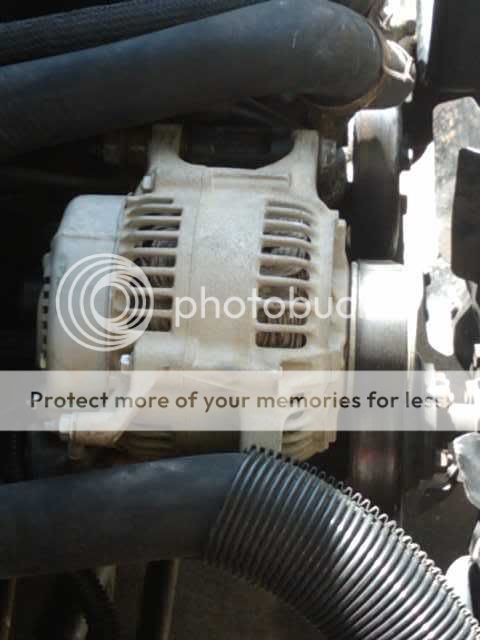

There is one more thing you need to modify before you plug your alternator in. Theres a connection that you need to unbolt and flip.Its the black connector on the back of the alternator. If you dont flip it, it will interfere with the AC bracket.
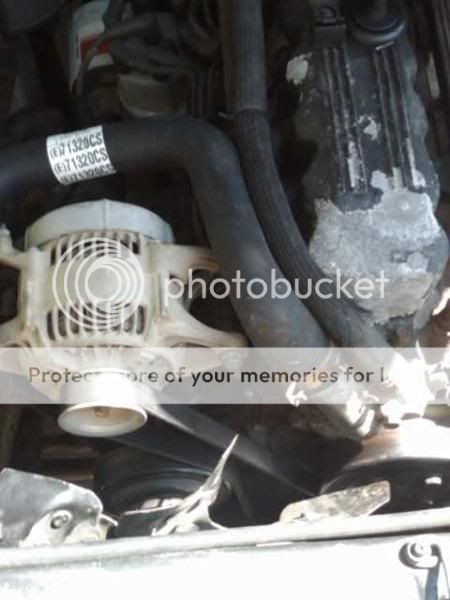
He used a 71 1/2" belt. Its pretty easy to figure out the way the belt is installed, but if anyone needs a diagram, i can draw one up.
So thats it. Only thing that needs to come out of your pocket is a few bolts, and a new belt! Hope this helps!
http://www.jeepskool.com/board/viewtopic.php?f=3&t=291&p=2396
The reason why I'm posting his method is because he simplified this modification without making any special brackets what so ever and used only what he had. I think its genius, and honestly never saw this method before.
Also, before I start - this does involve removing the AC compressor - there are a lot of compelling arguments to keep the compressor for on board air, or to use a TJ or WJ ac bracket. Thats is fine if you wish to do that, im simply showing another EASY method without searching for new parts.
So here goes it'
My method involved using a pre 91 Renix style AC bracket. Basically the bracket has bolts that go through the front of the bracket to hold down the compressor. The 91+ 4.0 used an AC bracket that has bolts that go through the top to secure to the bracket. This is the style my dad had. I also had my old AC bracket off my 00 which he used for mock up and final installation.
You first start off with this:
This was the bracket off the 95. It has an idler pulley, in which my 00' did not have. The pulley will get in the way if when you move the alternator to the top. So if you have this style bracket, simply unbolt the pulley.
Next you take the actual factory alternator bracket that bolts to the side of the engine. It looks like this:
You will end up putting the alternator bracket on top of the AC bracket like this:
You also want to make sure the side rib of the alternator bracket lines up with the rib on the AC bracket like this:
Before you do that, there are a few spots you need to grind down. Basically you want the factory alternator mount to fit flat on top of the AC bracket. The AC bracket has some webbing on top. You will need to grind down the spots shown here:
Unfortunately, I was not there to take a picture of the final bracket when it was ground down. So you just have to keep checking until everything fits smooth and flat.
Now you need to grind down a few spots on the bottom of the alternator bracket like this:
You dont need to grind everything completely away, just enough to make sure you have enough clearance to fit flat and smooth.
Once you have those brackets fitting smoothly, you will need to drill some holes to mount the two brackets together. So place the alternator bracket on top of the AC bracket (making sure the side ribs are lined up like mentioned before.) Mark and drill the rear two holes of the alternator bracket through the AC bracket. Then drill two more holes a couple inches below the holes you just drilled. Make sure you stay clear the webbing of the bracket to make things easier. I circled where he drilled his holes here:
After you completed that step, bolt the alternator bracket through the holes you just drilled to the AC bracket. I didnt catch what size bolts he used, but you can figure it out. Then simply bolt the alternator to the alternator bracket with the factory bolts like this:
There is one more thing you need to modify before you plug your alternator in. Theres a connection that you need to unbolt and flip.Its the black connector on the back of the alternator. If you dont flip it, it will interfere with the AC bracket.
He used a 71 1/2" belt. Its pretty easy to figure out the way the belt is installed, but if anyone needs a diagram, i can draw one up.
So thats it. Only thing that needs to come out of your pocket is a few bolts, and a new belt! Hope this helps!
