• Welcome to the new NAXJA Forum! If your password does not work, please use "Forgot your password?" link on the log-in page. Please feel free to reach out to [email protected] if we can provide any assistance.

beater!

I might be able to fit 35s with enough bump stopping. That leads me towards stronger axles, so once again I am thinking about getting a pair of JK Rubi D44s and building those. For now its good enough to go wheeling.

Have you broken anything out wheeling yet? Planning ahead for 35s can keep me awake at night thinking about it but an axle swap yet seems like territory for some bigger meats 36" and upwards. Slowly reinforce (truss, inner sleeve, reinforce Cs) the dana 30 and it will survive 35s.

I ran 34" ltbs on a bone stock 20 year old dana 30 with a lock rite and an upgraded tie rod for a few seasons no issues.

Love this thread BTW. You had me glued when you put S10 seats in the jeep :thumbup:
 
A friend of mine was parting out one of his XJs and throwing out a set of rock rails, so I grabbed them. No idea who made them. They fit pretty nice.

Rocker_Rails_Side_View.sized.jpg


Today some of us went to Red Cloud in Woodbridge, VA. There was a freak snow storm that turned everything into deep mud by mid-afternoon. All of my armor and recovery gear was used when I slid sideways into a tree, the rocker rails and Napier flares kept from breaking the side of the jeep, and the winch got used for self-recovery 3 different times. Just a big mud puddle by the end of the day.

2016_04_09_RCOR.sized.jpg


I really need some MTs
 
Some pics from the NAC meetup at Anthracite. I really enjoyed that trip, and I'm looking forward to going back to the park again. The weather was perfect, warm and dry, no slipping around on anything at all. I spent most of the day in Full-Time / AWD and only dropped into Part-Time for overkill.

2016_04_13_Anthracite_01.jpg


2016_04_13_Anthracite_02.jpg


2016_04_13_Anthracite_03.jpg


2016_04_13_Anthracite_05.jpg
 
I worked up a quick disconnect for the front license plate today. Basically I took the stock plastic bracket and cut off the overhang lip about 1.5" inches from the front, and then cut two slots into it for some velco strips. The strips go through the hawse which also keeps the bracket from flopping in the wind. Covers the winch, and only takes two seconds to remove.

Front_License_Bracket_Cut.sized.jpg


Front_License_Bracket_Velcro.sized.jpg


Front_License_Quick_Release.sized.jpg
 
Engine bay temperatures have proven to be a problem. The coolant temperature hasn't hit critical temperature yet, but the hood itself has gotten extremely hot a few times, even to the point where rain water evaporates off within a couple of seconds. I looked around at various options for a while but couldn't really find anything I liked, then I found the Rugged Ridge vents for TJ and JK for $50 and decided to try them. They fit pretty well and seem to do the job. Not great quality (OMIX-ADA) but they seem to work alright for now.

The plan was to put one hole on the driver side of the hood over the exhaust manifold to let hot air out, and keep the passenger side closed to protect the ignition components. I also wanted to avoid putting the hole over the brake booster to avoid rust, while also avoiding the truss that runs through the middle of the hood metal. Several measurements later and I had the vents positioned in a spot that looked safe so I drilled for the screw holes, and then measured and marked a spot for the hole.

Hood_Vent_Hole.sized.jpg


The hole could have been a little more to the drivers side. The manifold air temperature sensor is exposed, as is the warning switch on the brake distribution block. I will probably move the distribution block soon, and worst case I can probably move the air temperature sensor too. At some point I would also like to rig up a solenoid or vacuum diaphragm with a flap to close the hole when the temperature is low, but there's a fair bit of engineering involved in that.

Hood_Vent_Exposed_Electronics.sized.jpg


Hood_Vent_Hole_Inside.sized.jpg


The final product looks pretty good.

Rugged_Ridge_Hood_Vents_Installed.jpg


I've taken some measurements with an infrared thermometer and already noticed a dramatic amount of heat shedding. I drove around for an hour to get everything hot and the passenger side decorative vent only measured at 88 degrees, while the driver side vent with the hole measured 133 degrees. I was also able to put my hand on the hood and keep it there--warm but not hot like before. It really draws the heat out of the hood. Quality of the parts is kind of iffy, so I'm not sure how long it will hold up, but for now it seems to work alright.
 
Last edited:
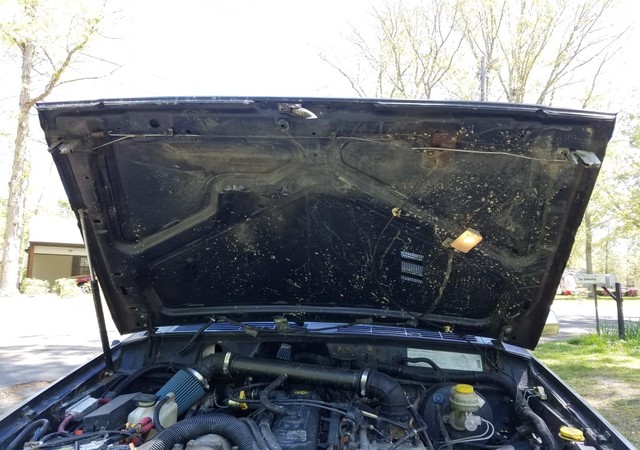
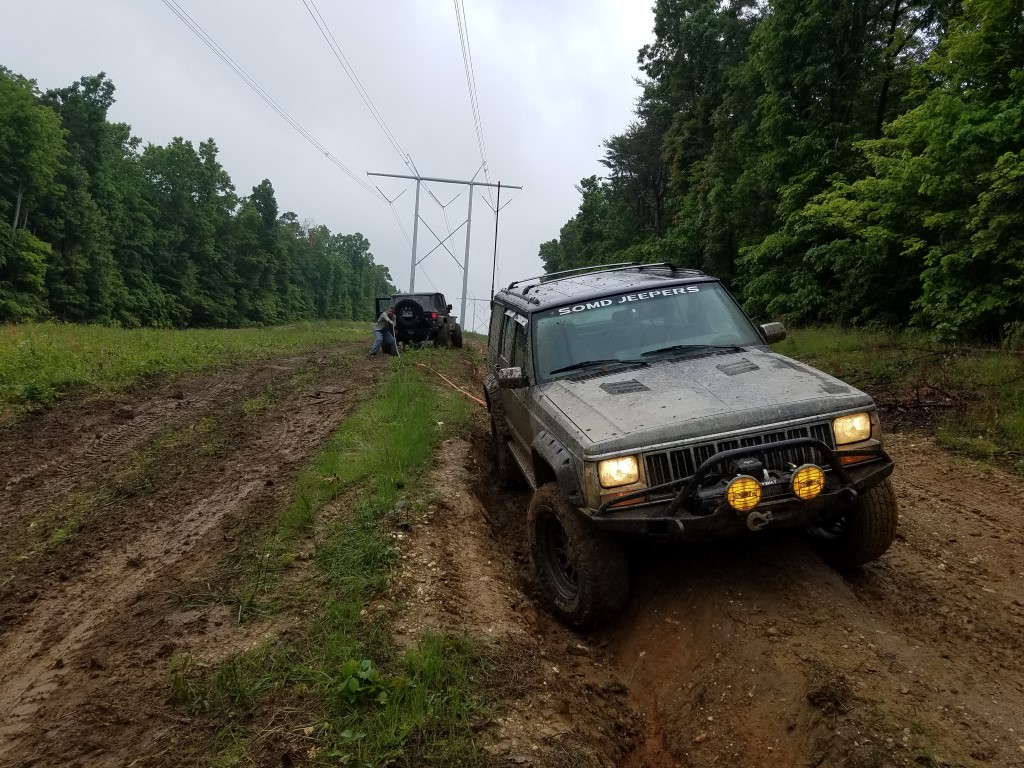
On the way up to Anthracite a couple of weeks ago, my 4WD indicator lights suddenly came on. I pulled off to look at the switch, and noticed the case was really hot--I could barely stand to touch it, when usually it is just kind of warm. I was able to keep driving, and was able to wheel all day and then turn around and drive home, but something was wrong.

Last night I got a chance to pull it open and found the chain was stretched really bad, to the point where I was able to pull it off the front sprocket without removing the sprocket from the gear. Yeap it had gotten cooked.

Stretched_Cloyes_Chain.sized.jpg


The magnet was coated in fuzz again, but this time there was no visible wear.

Magnet_Fur_2.sized.jpg


As near as I can tell, the the gerotor oil pump in the tail housing appears to have failed. Namely the outer ring seems to have gotten stuck in the pump housing, and the inner ring is just buzzing around instead of pushing oil through. It also sounds like the needle bearings on the differential are damaged, but I haven't popped it open yet. The transfer case worked just fine (for now), but obviously something inside has failed.

The good news is I have been rebuilding another NP242 on the side, and I was able to replace the old one with the new one today.

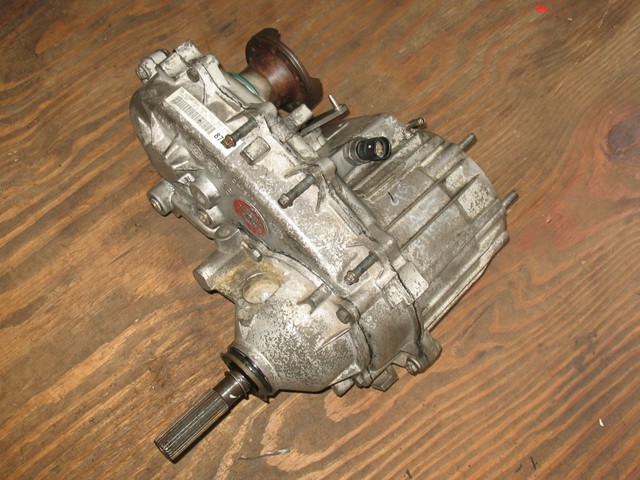
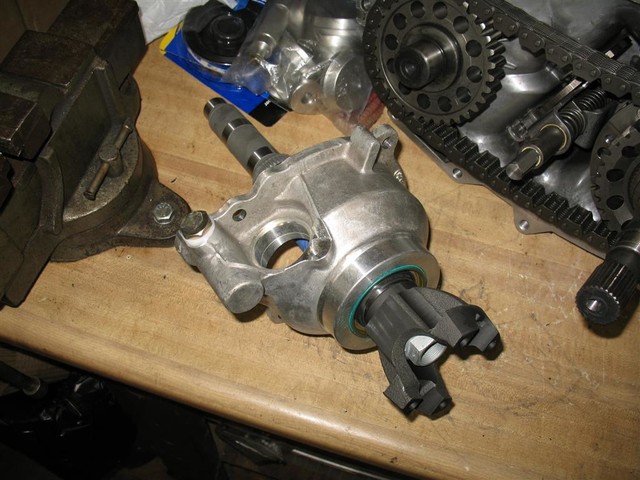
The build started with an NP242-WJ, which is a light-duty (non-HD) option that was installed on some of the early WJs with a 4.0. I had originally bought this from a part-out for $50 on the chance that it had some HD parts but it was just like a late-model NP242-J except for a couple of small differences. The case was pretty clean and felt good, so I decided to use it for a rebuild.

WJ_242_J.sized.jpg


WJ_242_J_Emblem.sized.jpg


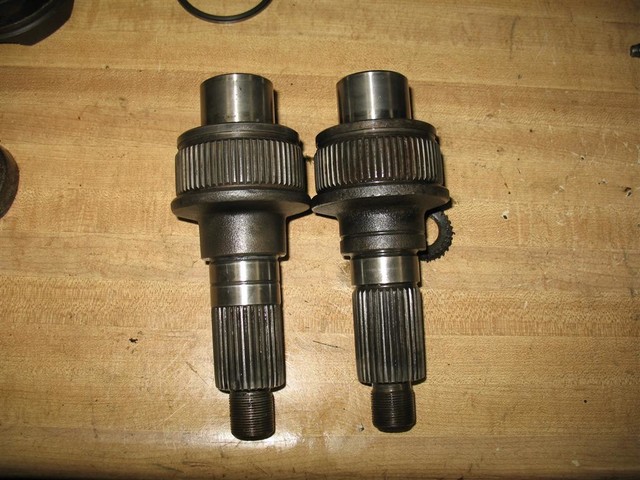
One of the main differences was that it had the CV yoke on the front output, instead of a u-joint yoke. I thought it would be a simple matter of swapping the yoke, but it turns out the input shafts are machined differently, so in order to use the u-joint yoke I had to swap input shafts too.

WJ_CV_vs_XJ_Yoke_Front_Output_Shafts.sized.jpg


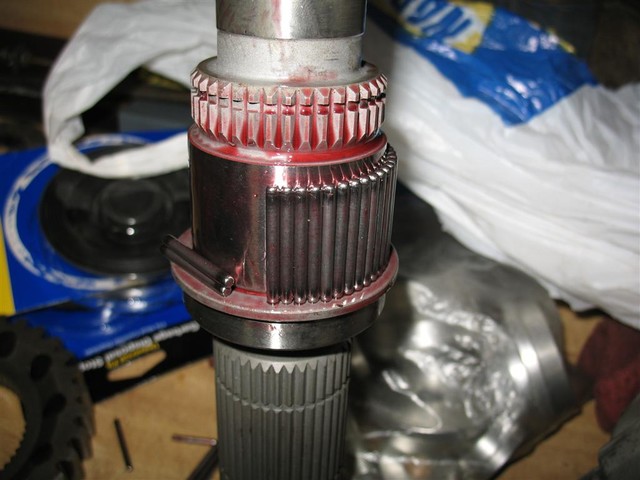
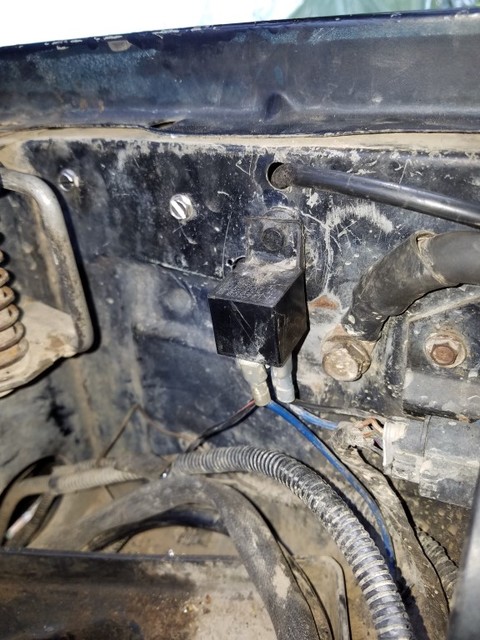
Another difference is that the WJ case does not have a provision in the tail cone casting for a speedo (the WJ got its speed from the wheel speed sensors), or for an indicator switch. The indicator difference was kind of complicated--the 242-J on the XJ has a raised/recessed collar on the end of the shaft that is used to work the indicator switch, which has 3 fixed positions and 2 active circuits (1-ON / both OFF / 2-ON)

XJ_Indicator_Switch_Cut.sized.jpg


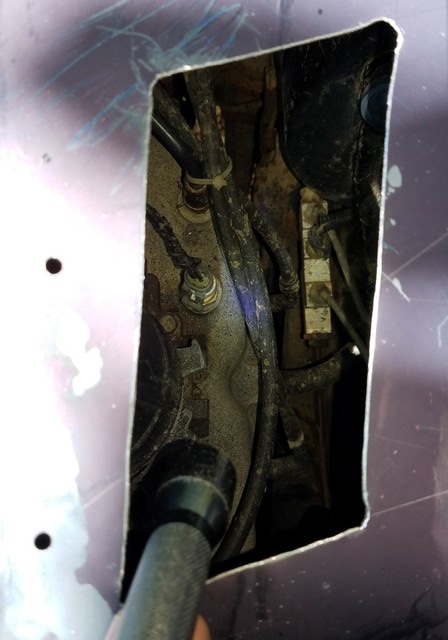
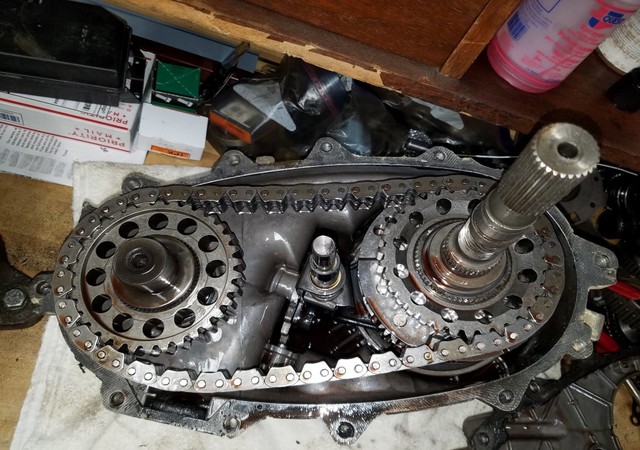
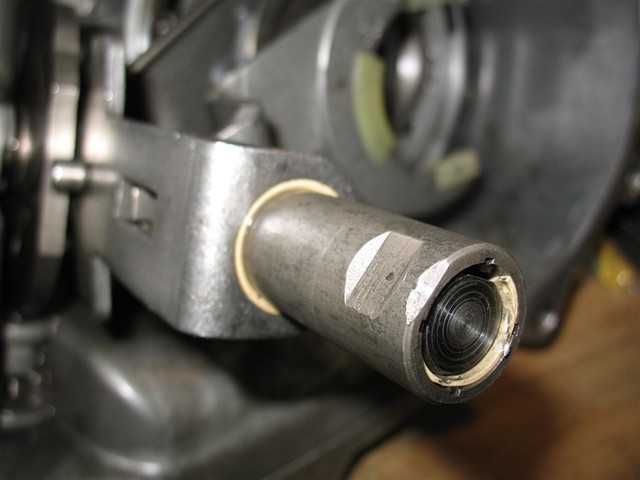
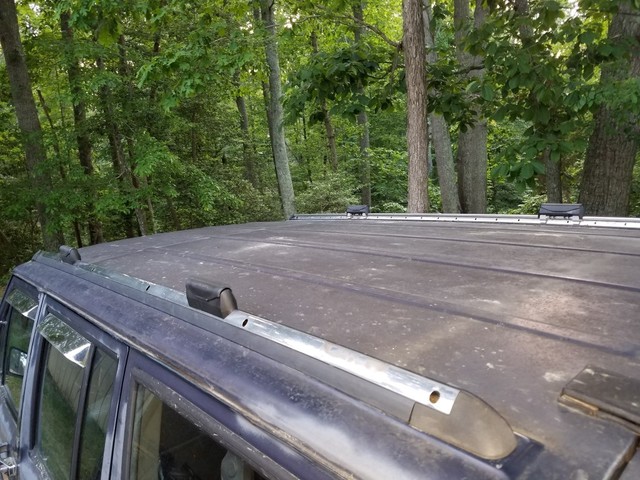
Meanwhile the WJ uses ridges on the shifter / mode wheel, with the switch on top of the case. You can see the ridges on the right side of this picture:

WJ_Indicator_Switch_Cut.sized.jpg


Worse, the WJ switch uses variable resistance on a single circuit, so its not compatible with the XJ electronics. I would have to use the XJ switch, which meant I had to use the XJ rods, mode wheel, and tail housing.

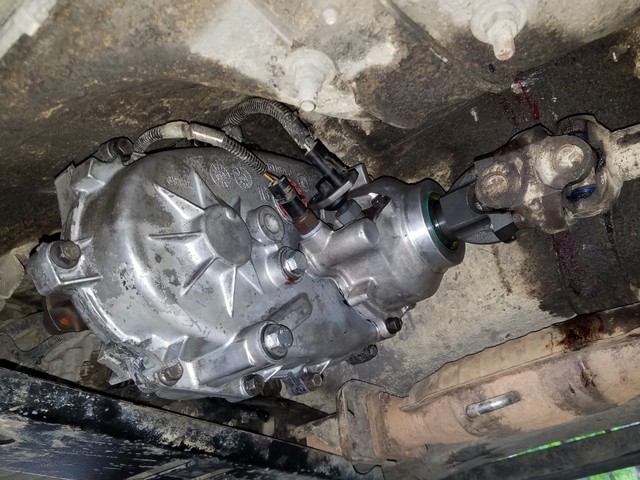
I decided to buy the Advance Adapters NP242 SYE through Tom Woods (their "HD" SYE), which is a true 32-spline SYE with a custom machined shaft. This gave me a stronger output and the correct output housing.

Tom_Woods_NP242_HD_SYE.sized.jpg


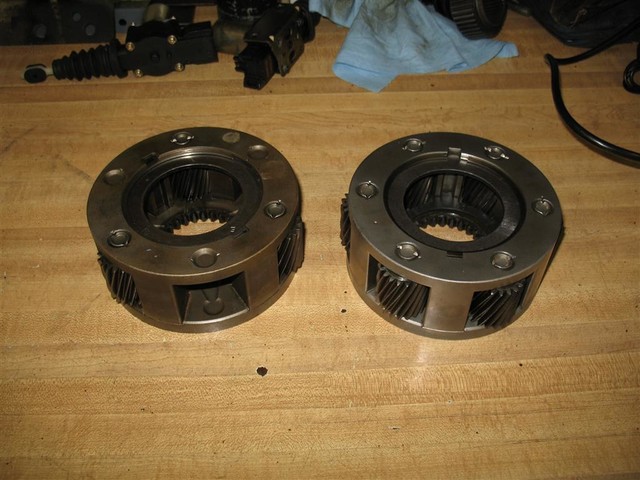
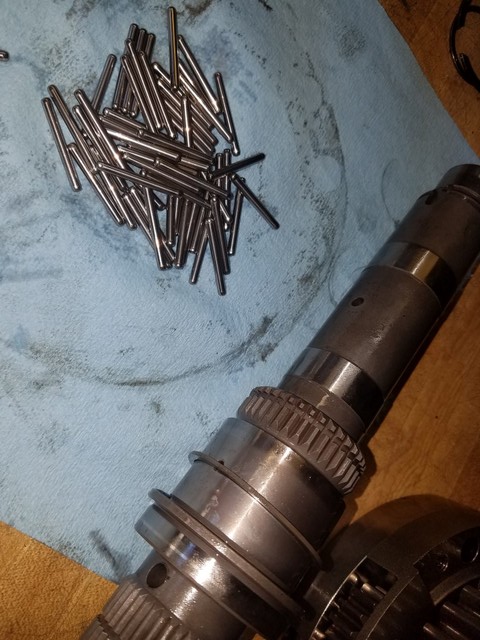
I also bought a 6-pinion low-range planetary on ebay, to improve strength and reduce noise

6_Pinion_Planetary.sized.jpg


While I had it apart, I also replaced all the bearings and seals with new Timken parts

Differential_Needle_Bearings.sized.jpg


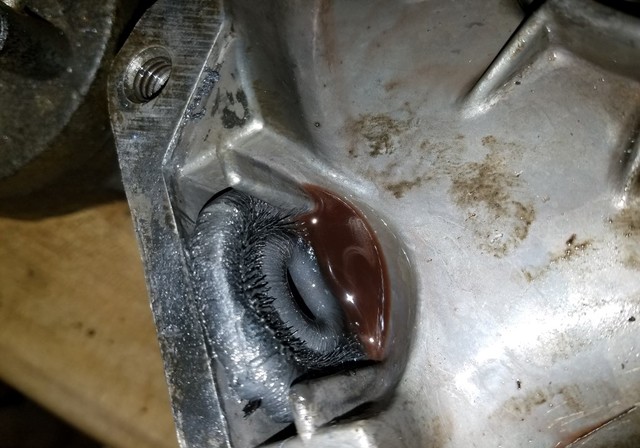
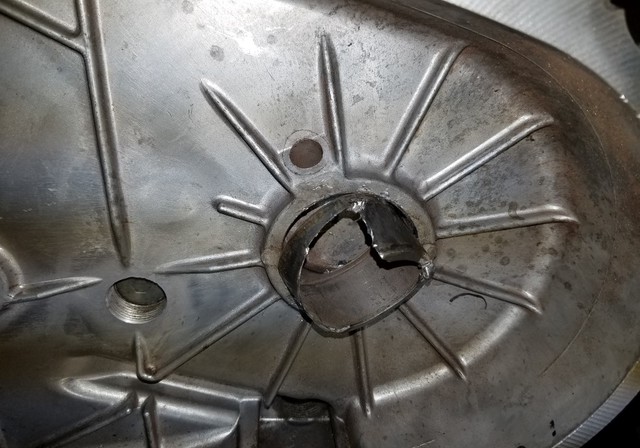
I had some trouble replacing the captive front output stabilizer bearing in the rear case half. I started by trying to pull it out by welding a socket to the lip and pulling it up with a bolt in the socket (thanks OverlandZJ for the idea), but the welds broke free and the bearing never moved. After that, I just cut the bearings and race with the Dremel, and then cut through the outer sleeve enough to push it off the case wall and break the tension.

Front_Output_Welded_Puller.sized.jpg


Front_Output_Cut_and_Release.sized.jpg


Finally got it installed

NP242_WJ_Installed.sized.jpg


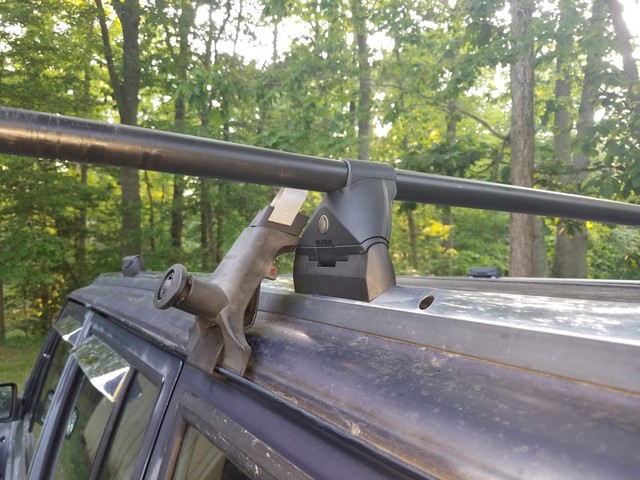
A couple of other things: One, the threaded boss for the indicator switch is too short and doesn't hold the switch at the right depth--this was fixed by using the delrin washer from the included plug as a spacer on the switch, which put it at a workable depth. Two, the AA SYE is shorter than my old hack-n-tap setup, so the old XJ driveshaft is not long enough--this was fixed by using the WJ front driveshaft that I already had on the front for the SYE (part number 52853500AA); this also means I can use the same driveshaft on both outputs again.

I got the case swapped in today and so far it seems to be working alright. I need to get another WJ driveshaft to hook up the front again, but I don't expect any problems. Interestingly, two noises that I had been chasing forever have disappeared, so that is a bonus. There is a little bit of a growl at low speed that's new, but I am going to give everything the chance to settle in for a few days before I start worrying about it.

If I ever replace transfer cases again, I will get a 242-AMG from an H1 Hummer
 
With the AA SYE, the front and rear driveshafts are the same again. I picked up two more WJ driveshafts, so now I have three, two will be run all the time and the third will be a spare.

I also picked up a used Yakima Megawarrior rack with crossbars. It needs a little cleanup but is intact. I'll remove my stock luggage rack and get some low-profile gutter mounts, spring project.
 
Chaos Off Road Park had their spring opening event, so I went with a local friend. The new NP242 has trouble staying in 4WD under load, like the rear mode collar at the differential was slipping halfway out of 4WD and only turning the rear output while grinding the front sprocket; normally when it falls out of 4LO it bangs into Neutral, but this felt like it was slipping at the differential end, and was also happening in 4HI as well as 4LO. The AWD position worked so I used it most of the day. The hood vent did not seem to help with temperatures that much, so I am going to make the hole larger and see if that helps. I still need to get some MTs.

2016_05_14_Chaos_ORP_01.sized.jpg


Looks like you all had way too much fun!
 
Another small mod. I was looking for alternatives to the vacuum reservoir football, and found out that TJs have a compact rectangular reservoir that should be feasible for mounting in lots of oddball places, so I bought one from ebay and got to looking. I was able to get it to mount inside the pocket at the front of the passenger fender (next to the battery, directly behind the header panel), and its out of the way, but I am still looking for other options.

In order to do this better, it would be necessary to remove the outer fender entirely, however that also requires removing the header panel and I didn't want to get too involved with it just yet. Bad enough that I had to remove the battery to drill the holes in the fender. The next time I take the front clip apart, I will look for a better mounting location, possibly behind the upper brace, similar to where the washer fluid bottle is located on the drivers fender on late-model XJs. For now this is good enough.

To start I made a template from cardboard, then installed spring nuts onto the wings of the reservoir.

Wrangler_Reservoir_Template.sized.jpg


Wrangler_Resrvoir_Spring_Nuts.sized.jpg


Then I marked and drilled the upper two holes in the inner fender, then marked and drilled the lower holes. There was already a hole on the inner fender where I could pass the vacuum tube through, so I just heated the tube with a lighter and made a bend in it at the right spot.

Wrangler_Resrvoir_Inside.sized.jpg


Reservoir is tucked up high and forward, and mostly protected.

Wrangler_Reservoir_Installed.sized.jpg


The bottom corner does stick out just a hair, however its protected by the wheel well from below, and the Napier flare from the outside. Its possible that it will get rubbed or hit, however, so I am going to keep an eye on it for a while. Like I said, I would rather have it further back and above the upper fender brace, but I think this is going to work for now.
 
The local FB jeep group had a private event at Red Cloud Off Road in VA. Most a lot of wooded trails with a few obstacles, the kind of place everybody wants to go when they get a Jeep. It was dry for a couple of days then rained overnight and into the morning, so slippery in the open areas but not too bad in the trees.

2016_05_21_RCOR_01.jpg


Slipped into a ditch once, otherwise no problems

2016_05_21_RCOR_02.jpg


One of the guys had an electrical fire, had to strap him out, then he got a tow truck to get him home. Fire extinguisher requirement is no joke.

2016_05_21_RCOR_Relay_Fire.jpg


I'd been having some trouble with temperature spikes on the trails, so I replaced the thermostat and radiator cap on Friday with premium NAPA parts, no problems with it yesterday.
 
I've been working on the Yakima Load Warrior a little here and there, and finally got it installed today.

It came with the Yakima 1A gutter mounts, which are nice and strong, but they stick out the side too far to make me comfortable. Looked around at options and decided to get the Yakima Landing Pads type 2 and the Control Towers to mount to the factory luggage tracks. The landing pads have two hooks that clamp into the track, then the control towers connect to the landing pads on the bottom and hold the crossbar on the top.

Yakima_Landing_Pads_2.sized.jpg


The landing pad / control tower combo is about 1/2" taller than the 1A gutter mount, but is inboard much further.

Yakima_Gutter_vs_Landing_Pad.sized.jpg


The crossbars end up being just a little higher than the stock luggage rack

Yakima_LP_Bar_vs_Stock.sized.jpg


Then the Load Warrior basket has brackets that secure it to the top of the crossbars

Yakima_Basket_Installed_1.sized.jpg


The finished product is kind of high up, safe height is about 7' tall. The Load Warrior is fairly narrow (only 39" wide), so I'm not too worried about tree limbs grabbing it or anything strapped to the side of it (like a jack). The big risk is that something will grab one of the Control Towers or the crossbar overhang.

Yakima_Basket_Installed_2.jpg


Still need to do some more repair work on it. The vinyl wrapper on one crossbar was destroyed so I wrapped the whole thing in electrical tape--need to order another pair of them. Also the threads in the basket extension are stripped, so I need to drill and tap or run some self-tappers through. Small things like that. Then I will start adding onto it, probably a cargo basket of some kind for driveshafts and axle shafts and such. I'm also looking to get light bars on the front and rear to fill in some of the gap

I am still waiting for my Dirtbound bumper / tire carrier to arrive. I plan to mount a ladder to it, and will start moving some of my expedition gear to the roof (spare driveshafts and axle shafts, etc). Then I'll move my spare to the tire carrier, and I'll be able to camp in the cab again.
 
Last edited:
I had to rebuild my NP242 twice again but it seems to be working well now. Specifically it was having problems where it would grind when braking in 2WD (diff slipping forward), and pop out of 4PT Hi and Lo into RWD under acceleration load (diff slipping backwards). It would also squeal at highway speeds. And I found some slow leaks between the transmission and transfercase.

The first time I tried to fix it I just popped it open with the intention of replacing the differential, but when I got it apart I found out that I'd forgotten to install the second spacer on the needle bearings, which allowed the differential to slide back and forth about 1/16th of an inch. That seemed likely to be the cause, so I repaired and reinstalled, but it didn't fix anything.

NP242_Roller_Bearings_and_Spacer.sized.jpg


After that failed to work, I booked some time at a friend's garage and spent a day tearing it out and all the way apart. What I found was that the differential I had used was heavily damaged, not just with slop, but with some metal friction damage as well. You can see in this pic that the inner sleeve picked up some extra metal like its welded on, and there is a friction channel worn into the housing.

1990_Differential_Wear.sized.jpg


When I built this transfercase I used a differential from a 1990 XJ because it had 6 bolts holding it together vs just 3 bolts on the newer units, thinking this would make it stronger. What I didn't take into account, however, was that this differential came from one of the guys in the local club who wheels their junk really hard, and he probably blew it up, which is why he swapped it for a 231. On top of that, my leaving the spacer out probably just added to the problems. All told, differential was blown and needed to be replaced, so I used the one from my WJ case and also installed new needle bearings. I also replaced a couple of seals while it was off and apart.

So far everything seems to be working fine. I took a day trip up to George Washington National Forest with some other guys and put all the positions under stress and nothing seemed to complain. There was not much diff whine but a little bit of chattering that did eventually go away after all the parts settled. I am going to add a tablespoon or two of differential gear oil to the transfercase and see what it does.

Couple of pics from GWNF, on the Flagpole Knob trail

2016_06_04_GWNF_07.sized.jpg


2016_06_04_GWNF_04.sized.jpg


2016_06_04_GWNF_08.sized.jpg


2016_06_04_GWNF_09.sized.jpg
 
I removed the stock heater valve a couple of years ago and have been running the hoses straight through. Unfortunately the AC compressor in my pos is pretty beat, and constant heat in the dash kind of overwhelms it, especially with the way the old-style blend system is setup. I've been thinking about alternative systems for a while and finally started working on something a couple of months ago.

The basic idea is to use a simple in-line vacuum valve to block off supply to the heater core. Then use a bypass towards the front of the engine that will let the coolant return to the pump without shedding heat through the valve at a rapid rate. This is similar to how I setup the heater core in my Cadillac when I did the 4.1 > 4.9 engine upgrade, except that car has two independent returns (one from the core, another from the bypass) that practically eliminates heat transfer altogether. With this setup there is opportunity for contagion, but keeping a long distance on the return leg reduces the rate of heat transfer at the far end enough so that it is not a problem.

For the valve, I used a Four Seasons 74671, which is used on some Audi and Fords (check rockauto.com for interchange list). The valve is setup for 3/4" hose (same as the thermostat supply), normally open (flows when heat is active or when vacuum is removed) with vacuum activating the diaphragm and closing the valve (blocked when HVAC controls are set to cool or turned off). This is installed near the heater core.

Four_Seasons_74671.sized.jpg


Then I rigged up a little bypass from some plastic radiator flush tees, one 3/4" for the supply and one 5/8" for the return. The tees have garden hose fittings but I cut those off with a hacksaw and used JB Weld to form them together (the high-temp stuff not the quick set). This is installed on the lines at the valve cover a little after the pump return tube sticks out.

Plastic_H_Valve_Test.sized.jpg


Installed... When the HVAC controls are set to Heat the valve opens up and coolant flows from the thermostat housing, straight through the 3/4" tee, and through the valve into the heater core. When the HVAC controls are set to Cold or Off, the valve closes and prevents coolant from entering the heater core. At that point the 5/8" bypass channel becomes the low-pressure path and coolant returns directly to the pump intake.

Simplified_Heater_Valve.sized.jpg


Observations so far:

1) It works

2) AC is much more effective. After a while the heater core gets hot anyway (heat transfer) but the rate of transfer is reduced enough for the AC to overcome. I need to take a long drive to fully measure temperature at the AC vents but short trips are obviously better.

3) Heat is still strong but takes a little longer to build up. Some of the hot coolant always escapes through the bypass, so there is less heat transfer, however the lines do build up to full heat eventually, it just takes a couple more minutes.

4) The short coolant return path in bypass mode means the engine reaches operating temperature MUCH faster when the bypass is active. This also makes heat more effective sooner! This is why the delay is short but still works--when the hot coolant enters the core, cabin heat picks up immediately.

4) There is some lag switching from hot to cold. The OEM design is faster (but much less reliable). When you go from cold to hot, the heater core is flooded with hot coolant and transfer happens pretty quick. When you go from hot to cold, the hot coolant that is trapped has to have its heat sucked off by the blower motor before the AC can overcome, which takes a little longer.

5) You have to bleed the air from the heater lines, same as with the stock setup, which can be difficult versus the straight through hoses.

6) Its cheap. Total cost was $18ish for the valve, $5 for the two tees, and I had the JB Weld on hand. I made another bypass and put it in my emergency bag in case the JB Weld doesn't hold, total cost around $30 I suppose

Will test more over the next few months and see how it goes.
Summer is here so I have had a chance to see how this works in high heat scenarios, and unfortunately it seems to be problematic. At 90 degree ambient temps, my old setup would idle around 210-220 with the AC running, but with this setup the idle temps can spike to 230 even with the AC off. I've had to turn on the heat a couple of times just to get the temps down. Today I swapped in a new pair of late-model hoses and temps came back to the normal range even in heavy traffic.

I think there is a problem with restricted flow somewhere. When I rev the engine, the temperature drops noticeably, suggesting that fluid is moving too slowly (NB: no mech fan, so RPMs don't affect fan CFM). With the additional restrictions from the bypass setup, it was probably too much. I'm considering a new radiator to improve coolant flow through the system.

Also the temperature at the vents for the AC has risen again now that the heater core is active all the time (and always partially exposed to the air in the older model design). It was at 45f all the time with the valve (right at FSM spec), but 57ish now. My AC has held a charge this winter, so I think I will get it professionally serviced and see how it works. If it gets below 50 I will leave the straight-through hoses installed.
 
Thought some more about the problem. With the valve activated, flow of coolant to the core is effectively halted. This had the desired effect of reducing temperature at the vents substantially (~15 degree delta). However the engine temperatures goes higher, especially when the ambient temperature is also high (85+ ambient). My current theory is that the heater core has essentially become a second radiator; turn it on and the engine maintains temperature, but turn it off and the engine coolant gets too hot. This suggests that the primary radiator is probably not cooling effectively on its own. I have no idea how old the radiator is, but I haven't found any receipts for a replacement so AFAIK its stock. I also installed a winch bumper this spring which further reduced airflow through it. I am going to order and install a Mopar HD radiator soon, if that works I will reinstall the valve assembly and see if the problem reappears. I will also upgrade the AC system at some point as well, because it needs it, but that will come later.
 
Jeep did great at the NACfest and I had a great time too. Conditions were clear and dry so everything was easy to get a hold on.

2016_06_24_Rausch_02.jpg


2016_06_24_Rausch_01.jpg


2016_06_24_Rausch_03.jpg


Only real problem was still running higher than it should. I'm going to buy the Jeep HD radiator everybody talks about. My build sheet says I had the HD Cooling System that was offered for 91, so I feel good about getting the updated version. I am also going to install a PS cooler while I have everything apart, both to improve performance and increase capacity. Also put two holes in the sidewall of my tire so I need to buy another of those. Transfer case performed flawlessly, just making a little noise in Full-Time.

I think I can fit 35s under the flares with another 1" of lift, so will start working on that with longer front springs and shackle relocators in the rear.
 
Last edited:
I installed the Mopar 52080104AC radiator today, and temperatures are basically back to where they before--205 on the highway 215 at a red light--and that is ~91 degree weather.

I also reinstalled the homemade heater control valve, so AC is working well again.

I am going to do some other cooling mods soon, probably buy a FlowKooler water pump, rebuild my trans cooler, and install a power steering cooler. I also want to replace the AC compressor and get it properly recharged but low necessity with the control valve working.
 
Last edited:
Went with a small group from the local FB club to Rausch on Saturday and PA Jeeps on Sunday. Saturday was great wheeling, ground was dry and could get around everywhere. I finally remembered to get the Jeep trail badges, including Crawl Daddy which is rated as a red by the park--only did about a quarter of the trail though. Just had a good time with my junk

2016_07_16_Rausch_Crawl_Daddy.sized.jpg
2016_07_16_Rausch_Flex.sized.jpg


Saw some great XJs at PA Jeeps' All-Breeds Jeep Show, and got to meet with a couple of guys again. Does this Comanche belong to anyone here?

2016_07_16_PA_Jeeps_01.sized.jpg


I am working on a couple of things, and hope to make some significant upgrades in the next few weeks.
 
Back
Top