-
Welcome to the new NAXJA Forum! If your password does not work, please use "Forgot your password?" link on the log-in page. Please feel free to reach out to [email protected] if we can provide any assistance.
You are using an out of date browser. It may not display this or other websites correctly.
You should upgrade or use an alternative browser.
You should upgrade or use an alternative browser.
Supercharged LS3 crammed into an XJ
- Thread starter Skruffy
- Start date
I like what you did with that CEL. I think my '01 is going to get an anti-anxiety CEL controller soon. Cheers!
Thanks man!
Got a couple more circuits covered.
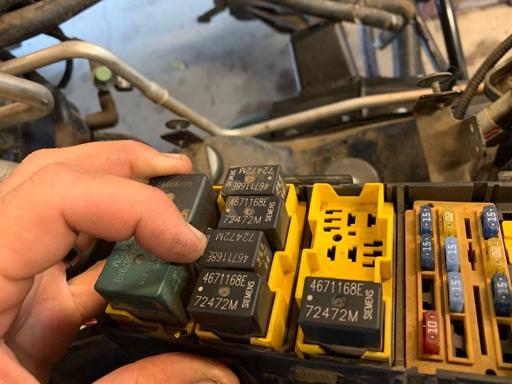
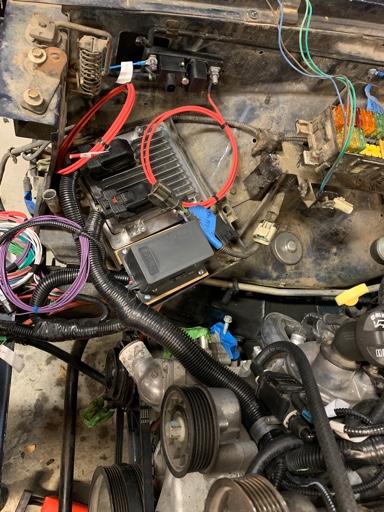
First was the neutral safety switch. The lokar shifter has a switch built into it so I used that as an interrupt between the starter relay and the starter solenoid. This way it will only start if the transmission is in park or neutral. To by pass the Jeep’s neutral safety switch relay I simply grounded the black/white tracer sensor wires that go into the starter relay. Now the Jeep always thinks it is in park/neutral and the lokar always gets current but only sends that current to the starter if the transmission is actually in park or neutral.
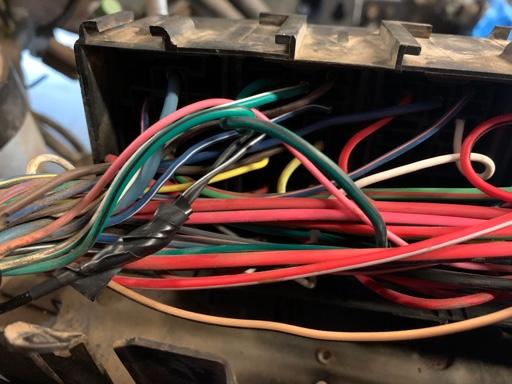
Below is the starter relay and below that shows the bk/wh wires that need to be grounded.
First was the neutral safety switch. The lokar shifter has a switch built into it so I used that as an interrupt between the starter relay and the starter solenoid. This way it will only start if the transmission is in park or neutral. To by pass the Jeep’s neutral safety switch relay I simply grounded the black/white tracer sensor wires that go into the starter relay. Now the Jeep always thinks it is in park/neutral and the lokar always gets current but only sends that current to the starter if the transmission is actually in park or neutral.
Below is the starter relay and below that shows the bk/wh wires that need to be grounded.
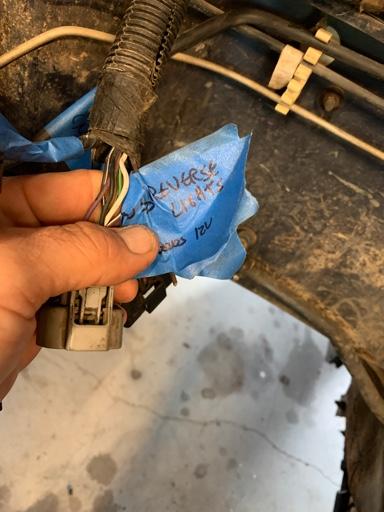
I also isolated the wire that feeds the backup lights for future use. On order is an item from spear tech that will allow me to use the back up lights.
I also wired my zero gravity tap shifter module into my locker shifter. Super easy and no need to photograph.
Got the motor chained up and will be putting it in today!

I also wired my zero gravity tap shifter module into my locker shifter. Super easy and no need to photograph.
Got the motor chained up and will be putting it in today!
maxbraketorque
NAXJA Forum User
- Location
- PDX
How much does it weigh in comparison to the 4.0 and AW4?
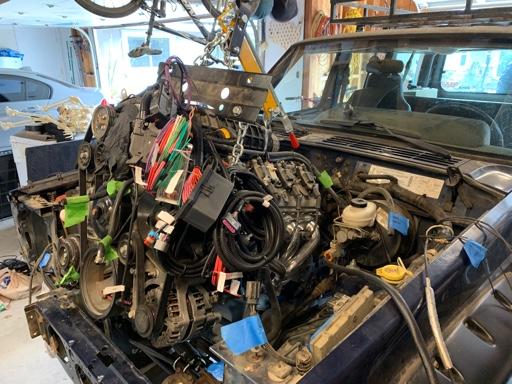
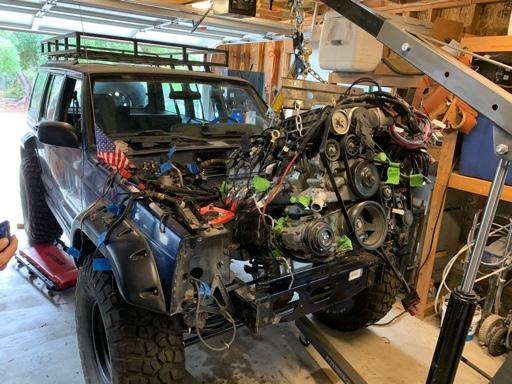
Got the motor in today and there was good and bad news.
Good news is that it is in and mounted and will work.
Bad news is that the alternator sits about 1/2"-1" too far to the drivers side. I will start look around for a mount that pulls the alternator closer to the body because the camaro mount means that the alternator interferes with the power steering box. There are millions of LS alternator mounts available and I cant tell which ones would improve my situation.
Anybody know how much smaller a CS121 style alternator is compared to a CS130? I am only needing a little bit of clearance here to make it work. If the smaller alternator would fit that would be great since I wouldn't need to find another belt and since the engine is supercharged all bets are off when it comes to looking for belts!
If anyone is wondering there is tons of room on the passenger side where the AC compressor is mounted. The transmission fit just fine in the tunnel, and the Clayton's Offroad crossmember that I have in there was in the right spot to mount the transmission as well. I needed to drill one hole for the rubber mount and that was it, all things considered not bad at all. T-case went right in clocked to the left one hole, I also had to trim the Novak T-Case cable mount about the size of a dime so that the shift lever didn't interfere. No big deal either. I didn't put the drive shafts in yet but have a fantasy that they will fit without modification.
I will definitely need to do something with the hood as expected.
I knew there would be some sort of problem (besides the hood) and I can live with messing around a bit with the alternator placement.
Last edited:
- Location
- In a strange land
Pictures remind me of watching a snake swallow something. Something that looks like it shouldn't fit.
Nice to see that it does indeed fit. Sort of.
Looking forward to your solution for the alternator.
Nice to see that it does indeed fit. Sort of.
Looking forward to your solution for the alternator.
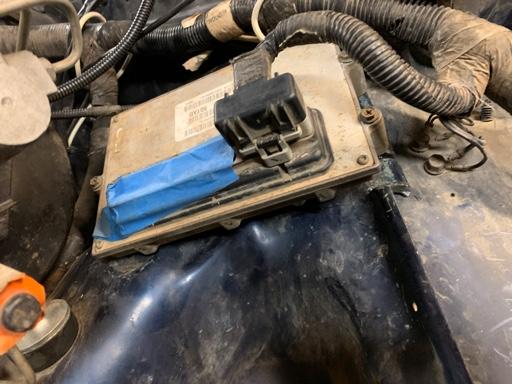
As I wired everything up I realized that I will need to place my battery on the drivers side, this of course forces me to move the Jeep ecu.
With the battery out of the way I will be able to mount the GM ecu on the passenger side. Tomorrow the alternator mount should arrive so I can finish that portion and order a new serpentine belt.
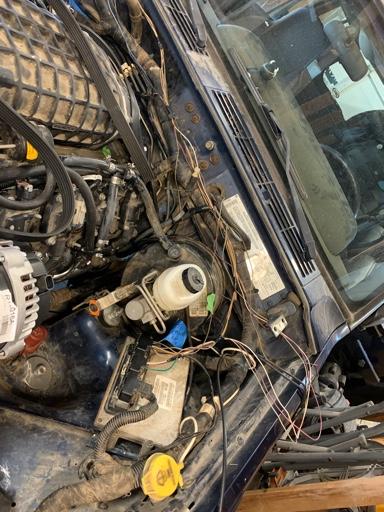
I also need to plug in all the last remnants of my XJ engine harness to run my gauges. Anybody know how the circuit for the 4wd indicator light on the dash works. The light that comes on when the Jeep is in 4wd. My XJ would light up and say “part time”.
The switch is located in the transfer case, it has two wires running into it, one goes right to ground the other comes from a 14 pin flat connector that merged the engine and transmission wiring harnesses. It is the least important light on the dash but would be nice to retain if it’s not too much trouble.
.


The transmission mount worked out great. It looks like overall the tcase is about 1” forward from its stock location. If you have a normal lift your drive shafts would be fine but my air suspension means that at full compression the front drive shaft becomes a limiting factor. I will need to shorten it a bit. The rear seems to be fine.
EDIT: tcase is about 2.5"-3" forward not 1". The novak engine mounts allow a little adjustment front and rear. I put them in the middle, but if I did it again I would mount it all the way back to get more room with the AC compressor and frame rail.
With the battery out of the way I will be able to mount the GM ecu on the passenger side. Tomorrow the alternator mount should arrive so I can finish that portion and order a new serpentine belt.
I also need to plug in all the last remnants of my XJ engine harness to run my gauges. Anybody know how the circuit for the 4wd indicator light on the dash works. The light that comes on when the Jeep is in 4wd. My XJ would light up and say “part time”.
The switch is located in the transfer case, it has two wires running into it, one goes right to ground the other comes from a 14 pin flat connector that merged the engine and transmission wiring harnesses. It is the least important light on the dash but would be nice to retain if it’s not too much trouble.
.
The transmission mount worked out great. It looks like overall the tcase is about 1” forward from its stock location. If you have a normal lift your drive shafts would be fine but my air suspension means that at full compression the front drive shaft becomes a limiting factor. I will need to shorten it a bit. The rear seems to be fine.
EDIT: tcase is about 2.5"-3" forward not 1". The novak engine mounts allow a little adjustment front and rear. I put them in the middle, but if I did it again I would mount it all the way back to get more room with the AC compressor and frame rail.
Last edited:

Wiring complete! Well except for the power to the fans since I have yet to instal the radiator.
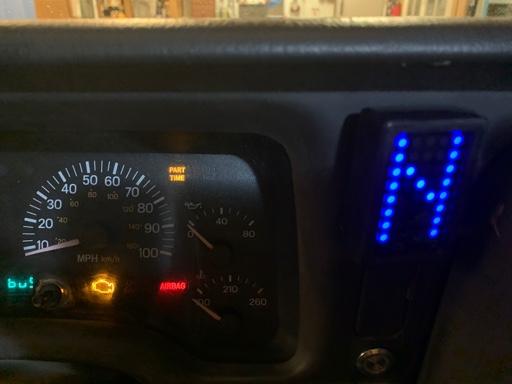
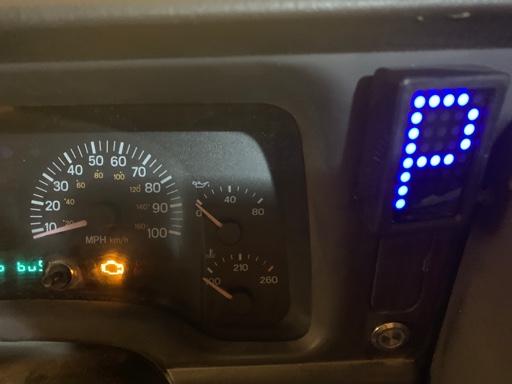
I also installed a shift boot on the locker shifter. And wired it all into the Chevy transmission. I also installed that nifty little display (top left) that shows me what gear I am in. I bought it from Spear Tech along with a CAN BUS relay that will know when I am in reverse and send power to the reverse lights. Easy peasy.
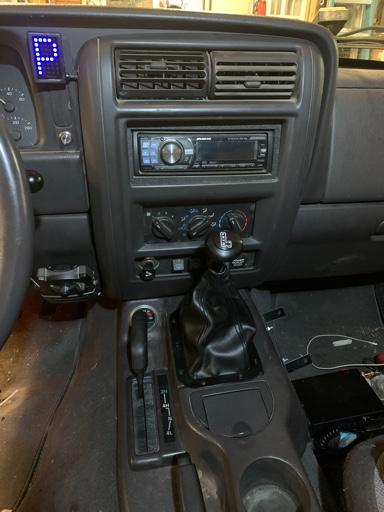
I also hard wired in the 4wd indicator light so that the little thing comes on when the Jeep is in 4wd. I isolated that bulb on the dash cluster like I did with the check engine light. Both are working correctly I am happy to report!
I got the shift linkages installed and adjusted correctly as well.
Also, that little button under the "P" is for my Air Conditioner clutch. The way the jeep determined if the AC was on or not was surprisingly complicated. The jeep always sends 12V to the high pressure switch, if the pressure is good the 12V makes it to the low pressure switch, if the pressure is still good it goes into a blue wire with a white tracer. That wire runs to the computer (C1 pin 22). When the AC is supposed to be on the computer supplies a ground at pin 22, which allows current to flow. That current splits at the high pressure switch and goes to a relay in the Power Distribution Center that closes and allows 12V to flow to the compressor clutch.
I scratched my head for a while trying to figure out how to integrate this into the Novak harness but couldn't quite wrap my head around it. So I took the easy route and just put a simple interrupt on the dash. When the button is pushed current flows through the Novak AC relay that is now wired into the high and low pressure switches. I am sure there is a way to do it without the button but it eludes me.
I also installed a shift boot on the locker shifter. And wired it all into the Chevy transmission. I also installed that nifty little display (top left) that shows me what gear I am in. I bought it from Spear Tech along with a CAN BUS relay that will know when I am in reverse and send power to the reverse lights. Easy peasy.
I also hard wired in the 4wd indicator light so that the little thing comes on when the Jeep is in 4wd. I isolated that bulb on the dash cluster like I did with the check engine light. Both are working correctly I am happy to report!
I got the shift linkages installed and adjusted correctly as well.
Also, that little button under the "P" is for my Air Conditioner clutch. The way the jeep determined if the AC was on or not was surprisingly complicated. The jeep always sends 12V to the high pressure switch, if the pressure is good the 12V makes it to the low pressure switch, if the pressure is still good it goes into a blue wire with a white tracer. That wire runs to the computer (C1 pin 22). When the AC is supposed to be on the computer supplies a ground at pin 22, which allows current to flow. That current splits at the high pressure switch and goes to a relay in the Power Distribution Center that closes and allows 12V to flow to the compressor clutch.
I scratched my head for a while trying to figure out how to integrate this into the Novak harness but couldn't quite wrap my head around it. So I took the easy route and just put a simple interrupt on the dash. When the button is pushed current flows through the Novak AC relay that is now wired into the high and low pressure switches. I am sure there is a way to do it without the button but it eludes me.
Last edited:
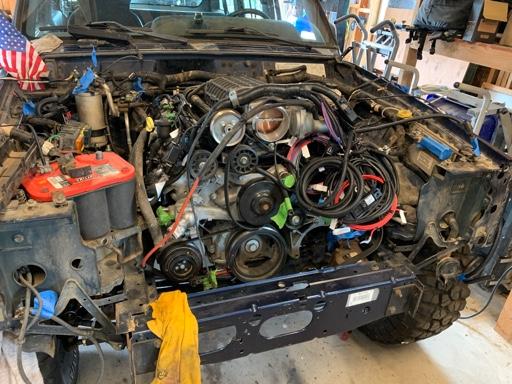
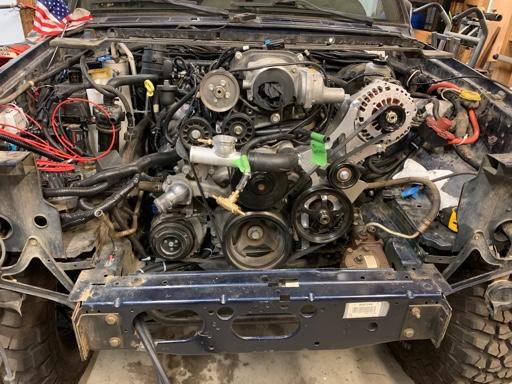
Now back to the front where I have installed an ICT Billet power steering and alternator bracket to deal with the clearance issue from the camaro brackets.

There is now plenty of clearance around the steering box. This mount puts the alternator way up high which would be a problem for most guys but since I need to modify my hood anyway it is not a problem.
I also didn’t realize that the new bracket only accepts truck alternators and power steering pumps so I had to get the truck versions of those to make it work. Naturally I failed to order a pully and am now waiting on one to arrive so I can install it and measure for my serpentine belt.
After I sell the camaro power steering pump, alternator and brackets on OfferUp this will have cost me about $200 to make it work. All things considered that’s not terrible.
Another problem is that my plan to put the battery on the drivers side will not work with the new placement of the alternator so the batter will have to move to the cargo area. Luckily I took the 15’ long 1AWG cable from the camaro just in case.
Over the weekend I hope to finalize my driveshafts, relocate the battery, and if the pully shows up get it on and belt measured and ordered. Then on to the radiator, trans, and power steering coolers, ac, and somehow some way an intercooler for that supercharger.
Last edited:
I think if you used the alternator bracket from this kit you could have kept everything else. This appears to move the alternator in and up about 3/4", as close to the block as possible. That said I didn't find just the alternator brackets on their site.
https://www.ictbillet.com/ls-truck-...ring-pump-bracket-lsx-ls3-lq4-lq9-billet.html
I bought the L99 Camaro stuff so I have the same problem, but I am not chopping up the hood for clearance. If I have to I'll just make a bracket, but there's not much room left to move the alternator in the stock position.
On mine the stock XJ power steering pump bolts into the L99 Camaro bracket (with different bolts) and the stock lines to the box actually fit perfectly, too. Shame to have to change all that.
I think if you used the alternator bracket from this kit you could have kept everything else. This appears to move the alternator in and up about 3/4", as close to the block as possible. That said I didn't find just the alternator brackets on their site.
https://www.ictbillet.com/ls-truck-...ring-pump-bracket-lsx-ls3-lq4-lq9-billet.html
I bought the L99 Camaro stuff so I have the same problem, but I am not chopping up the hood for clearance. If I have to I'll just make a bracket, but there's not much room left to move the alternator in the stock position.
On mine the stock XJ power steering pump bolts into the L99 Camaro bracket (with different bolts) and the stock lines to the box actually fit perfectly, too. Shame to have to change all that.
I didnt even consider using the XJ pump. That would have been smart, I am committed at this point and I already gave my buddy the XJ engine with all the accessories anyhow. I did look at the bracket you sent but if you dig deep and find the measurements none of the brackets that bolt in thst location will work. I cant remember now but I think they are all 8.25-8.75" from the center of the crank to the center of the alternator. Add a pully and it puts you 11.5"+ and the steering box sits at 11.25" so even with a mini alternator there is no room and certainly no clearance, at least not in my case.
I made a little progress over the weekend. I got the power steering pully installed and measured the serpentine belt and amazingly found the perfect size (91-5/8") on the first try. Usually I have to make a bunch of trips to the store and find out that what I need doesn't actually exist. I was able to relocate my battery to the cargo area. When I stripped the camaro I pulled 15' of 1AWG wire that sure came in handy for the battery relocation. In the process I re-did some previous wiring for my air compressor. With shorter runs and heavier gauge wire it is running much better. I also was able to hook up my power steering pump to the steering box. I could hardly believe it but the XJ power steering hose threaded right into the chevy power steering pump. All I had to do was make a couple soft bends in the tubing and the high pressure side is in. The low pressure side will be routed through a small (7"X11") cooler. Another 8"X16" cooler will go right next to it for the transmission. Once all that is in I will start looking for an intercooler that can go in the remaining space. I am also considering the space below the radiator, between the frame rails. It wont get as much air flow as the grill but there sure is lots of room.
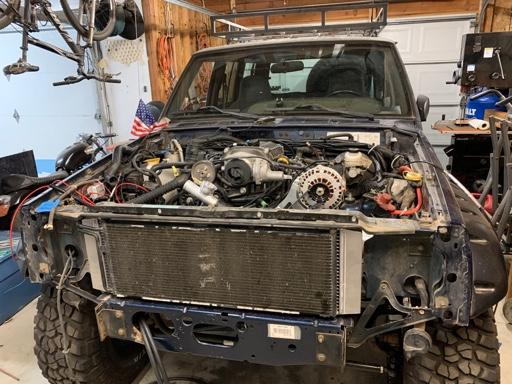
I messed around with the ridiculously huge Novak radiator. It drops right in but because it is so thick the AC condenser doesn't mount to it without modification. So I fabbed up some brackets and got the radiator and AC condenser set together.
The Drivers side of my engine bay is going to be tight space for sure, all the ports on the radiator and the AC condenser come out pretty much right on top of each other. It is going to work, just going to be real tight.
RockyMtn96XJ
NAXJA Forum User
- Location
- Littleton, CO
Soooo, what happened here?
RockyMtn96XJ
NAXJA Forum User
- Location
- Littleton, CO
Nevermind, my computer is stupid. Only showed me 1 page of the thread.
Seems like  has been down for a few days. In the mean time I got a lot done.
Radiator dropped right in, a bit of ass pain to mix and match hoses but I found a solution. This is the original AC condenser on there. I pity the fool that has to plumb it in cause it is gonna be a bear.
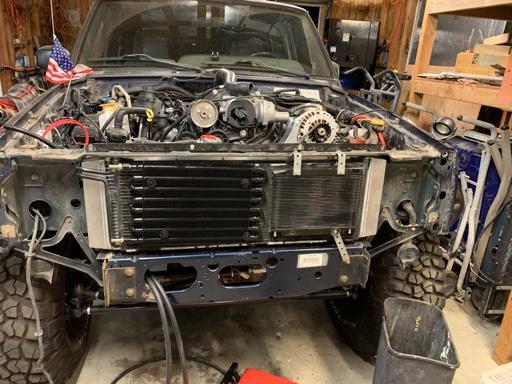
Trans cooler and power steering cooler went on easy peasy.

And finally got the face back on. There is about an inch of space left up front for an intercooler. Not sure if I am going to put it in that space or the space below (right behind the bumper).
Once the plumbing was done I went ahead and filled the coolant and power steering, crossed my fingers and turned the key. It fired right up. Super loud with just straight headers. I had a bit of a panic when I didnt see the oil pressure rise. So I shut her down to investigate. None of my gauges are working so I suspect a grounding problem and will look into it today. I threaded in an analog oil pressure sensor cranked it and watched the pressure climb. So oil pressure is good, I just need to find the problem with the guages.
I went ahead and purged the Power steering pump as well as the coolant. Fans came on and off as expected. So far so good.
My drive shafts are getting modified and should be getting them back early next week. If anyone else is doing this engine transmission combo, expect to need to adjust your drive shafts. With my suspension at full compression the rear shaft needs to be 34" (it was 32.5") the front needs to be 27" (it was 28.5"). At full lift (about 10" from stock) the rear needs to be 35" and the front needs to be 27.5". Those measurements are of course the extremes. Once I get the driveshafts back I will be off to the exhaust shop. After that all I have left is AC, intercooler and of course the hood!
has been down for a few days. In the mean time I got a lot done.
Radiator dropped right in, a bit of ass pain to mix and match hoses but I found a solution. This is the original AC condenser on there. I pity the fool that has to plumb it in cause it is gonna be a bear.
Trans cooler and power steering cooler went on easy peasy.
And finally got the face back on. There is about an inch of space left up front for an intercooler. Not sure if I am going to put it in that space or the space below (right behind the bumper).
Once the plumbing was done I went ahead and filled the coolant and power steering, crossed my fingers and turned the key. It fired right up. Super loud with just straight headers. I had a bit of a panic when I didnt see the oil pressure rise. So I shut her down to investigate. None of my gauges are working so I suspect a grounding problem and will look into it today. I threaded in an analog oil pressure sensor cranked it and watched the pressure climb. So oil pressure is good, I just need to find the problem with the guages.
I went ahead and purged the Power steering pump as well as the coolant. Fans came on and off as expected. So far so good.
My drive shafts are getting modified and should be getting them back early next week. If anyone else is doing this engine transmission combo, expect to need to adjust your drive shafts. With my suspension at full compression the rear shaft needs to be 34" (it was 32.5") the front needs to be 27" (it was 28.5"). At full lift (about 10" from stock) the rear needs to be 35" and the front needs to be 27.5". Those measurements are of course the extremes. Once I get the driveshafts back I will be off to the exhaust shop. After that all I have left is AC, intercooler and of course the hood!
Last edited:
- Location
- Fullerton, Ca
Love this build thread! Thanks for posting it.
Similar threads
- Replies
- 0
- Views
- 55
- Replies
- 9
- Views
- 201
- Replies
- 11
- Views
- 203