• Welcome to the new NAXJA Forum! If your password does not work, please use "Forgot your password?" link on the log-in page. Please feel free to reach out to [email protected] if we can provide any assistance.

STaK 300 and JB Conversions and Advance Adapers stuff -

XJ_ranger

NAXJA Member
NAXJA Member
Location
Port Orchard, WA
Dont know if this will help anyone, but I too the time to take the pictures, so ya'll can take the time to look at 'em!

Alright - here are the pics and associated text - before I forget what they all are... :lurker

Start by pulling your old T-case -
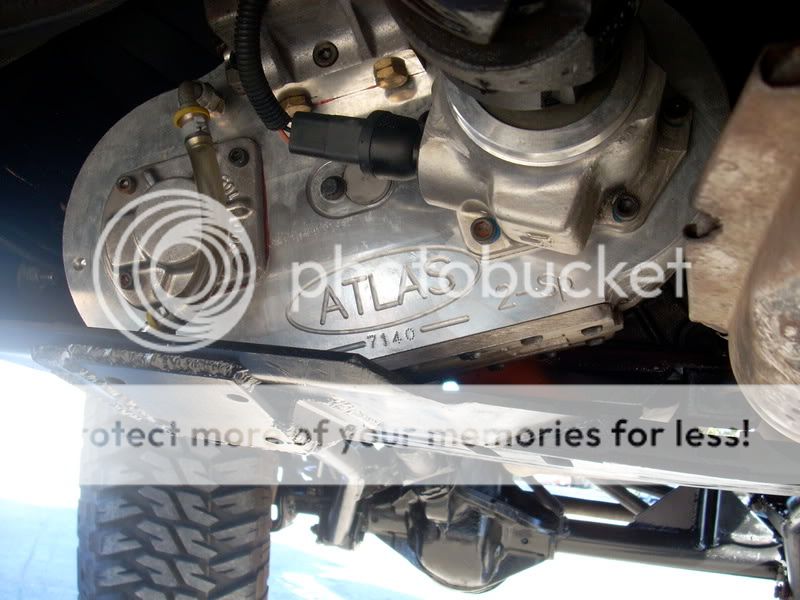
Bent ass flat belly skid -
dsc_0545.jpg


boogered, out of balance, worn out CV driveshafts -
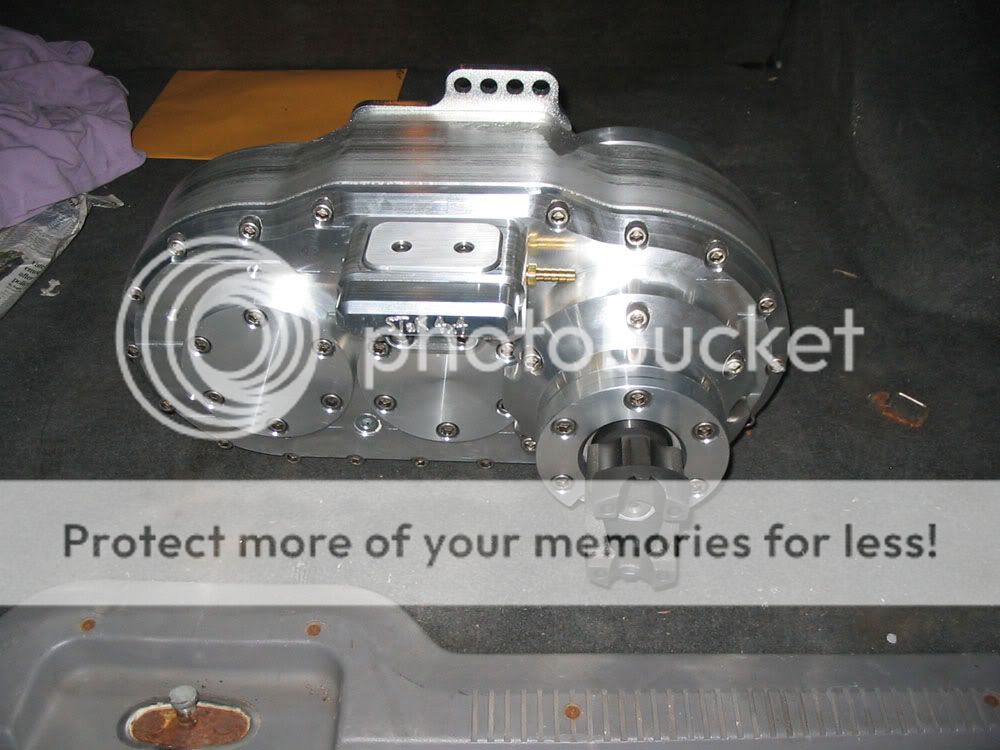
dsc_0546.jpg


and an NP231 -
dsc_0542.jpg


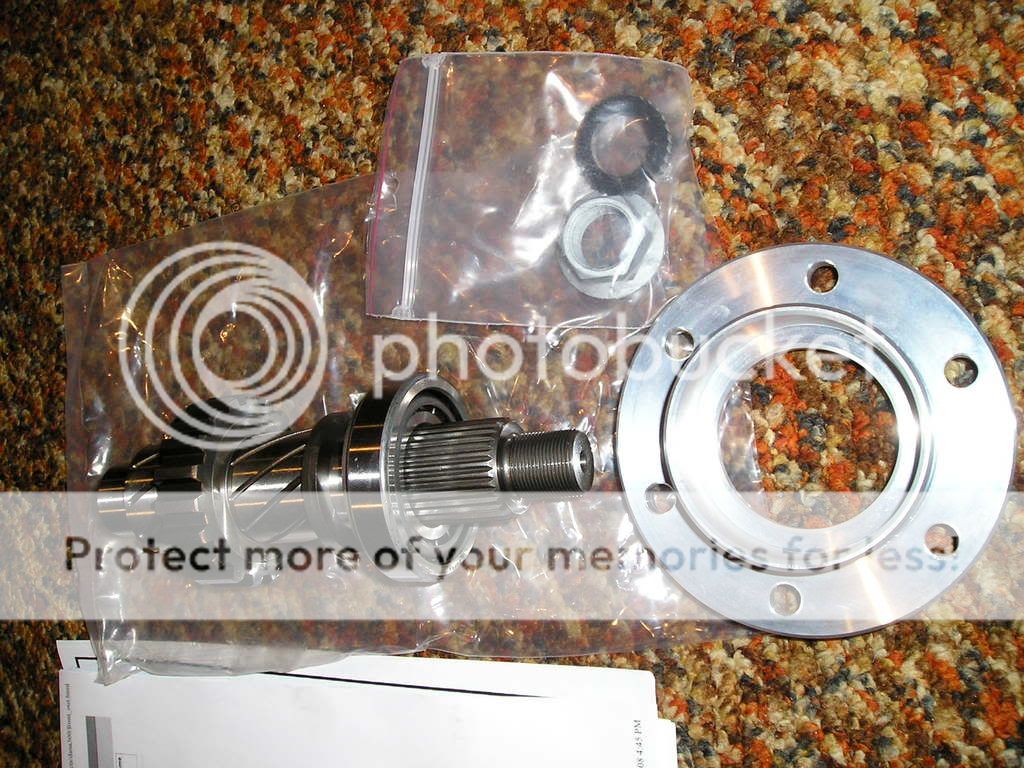
The first thing that I did was pull the clocking ring (which also holds the input shaft in) off, to take the input out / apart.
I bought the t-case with a 21 spline input, and the guy sent me the OEM 23 spline input as well.

dsc_0544.jpg


OEM input in the OEM input housing on the left, Advance Adapters 21 spline input in the AA housing on the right -
dsc_0549.jpg


here is how it all goes together - bearing on the shaft, bearing pressed into the housing, snap ring, then the 'small' gear, then another snap ring.
dsc_0551.jpg


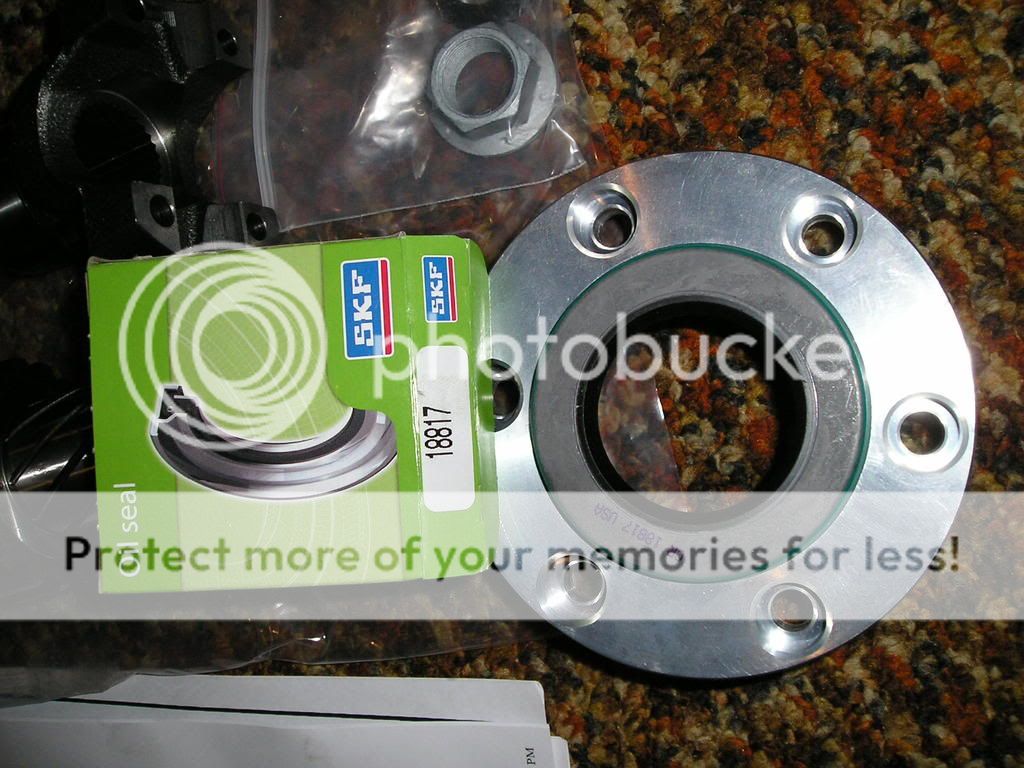
Couple shots of both the OEM input housing and the AA input housing -
dsc_0553.jpg


Note that the AA requires the use of a sealed bearing, because its shorter - this is importiant when sticking a d300 on something that was designed for a 231.
dsc_0552.jpg
 
Here are some comparison shots of the AA 21 spline input shaft, and the OEM 23 spline input shaft -
dsc_0554.jpg


dsc_0555.jpg


and a shot of my shop press - :squint:

dsc_0556.jpg


dsc_0557.jpg


see the sealed bearing VS the OEM bearing -
dsc_0558.jpg


Identical ID/OD and thickness, just sealed VS not...
dsc_0559.jpg


After popping the input gear apart, I split the case halves open. A lot of fawking stainless cap screws, and the thing came apart. I also popped the rear output housing off - an as I lack a shop press, this required the use of a puller, and a dead blow hammer :eek2:

dsc_0547.jpg


There are 48 needle bearings inside the 'idler' or 'cluster' gear - allong with 3 steel spacers. The big one is in the middle, the other 2 are on the outside. There are also 2 thrust washers that locate the 'idler' gear front to back - Also note that I pulled the detent balls, springs, and caps to pull the shift forks/rails out.
dsc_0548.jpg


dsc_0550.jpg


Of all the parts that were in the case, these are the only parts that I need (Plus 1 more shift collar, and the needle bearings and spacers)
dsc_0561.jpg


Assorted new parts - (JB Conversions 4:1, HD 32 spline front output, and HD 32 spline rear output)
dsc_0562.jpg


dsc_0563.jpg
 
Some more comparison shots -

JB Conversions high range gear VS OEM - the 'smaller' is the JB -
dsc_0564.jpg


dsc_0571.jpg


JB rear output housing VS OEM - Pics taken for this thread (http://www.pirate4x4.com/forum/showthread.php?t=789455&highlight=d300)
dsc_0565.jpg


dsc_0566.jpg


dsc_0567.jpg


dsc_0568.jpg


dsc_0569.jpg


To install the HD front output shaft, the front output bearing retainer housing has to be modified (Bore size increased in 2 places, and reliefs cut for bearing race removal)...
This step is buried deep in the directions, so you dont find it until 1:00pm on Saturday. Luckily Dean at Bent Metal Customs (253-222-4890) is totally cool, and was available to do this on Saturday of Memorial Day weekend - and for an awesome price.

Here is the front housing after dean increased the bore in 2 places, and I hacked it all up and made some reliefs to remove the bearing race (if that was ever necessary)
dsc_0606.jpg


Race installed -
dsc_0608.jpg


bearing chillin out in there -
dsc_0609.jpg


Seal installed - (that for some reason JB forgot to include in my shipment? but they listed the part number in their directions, so I went to Napa and picked one up for $10)
dsc_0610.jpg
 
Here is the aftermarket HD 32 spline JB front shaft - assembled with the LowMax gears and new bearings -
you can see that the shift collar is connecting the low range 'big' gear to the shaft, and the high range 'small' gear is able to spin free -

Also note the .230" spacer between the front bearing and the 'small' gear - that is important later.

dsc_0611.jpg


dsc_0612.jpg


The whole gears as they stack up - the input shaft is splined onto the small gear, which turns the 'cluster' or 'idler' gear (not pictured) in all positions - the case is shifted by connecting the shafts to the gears - but the gears ride on the shafts :hmm:
dsc_0613.jpg


After figuring out proper end play for the rear output shaft (not pictured), I installed the JB rear output housing onto the STaK case -
dsc_0615.jpg


dsc_0616.jpg


dsc_0617.jpg


Assembled the rear output shaft (speedo gear connection, shims, spacers, etc)

dsc_0617.jpg


and shoved it in there -
dsc_0619.jpg


Note that the output housing has a seperate 'seal' housing - this was to allow people to have a way to hook up a driveline e-brake - the output housing has 2 holes that are designed for dowel pins - rather than bolts - and this bolt on seal housing is provided for those of us who dont need / want a driveline e-brake.

Unfortunately for me - there was a slight mistake in either the seal housing, or the rear output housing bolt pattern - I could only get 3 bolts in of 6. Lacking the tools to determine which was out of spec, I took a 3/8" drill bit to the holes in the seal housing, which allowed just enough misalignment for the 5/16" Socket Head Cap Screws to fit in. So much for a $400 part fitting right the first time... :bang:
dsc_0620.jpg


Here is the OEM and JB (LowMax 4:1) 'cluster' or 'idler' gear -
dsc_0621.jpg


the 48 needle bearings, 3 spacers, and 2 thrust washers... I took some wheel bearing grease and shoved it in the cluster gear, and slid the needle bearings in - just like in a u-joint cap -
dsc_0622.jpg
 
after sliding the cluster gear onto its shaft, and re-installing the shift rods, I tried to throw the case back together. it went well, except the front output shaft was bound up, and the case wouldn't fully go together. :thumbsdown:

the STaK case uses a front output, rear bearing 'timing' flange, that bolts to the back of the case - this is designed to set front output shaft end play, and bearing pre-load.
JB provides a .230" shim, on the front output shaft to set end play, and some shims for the OEM front output bearing pre-load cap. These don't work with the STaK case, because the cap is different than the OEM one.

I played around with the dial calipers and noted that the STaK adjuster was capable of about .270" of adjustment, and the JB shim was .230", but they gave you about .040" of shim for the rear of the case. I decided to pull the shim out from under the bearing, and throw the case together, and see if I could just shim the stuff with the STaK timing housing...

Turns out that I could. :thumbsup:

(I was a tad frusterated at this point, and dont have any pics until I'd calmed down after my solution had worked.)

Completed almost as expensive as an Atlas case - on the bench...
dsc_0623.jpg


dsc_0624.jpg


In this shot, you can see how STaK does the timing of the rear bearing - the 6 socket head cap screws hold the housing on, and the 6 little 100% threaded allen head things provide the pre-load, and are lock nutted in place.
dsc_0625.jpg


dsc_0626.jpg


some comparison shots -
dsc_0628.jpg


dsc_0629.jpg


dsc_0630.jpg


dsc_0631.jpg


dsc_0632.jpg
 
To install the case, I had to modify the OEM t-case mount - the D300 is lacking the planetary reduction housing that the NP231 has, and the OEM tranny mount for an AX-15 in an XJ takes full advantage of that space.

Here I cut the corner off the plate that the rubber mount 'mounts' to -
dsc_0633.jpg


and did a shitty job of painting it - (the nozzle stuck open)
dsc_0635.jpg


I also had to cut out a chunk of the mount its self. I hope it works - otherwise its going to be a bitch - and I'll have to make something else... (also crappily painted) -
dsc_0637.jpg


Had to hack a huger hole in the floor... but thats not a concern...
dsc_0638.jpg


Front output - (installed)
dsc_0640.jpg


rear -
dsc_0644.jpg


My front driveshaft ended up needing to be shortened about 3.25", and the rear needs to get longer by about 4.5".

My anti-wrap crossmember might need some modification... but there is light at the end of the tunnel!
 
Nice.

A buddy of mine has nearly that exact 300 set up. He occasionally has an issue with the front output popping out of gear (apparently this is a problem made worse by the 4:1 gears). I'd definitely try beating the crap out of yours in front-only to see if it's an issue before you find out the hard way mid-obstacle.

Hmm - good call.

If that is the case, I'll throw some heftier springs in the front output shaft detent spring.

What is the comparison between what you built and going with an Atlas?
Was it worth the effort, or would you just buy the Atlas next time?

Lead time.

I bought all this stuff within the past two weeks, and needed it to be ready for Cal Rocs this weekend.

Also, I bought the STaK case used, and paid cash, and charged the JB parts on the card...

Also - I dead lifted the STaK 300 into place under the jeep by myself. Last time I installed an Atlas, I had to get Phil to help me.

And other than the slight issue with the tranny mount, it fit pretty good - the outer profile of the atlas would have required a lower clocking of the t-case, or a HUGE hole in the floor - as it is, the d300 is touching the floor above the front output.

Kind of a '6 of 1, half dozen of the other' kinda deal....

If I'd had more time to save up cash, and wait 2 to 3 weeks lead time for the Atlas, I probably would have gone that way, or bought this case complete from STaK (they sell this exact case, assembled, for like $2150).
 
I started with this:

stak1.jpg


... and ended with this:

DSCN0346.jpg


Hopefully you find that everything works out the way you plan! STaK could never figure out or give me any straight answers to why the case (2 speed, not 300 like yours) leaked oil. They eventually took the case back. Their customer service was great, but the product needed some more time to mature and get the kinks worked out.
 
Nice!

I didn't know that - but its all together!

Just pulled the front dig off - works awesome.

Hope my pics were helpful Jeff!

-Opie
 
Shakedown run complete -

I really like front dig.

Didnt have any issues with popping out of gear (I was a little concerned)

I dont think it emptied itself - even when I put the rig on its lid.

I did a few full throttle, only on the back tires, hop up and land with tires spinning attempts...

I bent my rear driveshaft so it hits the floor and the exhaust as it rotates.

No problems from the case...

I'm 100% satisfied right now.

check this thread for more 'shake down' run pics -
http://naxja.org/forum/showthread.php?t=996311
 
As you probably saw on my build thread on page 20 ( http://www.naxja.org/forum/showthread.php?t=945920&page=20 ) I gave up on getting any information or products from Stak and also bought a JB HD rear Dana 300 kit. I'm trying to figure out a caliper mount off the JB housing. I already have a High Angle Driveline flange, rotor and caliper. In any case, I just wanted you to know that when I tried to slip the six bolts in the JB seal cap, I could only get four of them to go in easily. The other two were hitting on the outside of their holes. I opened up the holes with the next size bigger than 5/16 in my drill kit and they all went in fine. So, you were not alone! Jeff
 
thanks for the heads up.

Good to know its not due to my inability to get that stuff lined up.
 
Back
Top