OverdriveXJ
NAXJA Forum User
- Location
- RICHFIELD, UTAH
My Roof Rack Build……part 1
Wow! This took awhile. I started this I think back at the end of December 2011. It has taken some time to finish, but hey Rome wasn’t built in a day…lol.
I looked around at racks for the roof and there are some nice ones out there. But I couldn’t see paying upwards of $500+ for what I wanted and then still have to add lights and wiring, CB antenna, etc. So I came up with this plan to build one.
My Rack’s base started life out as a display racking for my old store. I had a lot of it laying around. Its made out of mild steel. 1” sq tubing about .090 wall, with 1/8” solid rod tubing laced into each other in about 3”+ squares…about 4’ x 7’ I also have smaller sizes that are the same tubing but in 1’x7’ dimensions.

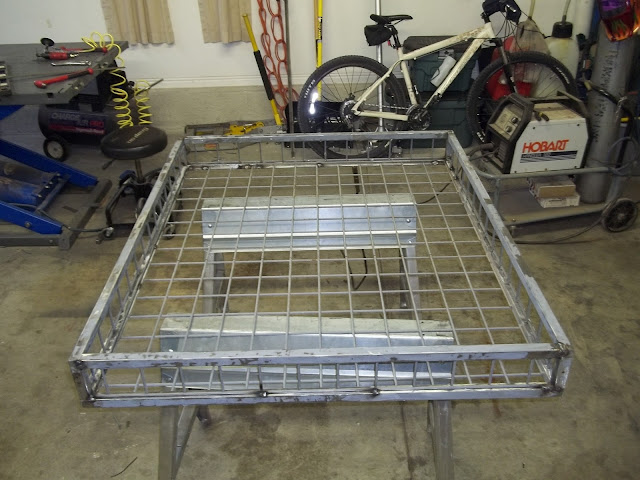
I cut this down to a useable size that I wanted. The base ended up 44”x53” which was about what I was looking for.
I ended up with this…

I then took the smaller pieces and cut them into my 4 sides which ended up at about 6” in height, and I created the sides of my rack like this.

By the time it was done it looked like this. Its only tack welded in this picture.
I wanted to add some lights to the front of it, but I wasn’t sure what kind at the time. I had some 5” round off-road lights left over from a previous project that were still new in the box so I figured I’d use those. Well I started to build my extension off the front for the lights and I was just not having any luck with what I was trying to accomplish. Then the wife showed up, I showed her what I had planned and she didn’t like it…..She didn’t like the extension, she didn’t care for the round lights etc……….Well it turns out she was right. So back to the drawing board…The project got put on hold until I could find some lights. Her idea was since the XJ has a boxy look to it and it has square headlights why not use square off-road lights. Ok that works, shouldn’t be hard to find…NOT!!!! Off-road lights are expensive to begin with and I’m cheap. So the hunt was on, for some inexpensive lights, butI was coming up with nothing. Of course with all the other things that life brings I wasn’t giving it my all in the search. Lol, Then one day we were in an IFA store here getting some dog food and just checking things out, when I came across these…..
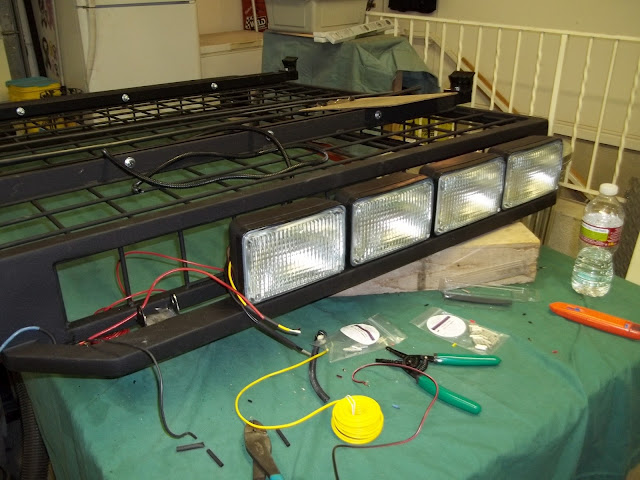
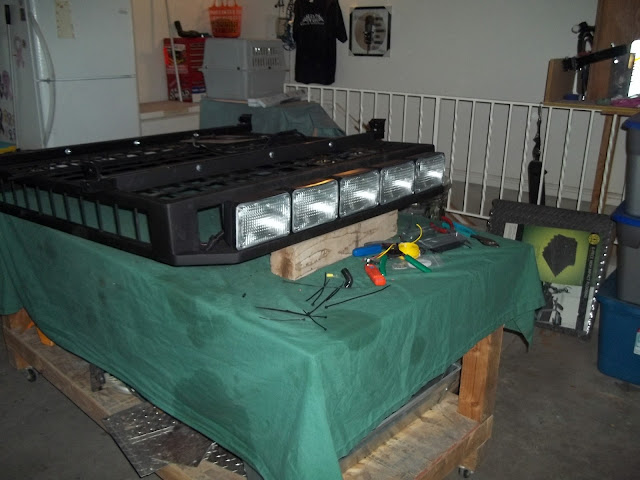
Tractors implement lights. They are 55w H3 so I can throw some 100w bulbs in them if need be. I'll wire them up to handle the 100w load. Now I was in business, I talked to a couple guys running them and they were happy with them, and they were cheap, readily available and I could run bigger bulbs if needed. So I bought one and went back to designing how to mount them what space I would need etc.
I continued on with the rack, building the front overhang off the top/front of the rack. The plan was to fit 5 of them across and have them hanging down from under the overhang.
This took a while, getting the overhang the way I wanted and spacing the lights, I had gone back and bought four more lights, actual spacing is based on the width of a #2 pencil. With that all figured out and built. It came time to mount them in a trial fit………
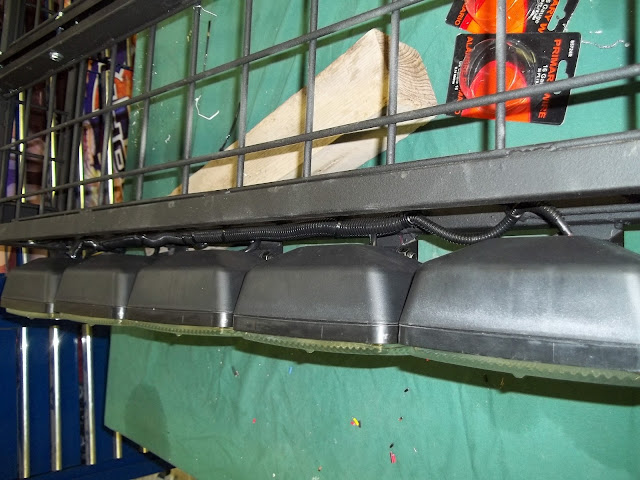
Ouch that doesn’t look right, NO!!! I just welded in the tabs and the lights hang 1 ½-2” below the bottom of the rack. So another Redbull and out came the small grinder and the tabs were removed and the thinking process started over again. Have you ever just had a certain look that you’re looking for and you know you can get it but it escapes you at the time you need a solution? This was one of those times. Keeping thinking Phillip you’ll get it….aaaaaaaaahhhaaaaaaaaaaa there it is. With the use of some sophisticated machinery I got them placed where I wanted them, with a couple of pieces of box tubing and some washers, works every time….lol. I re-welded in my mounting tabs in this new location, then proceeded to assemble the lights and they sat perfectly. My wife came out and we lined them up square and I spot welded the Light mounting brackets to my tabs….problem/solution done!
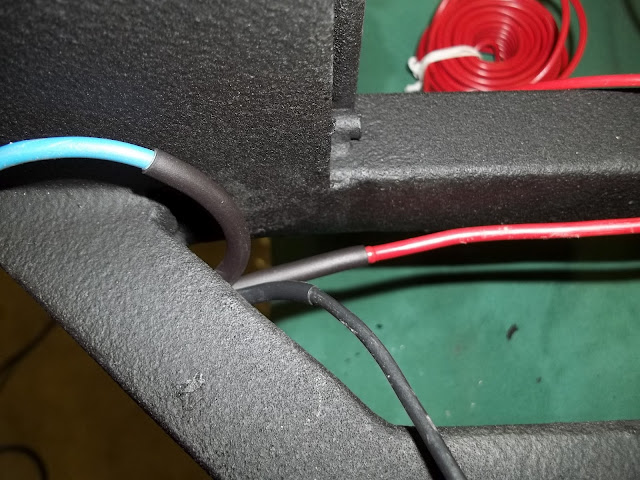
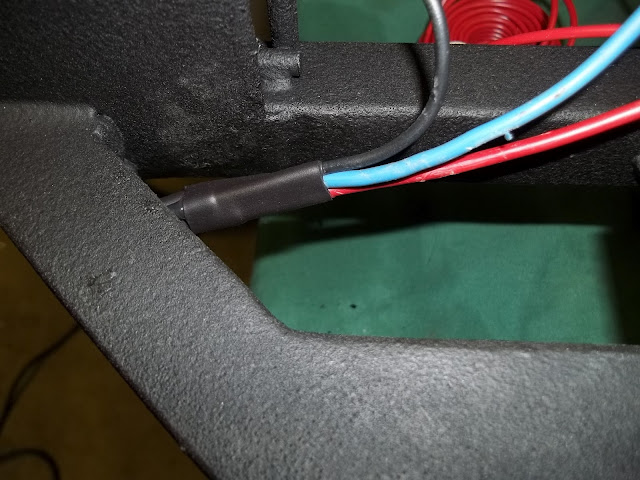
Next cam the wiring, wiring is what I enjoy…So I didn’t want the wires to be seen. Well at least as much as possible. So I drilled holes to the rack tubing cross drilled etc and ran the wires. Once they were installed I slipped shrink tubing over them where they might rub on the metal to protect them and welded up all my holes except for two, where they exit the rack for connections.
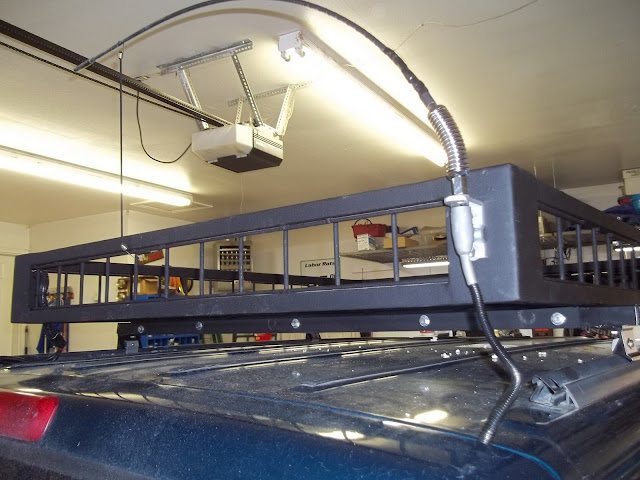
That all being done it was time to figure out how to mount this thing to my roof, I had a Mopar Spare Tire mount on the roof when I bought the XJ, it was attached to the roof rails. I had pulled it down and sold it. I looked into different mounting solutions and figured on using the same thing that Surco uses for their Safari racks. I found that Surco made Roof rail mounts for the jeeps so I bought those and their 48” crossbars which they also use.
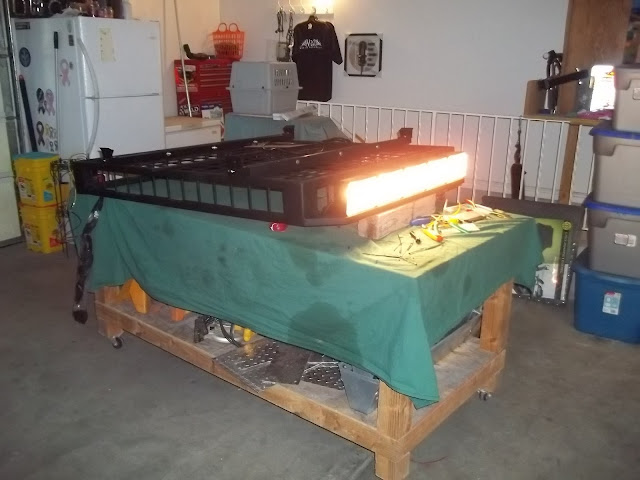
I proceeded to paint the Rack, it was finally coming to an end of a long project. With the rack being painted in 3M rubberized undercoating. (This stuff isn’t cheap) they make all kinds of this stuff but I wanted something durable. I had read an Expedition trailer build and this is what the guy used on his exposed parts under the trailer. So I found the part number and my local Napa had some. Now the stuff sprays on nice, but since it has those 3” openings in the racking it tends to take quite a bit to cover them, you are literally spraying from all directions to get those little bars covered. So it took almost 6 of the large cans to cover this thing.
Thank God for a heated garage in the winter time, I cranked the heater to keep the garage about 75 and sprayed one side at a time then I let it sit…I ended up having to let it sit for about 48+ hours the first time because I ran out and Napa was closed. In the meantime I had some wiring to do on the jeep to get it ready for the lights and the CB Antenna on the rack.
So my son and I took the interior apart and started wiring. We ran the wires for the lights, we ran the coax for the CB antenna. All these ran from the rear of the XJ to the front.
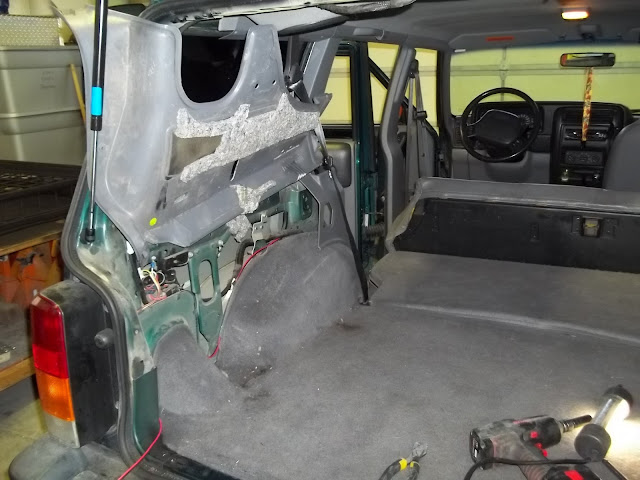
The light wires ran along the drivers side from the kick panel to the rear, then up the rear pillar to exit out the back under the liftgate.
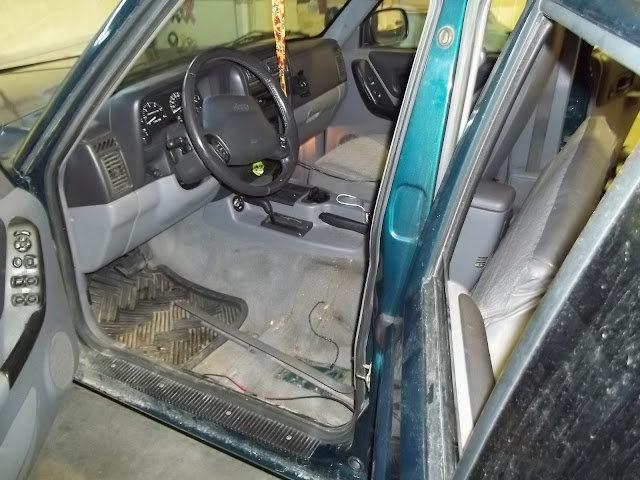

The coax was to run from the passenger side rear to the drivers front. We ended up running it along the upper interior trim pieces and down the front driver’s side A-pillar. It was tucked up under the rear of the headliner and then tucked behind the trim pieces until it came down the pillar. It exited the rear of the XJ at the liftgate…

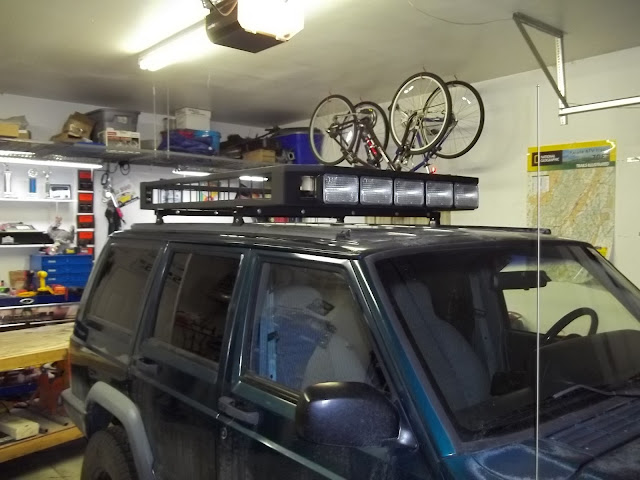
With this all done, we put the interior back together. I then moved onto getting the rack temporarily mounted on the roof. There I could center it where I wanted it and get the crossbars clamped to it. I then pulled the rack with the crossbars off the roof and drilled the holes needed to secure it. At first I drilled 3 holes in each crossmember but then decided to add two more on each. For a total of 10 bolts holding this thing together.
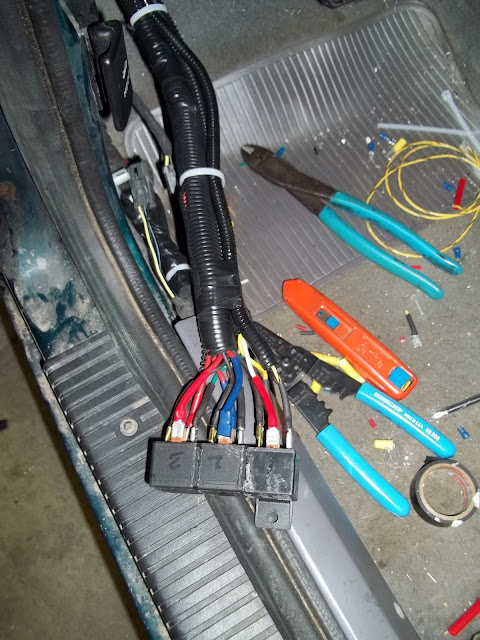
Now came time to mount the CB, wire up the switches for the lights, etc. This was a project in itself sort of. I designed a wiring schematic for the lights, utilizing three relays for two separate circuits.

The reason for three relays is simple, two of them are for the lights, Letting the relays carry the load of the lights instead of the switches. The other relay is for the switches. I didn’t want one of my kids turning the lights on while messing around etc. So I triggered the relay off the tail light circuit and provided power for the switches from a keyed 12volt source. The lights will only turn on when the key is on and the headlights/park lights are on.
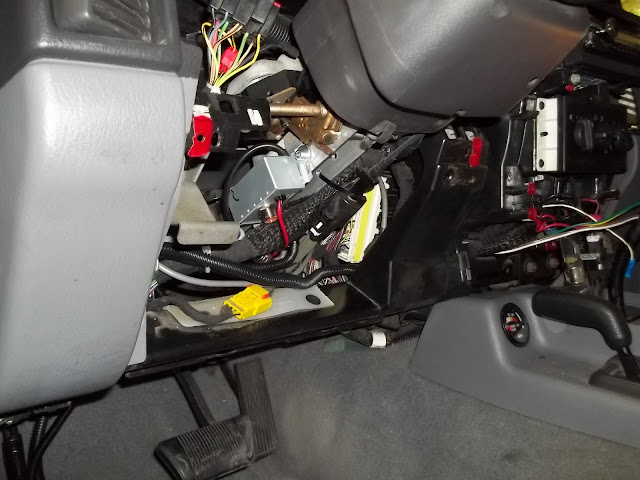
Next came the CB itself, I installed a Cobra 75 WXST unit, so the box was installed under the dash. I wired it directly to the battery….but through in a twist. I have a trickle charger that I sometime hook to my jeep if its going to sit for any length of time (i.e. Vacation, etc) So since it has a set of leads connected directly to the battery, I used another end and attached it to the wiring for the CB. So if I need to throw the charger on there I simply pull the connection apart and plug the charger in. I really only used the positive side of it, even though I ran the Negative into the jeep’s interior it remains unused. I grounded the radio’s little box to the chassis and installed a 20amp noise filter inline to cut down ignition and electrical noises.
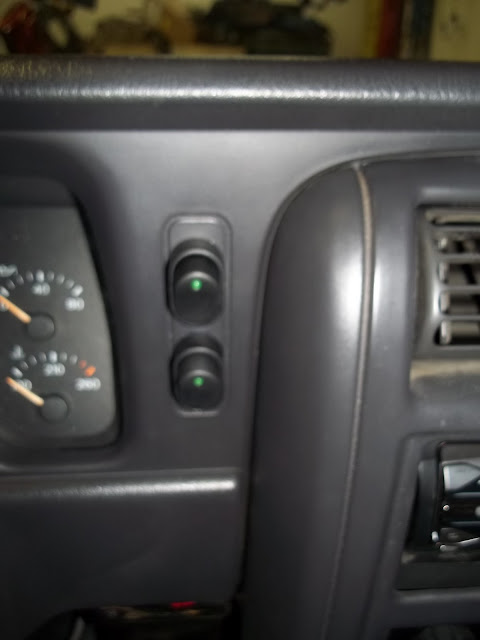
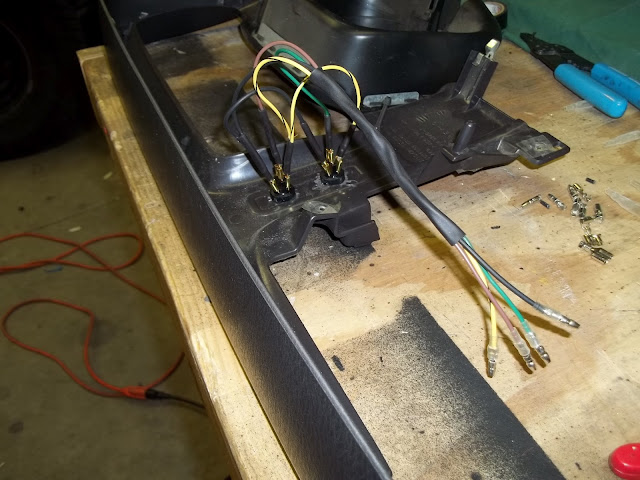
After all that was done it was time to place the two switches for the lights, I had a location picked out but at the last minute I decided that I wanted the switches some where else so I installed them next to the instrument cluster in Bezel…
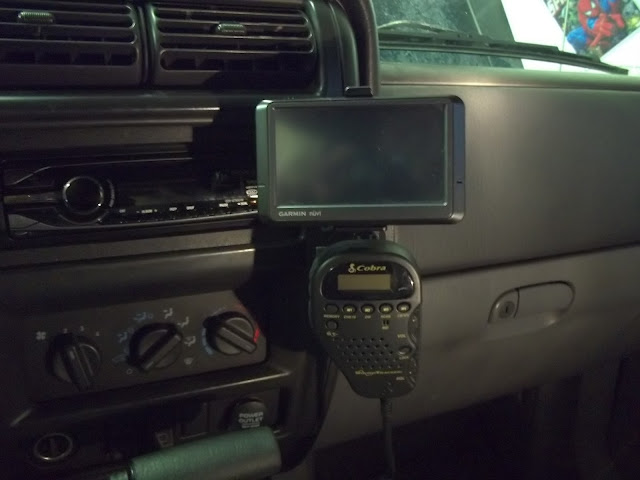
I had to mount the mic for the CB, I didn’t want it in my way, I also didn’t want to screw a mic holder to any parts of my dash or console. So since I had a GPS holder attached to my Bezel where my CD player/heater controls are, I added a bracket to hang off it and placed the mic clamp there so my mic would sit under my GPS….
to be continued.........
Wow! This took awhile. I started this I think back at the end of December 2011. It has taken some time to finish, but hey Rome wasn’t built in a day…lol.
I looked around at racks for the roof and there are some nice ones out there. But I couldn’t see paying upwards of $500+ for what I wanted and then still have to add lights and wiring, CB antenna, etc. So I came up with this plan to build one.
My Rack’s base started life out as a display racking for my old store. I had a lot of it laying around. Its made out of mild steel. 1” sq tubing about .090 wall, with 1/8” solid rod tubing laced into each other in about 3”+ squares…about 4’ x 7’ I also have smaller sizes that are the same tubing but in 1’x7’ dimensions.
I cut this down to a useable size that I wanted. The base ended up 44”x53” which was about what I was looking for.
I ended up with this…
I then took the smaller pieces and cut them into my 4 sides which ended up at about 6” in height, and I created the sides of my rack like this.
By the time it was done it looked like this. Its only tack welded in this picture.
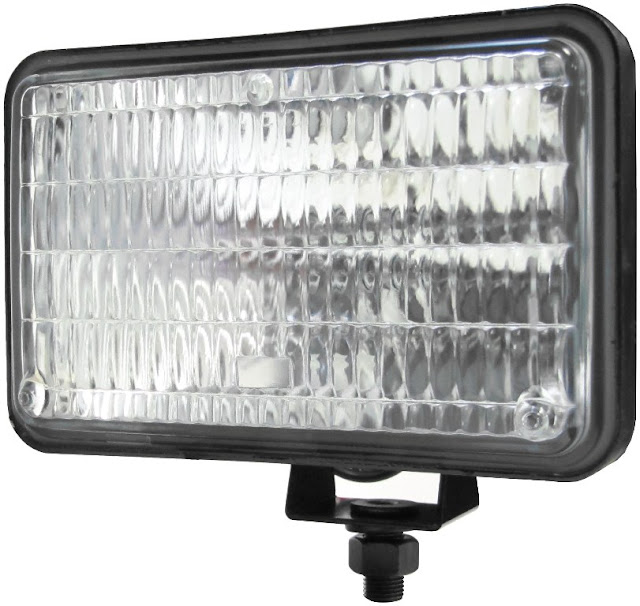
I wanted to add some lights to the front of it, but I wasn’t sure what kind at the time. I had some 5” round off-road lights left over from a previous project that were still new in the box so I figured I’d use those. Well I started to build my extension off the front for the lights and I was just not having any luck with what I was trying to accomplish. Then the wife showed up, I showed her what I had planned and she didn’t like it…..She didn’t like the extension, she didn’t care for the round lights etc……….Well it turns out she was right. So back to the drawing board…The project got put on hold until I could find some lights. Her idea was since the XJ has a boxy look to it and it has square headlights why not use square off-road lights. Ok that works, shouldn’t be hard to find…NOT!!!! Off-road lights are expensive to begin with and I’m cheap. So the hunt was on, for some inexpensive lights, butI was coming up with nothing. Of course with all the other things that life brings I wasn’t giving it my all in the search. Lol, Then one day we were in an IFA store here getting some dog food and just checking things out, when I came across these…..
Tractors implement lights. They are 55w H3 so I can throw some 100w bulbs in them if need be. I'll wire them up to handle the 100w load. Now I was in business, I talked to a couple guys running them and they were happy with them, and they were cheap, readily available and I could run bigger bulbs if needed. So I bought one and went back to designing how to mount them what space I would need etc.
I continued on with the rack, building the front overhang off the top/front of the rack. The plan was to fit 5 of them across and have them hanging down from under the overhang.
This took a while, getting the overhang the way I wanted and spacing the lights, I had gone back and bought four more lights, actual spacing is based on the width of a #2 pencil. With that all figured out and built. It came time to mount them in a trial fit………
Ouch that doesn’t look right, NO!!! I just welded in the tabs and the lights hang 1 ½-2” below the bottom of the rack. So another Redbull and out came the small grinder and the tabs were removed and the thinking process started over again. Have you ever just had a certain look that you’re looking for and you know you can get it but it escapes you at the time you need a solution? This was one of those times. Keeping thinking Phillip you’ll get it….aaaaaaaaahhhaaaaaaaaaaa there it is. With the use of some sophisticated machinery I got them placed where I wanted them, with a couple of pieces of box tubing and some washers, works every time….lol. I re-welded in my mounting tabs in this new location, then proceeded to assemble the lights and they sat perfectly. My wife came out and we lined them up square and I spot welded the Light mounting brackets to my tabs….problem/solution done!
Next cam the wiring, wiring is what I enjoy…So I didn’t want the wires to be seen. Well at least as much as possible. So I drilled holes to the rack tubing cross drilled etc and ran the wires. Once they were installed I slipped shrink tubing over them where they might rub on the metal to protect them and welded up all my holes except for two, where they exit the rack for connections.
That all being done it was time to figure out how to mount this thing to my roof, I had a Mopar Spare Tire mount on the roof when I bought the XJ, it was attached to the roof rails. I had pulled it down and sold it. I looked into different mounting solutions and figured on using the same thing that Surco uses for their Safari racks. I found that Surco made Roof rail mounts for the jeeps so I bought those and their 48” crossbars which they also use.
I proceeded to paint the Rack, it was finally coming to an end of a long project. With the rack being painted in 3M rubberized undercoating. (This stuff isn’t cheap) they make all kinds of this stuff but I wanted something durable. I had read an Expedition trailer build and this is what the guy used on his exposed parts under the trailer. So I found the part number and my local Napa had some. Now the stuff sprays on nice, but since it has those 3” openings in the racking it tends to take quite a bit to cover them, you are literally spraying from all directions to get those little bars covered. So it took almost 6 of the large cans to cover this thing.
Thank God for a heated garage in the winter time, I cranked the heater to keep the garage about 75 and sprayed one side at a time then I let it sit…I ended up having to let it sit for about 48+ hours the first time because I ran out and Napa was closed. In the meantime I had some wiring to do on the jeep to get it ready for the lights and the CB Antenna on the rack.
So my son and I took the interior apart and started wiring. We ran the wires for the lights, we ran the coax for the CB antenna. All these ran from the rear of the XJ to the front.
The light wires ran along the drivers side from the kick panel to the rear, then up the rear pillar to exit out the back under the liftgate.
The coax was to run from the passenger side rear to the drivers front. We ended up running it along the upper interior trim pieces and down the front driver’s side A-pillar. It was tucked up under the rear of the headliner and then tucked behind the trim pieces until it came down the pillar. It exited the rear of the XJ at the liftgate…
With this all done, we put the interior back together. I then moved onto getting the rack temporarily mounted on the roof. There I could center it where I wanted it and get the crossbars clamped to it. I then pulled the rack with the crossbars off the roof and drilled the holes needed to secure it. At first I drilled 3 holes in each crossmember but then decided to add two more on each. For a total of 10 bolts holding this thing together.
Now came time to mount the CB, wire up the switches for the lights, etc. This was a project in itself sort of. I designed a wiring schematic for the lights, utilizing three relays for two separate circuits.
The reason for three relays is simple, two of them are for the lights, Letting the relays carry the load of the lights instead of the switches. The other relay is for the switches. I didn’t want one of my kids turning the lights on while messing around etc. So I triggered the relay off the tail light circuit and provided power for the switches from a keyed 12volt source. The lights will only turn on when the key is on and the headlights/park lights are on.
Next came the CB itself, I installed a Cobra 75 WXST unit, so the box was installed under the dash. I wired it directly to the battery….but through in a twist. I have a trickle charger that I sometime hook to my jeep if its going to sit for any length of time (i.e. Vacation, etc) So since it has a set of leads connected directly to the battery, I used another end and attached it to the wiring for the CB. So if I need to throw the charger on there I simply pull the connection apart and plug the charger in. I really only used the positive side of it, even though I ran the Negative into the jeep’s interior it remains unused. I grounded the radio’s little box to the chassis and installed a 20amp noise filter inline to cut down ignition and electrical noises.
After all that was done it was time to place the two switches for the lights, I had a location picked out but at the last minute I decided that I wanted the switches some where else so I installed them next to the instrument cluster in Bezel…
I had to mount the mic for the CB, I didn’t want it in my way, I also didn’t want to screw a mic holder to any parts of my dash or console. So since I had a GPS holder attached to my Bezel where my CD player/heater controls are, I added a bracket to hang off it and placed the mic clamp there so my mic would sit under my GPS….
to be continued.........