• Welcome to the new NAXJA Forum! If your password does not work, please use "Forgot your password?" link on the log-in page. Please feel free to reach out to [email protected] if we can provide any assistance.

Pulling a 4.0 tips?

NVRwheels

NAXJA Forum User
Location
Cary, NC
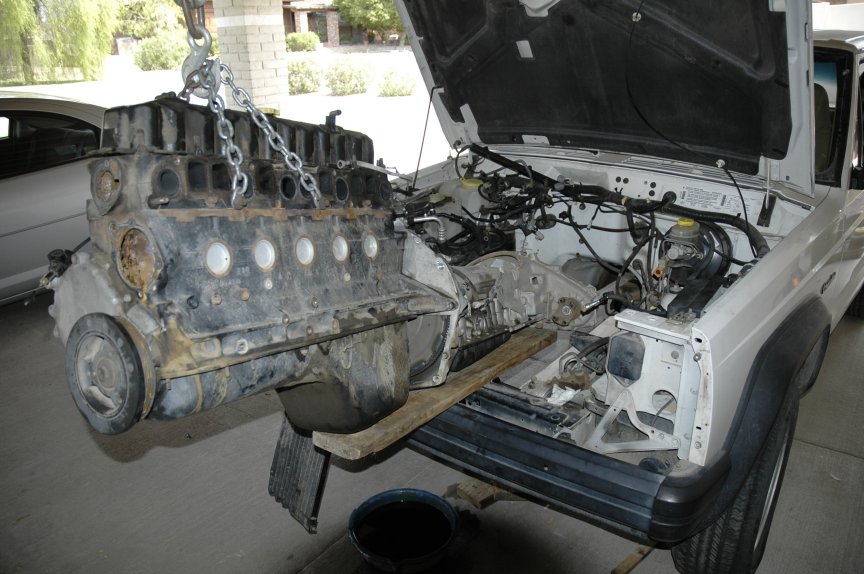
Gettin ready to pull my 4.0 out to swap in a new one and have a few questions. First off is their a good write up around or should I just use my hanes manual? cause I didn't see a section on pulling the motor.

So its it as simple as removing the radiator, ac condesor, starter, alternator, ac, and power steering?

If so What do I have to pull on the power steering? everything?

thanks,
Jake
 
Yes, it is pretty much that simple. On the A/C compressor and power steering pump, you don't have to fully remove them. Just unbolt them, and there should be enough slack in the lines that you can kind of shove them off to the side (where the airbox and battery would be sitting). You'll also probably want to remove the intake and exhaust manifolds, neither of which is all that bad either. We didn't fully remove the radiator either, we left all the trans cooling lines hooked up to it, and just moved it out of the way of the engine as it was coming out and going in.

You'll definitely want to have plenty of extensions, and a u joint or 2 can be helpful too. If you have them, gear wrenches can come in handy in a few places. If the engine has never been out before, you'll also need an E12 Torx socket for the 2 top bolts that go through the bell housing into the engine block. When I put things back together I replaced them with grade 8 hex head bolts to save the headache if I have to do it again.
 
Last edited:
The power steering pump has an integrated reservoir, so I think it's as simple as pulling two hoses (if my memory serves me right).

Pulling the radiator makes things much easier.

Biggest advice is to take it slow. After you have everything disconnected and the cherry picker hooked up, go slow, and keep checking for that last thing you missed ;)

Digital cameras are also key - take pictures before you start and the pictures can help you remember how everything goes back together.

Good luck!
 
pull the rad. Remove the battery so the AC compressor can sit there. Remove the air box so the steering pump can sit there. That way you don't have to disconnect any hoses if you don't want to.

The fun part is the two inverted torx bolts at the top of the bell housing. The best way I have found it to disconnect everything as much as possible except the engine brackets, and bell housing bolts. Put the engine on the hoist and the remove the large engine mount bushing bolts. Lower the engine. From the rear of the transmission use a long extension and a swivel joint to remove the two upper bolts. Remove the rest of the bell hosing bolts, leaving the larger left and right most ones for last. Assuming you have everything else disconnected the engine should pull out now. And don't forget to support the transmission with the engine out.
 
I am pretty sure that god invented the ratcheting 12pt box end wrench to get to those two bolts. Or the extensions trick works too, I just did not have that many available.
 
Remove the battery, air box and radiator, lay the PS pump over to air box side and the AC compressor over to the battery side.

The condenser can go forward and down (some) to be out of the way.

After removing the motor mounts and brackets from the block and the lower bell housing bolts (including the starter, dust covers, flex plate) I drop the engine down and easily remove the 2 upper SOB's, they are right there where you can get to them then.

I never remove the intake/exhaust but I always cut the 2 rusted up down tube bolts with a torch and just replace them with regular bolts on install.

After you have done a few its about a 3 hour job or less:D If your real good you can pull the motor tranny together out the top.
 
I am pretty sure that god invented the ratcheting 12pt box end wrench to get to those two bolts. Or the extensions trick works too, I just did not have that many available.

they are e-torx. i wouldn't use a 12-point socket or wrench on them, especially if it it siezed up, you could end up rounding them over. e-torx bit and extensions. i have a 20" 3/8 for a reason now.....

also, make sure you remove ALL the upper trans inspection plate cover bolts.

you don't need to remove the rad or even the front clip. put the hood on the 3rd prop position, and you can go straight up with it, you just have to spin the motor clockwise 45* half way out to clear everything. just did the installation "opposite of removal" on saturday

oh, and label your injector connectors!
 
Those bolts are evil. I gave up on getting the bolts off, and pulled engine/trans/tcase together.
 
Those screws are E12 (E-Torx sockets can be had at Sears and most better locals easily, find them by Lisle tools. Quality stuff...) and lower the tailend of the transmission to get to them. Use extensions.

Throw them in the recycle bin after you measure the length under the head, and then go get new screws. They're threaded 3/8"-16.

It's easier if you pull the head, which allows you to use the cylinder head screw holes (1/2"-13) to attach the hoist chains and better balance the engine as you pull it - in addition to picking up 4-6" of clearance at the rear.

Tie the aircon compressor off to the side, and now would be a good time to replace the power steering hoses anyhow.
 
I got the external torx socket at Advance Auto Parts, they had one on the shelf.
 
they are etorx, but luckily they are the only size that meshes almost perfectly with a 12pt. I would recommend getting the sockets, but if for some reason you cannot the option is there.
 
I am about to swap 4.0's from a 92 XJ to a grand Cherokee (95). Getting down to the tranny / transfer case / engine issues myself. The GC has a busted block, so we are stripping it down first, then scrapping the busted block. But plan to pull the assembled good engine from the 92 and move it to the 95. WE have the entire front end stripped off of both already, and ACs set to the side, condenser and rads pulled. etc.

The tranny and TC pulls, and engine pull will be my first time so I am also looking for the advise in this thread! I am especially concerned about surprises, and the torque converter. Planning to separate the tranny before pulling the engines.

Do we need to drain the Torque Conv, tranny, or Transfer Case? We may reuse the TCs and tranny already in the 95 GC.

Torque converter? You have to drill a hole in it to drain it. Tranny & tcase? Not unless you're pulling them (draining them does make them somewhat lighter.)

Unscrew the TC from the flexplate, and leave the TC in place until you can get around to it. Problem solved.
 
Those bolts are evil. I gave up on getting the bolts off, and pulled engine/trans/tcase together.

X2. Getting the star fasteners out and getting the block and transmission back together is more convenient this way. Put some boards on the axle to slide the transmission and xfer case on.

This was relatively easy to do as a one person job.

274671377_f489317680_o.jpg
 
X2. Getting the star fasteners out and getting the block and transmission back together is more convenient this way. Put some boards on the axle to slide the transmission and xfer case on.

This was relatively easy to do as a one person job.

274671377_f489317680_o.jpg
What two bolts are the chains attached to on the passenger side?
 
I don't know which ones he used, but 5-90 and I used the front AC compressor bracket mount area bolt holes and bolts.

You want to use the larger bolts/bolt holes, higher up on the block and head, but avoid using the head bolts on top or their holes for lifting.

I also rented a lift kit with lift plates from Autozone. Free rental, just paid a $40 refundable deposit for the 2 lift plates and chain. You would need to rent a pair though for 4 lift points, plates.

I also used a load lift equalizer I bought from Harbor Freight. Came in real hand at changing the load tilt during extraction and installation.
 
Back
Top