• Welcome to the new NAXJA Forum! If your password does not work, please use "Forgot your password?" link on the log-in page. Please feel free to reach out to [email protected] if we can provide any assistance.

Bell Housing Bolt Access

mn96sport

NAXJA Forum User
Location
Minnesota
Changing out the clutch in my '96 Sport. Transfer case is removed, but scratching my head on how to access the top bolts on the bell housing...or how many there are and where. Searched the site but can't find the right thread.

Any pictures on the top part of the housing ? and tricks to get to them ?

Thanks

96 Sport, 4.0
All Original 205,000 miles
US Forest Service Green
 
Drop the transmission and transfer case no more than 3 inches and disconnect the shift lever. The tranny has to be in 1st or 3rd to be able to get the shifter lever hold down clip out. You will have to remove the dust boot and then press down on the ring and turn it counter clockwise.
Now you can get to the bolts on the top. I did mine last week using about 4 feet of socket extensions and a E12 (inverse torx) socket to break them loose.
When you are in there don't forget to change the throw out bearing.

~Alex
 
Top screws are at roughly 1:00 and 11:00 looking forward. Heads (if OEM) are an E-12 "External Torx" - and using proper sockets is highly recommended (Lisle makes a good low-buck set of E-Torx sockets - check Sears or your local parts house that carries Lisle.)

Note that those screws are threaded 3/8"-16 (SAE) or M8-1.25/M10-1.0 (ISO), so they can be replaced with a hex head capscrew of the same length and thread. I highly suggest that you do so - it will save you headaches.

Lowering the transmission crossmember will make it easier to access those upper screws. If it's a manual, pull the shift boots inside and pull out the shifter before you drop the transmission case, or you'll likely end up sticking on the shifter lever hitting the transmission tunnel.
 
Gear shift is out. I went ahead and pulled the panel from the interior to access trans and top of transfer case. Couldn't reach the last transfer case nut without doing this.

Even with trans dropped really tough to see the bell housing bolts. Looks like the typical "lot of work" for just a couple of nuts.

Yah. I tend to replace those upper screws with studs (easier to guide a nut into place, and it gives extra alignment for getting the transmission into place.)

For the transfer case stud nuts, I find having a set of "stubby" wrenches to be terribly useful. I've got a 9/16" wrench for those studs that runs about 4-1/2" long...
 
As a follow-up....Got the set of torx sockets from Sears to "do it right". Appears during assembly those bolts were installed incredibly tight. It seemed they were installed with threadlocker they were so tight (but they were not). However, they had at least 75 ft-lbs of torque, perhaps even more.

The story is that even with the torx socket, I promptly rounded off one of the bolts. Considering virtually no access to get to the bolt, I was in one heck of a situation. None of the "standard' rounded bolt methods was going to work because of access...filing flat surface, torch, vice grips, etc. And after the rounding off this torx bolt, the bolt head was only about 3/8" in diameter.

There's not a lot of bolt contact surface with this torx head. On the other side, I pushed hard to maintain contact and at the same time rotating to break it free. Impact wrench did nothing help break free.

I searched the web for rounded bolt extraction methods. There are several socket type extractors available.

First purchase at Sears was a "Grip-Tite" set. Waste of money. There's a plastic insert that promptly broke with not a lot of force...these are getting returned.

Second purchase was from Irwin, Bolt Grip set. Thought this was going to work, but ultimately no enough bite into the head. These ended up stripping and rounding more of the bolt head.

Third purchase was a set from Xtraktor. Lot's of teeth on these. Ended up pounding on the 1/4" and smallest available socket in the set. This was attached to a 30" socket extension attached to a 3/4" ratchet, and 12" cheater bar. Applied the 75+ lbs of torque and it broke loose.

If this hadn't worked, would have had to start disassembling top of motor to get access;try and drill it out with a long bit, or tow it to my mechanic/junk yard.

Did learn that the Xtraktors set seems to be a good long term investment.
 
wow, quite the event!! glad you got it taken care of, and good to know that the xtraktors worked well for you
 
If you pulled the rest of the bolts first, that's also going to bind up the top bolts.

For those of you who haven't had the pleasure of getting at those bolts, they are the 11:00 and 1:00 position in this shot of my AW-4 bellhousing:

cps.jpg

The CPS hole is to the left at about 10:30ish.

Jon - what are the measurements of the E- bolts up top? I thought I had a listing on my site for the replacement bolt info to put a regular hex-head in there.

Jim www.yuccaman.com
 
Jon - what are the measurements of the E- bolts up top? I thought I had a listing on my site for the replacement bolt info to put a regular hex-head in there.

Jim www.yuccaman.com

Jim -
They should be listed on my site, in the Tech section. I don't recall the length offhand (I'm wanting to think 1-1/4" to 1-1/2",) but I am sure they were threaded 3/8"-16. They were a standard part, I got replacements at the hardware store (not my first choice, but OSH tends to have Taiwanese hardware, which is measureably better than Chinese. I flatly refuse to use Chinese hardware given a choice, and I've gone into just why before.)

You can use hex heads or socket heads. You can also use studs if you like (I prefer them,) and I think I used a 3/8"-16x2" stud to replace those wretched things...
 
The torx bolts were the first ones I tackled....didn't even loosen the others first. Wanted to tackle the tougher things first. The other 4 non-torx broke loose very easily.

I even quadrupled checked I was loosening and not tightening.
 
The torx bolts were the first ones I tackled....didn't even loosen the others first. Wanted to tackle the tougher things first. The other 4 non-torx broke loose very easily.

I even quadrupled checked I was loosening and not tightening.

Well Done... Torx Heads ??? Why Oh why??

Nick
 
Well Done... Torx Heads ??? Why Oh why??

Nick

Jeep was just making sure no tool would go untouched when doing this job, yanno, making you glad you spend all that money on tools.
 
Well Done... Torx Heads ??? Why Oh why??

Nick

Internal wrenching Torx came about because you could apply more torque to a Torx wrench than you could to a comparable hex key.

External wrenching Torx came about for a similar reason (more applied torque than a comparable hex head,) plus it was easier to retain the external Torx head in an automated wrench than a hex head, due to the flange (partly why flanged hex heads came about - the external Torx is simply a refinement of that idea.)

Not my guesswork, not consensus - this is from the people who came up with the idea (Camcar Textron.)

It does make some small sense - when you're building things by the thousands. Kinda like that silly little knuckle under the power steering pump on early rigs - it's made via powder metallurgy, because it costs about half as much to make, requires very little machining to final size (parts are nearly finished coming out of the mould,) and you can sinter far more simple parts in a shift than you can machine (making the line more productive - even compared to CNC.)

The catch? Early powder metallurgy didn't do well, and tended to fracture under extended or increased strain. Later powder metallurgy is much better - my Benchmade Emerson CQC7B(LH) has a blade made from powdered ATS34 CRES alloy, and is rock solid. Hell, it took me six years of hard use before I snapped the tip off of the blade and needed to have it re-ground.

There are advantages to powder metallurgy these days - you can make alloys that would not normally be possible, you produce parts that are spot-on final shape (or very close to it,) and you can make more parts in a shift by PM than by machining - manual or CNC. And, the technology has finally come to the point where it's useful.

It shouldn't replace everything - I wouldn't trust screws made by PM processes for anything but exotic applications (where exotic material properties would be required,) because the process of making screw threads - cold-rolling - results in a cold-forged piece that is much stronger than just about anything else. A cold-rolled thread is going to be far stronger than a comparable cut thread, simply due to the way it was made. Period.

Same reason heads are usually "cold-stamped" onto screws - you get stronger heads that way.

But, I digress.
 
what happens when the torx bolts strip? Thats what I'm dealing with right now.

They round off. Grab them with something a bit more solid - like vise grips - or just cut the heads off, pull the transmission, and grab the broken stub and pull that out.
 
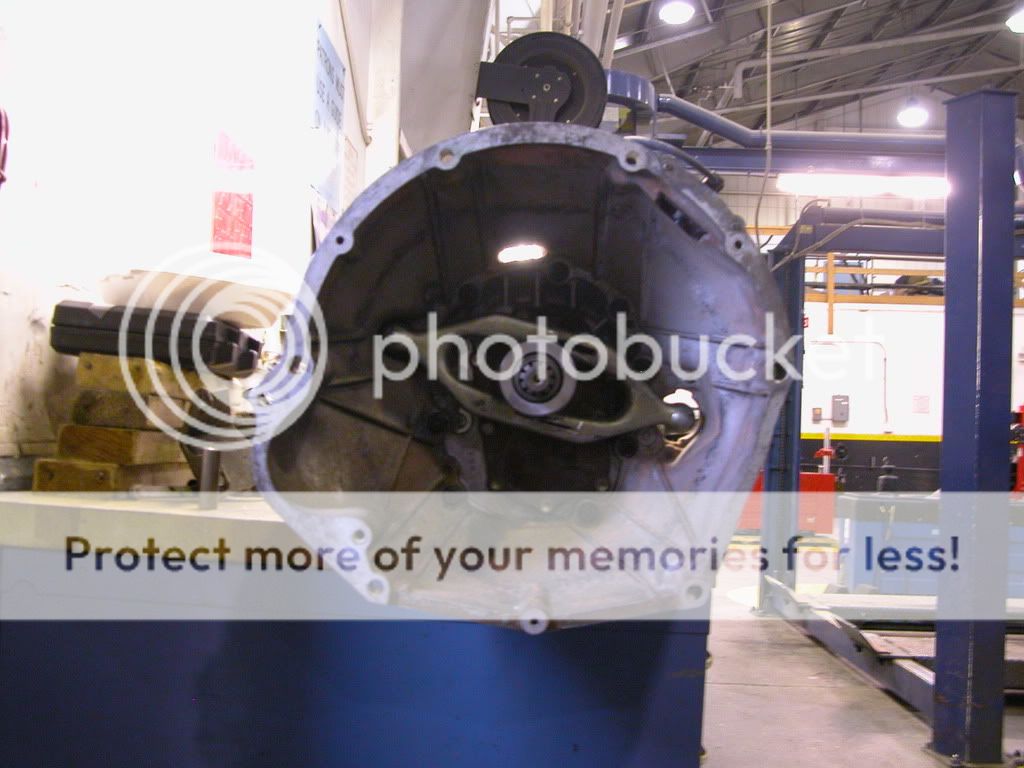
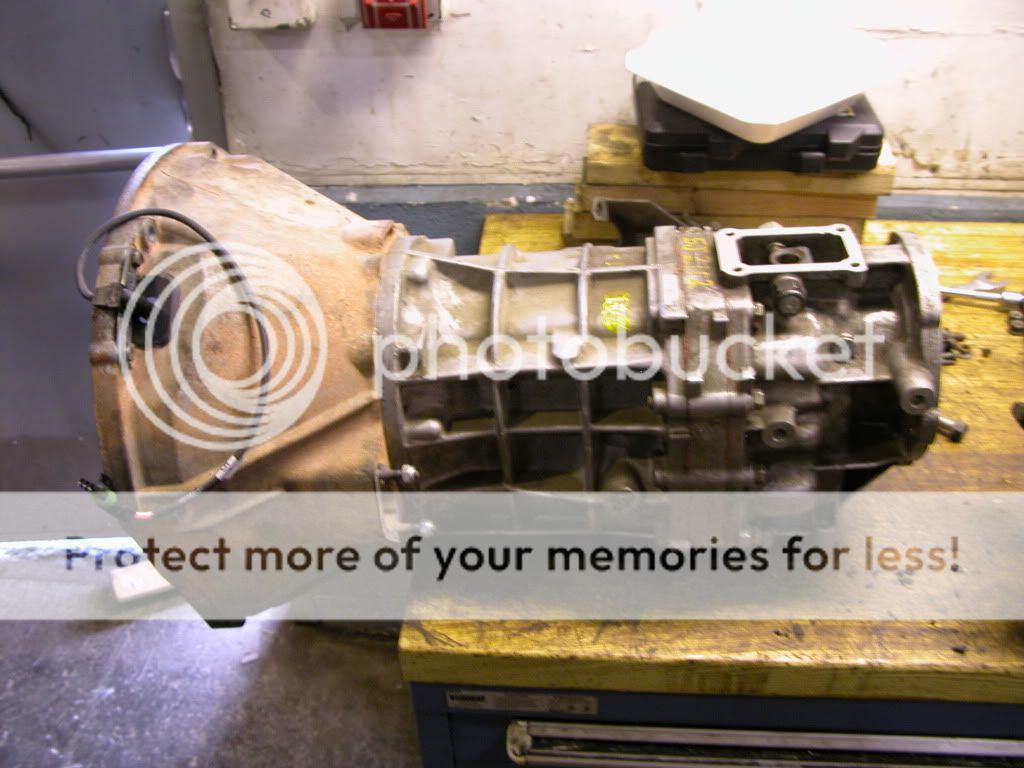
Oh hey I got some pics I have posted here and there of my AX-15 when it was going in my 88.
AX15001.jpg

Pic of the back of the engine

AX15005.jpg

The Bell Housing

AX15004.jpg

And a side shot
 
They round off. Grab them with something a bit more solid - like vise grips - or just cut the heads off, pull the transmission, and grab the broken stub and pull that out.

Yeah I'm working on cutting the heads off because I couldnt get in there enough to get a better grip with anything else.
 
Back
Top