• Welcome to the new NAXJA Forum! If your password does not work, please use "Forgot your password?" link on the log-in page. Please feel free to reach out to [email protected] if we can provide any assistance.

serpentine belt wearing pre-maturely

blazinjames

NAXJA Forum User
so i replaced my serpentine belt not that long ago and its is showing major signs of wear, cracking, loose, squeaking..

what could be the cause of this? one of the pullies not working or something?

i have a 89 xj 4l 4x4, with ac
 
Make sure the harmonic balancer is still intact. It's a two piece assembly with an inner and outer section with rubber in between. When it starts to fail, the outer piece will walk forward or more typically backward. This misaligns the belt and as it gets worse can cut a groove through the timing cover. X2 on getting the tension rihgt. Go get a krikket II tension gauge at Napa.
 
Make sure the harmonic balancer is still intact. It's a two piece assembly with an inner and outer section with rubber in between. When it starts to fail, the outer piece will walk forward or more typically backward. This misaligns the belt and as it gets worse can cut a groove through the timing cover. X2 on getting the tension rihgt. Go get a krikket II tension gauge at Napa.

where is the harmonic balancer???

i looked in my haynes manual and the FSM manual i have and couldnt find it..

thanks
 
where is the harmonic balancer???

i looked in my haynes manual and the FSM manual i have and couldnt find it..

thanks

It's the lowest pully on the nose of the crankshaft - wretched thing is massive, compared to the rest.

Exactly what sort of wear are you experiencing - can you post a pic? That would help greatly - different faults can cause different sorts of wear.

Also, it's worth noting that the OEM belts and most "house branded" belts are made by Dayco - and Dayco belts, in a word, suck. I helped a guy install an OEM belt on after I'd done a harmonic damper job for him, and the belt started to delaminate immediately. Stick to Gates or Goodyear (Carquest house brand is, I think, Goodyear - and NAPA is one or the other of those,) and it will last you fine. I won't use any other brand of belts or hoses anymore - I've just run across too much trouble to trust anything else.
 
007.jpg
006.jpg


not the best pictures but u can see where it is wearing on the inside of the belt

thanks
 
OK - by "inside" I take it you're referring to the engine-side edge of the belt, yes? Typically, "inside" refers to the ribbed side, and "outside" to the smooth back. "Front edge" and "back edge" are referring to the belt as mounted.

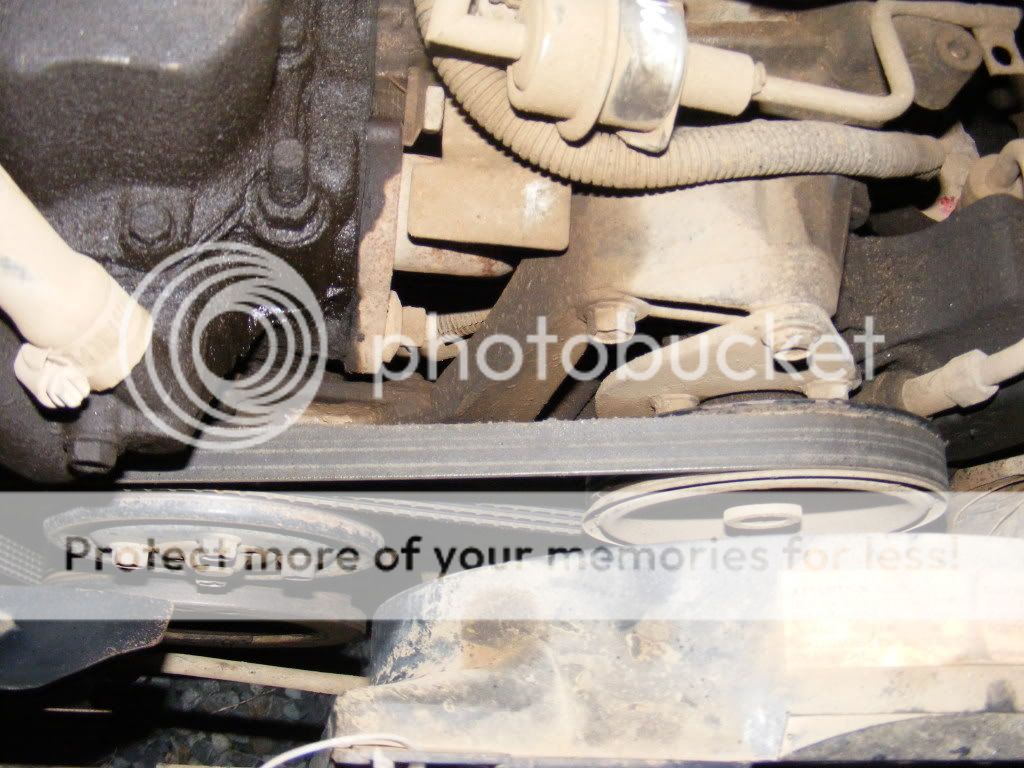
If you look at your second picture, you see two pullys one atop the other on the left. The big honkin' pully on the bottom is the harmonic damper, and it looks like it's starting to separate. A quick test is to take a covenient straightedge and lay it across the front of the pully - the hub and the ring should both be touching the edge, or close to it (1/16" or so.) It looks like the ring on yours is "walking out" - meaning that the rubber ring between the hub and ring has started to wear, and is allowing the parts to move relative to each other. This would account for the wear on your belt - since that would stress and abrade the back edge (as mounted.)

You're going to have to replace that pully. It can be done with hand tools in an after-noon, but you might want someone who has done the job before to help you, if you haven't done it on your own. A few things to bear in mind:

1) Replace the seal behind it while you're there, or you'll be kicking yourself good and hard when it fails in a month or so.
2) You'll need a puller to get the damper off.
3) Thou Shalt Not hammer thy new harmonic damper in place! Get a batch of 1/2"-20 screws (about 1-1/2" to 3" long) and washers - you're going to use these to gently drive the damper in place. Lubricate the snout of the crankshaft and the bore of the damper with never-seez - since a Woodruff key is used to maintain alignment, it's just to make installation and removal easier.

The new damper is driven on the final stretch by the OEM snout screw - dip it in oil (or coat it in grease) and torque to 80 pound-feet. Make sure to use the thick hardened washer under the screw head.
 
Be careful when you buy a replacement balancer. A lot of parts places will sell you a Dorman unit.

When we did GrimmJeeper's balancer a couple of weeks ago, we found that the hole in the Dorman was .005" too small...it wouldn't fit on the crank snout. We measured three different Dormans at three different stores and they were all the same.

If you are able to machine the hole out a bit, then go for it. But we didn't have the proper equipment to do so. We were able to get a factory used balancer on there for now.
 
If you buy the balancer puller at Napa, you'll need a shorter bolt for it. Otherwise the whole shebang is long enough that it hits the radiator.

definitely heed 5-90's advice about getting long bolts to pull the balancer back on. You want a bunch of threads engaged when you crank on the bolt. I've seen a few people post that they tried using the stock bolt with just a few threads engaged and stripped the outer few threads.

The only other advice I have is to break that big bolt loose before you loosen or take off the belt. If you got an automatic, a rag jammed in the belt can hold things still in a pinch.

Oh, and reseal that valve cover while you're there. :}
 
Yes, same thing.

Kinda hard to see in the picture. But it looks like it's separating. See how the outer ring sticks out more than the inner part?
 
Yup definitely bad. The outer section has walked at least 1/4" forward. The valve cover isn't a big job. Mostly just undoing all the bolts, cleaning everything up, putting a new gasket in there, putting the cover back on, and lightly snugging the bolts back down.
 
I've gone into detail elsewhere around here on how to get a good valve cover seal - it can be difficult on inline six engines (and worse on inline eights!) So, you may find the search function useful there.

Torque specs for anything I've got FSMs for to date are on my site in the Tech Archives - click the link in my sig. IIRC, the valve cover screws are torqued to 84 pound-inches/7 pound-feet, and you'll really want to use a torque wrench for those so you're consistent and don't overdo it (or you'll crush the gasket, and end up doing the job over again.)
 
Back
Top