• Welcome to the new NAXJA Forum! If your password does not work, please use "Forgot your password?" link on the log-in page. Please feel free to reach out to [email protected] if we can provide any assistance.

Questions on entire vehicle painting

BIGSLVRXJ

NAXJA Forum User
Location
Des Moines, Iowa
Hey all, I wanted to ask a few questions on here because I know several of you are fairly good at this stuff. I plan to paint 2 vehicles this summer... my 1990 XJ and my 1995 Chevy Caprice. Now to give a background on my painting skills...
I have completely rattle canned an MJ. It turned out decent but the one thing I was especially displeased with was the "tiger stripes" (I've heard that is the technical term for them) or the lines between passes of the spray. Here is a picture just for kicks...it exaggerates the tiger stripes quite a bit.

MancheTrimmedandSuch002.jpg


Anyway, since then I have bought a paint gun. It is a Finex model that was right around $150. I have gotten the basic idea of mixing the activator/reducer/paint pretty well. I have a DeWalt Emglo compressor that I plan to be painting with that can produce 4.5 CFM @ 100 PSI which I figure should be plenty powerful. I also have the regulator/drier to go along with it. My question about the compressor is, should I have it on the ground and the drier/regulator mounted above it to...for example...a stud?

Now on to the true painting questions...

The Jeep has been repainted by Maaco and most of it is holding on pretty well, but I want a color change. It was a cheap enamel paintjob so I will prep it down make sure it's no longer glossy and shoot it. Now my question is...very shortly I will be buying a soda blaster, should I blast it all the way down past the Maaco and Jeep paint and start over?

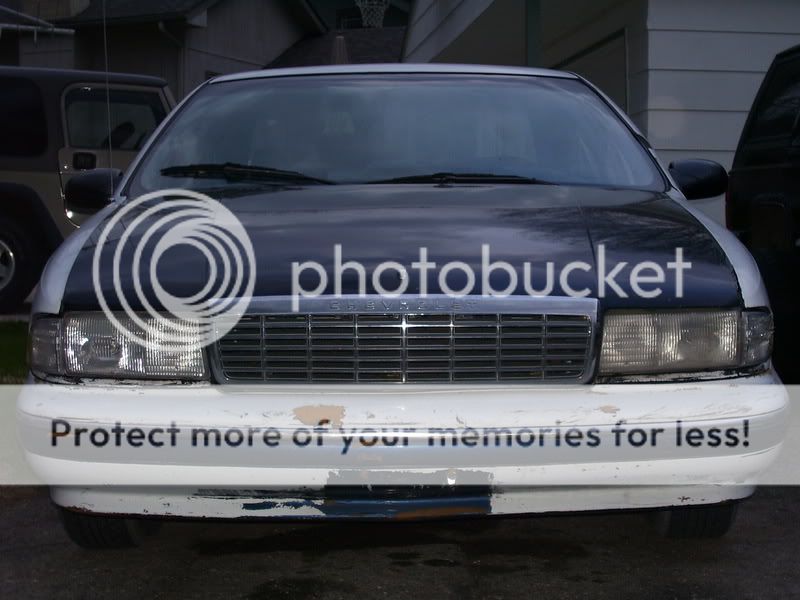
The Caprice has had a rattle can or very very gun paintjob done to it. It doesn't even appear they made an attempt to take the clear off the original paint, which really aggrevates me. Anyway, I took it to a car wash and could actually blast the 2nd cheap layer off. It was slow but I made some progress on the trunk lid. Should I rent/buy a pressure washer and blast the rest of it off, should I use aircraft stripper or should I just prep the 2nd crummy layer and paint over it? Here are a couple pictures that shows the worst of that 2nd paintjob...

1995Caprice17.jpg

1995Caprice18.jpg


I am going to get new plastic bumper skins for it also, the existing ones are not salvageable.

If anyone can help me out with some advice that would be swell. The only thing I don't want to hear is "you're not qualified to do it, take is somewhere". I want to go through this learning process so I can do it in the future. Any suggestions are greatly appreciated.
Thanks,
Collin
 
Last edited:
you could do the rustolem roller job on them
 
If the paint on the Caprice comes off with a pressure washer, I'd at least strip down to the original paint and prep from there. Prepping to bare metal is a lot of work, and you have to start with primer (when you leave the OEM paint, you can usually use that as a primer coat once you've knocked the gloss off of it.)

Bear in mind that you'll have to paint the urethane bumper covers separately, since they require a flexible paint that doesn't work so well on metal. There could be something that will catalyse the paint to be flexible so you can use the same batch, but don't hold me to that - it's been a while.

For the stripes on your MJ - did you not overlap the strokes enough? I'm thinking 1/3- to 1/2-width for overlap - but I was paint prep, not the squirt guy. But, that's the rule I've used for spraybomb work, and I've done well by it.

Make sure your compressor has either a fairly large tank or a fairly high duty cycle - or you'll get sags in the pressure/volume that will affect your paint job!
 
5-90 said:
If the paint on the Caprice comes off with a pressure washer, I'd at least strip down to the original paint and prep from there. Prepping to bare metal is a lot of work, and you have to start with primer (when you leave the OEM paint, you can usually use that as a primer coat once you've knocked the gloss off of it.)

Bear in mind that you'll have to paint the urethane bumper covers separately, since they require a flexible paint that doesn't work so well on metal. There could be something that will catalyse the paint to be flexible so you can use the same batch, but don't hold me to that - it's been a while.

For the stripes on your MJ - did you not overlap the strokes enough? I'm thinking 1/3- to 1/2-width for overlap - but I was paint prep, not the squirt guy. But, that's the rule I've used for spraybomb work, and I've done well by it.

Make sure your compressor has either a fairly large tank or a fairly high duty cycle - or you'll get sags in the pressure/volume that will affect your paint job!
Thanks Jon, those ideas are pretty well along my lines of thinking. I actually have done some plastic painting with Krylon Fusion rattlecans and it will stick to plastic unbelieveably well, but again, I'd rather keep cans out of this equation all together. Keep the tips coming guys.
 
Pick yourself up a DA Sander if you dont already have one, you'll see pretty quick where you may have issues with lifting paint. On the roof of my XJ i went into the paint because of questionable clearcoat.

All the experienced guys will tell you that prep is 90% of the job, and after doing my rig i believe them. Take your time and dont rush the job or cut corners.
 
Regarding the tiger stripes, rattlecan pretty much has to be flat or semi-gloss to get a usable finish on a large piece. The high-gloss stuff has to be perfectly "wet" when applied in order for it to keep the wet finish when dry--if you get any overspray and there are any "rough" areas they will be rough when dried too. This is pretty much why trim paint jobs look great (semi-gloss or satin/flat) while body paint looks crap (high-gloss). One trick here is to use a fan spray tip instead of a conical spray tip, it makes a lot less overspray and is much easier to get a wet finish without runs.

As for your new project, I don't know that much about HVLP other than it's expensive to get an adequate setup.
 
ehall said:
As for your new project, I don't know that much about HVLP other than it's expensive to get an adequate setup.

No, Its not really expensive. The bulk in money spent is on a good compressor. A 60gal 6.5hp or higher works the best for home use, bigger would be better but more money. The rest is a good working gun and filter. I have high end and low HVLP guns and both work great as long as they are dialed in right.

I used an HVLP gun bought from Harbor Freight to paint a car that was in Hot Import Nights car show Here in seattle and it looked great. it was only a $50 gun.
 
XJLaredo said:
No, Its not really expensive. The bulk in money spent is on a good compressor. A 60gal 6.5hp or higher works the best for home use, bigger would be better but more money. The rest is a good working gun and filter. I have high end and low HVLP guns and both work great as long as they are dialed in right.

I used an HVLP gun bought from Harbor Freight to paint a car that was in Hot Import Nights car show Here in seattle and it looked great. it was only a $50 gun.

First, I wanted to say thanks to all for the responses.

XJLaredo-what brand/type of compressor would you recommend? I don't think my 3 gallon or whatever Emglo compressor is going to cut it if you're saying a 60 gallon is best. I looked around and even at Harbor Freight a 60 gallon 5 hp is $850.00; it's not that I'm opposed to spending the money since I could use a compressor that big anyway (for blasting, etc.) I just want to be well informed going into it. Let me know when you get a minute.
Thanks,
Collin
 
BIGSLVRXJ said:
First, I wanted to say thanks to all for the responses.

XJLaredo-what brand/type of compressor would you recommend? I don't think my 3 gallon or whatever Emglo compressor is going to cut it if you're saying a 60 gallon is best. I looked around and even at Harbor Freight a 60 gallon 5 hp is $850.00; it's not that I'm opposed to spending the money since I could use a compressor that big anyway (for blasting, etc.) I just want to be well informed going into it. Let me know when you get a minute.
Thanks,
Collin

If your compressor's motor is up to scratch (always possible,) just add in another storage tank. As long as there is no sort of "one-way" valving between the two, you can run multiple tanks off of a single compressor - just let it "start up" longer before you use it to get up to pressure.

With a little creativity, you can even plumb in additional tanks with on/off switches, and have taps between them. Need more capacity? Turn on another tank and tap in after it. Need less? Turn off the other tank, and tap in on the first leg.
 
Well since I got somewhat absorbed in the whole compressor thing, the two in need of paint have been put on hold. I have however found that I can get a 60 gallon 3hp (with a peak of 7hp) compressor for around $400 which doesn't seem overly bad. The one other thing is I will have to get the garage wired for 240v, but it's unfinished and has many open slots in the fuse box, so that shouldn't be a big deal. Jon, I may still go with a storage tank however, I had heard of people converting propane cylinders to hold air and then plumbing them in series from the compressor...would you go this route or do something different? Thanks again for all the help everyone, I can't wait to get the gun up and going.
 
I'd say the propane tank idea has some merit - but I'd want to use some of the nice heavy industrial ones, like you see on the backs of forklifts. Plumb them using hardline - or have a hardline manifold and only a few inches of soft hose to the thing, and check the soft hose regularly.

You'll want a decent reserve capacity for painting - that's what all the tanks are for. More is better, and let it all fill up before you start painting (yeah, it can certainly make a difference! You'll usually get a smoother and more even paint job if you start with a full compressor tank than if you just fire the thing up and start squirting.)

As far as a 240VAC circuit - don't you have a dryer in the garage? Those are usually 240VAC... Just have one or the other plugged in at a time.
 
5-90 said:
As far as a 240VAC circuit - don't you have a dryer in the garage? Those are usually 240VAC... Just have one or the other plugged in at a time.
No dryer, this garage is detached from the house, it was strictly to put 2 cars and a few lawnmowers in; it didn't turn into an auto shop until I got ahold of it. I'm pretty sure with everything out in the open though an electrician should be able to do it fairly cheaply. I'll keep you all posted as I get closer to shooting paint; hoping to have the compressor yet late this month.
 
I'll add that a big part of 'prep' is that after the surface is repaired & sanded to your liking, be sure to wash it off really well (I'd prefer liquid dishsoap rather than "car-wash" soap, since the latter may have some weird wax junk in it.)

Unless products have changed dramatically, masking tape hates water. Get that stuff wet & let it dry one time and you will see. Good tape (like 3M) is a little pricy but fully worth it. Also newspaper makes sucky covering material ... but it's cheap. if you have to use it, go extra thick.

I have no input for the HVLP... I did my autobody training from '80-'83. All I've ever used is DeVilbiss siphon (for auto lacquer primer, acrylic lacquer & acrylic enamel topcoats) and a DeVilbiss pressure feed setup for furniture refinishing... so the newfangled low VOC products, and HVLP spray equipment I'm out of the loop on. I can agree that a bigger compressor (for Volume) will be your pal. 240V will be cheaper to operate over time than a bigger 120V.

Wash with the suds and dry it off: I've found that a leaf blower works awesome for rough & dirty drying most anything, then detail-dry with the air hose. (laundry, pets, kids, cars, etc... Take care to tie down whatever it is your wanting to dry.) Obviously don't use a gas-powered leafblower indoors too long... and oily 2-stroke exhaust residue wont be good for paint adhesion.

With the old-school paints I learned on, 'fisheyes' were a constant flaw/hassle. IIRC we used a product called "Smoothie" at a couple squirts per unmixed gallon of paint. Fisheyes are places on the surface that has oil residue. The paint pulls back as it dries, and leaves little unpainted circles. Use a prep-wash solvent (Prepsol was one brand name, but in school, we just used the same enamel reducer that we thinned the paint with) and two clean rags: Wet-wipe and dry wipe. Get everywhere (twice) that you'd like paint to stick. Do it again after final masking. One missed fingerprint or some goo in the wrong spot = beginnings of a sucky day! Not so bad with lacquer (dries in minutes, flaws & crap sand right out) but non-hardened enamel...ugh.

That's all I got for now.
 
woody said:
I'll add that a big part of 'prep' is that after the surface is repaired & sanded to your liking, be sure to wash it off really well (I'd prefer liquid dishsoap rather than "car-wash" soap, since the latter may have some weird wax junk in it.)

Stuff I used when I was doing prep professionally? Basic Tide, no bleach, no additives - and the hottest water you could stand to put your paws in.

Give the entire surface a wipe with denatured alcohol right before you spray - this not only will get the rest of the dust that may remain, but will also help to get rid of the water that hasn't dried yet.
 
BIGSLVRXJ said:
No dryer, this garage is detached from the house, it was strictly to put 2 cars and a few lawnmowers in; it didn't turn into an auto shop until I got ahold of it. I'm pretty sure with everything out in the open though an electrician should be able to do it fairly cheaply. I'll keep you all posted as I get closer to shooting paint; hoping to have the compressor yet late this month.

5-90 didn't mean a cloths dryer(i hope, lol) he ment an air dryer. It is to remove the vapors in the air that are caused by the high temperature from the compressor motor. There should always be at least 25ft of line in a downward motion before any filters, this is to let the vapors cool and turn into a solid wich is easier to remove.

Sorry about not see your question to me about the tanks, i havnt been on this area in a while. I suggest a 60 gallen tank due to costs of adding a secondary tank and hoping your smaller motor can keep up when the air supply is getting low, this can cause spraying problems.

PM me if you have any questions regarding this since i never know when i'll get back to this section.
 
XJLaredo said:
5-90 didn't mean a cloths dryer(i hope, lol) he ment an air dryer. It is to remove the vapors in the air that are caused by the high temperature from the compressor motor. There should always be at least 25ft of line in a downward motion before any filters, this is to let the vapors cool and turn into a solid wich is easier to remove.

Sorry about not see your question to me about the tanks, i havnt been on this area in a while. I suggest a 60 gallen tank due to costs of adding a secondary tank and hoping your smaller motor can keep up when the air supply is getting low, this can cause spraying problems.

PM me if you have any questions regarding this since i never know when i'll get back to this section.

No - I meant a clothes dryer - electric clothes dryers are invariably 220VAC, and that would have taken care of wiring in a circuit (220VAC/40-50A, IIRC. Plenty to run a compressor or most fab gear - one at a time, at least.)

Air dryers (for the lines) aren't typically electric, and are simply mounted inline (before or after the tank - if after, make sure you have a "pop valve" to drain water from the storage tank...)
 
FWIW, my dad painted his sebring with a hvlp gun from harbor freight, it had a plastic base and wrinkle hose, and I swear the base housed a fan. It actually did a great job, the only thing I did not like was he laid his 2nd coat on too think and it orange peeled. It was the cheapest little paint sprayer I have ever seen, but it did a great job, no compressor or tank, just a little hvlp fan.
 
Wagner makes a couple of electric HVLP guns too. The "Control Spray" costs about $60

Control_Spray_300pixels.JPG


They have a bigger brother to it that is about $100. Harbor Freight sells one like this.

FineSpray_HVLP_Set.jpg


Both of them have horizontal and vertical fan tips.

I'm planning to use the cheap one with Rustoleum and mineral spirits.
 
I've turned out some good paint jobs with Dupont Acrylic. Not real pricey, dries in a reasonable time and easy to spray. I believe in the kiss principle (keep it simple stupid). I usually only spray one of two colors, black or white. Reason being, if you have to go back to re coat or repaint, the difference in the color shade is hard to see. Touch up is a snap.
My method is also simple, I paint in the early morning (fewer bugs), try for around 70 F and wet down the ground in a thirty foot circle to keep the dust down. I often paint in the open in a parking lot someplace. I pick a morning with no wind and little chance of rain for at least 5-6 hours.
Primer is your friend. Sealer primer can save you a lot of grief, especially painting over enamel. I've had some bad experiences painting over enamel. The base coat (enamel) will get soft, primer or no primer, but the sealer primer seems to help avoid the coats drying at different rates and causing crinkling and other catastrophes. I've used both sanding primer and sealing primer with good results.
Read up some before you start, typical gun pressures are low, depending on the paint manufacturers recommendation.
 
ehall said:

my dad used the harbor freight version of this. He used a good primer sealer and good paint. Then he used a HF air brush and painted flames. Make sure you mix the primer seal yourself. He seriously had it mixed at the paint store, drove home and started to spray it, no more than a 15 min wait, and it was already separating.
 
Last edited:
Back
Top