• Welcome to the new NAXJA Forum! If your password does not work, please use "Forgot your password?" link on the log-in page. Please feel free to reach out to [email protected] if we can provide any assistance.

Lining the Rockers

98XJSport

Destiny is the rising sun
Location
Western Maine
Well Im hoping to clean up some surface rust and trying this tomorrow. The plan is to wire wheel the surface rust. This is where my questions start. Do I wire wheel the whole rocker, or should I get some sandpaper and rough it up that way? What grit, if so?

I assume then I will need to clean it with something, the liner should tell me what. I plan on using a rattlecan liner, no spray gun and it will be easier to touch up. First, though I want to use something for a rust converter/protector. Any good recommendations that I can grab at the local parts place? I want something that I can just throw a few coats on, then line over that.

I think that covers it, I plan on doing from where the trim is down. Did I miss anything? How long does the stuff usually take to dry? Any other tips or tricks would be much appreciated.

Thanks!
 
I used 80 grit on mine, took about 5-10 minutes to dry to touch, no idea about how long it took to be completely dry. I did mine from the upper bodyline down. So basically the whole side of my junk is rattlecan bedlined. It gets lots of compliments.
 
I like the look, and the protection. Ive seen tons of writeups, but not with details really. Im also hoping this will give me a good base if/when I take off the rear bumper endcaps.
 
I just resprayed my driver's side rockers this past weekend. I didn't feel like going with the bedliner, since my XJ is still pretty clean, so I used Rustoleum Hammered Finish black.

I used a heat gun to soften the glue on the stripes and the vinyl, then carefully peeled it off. Cleaned the glue residue off with MEK. Masked it off very carefully, then sanded it with 200 grit sandpaper. Cleaned the sanding dust off with MEK, then sprayed 4 coats of paint, quickly removed the masking tape BEFORE the paint started to dry, and then let it dry overnight.

I didn't have any rust on my rockers so the sanding went pretty quick. A friend of mine who is into Full-Size Jeeps recommended the rust converter that they sell at Wal-Mart.
 
When I did mine w/ rattle can I roughed it w/ 80 grit to start. Then I did around 3 coats of primer letting each coat dry before doing the next layer. I then roughed out the primer a bit w/ around 400 grit. From there I applied the liner in three different coats. I used a rustoleum medium texture liner and it turned out very well. When appling try to keep the can at the same distance from surface and keep the can moving the whole time. This helps w/ eveness which must be done well b/c you cant sand this stuff out when your done. Hope this helps a bit.
 
So it's looking like clean rust, rough it all up with 80 grit, clean, rust converter, light sanding and clean, then line it.

Sounds easy enough...
 
Dave41079 said:
I used 80 grit on mine, took about 5-10 minutes to dry to touch, no idea about how long it took to be completely dry. I did mine from the upper bodyline down. So basically the whole side of my junk is rattlecan bedlined. It gets lots of compliments.


How many cans did it take you? How many coats did you do?
 
I just sprayed mine with Duplicolor aerosal. Its all in how you prep it. First I wiped the whole area down with acetone, Then sanded with 100 grit, wiped it down with a tack cloth. Resanded the entire are with a maroon scruffy pad. Cleaned the whole area with wax and grease remover and then sprayed.
100_3709.jpg
 
DeftwillP said:
How many cans did it take you? How many coats did you do?

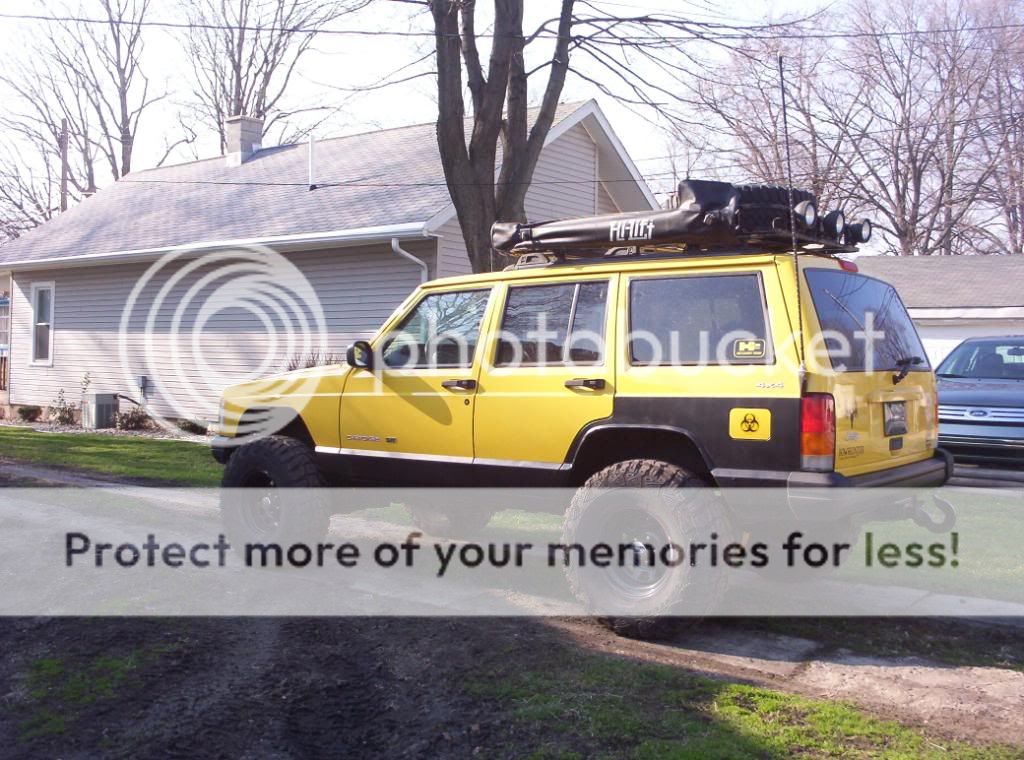
It was almost two years ago, but I want to say It took 7 or 8 cans. I couldn't tell you how many coats I put on either, I would say it would equal out to two, maybe three. I just kept spraying until it was all well covered and even. Here is a picture.

doorless1004.jpg
 
I just did this to my 94 yesterday i took a wire wheel to them to get all the surface rust off then i cleaned them with a tar and bug remover which worked great then sprayed rust converter and rubber undercoating from the plastic trim down it came out really nice hopefully that will keep them from rusting for atleast a few more years
 
Must be a Maine thing :cheers: I am cleaning things up and trimming the inch of fender that the screw holes were in first, then going this route. Now if I can just figure out how to get the rear bumper endcap off... :eyes:
 
I just re-did mine and if the rust is on the inside your just wasting time, once you start sanding you'll know right away. With mine I sanded until the rust was gone and that turned out to be when I got through the sheet metal. But if your lucky enough for it to be just surface rust then you might want to spray it with rust stop to help it from showing back up.
 
Last edited:
For those that have done it with the rattlecan stuff, how well does it hold up? Dave, you've said that you have it on for 2 years.
 
It's held up great. I beat the snot out of it and no problems. It's chipped off on edges or places I didn't sand too well originally, but I just respray a spot here and there, and it's fine. No more scratches, and it actually cleans really well. I've used a brush on it before to scrub off dirt/bugs/mud/birdshit/whatever, and no problems at all.
 
Dave41079 said:
It's held up great. I beat the snot out of it and no problems. It's chipped off on edges or places I didn't sand too well originally, but I just respray a spot here and there, and it's fine. No more scratches, and it actually cleans really well. I've used a brush on it before to scrub off dirt/bugs/mud/birdshit/whatever, and no problems at all.
Same here part of the reason I did it is because you can just respray it. getting dirt off is a pain but it's not to bad with a brush.
 
How does the spray on stuff do as a filler? I found a big dent under the bumper endcap. Not very deep, so hopefully if I do it right with the rattlecan I can make it go away...
 
I used Duplicolor Aerosal bedliner , pretty happy with the results.

100_3691.jpg

100_3698.jpg
 
Back
Top