• Welcome to the new NAXJA Forum! If your password does not work, please use "Forgot your password?" link on the log-in page. Please feel free to reach out to [email protected] if we can provide any assistance.

Homemade Bumper

Steve F

NAXJA Forum User
Location
Australia
I've got a week off work so decided to make myself a new bumper. Two days into it and I have the stock one off, the plates to mount it made and the bumper shaped and welded up. Just need to trim the ends of it, add a bottom to it and beef up the brackets I made to include some tow hooks etc.

So far it has cost me $56AUD, which is about $40USD I guess. I'm baseing it on the RockLizard Monitor bumper.

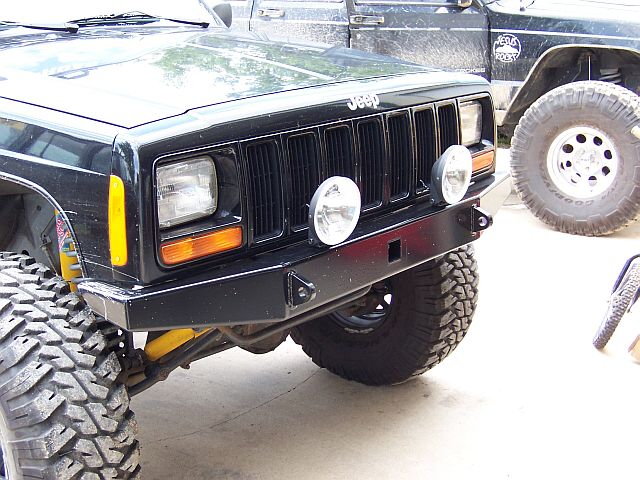
This is what I'm going for.

monitor1.jpg


And here is my progress.

Yesterday.

100_2761.sized.jpg


100_2759.sized.jpg


Today I got this far.


Bumper_011.sized.jpg


Bumper_015.sized.jpg


Bumper_021.sized.jpg


Bumper_018.sized.jpg


Tomorrow I should get the recover hooks mounted and the basics of the bumper finished off :)

Cheers
Steve
 
very nice work.
 
looking great , whats the specs on the metal youre using? 3x5? 3x6? 1/4" ? mounts look to be 1/4"

its always great to see people building stuff instead of buying it, keep up the good work.
 
I seriously need to buy a welder....a front and rear bumper and thats paid for, not to mention a roof rack! Looks awesome!
 
Last edited:
88rockxj said:
looking great , whats the specs on the metal youre using? 3x5? 3x6? 1/4" ? mounts look to be 1/4"

its always great to see people building stuff instead of buying it, keep up the good work.

The brackets are 6mm (approximatley 1/4") The bumper itself is also 6mm thick, probably thicker than it needs to be but it was the only angle I could get in the size I needed which is 75mm x 125mm so in imperial it's 1/4" and 3"x5". The towhook mounts will be 8mm angle with 8mm reinforcement, I need to go buy that tomorrow morning.

Too buy this bumper down here in Australia I'd be looking at about $800AUD, more like $1200 for an ARB bar. This will cost me about $80 in steel, some paint, about 5 welding rods and so far 3 1mm cutting disks for the grinder :)

Cheers
Steve
 
Looks good.

Not sure if you are using it to reinforce the steering box. If not, you may want to consider it.... just my input.
 
rpraterxj said:
Looks good.

Not sure if you are using it to reinforce the steering box. If not, you may want to consider it.... just my input.
When I made my bumper I didnt do that, and on the next rip, ripped the box off the frame. Wish I had done it before.
Also, you should have made the brackets extend through the angle iron for the tow hooks. Would have made it a lot stronger, and a better tow point.
 
x3 on the steering box bolts...

my front bumper ties in with 15 bolts...
 
thats great work, I am trying to make a bumper much like that work but out of 2x6 square tubing so it can be a air tank aswell. if mine turns out half as well as yours has I will be happy.
 
To answer some questions.

It'll will tie in with the steering bracket bolts, so all up it will have 15 bolts holding it on, 9 on the drivers side and 6 on the passenger side.

I didn't extend the brackets through the face of the bumper as it is illegal to have protrusions from the face of the bumper here and they are very strict on that sort of thing at the yearly inspection. The tow hooks will have to be under the bumper.

I never cut all the way through the angle, I scored the back of it with a 3mm cutting disc on the grinder and then bent the steel. This way you can position it just right and not have to worry too much about it moving etc. It also means the face of the bumper has no welds on it. When it's bent to shape weld over the cut you made in the back to strengthen it again :)

Cheers
Steve
 
Ready for paint, I did consider geting it powder coated but I'm thinking I may add a hoop to the top later and a skidplate on the bottom of it, I just dont have time this week and need the jeep back on the road :) Sooo, rattle can bumper paint will do it for now.

One final test fit and a check to make sure it all looks nice :)
Bumper_030.sized.jpg


The pink stuff is scratch filler to hide the grinding marks
Bumper_038.sized.jpg


And here you can see one of the recovery points.
Bumper_027.sized.jpg


Blurry but you get the idea.
Bumper_032.sized.jpg


Anyway, first coat goes on this afternoon and then another tomorrow morning and then it's time to fit it (after moving the horns etc and trimming the wheel arch liner)

Cheers
Steve
 
Back
Top