• Welcome to the new NAXJA Forum! If your password does not work, please use "Forgot your password?" link on the log-in page. Please feel free to reach out to [email protected] if we can provide any assistance.

broken thermostat mount

rckclmbr

NAXJA Forum User
Location
Abilene, Tx
ok so i am getting ready to go for a weekend of wheeling fun down at katemcy, tx and i have to do a coolant change just to make sure we stay nice and cool in the 100 degree heat. well after i get it all asembled, i turn it on and water starts pouring out from around the thermostat. so i pull it off again and this is what i see.

DSC_0084.jpg


DSC_0086.jpg
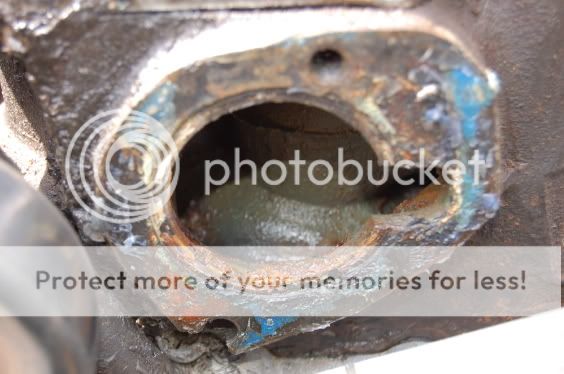
we are going to try to pull it and weld it. just cause that doesn't cost anything and if that doesnt work then junkyard time here we go!
 
are there any threads left looks like it was just a slight crack. are you sure the leaking was not just from the sealing surfaces not being cleaned well enough before assembly.
 
when we would put that bolt in we could tighten it by hand and it would get fairly tight then just go loose. so we kept pressure on it and tried screwing it in to the same problem.
 
Ouch. You might want to look for a threaded bung for that, rather than a Heli-Coil.

The mating surfaces do need to be fairly clean, but I'm sure you already know that. I usually use Scotch-Brite wheels to get the surfaces nice and clean - and they leave a very slightly rough surface, which helps gasket sealing. You can probably find them at your local hardware store or better parts house (don't bother with a chain house for those,) or check an MRO outfit like MSC Direct, or possibly Eastwood (a company that does autobody restoration supplies. I've got their catalogue somewhere...)

Failing that, what year is the head? I'm trying to collect a set or two so I can section them and check them out, and that's a candidate. I'm sure I could swing down there next time I drive to Indiana to visit family, since I'm usually not in any sort of hurry when I go...

5-90
 
5-90 said:
Ouch. You might want to look for a threaded bung for that, rather than a Heli-Coil.

whats a threaded bung and heli coil?

i am gonna try to seal it again. with one bolt actually screwed in and the other hammerd in. then if that doesn't work we are gonna pull it and weld it all up and try and re thread it. but if none of that works you are welcome to it 5-90. its off of a 1990.

o and i forgot this one... i am gonna try to JB weld that whole thing closed. then i am gonna get a self tapping screw and see if i can get that to work.

If anyone else has any last ditch situations let me know! Cause spending 5 or 6 bucks trying something is alot cheaper than a new head.
 
A Heli-Coil is a screw thread insert used to repair threaded holes. It is made from wire that has a "flattened diamond" shape, and requires a special drill (usually listed, if not included) and tap (which is usually included.)

A "threaded bung" is a solid insert with internal and external threads. The better ones have standard threads on the outside, negating the need for special taps and drills. For instance, a 1/4"-20 threaded bung will usually have a 3/8"-18 external thread, meaning you drill the hole to size to accept a 3/8"-16 tap, tap the hole, and screw the bung in. It will have an inside thread roughly equal to the one that was there orignally, unless you select something different.

Both are available from MSC Direct (www.mscdirect.com.) Even if you don't get anything from them this go-round, order their catalogue. It's freem, four inches thick, and certainly worth having (reminds me, mine is four years old. Time to correct that oversight...)

If you're going to weld, let me offer up some advice.

DO NOT tackle this job yourself, unless you have welded cast before. Cast is not easy to weld (I've assisted, but I've never done it) and requires pre-heating, and sometimes post-heating and slow cooling to get a good weld and not get cracks. The casting usually has to be heated to somewhere around 500*F so it doesn't warp or crack - at least in the area of the weld. A much more gradual heat gradient is required for castings than for wrought stock.
DO try to get it TIG-welded. Even with pre- and post-heating, TIG remains about the best process for the job.
DO try to get a high-nickel rod, to match the alloy you're welding. Changing the contents ("assay") of casting metal can result in significant changes in how it responds to temperature elevations and changes - and that can result in weld failure. Don't ask how I know...
DO try to get someone who has welded castings to do the job for you - and you help (if you don't have practise welding cast iron.) Especially for something like this - it's well worth it.
DO see if you can't get a machine shop to grind the weld smooth for you in this case, or take a good deal of effort and time to grind it nice and smooth yourself. This is something you just don't want to screw with.

Oh - and since it's a 1990 (and therefore a #2586 head,) I won't worry about that - I have several of those. I'm trying to nail down a couple #7120, #0630, and #0331 heads now - I've even got a #2585 (although I'd like to get another.)

5-90
 
Have you checked on the availability of a new thermostat housing? I had a similar problem- a hairline crack, and I could NOT get the thing to stop leaking. I had assumed that I couldn't get a replacement, or I wouldn't have wasted time fidgeting with it. Anyway, it cost about $12 at the local parts store, and it came with a gasket to boot! No more leak!
 
Oops- it's a mount, not a housing. I guess I'd been staring at the housing so much lately that I jumped to the wrong conclusion.

I bet you wish it was a housing. Oh man, that stinks...
 
Another option would be to get a stud tig welded into the existing hole and use a nut to fasten thermostat housing to it. Just make sure that it is long enough to leave you enough threads to grab onto to not too long.
 
well since i hadn't seen this post in a few weeks heres the up date.
It seems to be holding up.

what i did:
1. sand papered and razor bladed the thing as clean as i could.
2. used more than half a tube of blue silicone sealant
3. got a short bolt and a hammer and beat it till it went in as far as i could get it.
4. then tighented the top bolt and let it sit

started it up the next morning. only had a slow dripping leak. nothing like the previous day when it looked like i had installed a fountain in my engine bay.

as of today, we have no leak at all and it seems to be holding up farily well. I was kinda nervous to drive on the highway thinking that it might just explode or somthing one me but i just got back from a short trip around town at 80 mph and all is well!
 
Back
Top