THINGS YOU'LL NEED TO BRING TO YOUR LOCKER INSTALL PARTY:
1-Spartan locker for 27 spline Dana 30 axle. REQUIRED FOR INSTALL
2-Two (2) Bottles of gear oil. REQUIRED FOR INSTALL (Everyone has preferences, I only use Lucas, one bottle of 80W-90 and fill remainder with 85W-140, about a 3-2 ratio.)
3-LubeLocker gasket (or any appropriate gasket and RTV if applicable) REQUIRED FOR INSTALL (Follow torquing procedure during install!)
4-Two (2) differential bearing cups. OPTIONAL, BUT RECOMMENDED (you're already there, and they're cheap)
5- I also bought inner axle seals as well as differential bearings just in case they were in need of being replaced. My seals and bearings were both in fantastic condition (almost 300K!!). I recommend keeping as many factory tolerances as condition permits, as your old factory parts are often better/stronger than bearings/seals obtained from your local parts store. However, there are better options out there, if you feel so inclined. IF ITS NOT BROKE, DON'T BREAK IT!
6-Tools. REQUIRED FOR INSTALL
7-Drain pan
Two (2) bottles of brake parts cleaner
Drill and copper/steel wire wheel
Roll pin punch set (3/16" diameter, at least 3" long)
Can o' grease
Feeler gauges or slide caliper
Red Loctite
THE PROCESS OF INSTALLING YOUR NEW SPARTAN LOCKER!
REMOVE TIRES
SUPPORT VEHICLE SECURELY ON JACK STANDS.
REMOVE BRAKE CALIPERS AND ROTORS.
REMOVE AXLE SHAFTS.
REMOVE DIFFERENTIAL COVER BOLTS, WITH THE EXCEPTION OF THE TOP BOLT. LOOSEN TOP BOLT TO HALF THREAD TO ALLOW THE MATING SURFACES TO SEPARATE. PLACE DRAIN-PAN UNDER DIFFERENTIAL TO CATCH OIL.
I USED A RUBBER MALLET TO SEPARATE THE COVER, YOU MAY CHOOSE TO USE A FLAT HEAD SCREWDRIVER OR SMALL PRY BAR, BE CAREFUL NOT TO DAMAGE THE SURFACES.
Mine was filthy, thick and smelled great. It was clean of debris, though, with no metal or evidence of water or mud being found.
Next...
REMOVE DIFFERENTIAL BEARING CAP BOLTS.
THERE ARE FOUR BOLTS. TWO HOLDING EACH BEARING CAP IN PLACE.
IT IS IMPORTANT TO NOTE THE LOCATION OF EACH CAP AND BOLT. BE SURE TO PUT THEM BACK EXACTLY WHERE THEY CAME FROM, THE CAPS FACING THE PROPER WAY AND THE BOLTS IN THEIR SAME HOLE. DO NOT FORGET! HERE I AM POINTING TO ONE OF THE FOUR BOLTS. 5/8" IF I REMEMBER CORRECTLY, BUT BE SURE TO USE YOUR OWN JUDGEMENT ON BOLT HEAD SIZES.

NEXT...
REMOVE THE CARRIER
GRASP IT WITH BOTH HANDS, MAKING SURE TO HOLD THE DIFFERENTIAL BEARINGS AND CUPS IN PLACE WHILE YOU WIGGLE IT OUT FROM IN BETWEEN THE TIE ROD AND HOUSING. IT SHOULD COME OUT FAIRLY EASILY. IF IT NEEDS SOME CONVINCING, YOU MAY CHOOSE TO PLACE A PRY BAR UNDER THE RING GEAR OR DIFFERENTIAL TO HELP IT. DO NOT DROP IT! DO NOT DAMAGE THE INTERNAL PARTS, COVER PRY BAR WITH A RAG IF YOU MUST!
MATING SURFACE IS CLEANED BY USING A DRILL AND COPPER WHEEL. YOU MAY USE A STEEL WHEEL TO BUST OFF THE HEAVY PARTS OF THE GASKET, BUT AVOID "DIGGING" ONE SPOT OUT WITH A HEAVY WHEEL, AS YOU MAY DAMAGE THE SURFACE. NOW YOU CAN SEE THE INNER AXLE SEALS. MINE LOOKED BRAND NEW. I CHOSE NOT TO REPLACE THEM, AS THEY WERE DOING THEIR JOB PROPERLY.
NEXT...
YOU WILL BE REMOVING THE RING GEAR FROM THE DIFFERENTIAL CASE
BEFORE YOU REMOVE ANY OF THE BOLTS, YOU ABSOLUTELY MUST MARK THE CORRELATION OF ANY ONE PARTICULAR RING BOLT AND THE HOLE IN WHICH IT BELONGS ALONG WITH IT'S RELATION TO THE DIFFERENTIAL!!! USE A PENCIL OR PAINT MARKER. DO NOT SKIP THIS STEP! I FORGOT TO TAKE A PICTURE BEFORE I REMOVED THE BOLTS, SO THE FOLLOWING PHOTO IS WITH BOLTS REMOVED, SHOWING MY MARK.
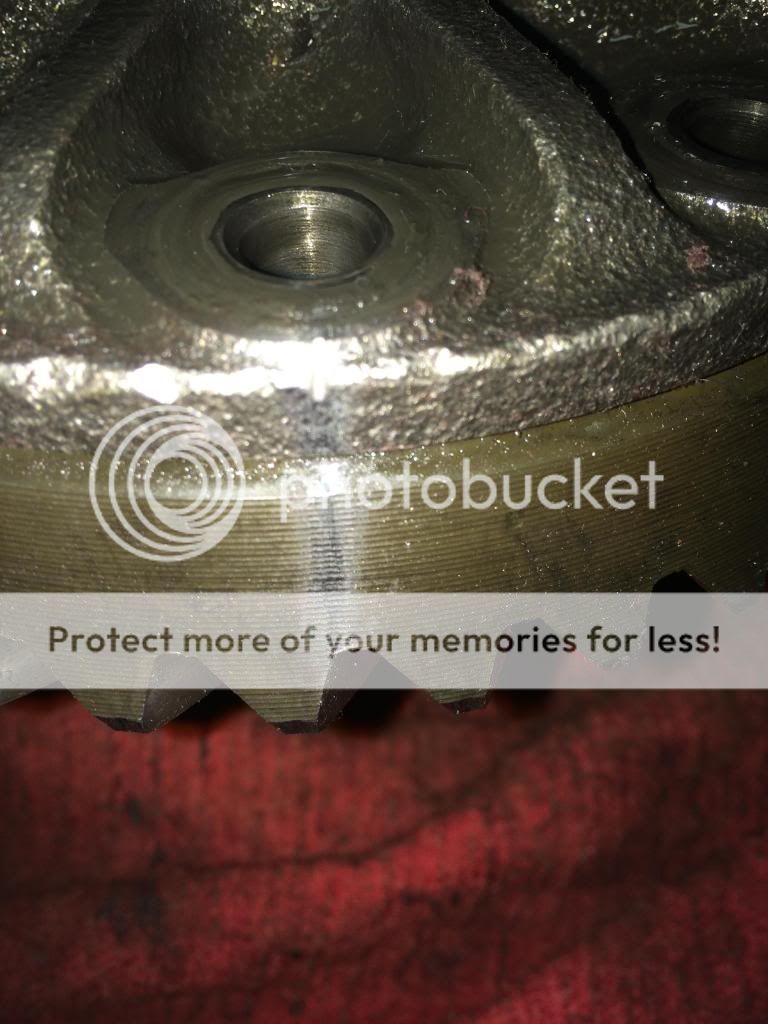
I EVEN WENT AS FAR TO LAY OUT THE BOLTS IN A PATTERN SO THEY WOULD EACH GO BACK INTO THEIR RESPECTIVE HOLES.
NEXT...
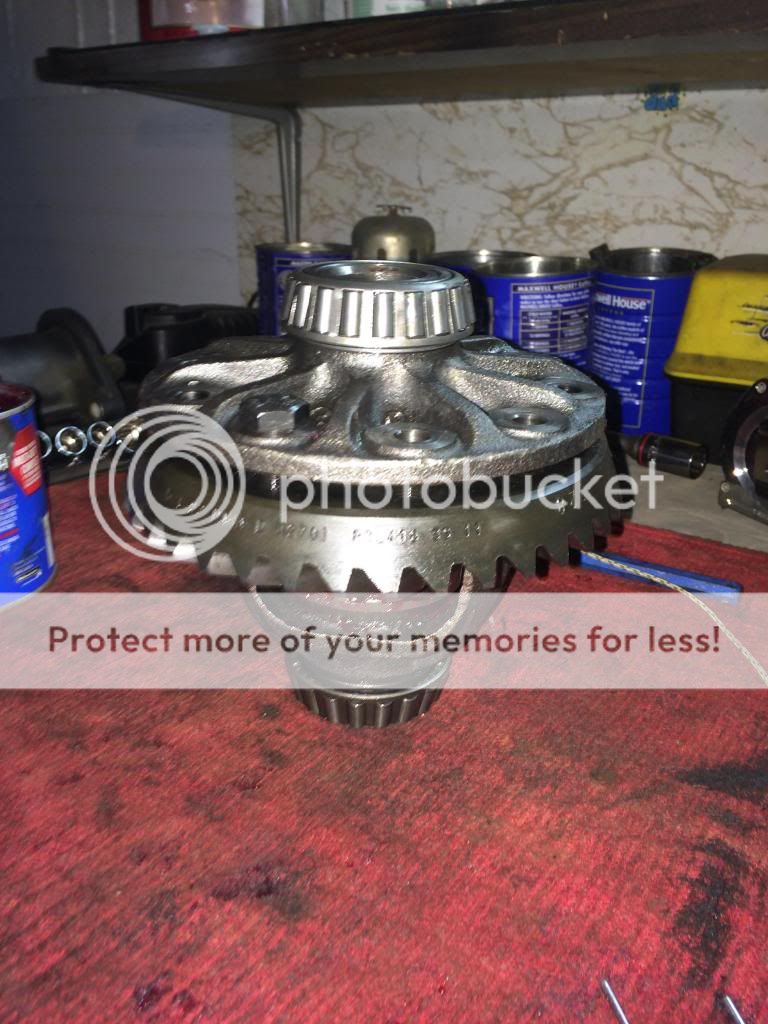
REMOVE THE RING GEAR BY SETTING THE DIFFERENTIAL CASE ON IT'S END AND, USING A RUBBER OR LEATHER MALLET, KNOCK THE RING GEAR OFF. SOME COME EASY, SOME TAKE A LITTLE BIT OF CONVINCING. USE YOUR BRAIN, DON'T DAMAGE ANYTHING. I FORGOT TO TAKE A PICTURE DURING DIS-ASSEMBLY, SO THIS NEXT PHOTO IS FROM THE INSTALL, BUT IS SHOWN IN THE SAME MANNER AS IF YOU WERE REMOVING IT.
NEXT...
REMOVE THE ROLL PIN HOLDING ALL OF THE GOODIES INSIDE IN PLACE. IN THIS PHOTO I'M POINTING TO IT WITH A ROLL PIN REMOVAL PUNCH.
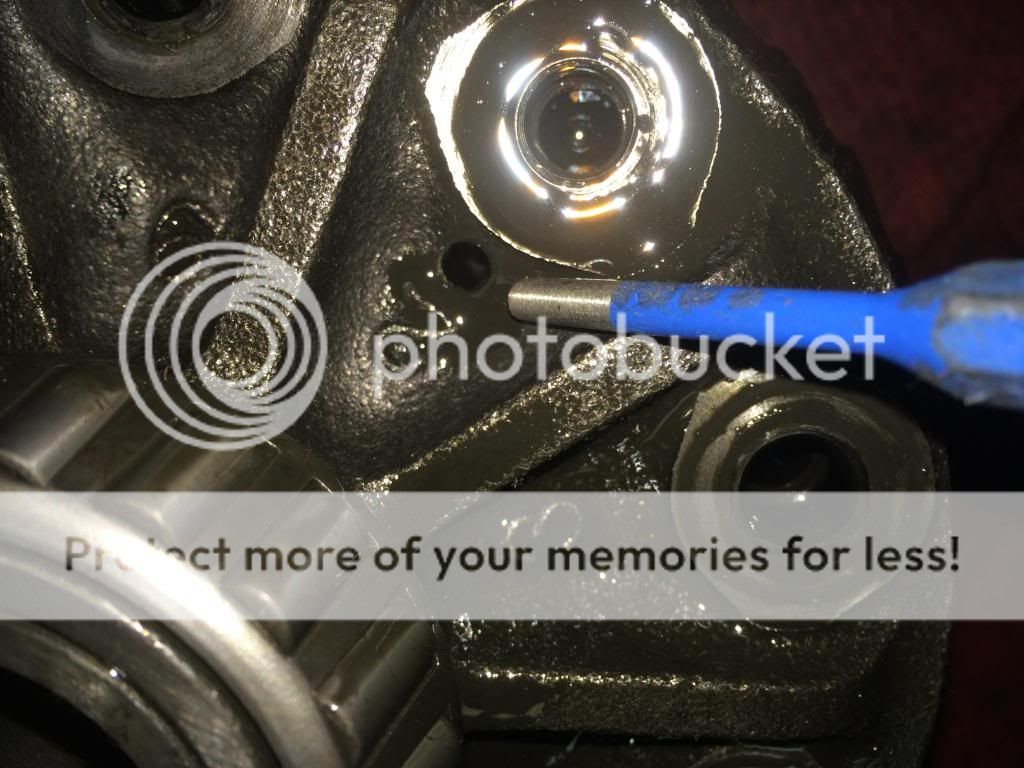
TAP THE ROLL PIN OUT USING A ROLL PIN REMOVAL PUNCH. SIZE IS 3/16", IF I REMEMBER CORRECTLY. WHAT I DO REMEMBER IS, MY PUNCH WASN'T QUITE LONG ENOUGH. I HAD TO USE A DIFFERENT TOOL. I USED A CRAFTSMAN TORX T10 SIZE. BE CAREFUL NOT TO FLARE OUT THE ROLL PIN INSIDE THE CARRIER. THE PIN IS HOLLOW, SO FLARING IT OUT IS POSSIBLE, IF NOT CAREFUL. THE MINIMUM LENGTH REQUIRED TO PUSH THE PIN OUT IS ABOUT 2 3/4"
NEXT...
REMOVE THE CROSS PIN THAT IS HOLDING THE SPIDER GEARS AND THRUST WASHERS INSIDE OF THE DIFFERENTIAL. IT SHOULD JUST PUSH OUT WITH YOUR FINGER, IF NOT, HELP IT BY TAPPING IT THROUGH WITH A PUNCH AND HAMMER.
NEXT...
REMOVE THE SPIDER GEARS FROM DIFFERENTIAL. IMPORTANT NOTE: IF YOU ARE USING ANY LOCKER OTHER THAN A SPARTAN, YOU HAVE TO KEEP THE THRUST WASHERS (or buy new) FOR RE-INSTALLATION OF YOUR NEW PARTS. THE SPARTAN DOES NOT REQUIRE RE-USE OF THESE.
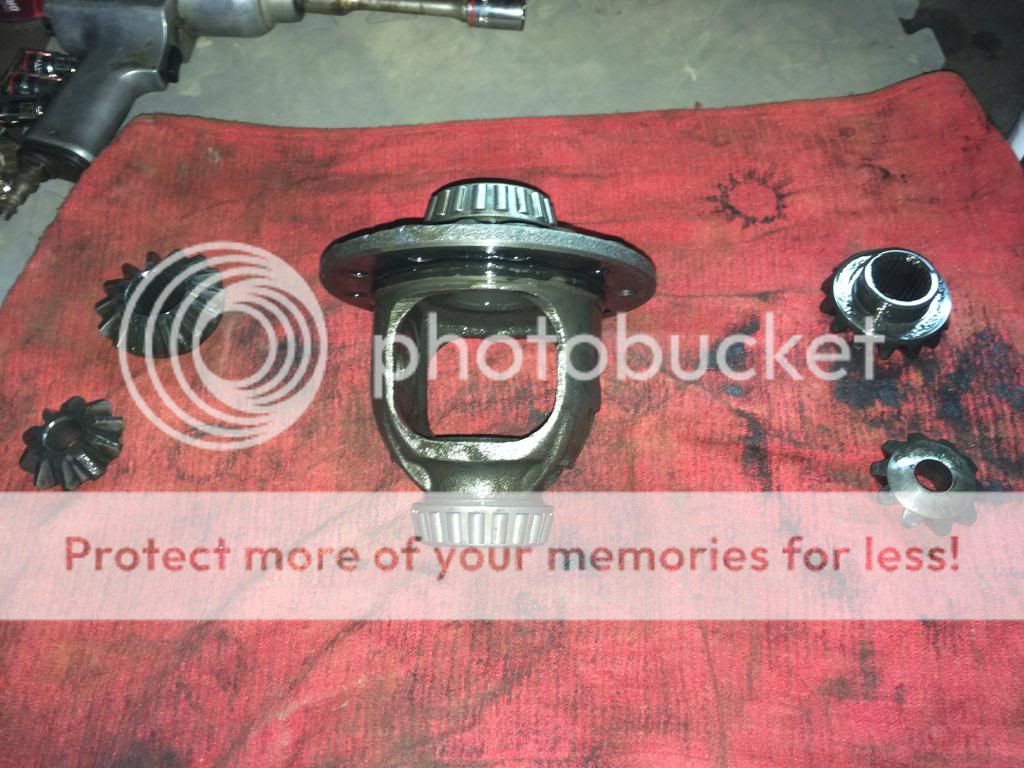
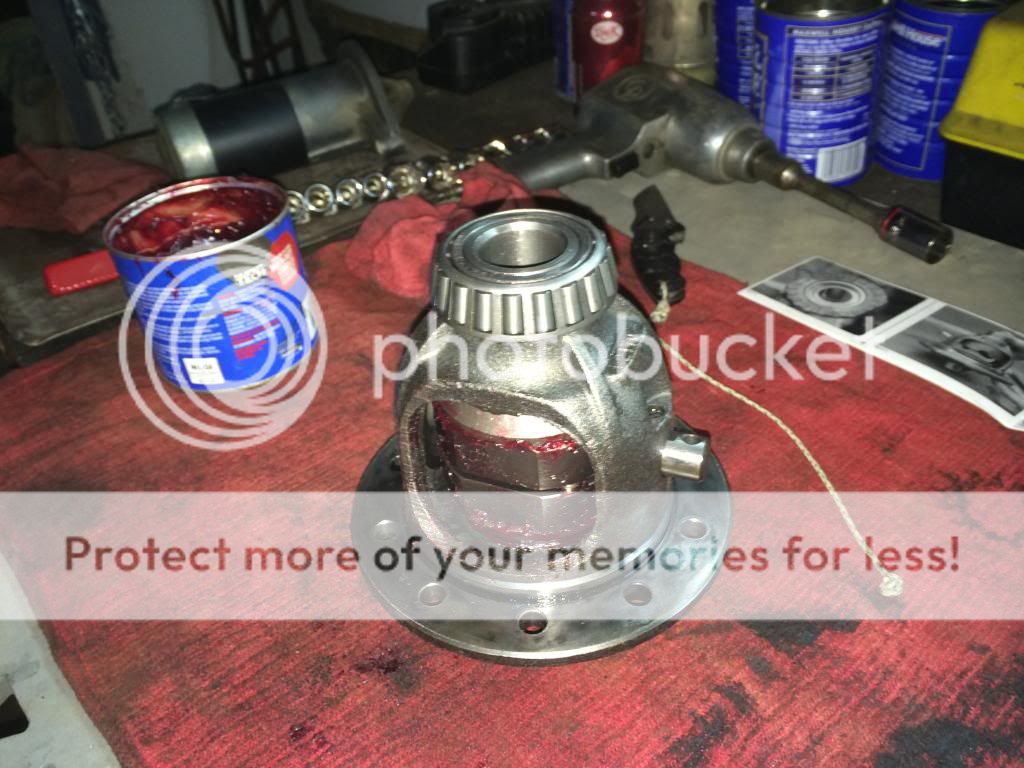
THE NEXT PHOTO IS WHERE YOU SHOULD BE RIGHT NOW. RING GEAR OFF. ROLL PIN OUT. CROSS PIN REMOVED. SPIDERS AND THRUST WASHERS OUT.
NEXT...
SET YOUR SPIDER GEARS, WASHERS AND OLD CROSS PIN ASIDE.
HOSE THE REMAINING DIFFERENTIAL OUT WITH BRAKE CLEANER.
NEXT...
HERE IS A PICTURE OF THE SPARTAN IN IT'S PACKAGING. AS YOU CAN SEE, THIS INCLUDES A NEW CROSS PIN, ROLL PIN, TWO DRIVERS, TWO SIDE COUPLERS, TWO SPACERS, FOUR ALIGNMENT PINS, FOUR SPRINGS AND FOUR PIECES OF WIRE.

HALFTIME!!! WASH HANDS. EAT A SLICE OF COLD GARAGE PIZZA. PEE.
NEXT...
PLACE A SPRING INTO THE HOLLOW END OF EACH OF THE ALIGNMENT PINS.
NEXT...
PLACE EACH ALIGNMENT PIN, SPRING DOWN, INTO EACH OF THE HOLES ON THE TWO DRIVERS. THIS PHOTO SHOWS THREE IN PLACE AND ONE ON THE SIDE.

NEXT...
GET THOSE FOUR LITTLE WIRES. THERE IS A SMALL HOLE PILOTED INTO THE DRIVERS. COMPRESS THE SPRINGS BY PUSHING DOWN ON THE ALIGNMENT PINS UNTIL THEY ARE AROUND FLUSH WITH THE DRIVER SURFACE. NOW SLIDE A PIECE OF WIRE INTO THE PILOT HOLE TO RETAIN THE PIN AND SPRING INSIDE THE DRIVER. DO THIS FOR ALL FOUR. WHAT YOU HAVE SHOULD LOOK LIKE THE NEXT PHOTO, MINUS THE GREASE.

NEXT...
SLOP GREASE ALL OVER YOUR NEW PARTS. THIS INCLUDES: TWO DRIVERS, PINS COMPRESSED, LITTLE WIRES STICKING OUT FROM THE SIDE; TWO SIDE COUPLERS; AND TWO SPACERS. FLIP YOUR DIFFERENTIAL OVER ON IT'S FLAT SIDE AND PLACE ONE SIDE COUPLER IN AS SHOWN IN THE PHOTO.

NEXT...
PLACE THE SPACERS INTO THE CENTERS OF EACH DRIVER, MAKING SURE THAT THE "OPEN" FACE OF THE SPACER IS POSITIONED TOWARD THE DRIVER'S TEETH LIKE IN THE PHOTO (IT IS KINDA PROPPED UP ON TOP TO SHOW DIMENSIONS IN THE PIC). "CLOSED" OR "FLAT" SIDE TOWARD THE ALIGNMENT PINS.

NEXT...
PLACE THE SIDE COUPLER IN THE OTHER SIDE OF THE DIFFERENTIAL, HOLDING IT UP WITH YOUR HAND, LIKE THIS.

NEXT...
PLACE A DRIVER INSIDE DIFFERENTIAL, TEETH DOWN, TO MATCH THE SIDE COUPLER. IT SHOULD LOOK LIKE THIS.

NEXT...
MANEUVER THE OTHER DRIVER INTO THE DIFFERENTIAL IN THE SAME FASHION AS BEFORE, TEETH TO TEETH. DON'T KNOCK OUT ANY OF THOSE LITTLE WIRES. WHAT YOU SHOULD BE LOOKING AT IS THIS, BUT WITH THE LITTLE WIRES HANGING OUT.

NEXT...
ROTATE THE DRIVERS UNTIL THE ALIGNMENT PIN ASSEMBLIES LINE UP WITH CORRESPONDING ALIGNMENT PIN SEATING NOTCHES IN THE OPPOSITE DRIVER. THEN, PULL THE WIRES OUT OF THE PILOT HOLES, THEREBY RELEASING THE SPRING TENSION AND FULLY SEATING THE PINS INTO THE NOTCHES.
NEXT...
ARRANGE THE INTERNALS OF THE ASSEMBLY SO THAT YOU CAN SLIDE THE CROSS PIN IN FROM THE DIRECTION THAT IT CAME OUT. AFTER YOU HAVE THE CROSS PIN INSTALLED, AND BEFORE YOU PUT THE ROLL PIN IN, YOU NEED TO TAKE A CENTER GAP MEASUREMENT. DO THIS USING A SET OF FEELER GAUGES OR A SLIDE CALIPER. THE ACCEPTABLE TOLERANCES SHOULD MEASURE BETWEEN 0.145 INCHES AND 0.170 INCHES. IF YOUR MEASUREMENT DOES NOT FALL WITHIN THESE PARAMETERS, CHECK INSTALLATION PROCEDURE AND CHECK FOR OBSTRUCTIONS.
NEXT...
ALIGN THE HOLE IN THE CROSS PIN WITH HOLE IN WHICH THE ROLL PIN GOES THROUGH. TAP NEW ROLL PIN THROUGH HOLE WITH ROLL PIN PUNCH OR OTHER SUITABLE TOOL. ONCE AGAIN, DON'T FLARE THE ROLL PIN INSIDE THE CARRIER BY NOT PAYING ATTENTION.
NEXT...
PLACE YOUR RING GEAR BACK ONTO THE DIFFERENTIAL UTILIZING THE MARKS YOU MADE DURING REMOVAL. THIS WILL BE A VERY SNUG FIT. DON'T GET ANYTHING ASKEW. TAKE YOUR TIME TO MAKE SURE IT SEATS PROPERLY. TIGHTEN THEM ALL IN A STAR PATTERN ONLY ENOUGH TO PULL THE MATING SURFACES TOGETHER. NOW... I DON'T HAVE A FSM FOR THIS JEEP, AND THERE WAS SOME CONFLICTING EVIDENCE ABOUT THE TORQUE SETTINGS ON THE RING GEAR BOLTS. THE OPTIONS ARE 55 FT/LB AND 70-90 FT/LB, A BIG DIFFERENCE. THAT BEING SAID, I'VE BROKEN ENOUGH BOLTS IN MY LIFE TO KNOW WHEN TIGHT IS TIGHT. HERE'S WHAT I DID, I WENT TO 65 FT/LB WITH RED LOCTITE. I FELT COMFORTABLE WITH THAT, AND SO DID THE DIFFERENTIAL. I WORKED MY WAY THERE. STAR PATTERN TO 35 FT/LB. STAR PATTERN AGAIN TO 65 FT/LB.
NEXT...
TIME TO PUT THE ASSEMBLED DIFFERENTIAL BACK INTO YOUR JEEP. TAKE A PICTURE OF YOUR WORK, IF YOU'VE DONE EVERYTHING CORRECTLY, YOU WON'T BE SEEING IT AGAIN!
SLOP SOME GREASE IN YOUR BEARING CUPS. PLACE THEM OVER THE BEARINGS AND GRASP IT TIGHTLY WITH BOTH HANDS. WORK IT INTO THE HOUSING. HOLD IT IN PLACE WITH ONE HAND AND FETCH YOUR BEARING CAPS AND BOLTS, MAKING SURE TO PUT THEM IN EXACTLY THE SAME WAY THEY CAME OUT. PUT A LITTLE RED LOCTITE ON THE BOLTS AND THREAD THEM ALL IN A LITTLE. THAT WILL HOLD EVERYTHING IN PLACE.
NEXT...
TIGHTEN THE BEARING CAP BOLTS TO 20 FT/LBS. THEN RE-TIGHTEN TO FACTORY SPEC 45 FT/LBS.
NEXT...
RE-INSTALL AXLE SHAFTS. 75 FT/LBS FOR THE WHEEL BEARING BOLTS.
RE-INSTALL BRAKES AND HARDWARE.
PUT TIRES BACK ON, BUT LEAVING VEHICLE ON JACK STANDS.
CARRIER IN VEHICLE INSTALL TEST:
1)PUT VEHICLE IN GEAR AND IN 4WD
2)ROTATE ONE TIRE FORCEFULLY UNTIL IT STOPS AGAINST THE DRIVE TRAIN. THIS MUST BE DONE INN BOTH DIRECTIONS ON EACH SIDE.
3) HAVE ANOTHER PERSON ROTATE THE OPPOSITE TIRE IN THE OPPOSITE DIRECTION, IT SHOULD UNLOCK AND SPIN.
4) YOUR SPARTAN SHOULD MAKE A CLICKING SOUND AS THE TEETH PASS OVER EACH OTHER. IF THIS SOUND IS NOT PRESENT, OR YOU CANNOT GET THE TEETH TO DISENGAGE AT ALL, CHECK YOUR WORK.
IF YOU HAVE DONE EVERYTHING CORRECTLY...
CLEAN THE MATING SURFACE ON YOUR COVER.
PUT YOUR DIFFERENTIAL COVER BACK ON USING LUBELOCKER GASKET OR RTV.
ADD GEAR OIL.
LOWER VEHICLE.
TIGHTEN LUG NUTS.
1-Spartan locker for 27 spline Dana 30 axle. REQUIRED FOR INSTALL
2-Two (2) Bottles of gear oil. REQUIRED FOR INSTALL (Everyone has preferences, I only use Lucas, one bottle of 80W-90 and fill remainder with 85W-140, about a 3-2 ratio.)
3-LubeLocker gasket (or any appropriate gasket and RTV if applicable) REQUIRED FOR INSTALL (Follow torquing procedure during install!)
4-Two (2) differential bearing cups. OPTIONAL, BUT RECOMMENDED (you're already there, and they're cheap)
5- I also bought inner axle seals as well as differential bearings just in case they were in need of being replaced. My seals and bearings were both in fantastic condition (almost 300K!!). I recommend keeping as many factory tolerances as condition permits, as your old factory parts are often better/stronger than bearings/seals obtained from your local parts store. However, there are better options out there, if you feel so inclined. IF ITS NOT BROKE, DON'T BREAK IT!
6-Tools. REQUIRED FOR INSTALL
7-Drain pan
Two (2) bottles of brake parts cleaner
Drill and copper/steel wire wheel
Roll pin punch set (3/16" diameter, at least 3" long)
Can o' grease
Feeler gauges or slide caliper
Red Loctite
THE PROCESS OF INSTALLING YOUR NEW SPARTAN LOCKER!
REMOVE TIRES
SUPPORT VEHICLE SECURELY ON JACK STANDS.
REMOVE BRAKE CALIPERS AND ROTORS.
REMOVE AXLE SHAFTS.
REMOVE DIFFERENTIAL COVER BOLTS, WITH THE EXCEPTION OF THE TOP BOLT. LOOSEN TOP BOLT TO HALF THREAD TO ALLOW THE MATING SURFACES TO SEPARATE. PLACE DRAIN-PAN UNDER DIFFERENTIAL TO CATCH OIL.
I USED A RUBBER MALLET TO SEPARATE THE COVER, YOU MAY CHOOSE TO USE A FLAT HEAD SCREWDRIVER OR SMALL PRY BAR, BE CAREFUL NOT TO DAMAGE THE SURFACES.
Mine was filthy, thick and smelled great. It was clean of debris, though, with no metal or evidence of water or mud being found.
Next...
REMOVE DIFFERENTIAL BEARING CAP BOLTS.
THERE ARE FOUR BOLTS. TWO HOLDING EACH BEARING CAP IN PLACE.
IT IS IMPORTANT TO NOTE THE LOCATION OF EACH CAP AND BOLT. BE SURE TO PUT THEM BACK EXACTLY WHERE THEY CAME FROM, THE CAPS FACING THE PROPER WAY AND THE BOLTS IN THEIR SAME HOLE. DO NOT FORGET! HERE I AM POINTING TO ONE OF THE FOUR BOLTS. 5/8" IF I REMEMBER CORRECTLY, BUT BE SURE TO USE YOUR OWN JUDGEMENT ON BOLT HEAD SIZES.
NEXT...
REMOVE THE CARRIER
GRASP IT WITH BOTH HANDS, MAKING SURE TO HOLD THE DIFFERENTIAL BEARINGS AND CUPS IN PLACE WHILE YOU WIGGLE IT OUT FROM IN BETWEEN THE TIE ROD AND HOUSING. IT SHOULD COME OUT FAIRLY EASILY. IF IT NEEDS SOME CONVINCING, YOU MAY CHOOSE TO PLACE A PRY BAR UNDER THE RING GEAR OR DIFFERENTIAL TO HELP IT. DO NOT DROP IT! DO NOT DAMAGE THE INTERNAL PARTS, COVER PRY BAR WITH A RAG IF YOU MUST!
MATING SURFACE IS CLEANED BY USING A DRILL AND COPPER WHEEL. YOU MAY USE A STEEL WHEEL TO BUST OFF THE HEAVY PARTS OF THE GASKET, BUT AVOID "DIGGING" ONE SPOT OUT WITH A HEAVY WHEEL, AS YOU MAY DAMAGE THE SURFACE. NOW YOU CAN SEE THE INNER AXLE SEALS. MINE LOOKED BRAND NEW. I CHOSE NOT TO REPLACE THEM, AS THEY WERE DOING THEIR JOB PROPERLY.
NEXT...
YOU WILL BE REMOVING THE RING GEAR FROM THE DIFFERENTIAL CASE
BEFORE YOU REMOVE ANY OF THE BOLTS, YOU ABSOLUTELY MUST MARK THE CORRELATION OF ANY ONE PARTICULAR RING BOLT AND THE HOLE IN WHICH IT BELONGS ALONG WITH IT'S RELATION TO THE DIFFERENTIAL!!! USE A PENCIL OR PAINT MARKER. DO NOT SKIP THIS STEP! I FORGOT TO TAKE A PICTURE BEFORE I REMOVED THE BOLTS, SO THE FOLLOWING PHOTO IS WITH BOLTS REMOVED, SHOWING MY MARK.
I EVEN WENT AS FAR TO LAY OUT THE BOLTS IN A PATTERN SO THEY WOULD EACH GO BACK INTO THEIR RESPECTIVE HOLES.
NEXT...
REMOVE THE RING GEAR BY SETTING THE DIFFERENTIAL CASE ON IT'S END AND, USING A RUBBER OR LEATHER MALLET, KNOCK THE RING GEAR OFF. SOME COME EASY, SOME TAKE A LITTLE BIT OF CONVINCING. USE YOUR BRAIN, DON'T DAMAGE ANYTHING. I FORGOT TO TAKE A PICTURE DURING DIS-ASSEMBLY, SO THIS NEXT PHOTO IS FROM THE INSTALL, BUT IS SHOWN IN THE SAME MANNER AS IF YOU WERE REMOVING IT.
NEXT...
REMOVE THE ROLL PIN HOLDING ALL OF THE GOODIES INSIDE IN PLACE. IN THIS PHOTO I'M POINTING TO IT WITH A ROLL PIN REMOVAL PUNCH.
TAP THE ROLL PIN OUT USING A ROLL PIN REMOVAL PUNCH. SIZE IS 3/16", IF I REMEMBER CORRECTLY. WHAT I DO REMEMBER IS, MY PUNCH WASN'T QUITE LONG ENOUGH. I HAD TO USE A DIFFERENT TOOL. I USED A CRAFTSMAN TORX T10 SIZE. BE CAREFUL NOT TO FLARE OUT THE ROLL PIN INSIDE THE CARRIER. THE PIN IS HOLLOW, SO FLARING IT OUT IS POSSIBLE, IF NOT CAREFUL. THE MINIMUM LENGTH REQUIRED TO PUSH THE PIN OUT IS ABOUT 2 3/4"
NEXT...
REMOVE THE CROSS PIN THAT IS HOLDING THE SPIDER GEARS AND THRUST WASHERS INSIDE OF THE DIFFERENTIAL. IT SHOULD JUST PUSH OUT WITH YOUR FINGER, IF NOT, HELP IT BY TAPPING IT THROUGH WITH A PUNCH AND HAMMER.
NEXT...
REMOVE THE SPIDER GEARS FROM DIFFERENTIAL. IMPORTANT NOTE: IF YOU ARE USING ANY LOCKER OTHER THAN A SPARTAN, YOU HAVE TO KEEP THE THRUST WASHERS (or buy new) FOR RE-INSTALLATION OF YOUR NEW PARTS. THE SPARTAN DOES NOT REQUIRE RE-USE OF THESE.
THE NEXT PHOTO IS WHERE YOU SHOULD BE RIGHT NOW. RING GEAR OFF. ROLL PIN OUT. CROSS PIN REMOVED. SPIDERS AND THRUST WASHERS OUT.
NEXT...
SET YOUR SPIDER GEARS, WASHERS AND OLD CROSS PIN ASIDE.
HOSE THE REMAINING DIFFERENTIAL OUT WITH BRAKE CLEANER.
NEXT...
HERE IS A PICTURE OF THE SPARTAN IN IT'S PACKAGING. AS YOU CAN SEE, THIS INCLUDES A NEW CROSS PIN, ROLL PIN, TWO DRIVERS, TWO SIDE COUPLERS, TWO SPACERS, FOUR ALIGNMENT PINS, FOUR SPRINGS AND FOUR PIECES OF WIRE.
HALFTIME!!! WASH HANDS. EAT A SLICE OF COLD GARAGE PIZZA. PEE.
NEXT...
PLACE A SPRING INTO THE HOLLOW END OF EACH OF THE ALIGNMENT PINS.
NEXT...
PLACE EACH ALIGNMENT PIN, SPRING DOWN, INTO EACH OF THE HOLES ON THE TWO DRIVERS. THIS PHOTO SHOWS THREE IN PLACE AND ONE ON THE SIDE.
NEXT...
GET THOSE FOUR LITTLE WIRES. THERE IS A SMALL HOLE PILOTED INTO THE DRIVERS. COMPRESS THE SPRINGS BY PUSHING DOWN ON THE ALIGNMENT PINS UNTIL THEY ARE AROUND FLUSH WITH THE DRIVER SURFACE. NOW SLIDE A PIECE OF WIRE INTO THE PILOT HOLE TO RETAIN THE PIN AND SPRING INSIDE THE DRIVER. DO THIS FOR ALL FOUR. WHAT YOU HAVE SHOULD LOOK LIKE THE NEXT PHOTO, MINUS THE GREASE.
NEXT...
SLOP GREASE ALL OVER YOUR NEW PARTS. THIS INCLUDES: TWO DRIVERS, PINS COMPRESSED, LITTLE WIRES STICKING OUT FROM THE SIDE; TWO SIDE COUPLERS; AND TWO SPACERS. FLIP YOUR DIFFERENTIAL OVER ON IT'S FLAT SIDE AND PLACE ONE SIDE COUPLER IN AS SHOWN IN THE PHOTO.
NEXT...
PLACE THE SPACERS INTO THE CENTERS OF EACH DRIVER, MAKING SURE THAT THE "OPEN" FACE OF THE SPACER IS POSITIONED TOWARD THE DRIVER'S TEETH LIKE IN THE PHOTO (IT IS KINDA PROPPED UP ON TOP TO SHOW DIMENSIONS IN THE PIC). "CLOSED" OR "FLAT" SIDE TOWARD THE ALIGNMENT PINS.
NEXT...
PLACE THE SIDE COUPLER IN THE OTHER SIDE OF THE DIFFERENTIAL, HOLDING IT UP WITH YOUR HAND, LIKE THIS.
NEXT...
PLACE A DRIVER INSIDE DIFFERENTIAL, TEETH DOWN, TO MATCH THE SIDE COUPLER. IT SHOULD LOOK LIKE THIS.
NEXT...
MANEUVER THE OTHER DRIVER INTO THE DIFFERENTIAL IN THE SAME FASHION AS BEFORE, TEETH TO TEETH. DON'T KNOCK OUT ANY OF THOSE LITTLE WIRES. WHAT YOU SHOULD BE LOOKING AT IS THIS, BUT WITH THE LITTLE WIRES HANGING OUT.
NEXT...
ROTATE THE DRIVERS UNTIL THE ALIGNMENT PIN ASSEMBLIES LINE UP WITH CORRESPONDING ALIGNMENT PIN SEATING NOTCHES IN THE OPPOSITE DRIVER. THEN, PULL THE WIRES OUT OF THE PILOT HOLES, THEREBY RELEASING THE SPRING TENSION AND FULLY SEATING THE PINS INTO THE NOTCHES.
NEXT...
ARRANGE THE INTERNALS OF THE ASSEMBLY SO THAT YOU CAN SLIDE THE CROSS PIN IN FROM THE DIRECTION THAT IT CAME OUT. AFTER YOU HAVE THE CROSS PIN INSTALLED, AND BEFORE YOU PUT THE ROLL PIN IN, YOU NEED TO TAKE A CENTER GAP MEASUREMENT. DO THIS USING A SET OF FEELER GAUGES OR A SLIDE CALIPER. THE ACCEPTABLE TOLERANCES SHOULD MEASURE BETWEEN 0.145 INCHES AND 0.170 INCHES. IF YOUR MEASUREMENT DOES NOT FALL WITHIN THESE PARAMETERS, CHECK INSTALLATION PROCEDURE AND CHECK FOR OBSTRUCTIONS.
NEXT...
ALIGN THE HOLE IN THE CROSS PIN WITH HOLE IN WHICH THE ROLL PIN GOES THROUGH. TAP NEW ROLL PIN THROUGH HOLE WITH ROLL PIN PUNCH OR OTHER SUITABLE TOOL. ONCE AGAIN, DON'T FLARE THE ROLL PIN INSIDE THE CARRIER BY NOT PAYING ATTENTION.
NEXT...
PLACE YOUR RING GEAR BACK ONTO THE DIFFERENTIAL UTILIZING THE MARKS YOU MADE DURING REMOVAL. THIS WILL BE A VERY SNUG FIT. DON'T GET ANYTHING ASKEW. TAKE YOUR TIME TO MAKE SURE IT SEATS PROPERLY. TIGHTEN THEM ALL IN A STAR PATTERN ONLY ENOUGH TO PULL THE MATING SURFACES TOGETHER. NOW... I DON'T HAVE A FSM FOR THIS JEEP, AND THERE WAS SOME CONFLICTING EVIDENCE ABOUT THE TORQUE SETTINGS ON THE RING GEAR BOLTS. THE OPTIONS ARE 55 FT/LB AND 70-90 FT/LB, A BIG DIFFERENCE. THAT BEING SAID, I'VE BROKEN ENOUGH BOLTS IN MY LIFE TO KNOW WHEN TIGHT IS TIGHT. HERE'S WHAT I DID, I WENT TO 65 FT/LB WITH RED LOCTITE. I FELT COMFORTABLE WITH THAT, AND SO DID THE DIFFERENTIAL. I WORKED MY WAY THERE. STAR PATTERN TO 35 FT/LB. STAR PATTERN AGAIN TO 65 FT/LB.
NEXT...
TIME TO PUT THE ASSEMBLED DIFFERENTIAL BACK INTO YOUR JEEP. TAKE A PICTURE OF YOUR WORK, IF YOU'VE DONE EVERYTHING CORRECTLY, YOU WON'T BE SEEING IT AGAIN!
SLOP SOME GREASE IN YOUR BEARING CUPS. PLACE THEM OVER THE BEARINGS AND GRASP IT TIGHTLY WITH BOTH HANDS. WORK IT INTO THE HOUSING. HOLD IT IN PLACE WITH ONE HAND AND FETCH YOUR BEARING CAPS AND BOLTS, MAKING SURE TO PUT THEM IN EXACTLY THE SAME WAY THEY CAME OUT. PUT A LITTLE RED LOCTITE ON THE BOLTS AND THREAD THEM ALL IN A LITTLE. THAT WILL HOLD EVERYTHING IN PLACE.
NEXT...
TIGHTEN THE BEARING CAP BOLTS TO 20 FT/LBS. THEN RE-TIGHTEN TO FACTORY SPEC 45 FT/LBS.
NEXT...
RE-INSTALL AXLE SHAFTS. 75 FT/LBS FOR THE WHEEL BEARING BOLTS.
RE-INSTALL BRAKES AND HARDWARE.
PUT TIRES BACK ON, BUT LEAVING VEHICLE ON JACK STANDS.
CARRIER IN VEHICLE INSTALL TEST:
1)PUT VEHICLE IN GEAR AND IN 4WD
2)ROTATE ONE TIRE FORCEFULLY UNTIL IT STOPS AGAINST THE DRIVE TRAIN. THIS MUST BE DONE INN BOTH DIRECTIONS ON EACH SIDE.
3) HAVE ANOTHER PERSON ROTATE THE OPPOSITE TIRE IN THE OPPOSITE DIRECTION, IT SHOULD UNLOCK AND SPIN.
4) YOUR SPARTAN SHOULD MAKE A CLICKING SOUND AS THE TEETH PASS OVER EACH OTHER. IF THIS SOUND IS NOT PRESENT, OR YOU CANNOT GET THE TEETH TO DISENGAGE AT ALL, CHECK YOUR WORK.
IF YOU HAVE DONE EVERYTHING CORRECTLY...
CLEAN THE MATING SURFACE ON YOUR COVER.
PUT YOUR DIFFERENTIAL COVER BACK ON USING LUBELOCKER GASKET OR RTV.
ADD GEAR OIL.
LOWER VEHICLE.
TIGHTEN LUG NUTS.