• Welcome to the new NAXJA Forum! If your password does not work, please use "Forgot your password?" link on the log-in page. Please feel free to reach out to [email protected] if we can provide any assistance.

Aw-4 Freeway speed "bucking"

Guerillastyle

NAXJA Forum User
Location
SF
Hello fellow jeepers,
I come to you all with a problem I have started to recently experience more thoroughly when driving my jeep. I have looked for similar problems online as well as tested/cleaned any associated sensors.
Jeep:
1988 Cherokee Chief 4x4
Aw-4 transmission
The Problem:
At freeway speeds the jeep begins to jerk or buck when a certain speed is held, the RPMs remain the same. The motion is as if you violently accelerate then stop. This problem has persisted in the past, but more recently has become unable to ignore.
 
It started happening 3 weeks ago on mine (XJ 98). I cleaned the IAC (first time in 300k miles) and it hasn't done it since then. Worth a try.
 
Recently took off whole throttle body/intake and cleaned thoroughly including IAC and TPS (re-adjusted as well).
Both the speedometer and tachometer maintain their readings without jumping around or moving.
 
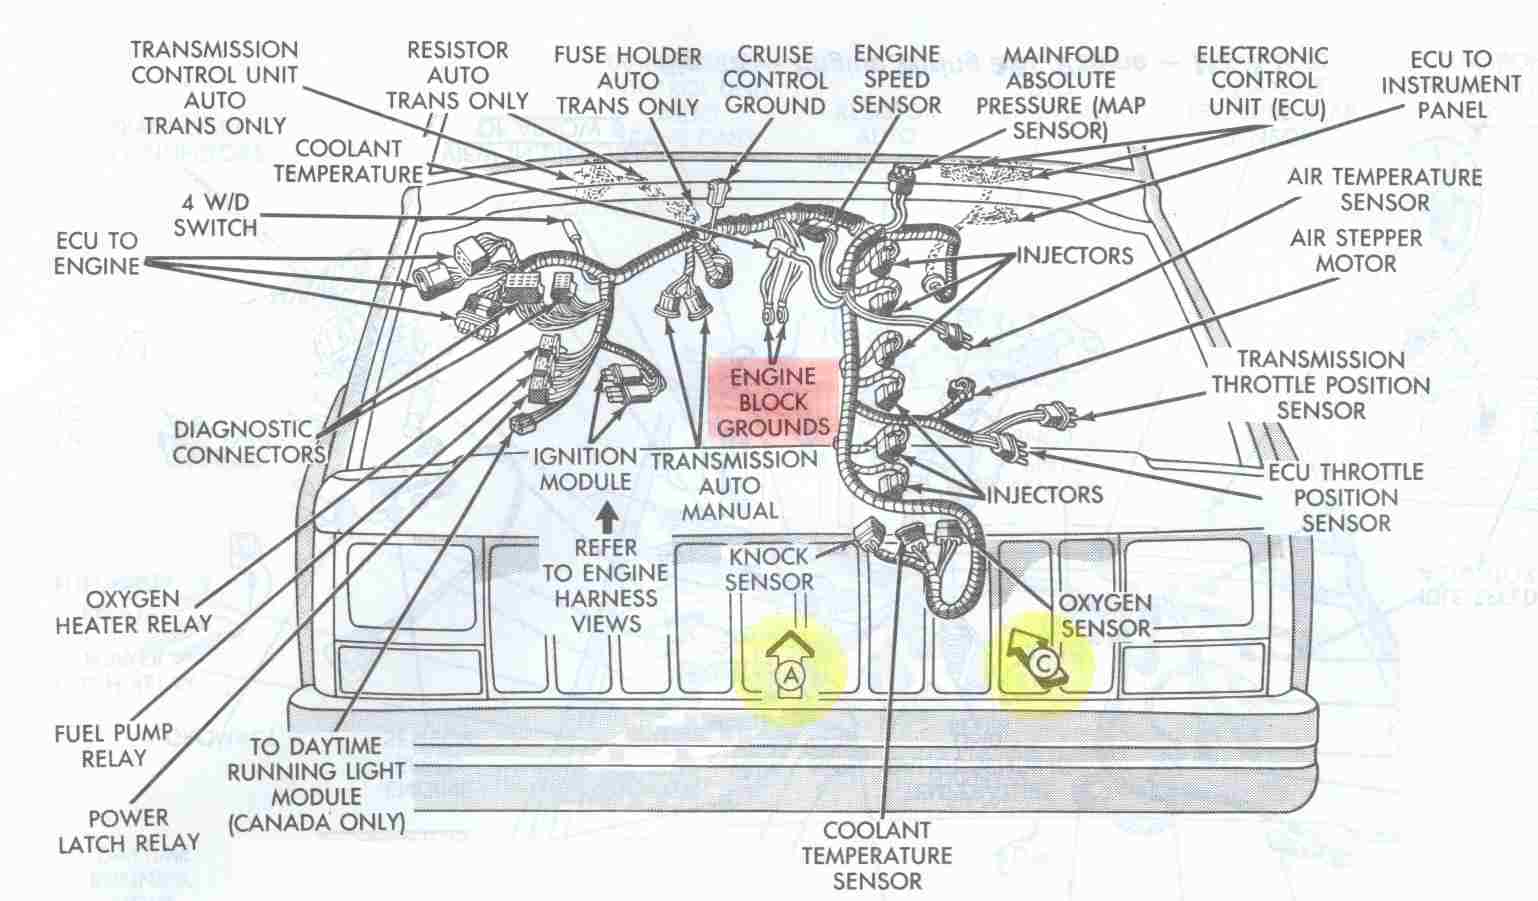
The transmission TCU shift logic ground is at the engine dipstick tube stud.
If it were me, I would perform both of these simple procedures.

Renix Ground Refreshing
The Renix era XJs and MJs were built with an under-engineered grounding system for the engine/transmission electronics. One problem in particular involves the multiple ground connection at the engine dipstick tube stud. A poor ground here can cause a multitude of driveabililty issues, wasted time, and wasted money replacing unnecessary components.
The components grounding at the dipstick tube stud are:
Distributor Sync Sensor, TCU main ground, TCU "Shift Point Logic", Ignition control Module, Injectors, ECU main ground which other engine sensors ground through, Oxygen sensor, Knock Sensor, Cruise Control, and Transmission Sync signal. All extremely important stuff.
The factory was aware of the issues with this ground point and addressed it by suggesting the following:
Remove the nut holding the wire terminals to the stud. Verify that the stud is indeed tightened securely into the block. Scrape any and all paint from the stud’s mounting surface where the wires will attach. Must be clean, shiny and free of any oil, grease, or paint.
Inspect the wire terminals. Check to see that none of the terminals are crimped over wire insulation instead of bare wire. Be sure the crimps are tight. It wouldn’t hurt to re-crimp them just as a matter of course. Sand and polish the wire terminals until clean and shiny on both sides. Reinstall all the wires to the stud and tighten the nut down securely.
While you’re in that general area, locate the battery negative cable which is fastened to the engine block just forward of the dipstick stud. Remove the bolt, scrape the block to bare metal, clean and polish the cable terminal, and reattach securely.
Another area where the grounding system on Renix era Jeeps was lacking is the engine to chassis ground. There is a braided cable from the back of the cylinder head that also attaches to the driver’s side of the firewall. This cable is undersized for it’s intended use and subject to corrosion and poor connections at each end.
First off, remove the cable end from the firewall using a 15mm wrench or socket. Scrape the paint off down to bare metal and clean the wire terminal. Reattach securely.
Remove the other end of the cable from the rear of the head using a 3’4" socket. Clean all the oil, paint and crud from the stud. Clean the wire terminal of the cable and reattach securely.
A suggestion regarding the braided cable:
I prefer to add a #4 Gauge cable from the firewall to a bolt on the rear of the intake manifold, either to a heat shield bolt or fuel rail bolt. A cable about 18" long with a 3/8" lug on each end works great and you can get one at any parts store already made up. Napa has them as part number 781116.
A further improvement to the grounding system can be made using a #4 cable, about 10" long with 3/8" terminals at each end. Attach one end of this cable to the negative battery bolt and the other end under the closest 10mm headed bolt on the radiator support just forward of the battery. Napa part number 781115.
 
 
If you want to upgrade your grounds and battery cables in general, contact Jon at
www.kelleyswip.com. He makes an incredible cable upgrade for a very reasonable price.
 
Revised 11-28-2011

Cruiser’s Trans Plug Refreshing

Over near the trans dipstick tube are 2 rather large connectors. One is black and the other gray. These 2 connectors carry all the info between TPS, TCU, NSS, speed sensor, and trans solenoids.
Unplug each one, visually inspect for corrosion or bent pins, spray them out with electrical contact cleaner and plug them back in.
Revised 3-28-2012


is your speedometer dropping to zero when it jerks?

mechanically driven from the t-case.


Do you hae an analog sweep multimeter? I'd suspect a dead spot in the TPS at cruise throttle

after you do cruisers ground regimen.
 
I had a somewhat similar issue, however it did not do it continually at a given RPM.

Occasionally it'd "hiccup".. turned out to be the ignition coil going out.
 
Cruise54,
thank you for the extensive writeup on refreshing grounds... I did however recently take care of the braided line and cleaned that pig up.
I'm going to go look for that ground connecting to the dipstick stud. Any pics of location possible?
 
replace the braided ground strap with a proper piece of wire.

I thin I last use a premade 12" batery cble from the parts store.

trust me.
 
Yeah so I just found the ground at the dipstick stud. The ground connections were dirty coming from the firewall; assuming these are the the ecu and tcu.
Test drive time right now!
Unfortunately my father whom is a contractor is working out of county, and the plethora of tools typically at my disposal is absent. So I guess its off to home depot to pick up some of these to make a diy ground. http://oakbluffclassifieds.com/Consumer-Grade/25-nylon-ring-terminal-connector-4-wire-3-8-stud.aspx
 
Have you checked your distributor cap and rotor and plug wires. Had the se problem recently turned out to be corrosion on two terminals. Only acted up when it was hot and at freeway speeds under a load
 
Electrical_Engine_Ground_Points_Overview.jpg


Electrical_Engine_Ground_Points_Arrow_A.jpg


Electrical_Engine_Ground_Points_Arrrow_B.jpg

from here: http://www.lunghd.com/Tech_Articles/Electrical/Ground_straps.htm
 
Have you checked your distributor cap and rotor and plug wires. Had the se problem recently turned out to be corrosion on two terminals. Only acted up when it was hot and at freeway speeds under a load

Hmm... no have yet to; will definitely take a look at those mentioned.

I honestly associate this problem with the transmission due to the fact that I feel the bucking coming from the rear of the vehicle not the engine.
 
Hmm... no have yet to; will definitely take a look at those mentioned.

I honestly associate this problem with the transmission due to the fact that I feel the bucking coming from the rear of the vehicle not the engine.


Yeah, but tune-up stuff is basic, just as good grounds are. Every 30,000 miles you're due for plugs, wires, cap and rotor along with fuel filter. NGK or Champion Copper plugs and dizzy cap and rotor with brass terminals and quality wires like Belden available at Napa.
 
I've seen it mentioned already in this thread, and I'll second it. Test the TPS. Grab a few at the junk yard if you can. My '96 (yeah, I know, different ignition!) was acting the same, only the engine was joining in the fun sometimes. It was the TPS, randomly and intermittantly confusing the tranny into weird shifting, and dropping in and out of convertor lock-up. A new one didn't work, but a variety of previously loved ones yielded one that was just right. Cheap fix, and worth a try. Look up the part number on a website (Rock Auto, Advance, etc.), and Google the number, and you should come up with other vehicles it could cross-reference to, enlarging the pool of potential donors. Good luck!
 
I've seen it mentioned already in this thread, and I'll second it. Test the TPS. Grab a few at the junk yard if you can. My '96 (yeah, I know, different ignition!) was acting the same, only the engine was joining in the fun sometimes. It was the TPS, randomly and intermittantly confusing the tranny into weird shifting, and dropping in and out of convertor lock-up. A new one didn't work, but a variety of previously loved ones yielded one that was just right. Cheap fix, and worth a try. Look up the part number on a website (Rock Auto, Advance, etc.), and Google the number, and you should come up with other vehicles it could cross-reference to, enlarging the pool of potential donors. Good luck!

87 to 90 4.0s with an auto trans. Here's how to test the TPS:


RENIX TPS ADJUSTMENT
Before attempting to adjust your TPS be sure the throttle body has been recently cleaned. It's especially important that the edges of the throttle butterfly are free of any carbon build-up.
IMPORTANT NOTE: With the Key OFF, and using the positive (red) lead of your ohmmeter, probe the B terminal of the flat 3 wire connector of the TPS. The letters are embossed on the connector itself. Touch the black lead of your meter to the negative battery post. Wiggle the wiring harness where it parallels the valve cover and also over near the MAP sensor on the firewall. If you see more than 1 ohm of resistance, or fluctuation in your ohms reading, some modifications to the sensor ground harness will be necessary. The harness repair must be performed before proceeding. I can provide an instruction sheet for that if needed.
MANUAL TRANSMISSION:
RENIX manual transmission equipped XJs have a three-wire TPS mounted on the throttle body. This manual transmission vehicle TPS provides data input to the ECU. The manual transmission TPS has three wires in the connector and they're clearly embossed with the letters A, B, and C. Wire "A" is positive. Wire "B" is ground. Key ON, measure voltage from "A" positive to "B" ground by back-probing the connectors. Note the voltage reading--this is your REFERENCE voltage. Key ON, back-probe the connector at wires "B" and "C". Measure the voltage. This is your OUTPUT voltage. Your OUTPUT voltage needs to be seventeen percent of your REFERENCE voltage. For example: 4.82 volts X .17=.82 volts. Adjust the TPS until you
have achieved this percentage. If you can't achieve the correct output voltage replace the TPS and start over.
AUTOMATIC TRANSMISSION: RENIX automatic transmission equipped XJs have a TPS with two connectors. There is a flat three-wire connector, same as the manual transmission vehicles have, and it is tested the same as the manual transmission equipped vehicles—FOR ENGINE MANAGEMENT RELATED ISSUES.
However, the automatic TPS also has a square four-wire connector clearly embossed with the letters A,B,C, and D. It only uses three wires and provides information to the Transmission Control Module. Key ON, measure voltage between "A" positive and "D" ground. Note the voltage. This is your REFERENCE voltage. Back-probe the connector at wires "B" and "D". Measure the voltage. This is your OUTPUT voltage. Your OUTPUT voltage needs to be eighty-three percent of your REFERENCE voltage. For example 4.8 volts X .83=3.98 volts. Adjust the TPS until you have achieved this percentage. If you can't, replace the TPS and start over. So, if you have an automatic equipped XJ your TPS has two sides--one side feeds the ECU, and the other side feeds the TCU.
FOR AUTOMATIC TRANSMISSION RELATED ISSUES. Check the four-wire connector side of the TPS.
If you have ENGINE issues check the three-wire connector side of the TPS. For those with a MANUAL TRANSMISSION--the TPS for the manual transmission XJs is stupid expensive. You can substitute the automatic transmission TPS which is reasonably priced.
Revised 05-28-2012
 
UPDATE!!
Alright guys thanks for all the help troubleshooting this issue.
Currently I have refreshed all grounds from the engine as well as the one close to the ballast. I kept on having problems and seemed to be getting worse if anything. Than, another issue began happening, intermittently the jeep would rev and not come down when starting. This more recent issue lead me to replace the TPS. After replacing the TPS and doing a test drive I believe that my issue may have been fixed.
Will update if problem persisted/arises again.
 
Back
Top