CaliGold
NAXJA Forum User
- Location
- Granada Hills, CA
Ford Explorer 8.8 Axle Swap - Write Up / Setup Data
I finished up my 8.8 swap last week and thought I would share my setup with you guys.
I realize that every rig is different, depending on what leaf springs you have, or whether you are running a SYE/CV-driveshaft or longer shackles, but I think this is a good baseline for someone wanting to prep their axle without too much down time, especially if it's a daily driver.
MY SCENARIO BEFORE AXLE SWAP:
1997 Sport 4.0L
AW4, NP231
Dana 30 / Dana 35 (3.55 ratio)
AA SYE
Tom Woods CV Driveshaft
Stock shackles
No TC drop
4 deg shims on D35
Bastard pack rear leafs 3-3.5” (XJ main, trimmed S-10 main, S-10 second, smallest XJ)
FOR THE SWAP:
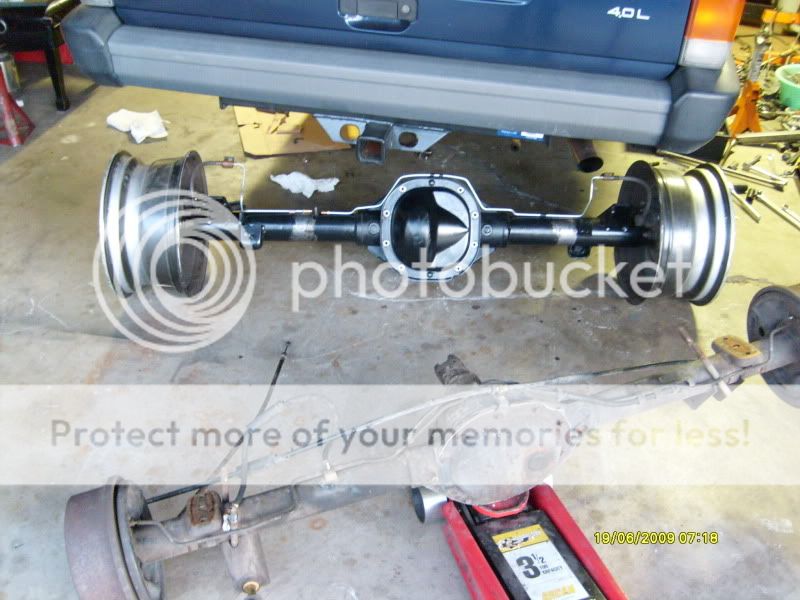
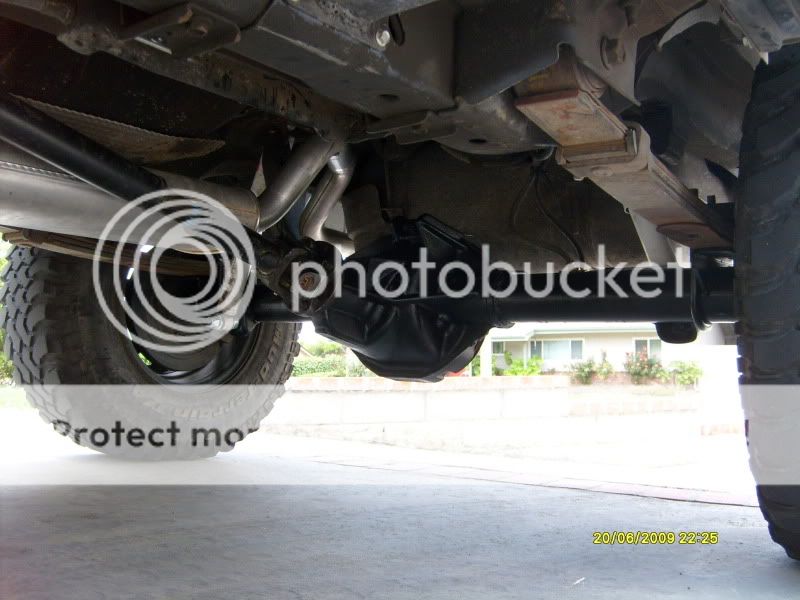
1997 Explorer 8.8 axle with 3.73 LSD and disc brakes
MORE anti-wrap spring perches, spring plates and U-bolts
Spicer drive flange for 1310 universal joints
AXLE PREP:
For me, the most tedious part of the swap is removing all the Explorer stuff from the axle. I only used a reciprocating saw and disk grinder and it took several weekends to get it all removed and smooth. Maybe a portable band saw would work better? Plasma cut?
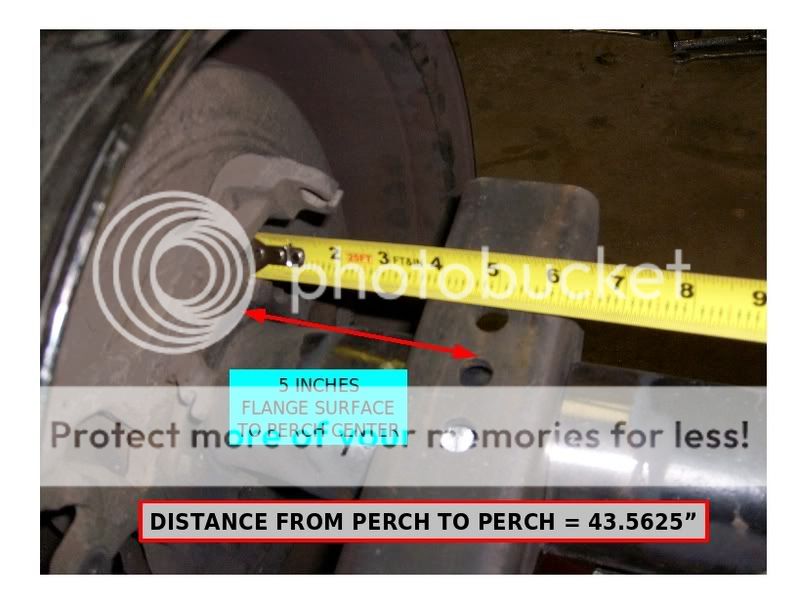
Several weeks before the swap, I did a mockup install of the 8.8 axle to set perch angles and shock mount locations. I did some measurements of the D35 and found that the stock pinion angle is set pointing up approx 11 degrees relative to the perches. The stock perch to perch distance was 43 and 9/16 inches (43.5625”) center to center.
For the 8.8, I set the pinion angle pointing upward 15 deg relative to the perches. This seemed correct since I was using 4 deg shims with the old axle.

I also made sure the perches were centered equally on both sides by measuring the distances from perch to brake flange. It turned out to be about 5 inches. 5 and 1/16 inches is probably more accurate, but just make sure it's equal left and right keeping the perch to perch dimension of 43.5625 inches.
For shock mounts, I considered the pre-made stuff from JKS and Ruffstuff, but ultimately ended up cutting a cheap leaf spring perch in half. I opened up the perch hole to 5/8 and welding a 5/8 bolt. Looks good and works good. This also allowed me to use a stock shock since the lower mount is now about 2 or 3 inches higher.
Here's a guide for mounting the shock mounts with the correct angle.

When you are ready to tack weld the shock mounts, place them as far outboard as possible while leaving room for the u-bolts.
BRAKES:
For my brake lines, I used this handy dandy plier from Harborfreight tools.

http://www.harborfreight.com/cpi/ctaf/displayitem.taf?Itemnumber=95782
For bending hard lines, I strongly recommend pre-bending some coat hanger wire to have template for bending. Otherwise, you could end up buying lots of hard line as you'll do it over and over 'till you get it right.
You'll need to cut and flare at least one end of each line unless you're very lucky finding the exact length.
I used 2 Explorer passenger side soft lines bolted to fabbed brackets welded to the spring plates. I re-used the Dakota rear brake distribution block mounted to the vent hole using the stock brass D35 vent tube fitting.
I decided to modify the proportioning valve by removing both the spring and inner o-ring. This made a significant improvement in braking. I still need to make sure the rear brakes do not lock up first in a panic swap, but I think they are near being balanced. I already have a Tilton adj prop valve I can install if the rears end up locking up first.
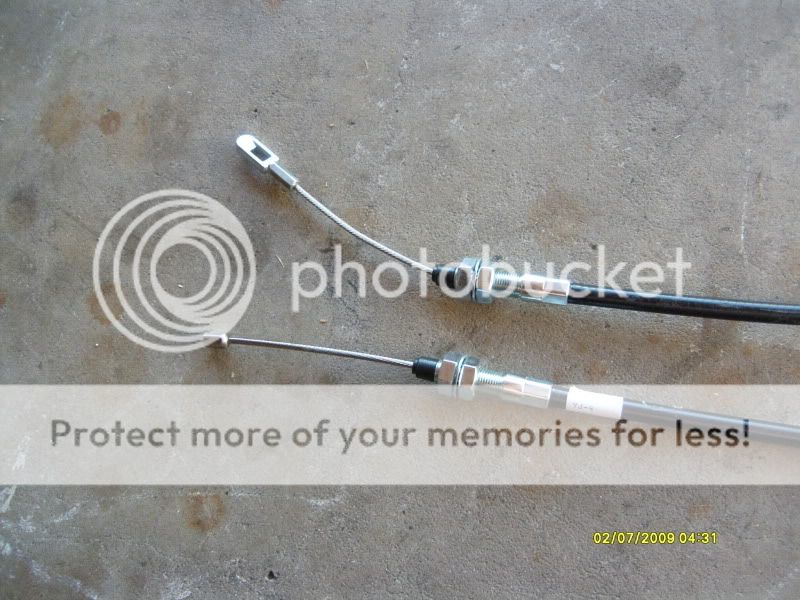
I played around with e-brake cables from Explorer, ZJ and modifying the D35 cables, but I eventually caved in and spent the $130 on MORE cables which should be delivered shortly.
NOTABLE COMMENTS:
I had a Dynomax catback that interfered with the pumpkin on the 8.8, so I had to make some minor modifications, so be prepared.
The LSD will make the steering feel like it wants to self center slightly more than before. I consider this an improvement since some of this was lost when I originally lifted my rig.
I'm okay with the stock Explorer 3.73 gears. I have 31 inch BFG KM's with about 50 percent tread, and the speedo has returned to being accurate. I plan to regear the front D30 to match. I will need a new carrier to run 3.73 or lower (numerically higher) gearing in the D30.
Good luck to anyone who want to try this swap. I hope the numbers help.

I finished up my 8.8 swap last week and thought I would share my setup with you guys.
I realize that every rig is different, depending on what leaf springs you have, or whether you are running a SYE/CV-driveshaft or longer shackles, but I think this is a good baseline for someone wanting to prep their axle without too much down time, especially if it's a daily driver.
MY SCENARIO BEFORE AXLE SWAP:
1997 Sport 4.0L
AW4, NP231
Dana 30 / Dana 35 (3.55 ratio)
AA SYE
Tom Woods CV Driveshaft
Stock shackles
No TC drop
4 deg shims on D35
Bastard pack rear leafs 3-3.5” (XJ main, trimmed S-10 main, S-10 second, smallest XJ)
FOR THE SWAP:
1997 Explorer 8.8 axle with 3.73 LSD and disc brakes
MORE anti-wrap spring perches, spring plates and U-bolts
Spicer drive flange for 1310 universal joints
AXLE PREP:
For me, the most tedious part of the swap is removing all the Explorer stuff from the axle. I only used a reciprocating saw and disk grinder and it took several weekends to get it all removed and smooth. Maybe a portable band saw would work better? Plasma cut?
Several weeks before the swap, I did a mockup install of the 8.8 axle to set perch angles and shock mount locations. I did some measurements of the D35 and found that the stock pinion angle is set pointing up approx 11 degrees relative to the perches. The stock perch to perch distance was 43 and 9/16 inches (43.5625”) center to center.
For the 8.8, I set the pinion angle pointing upward 15 deg relative to the perches. This seemed correct since I was using 4 deg shims with the old axle.
I also made sure the perches were centered equally on both sides by measuring the distances from perch to brake flange. It turned out to be about 5 inches. 5 and 1/16 inches is probably more accurate, but just make sure it's equal left and right keeping the perch to perch dimension of 43.5625 inches.
For shock mounts, I considered the pre-made stuff from JKS and Ruffstuff, but ultimately ended up cutting a cheap leaf spring perch in half. I opened up the perch hole to 5/8 and welding a 5/8 bolt. Looks good and works good. This also allowed me to use a stock shock since the lower mount is now about 2 or 3 inches higher.
Here's a guide for mounting the shock mounts with the correct angle.
When you are ready to tack weld the shock mounts, place them as far outboard as possible while leaving room for the u-bolts.
BRAKES:
For my brake lines, I used this handy dandy plier from Harborfreight tools.
http://www.harborfreight.com/cpi/ctaf/displayitem.taf?Itemnumber=95782
For bending hard lines, I strongly recommend pre-bending some coat hanger wire to have template for bending. Otherwise, you could end up buying lots of hard line as you'll do it over and over 'till you get it right.
You'll need to cut and flare at least one end of each line unless you're very lucky finding the exact length.
I used 2 Explorer passenger side soft lines bolted to fabbed brackets welded to the spring plates. I re-used the Dakota rear brake distribution block mounted to the vent hole using the stock brass D35 vent tube fitting.
I decided to modify the proportioning valve by removing both the spring and inner o-ring. This made a significant improvement in braking. I still need to make sure the rear brakes do not lock up first in a panic swap, but I think they are near being balanced. I already have a Tilton adj prop valve I can install if the rears end up locking up first.
I played around with e-brake cables from Explorer, ZJ and modifying the D35 cables, but I eventually caved in and spent the $130 on MORE cables which should be delivered shortly.
NOTABLE COMMENTS:
I had a Dynomax catback that interfered with the pumpkin on the 8.8, so I had to make some minor modifications, so be prepared.
The LSD will make the steering feel like it wants to self center slightly more than before. I consider this an improvement since some of this was lost when I originally lifted my rig.
I'm okay with the stock Explorer 3.73 gears. I have 31 inch BFG KM's with about 50 percent tread, and the speedo has returned to being accurate. I plan to regear the front D30 to match. I will need a new carrier to run 3.73 or lower (numerically higher) gearing in the D30.
Good luck to anyone who want to try this swap. I hope the numbers help.
Last edited:
 .
.