• Welcome to the new NAXJA Forum! If your password does not work, please use "Forgot your password?" link on the log-in page. Please feel free to reach out to [email protected] if we can provide any assistance.

Forward-mounted Storage

WrenchMonkey

NAXJA Member #771
NAXJA Member
Something a little different than the norm. Not much, just a little.

My old setup sucked. I had the spare tire right behind the front seats, and all my tools and parts in boxes behind it. But since everything was trapped under my surco rack, I couldn't get into anything without pulling everything out on the trail, then carefully repacking it all.

So I decided to rearrange. A little sketching in WindowsPaint (yes, I know it's like PhotoShop for retards) and I came up with this:

cabinet00.jpg


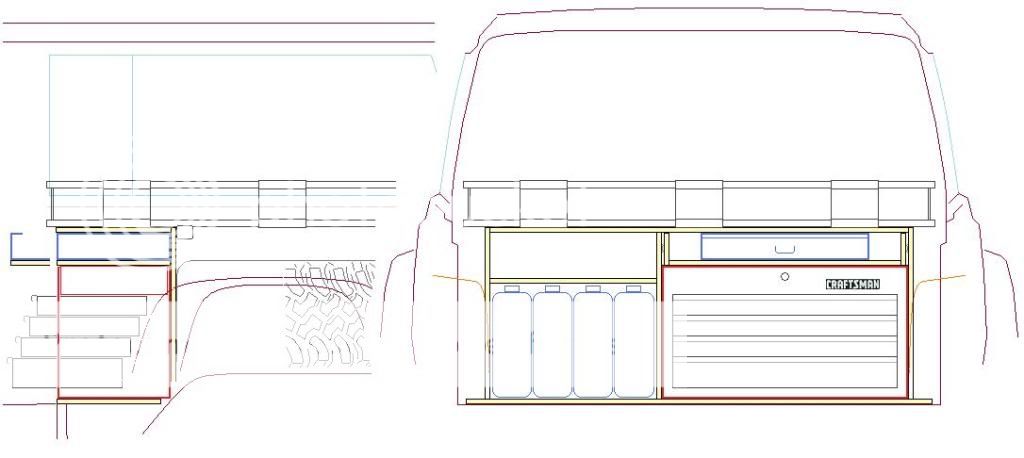
(It looked better as a bitmap)


The cabinet is about 12"Dx18H"x45"W. It's mostly 1/2" plywood. I used 1/8x1" angle and 1/4x1-1/2" flatstock to fab simple brackets to mount the whole thing to the old seatback mounts.

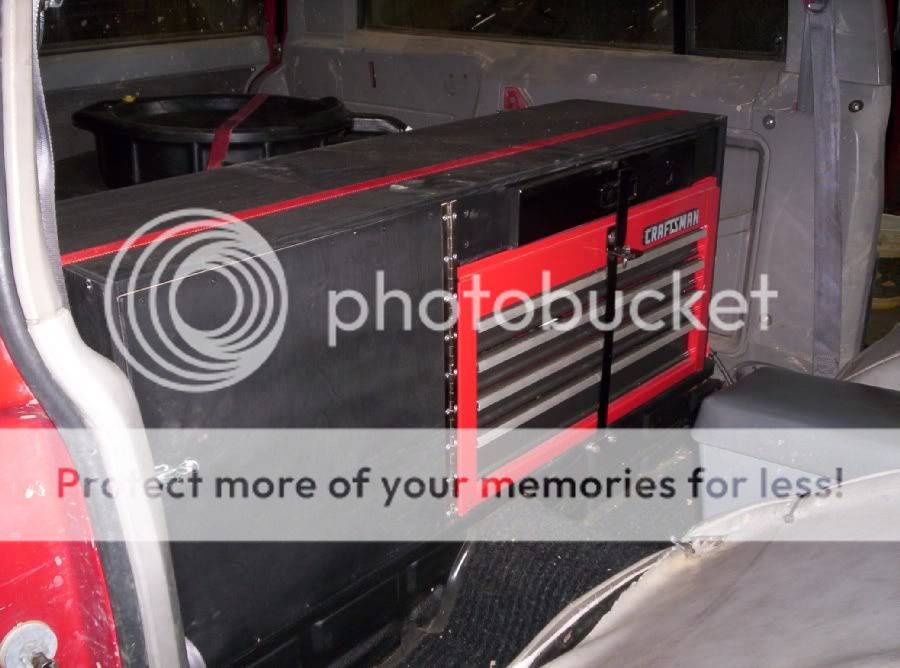
I cannibalized the top of my Craftsman chest, removed the lid, and mounted the box behind the driver's seat:

cabinet01.jpg


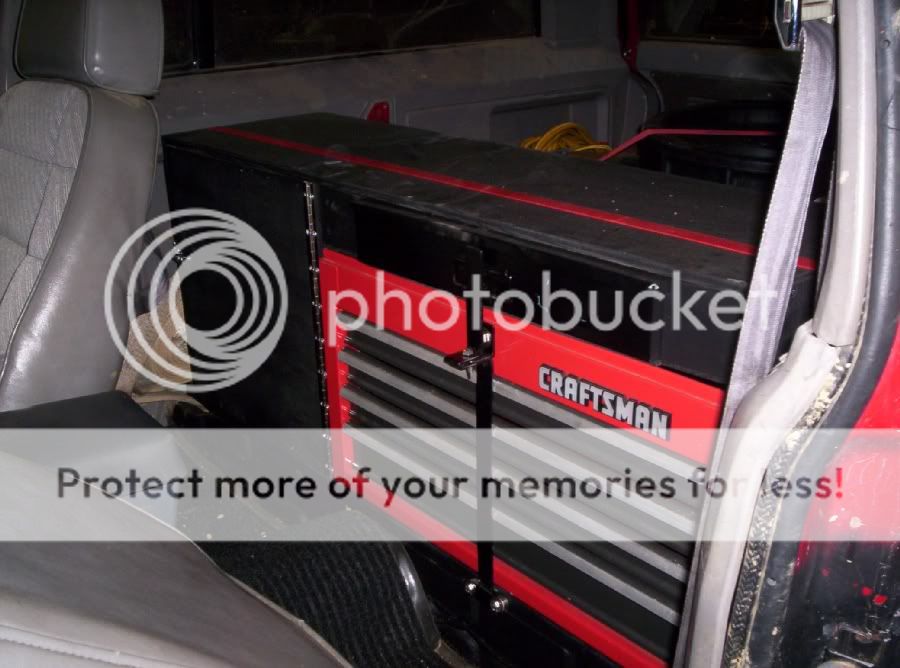
All four drawers open fully, without having to slide the seat forward:

cabinet02.jpg


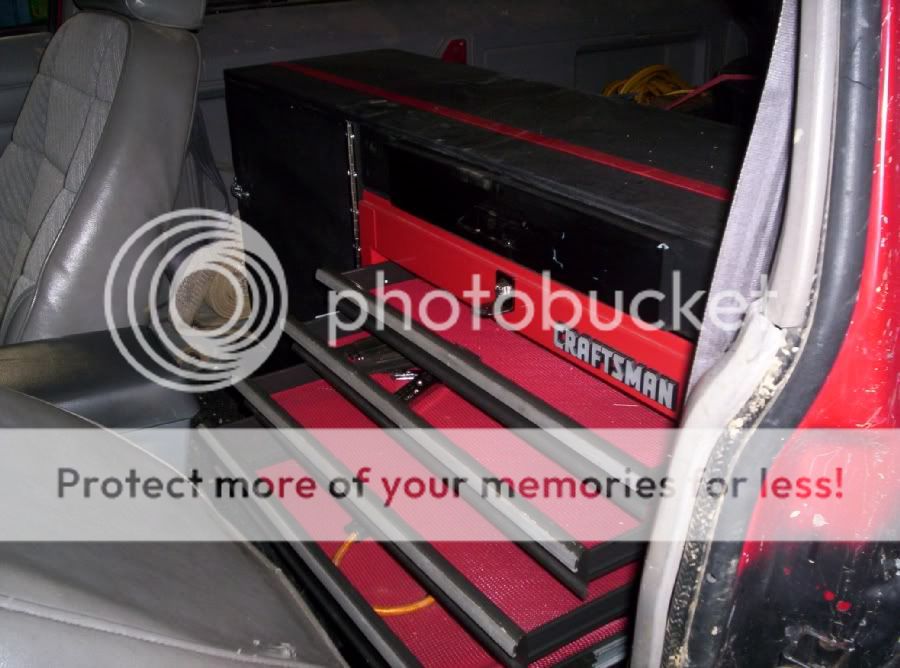
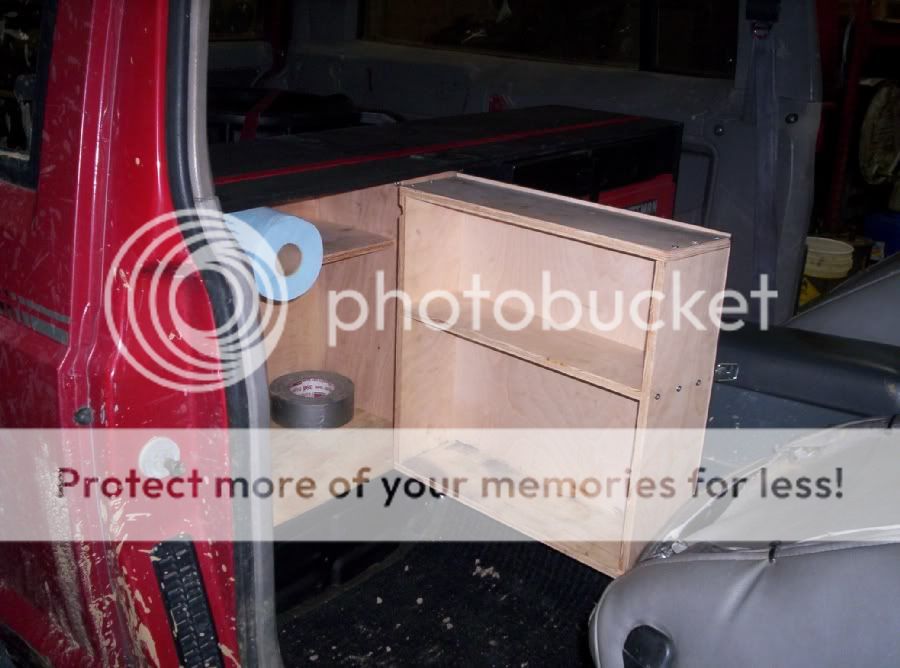
I rescued a parts bin from the dumpster at work, and built a larger drawer to carry it.

cabinet03.jpg


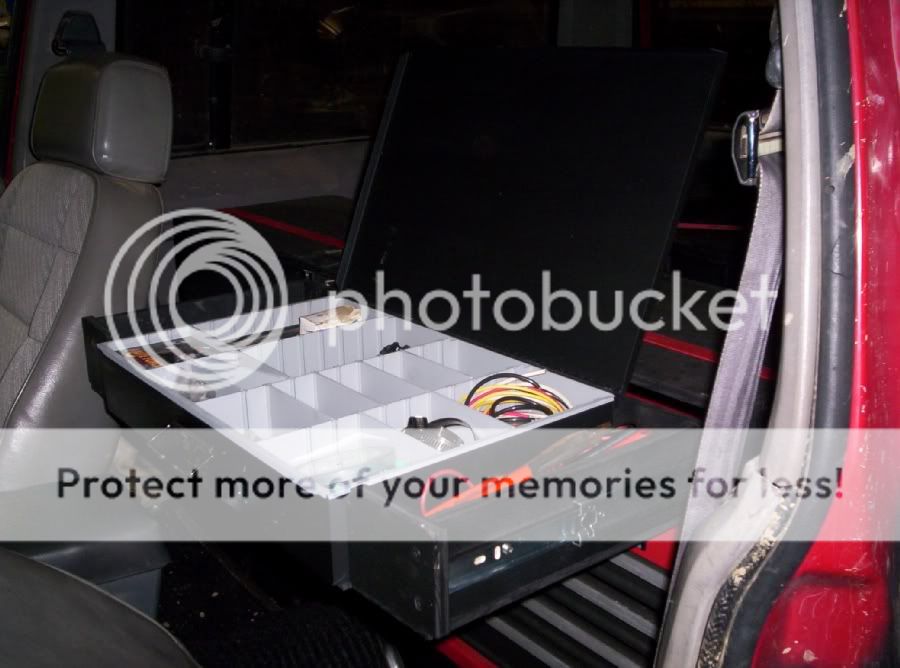
I didn't get a pic, but I used extra-long slides to let the drawer pull ~6" beyond the cabinet. There's a 4" deep space in the top of the craftsman chest, and pulling the drawer that far out lets me access that space.
 
On the passenger side, I had a 12x17x18" space to work with.

cabinet04.jpg


To use as much of the space as possible, and still allow easy access, I accepted that I'd have to slide the seat forward to get into it

That 12" depth was enough to put 7" shelf in the back, and 5" shelves on the door.

cabinet05.jpg


This gives me room for:
- (4) one-gallon jugs in the back.
- A spare unibearing, axle stub, duct tape and papertowels on the shelf
- Bottle jack, quart of brake fluid, pint of steering fluid, ketchup bottle, yield and antisieze on the door.
- An assortment of small, boxed parts on the door shelf.

cabinet06.jpg
 
Originally, I planned for the whole thing to swing up on the seat bolts. There's lots of space underneath it, and I really wanted to stash my axleshafts in there to keep the weight low. But the cabinet ended up way too heavy to want to lift it.

Fortunately, there was still plenty of space in the back for my 35" spare and a 9x9x30" crate (another dumpster salvage :D) The box is plenty big enough for both D30 axleshafts with bearings, a driveshaft, a 12" 2x8, and a bigass prybar.

cabinet09.jpg


I still need to mount my surco rack to the top of it all, but since I only use it to carry my summer doors, it's not a priority right now.

All in all, I'm really happy with it. It puts anything I want to carry at my fingertips, and it's really rattle-free, which is something I worried about.

In fact, my only problem has been the temptation to overload it. It holds so much, so neatly, that I filled it with nearly every part and tool I own. The extra 200# (!!!) has the ass of the jeep saggin.

But that's a problem/project for another thread...

Robert
 
I like it, it looks to be very functional. To be honest, my favorite part of the whole damn thing is the use of the labeled one gallon jugs to store fluids in bulk. I hate keeping 15 different quart size bottles of fluids. It never occurred to me to just transfer it all to one larger jug. One of those light bulb moments for me.

Nice job!

Too bad the seats on my 4 door dont fold forward...

~James


Thanks.

I had some nice heavy gallon jugs, but the round footprint wasted a lot of space. I wanted something square, and even considered milk jugs, but they're just so flimsy.

Fortunately, I never throw nothin' away, so I just happened to have four matching Prestone jugs. Scraping/scrubbing the labels off was probably the hardest part of the whole thing...

And yeah, you're right: I doubt it would really work at all in a four-door. The B-pillar is just right in the way...

Robert
 
Sweet setup . I like it .. Looks like you have a place for everything .

Is that the new tread design I see on your spare?

Nick
 
that is freakin awesome!!!! wish i could come up with some stuff like that.
 
Quit being so organized, it makes the rest of us look bad.

Just kidding, that's a really nice looking setup.

I just HATE lookin' for shit. It was a pet peeve before, and the service only reinforced it (I'm sure your AF boxes are set up about like my Navy jobs were.)

I really boils down to lazy: I recognize that it takes less effort to put something away once, than rummage through everything searching...

But thanks!

Robert
 
Hope the tool chest is bolted down well because all that stuff will kill you in a role over.
 
Spiffy!

For those of you with four-door rigs who don't use the back seat, the 2D and 4D seat bases will swap handily within generations (my 88 2D has a 1987 4D driver's seat, a 1988 2D pax seat, and the rear seat hasn't been unfolded for use in years. Hell, the kids are all growed up, so I don't have to tote them around anymore...)

"Within generations?" Should work within 1984-1996 and 1997-2001, and I'm sure it will work 1984-1986, 1987-1996, 1997-2001.
 
Hope the tool chest is bolted down well because all that stuff will kill you in a role over.

No doubt.

I think the steel brackets I made would have been sufficient. Four bolts per side, then tied into the factory seat mounts with a 12mm bolt each (I think it was, I know it was an 18mm head...)

But that is a lot of weight in a big metal box, right behind my skull. So I ran a 1000# ratchet strap over the whole thing (the red stripe in the pics) and hooked on the "crossmember" in the floor.

Overkill is the hallmark of the poor engineer, and I'm not ashamed to admit it...

Robert
 
Overkill is the hallmark of the poor engineer, and I'm not ashamed to admit it...

Robert

Not necessarily. An engineer can be described as a man who can do "for one dollar what any fool can do for ten" or can do "with one pound of material what any fool can do with ten," but mild overkill is not misplaced.

Consider the environment we're operating in. It's entirely possible that you're going to push your design past original design specs - so you expand them to account for that.

Problem solved.
 
All the engineers I know have no concept of time or money. A managers nightmare.

I really like your storage solution, nice work. I got alot of ideas from you.

Thank you!
 
Awesome work. Since I have to keep my rear seat (I have two little ones), I'm working on a storage floor for the back-seat area. You've given me some good ideas for the top of my Craftsman chest, too.
 
Awesome work. Since I have to keep my rear seat (I have two little ones), I'm working on a storage floor for the back-seat area.

Thanks.

Do you mean like a "false floor," six inches higher than the real floor? I'm considering something like that for my axleshafts.

The crate in the back works fine, but it looks like an afterthought (which, really, I guess it was.) And I'd like to get the weight of the shafts lower (for cog) and forward (to help with the rear end sag) if I could.

I figure I could build the floor up to the bottom of the door/drawer. Depending on the size of your "little ones," you could go higher, though if you go too high, you won't be able to fold the rear seat...

You've given me some good ideas for the top of my Craftsman chest, too.

A few tips...

I had to remove the lid, because my surco rack is going to mount above it. It'll make life easier if you can leave the lid on, for a couple reasons:

The hinge was spot-welded on (on mine at least, I'm sure they're all the same.) The bad part was having to drill all those welds. The upside was that gave me a nice, even set of mounting holes to bolt the box into the cabinet!

The lid also controls the "latches" that holds the drawers shut. You'll have to fish that out, then engineer a replacement.

Another option I looked at was what they call an "intermediate chest." They don't have a lid, and the front lock hold the drawers shut (designed to go in the middle of the three-piece combo stack.)

I didn't use one because (1) their latch obviously wasn't designed for off-roading, and I think it would have rattled like hell, and (2) I didn't want to spend another $200, if I already had something I could make work.

I'm cheap like that.

Good luck!

Robert
 
Last edited:
Back
Top