I have been doing some info searching on the durango alt upgrade. I would love it if some of you could detail what is needed to do this upgrade. I am unsure on the wiring requirements and fuse upgrades needed. Also I would like to know what exact years will use the same plug connectors. I have heard that the 1998 and 1999 Durangos have the same plugs. Let me know the info guys.
-
Welcome to the new NAXJA Forum! If your password does not work, please use "Forgot your password?" link on the log-in page. Please feel free to reach out to [email protected] if we can provide any assistance.
- Home
- Forums
- NAXJA Unibody Jeep Technical Forums
- Jeep Cherokee XJ (1984 - 2001)
- Modified Tech Discussion
You are using an out of date browser. It may not display this or other websites correctly.
You should upgrade or use an alternative browser.
You should upgrade or use an alternative browser.
Help with info on the 136 amp Durango Alternator install
- Thread starter xjjeepcjs
- Start date
5-90
NAXJA Forum User
- Location
- Hammerspace
xjjeepcjs said:I have been doing some info searching on the durango alt upgrade. I would love it if some of you could detail what is needed to do this upgrade. I am unsure on the wiring requirements and fuse upgrades needed. Also I would like to know what exact years will use the same plug connectors. I have heard that the 1998 and 1999 Durangos have the same plugs. Let me know the info guys.
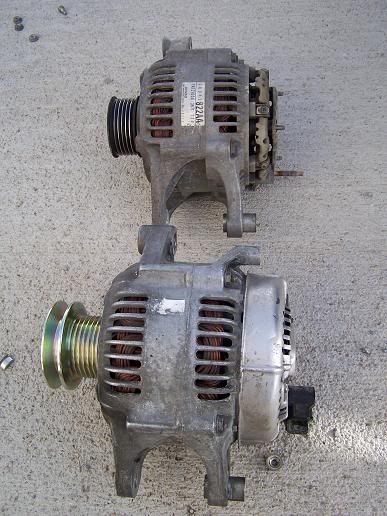
They are both Nippondenso alternators, and should use the same connections (not really a plug - it's a set of ring terminals. Two for the field, one for the output, and maybe one for a case ground.) The primary difference is internal.
I've heard that, sometimes, the mounting feet (or the bracket on the engine) need to be ground slightly for clearance. Given a choice, I'd grind the feet on the alternator - makes it easier to 'go back' if you need to at a later date.
What year is your rig? I can look it up and let you know just how much of an upgrade it is likely to be for you.
Especially if you plan on using that full output much, I'd think about upgrading the mains wiring (6AWG is a little paltry in the first place,) and you'll also need some variety of fuse (a number of people here have used my ANL150 kit with good results.) The OEM fusible link is usually "just enough" for the OEM alternator, and going to full output with a bigger unit tends to blow the fusible link out. Finding 10AWG fusible link wire is a pain in the arse - I've not been able to find it in bulk yet (and I'm almost willing to bet that you can't get it from the dealer - you'll end up having to get the entire subharness...)
- Location
- Southern Maryland
This is the spec sheet for the Nippon Denso that I used. The "used on" part lists all the vehicles that it available on.

http://www.bc4x4.com/tech/2004/jeepalt/ provides a pretty good intro but doesn't describe everything that's needed. The installation is pretty tedious and takes the better part of a day.
Disconnect the battery cables and remove the battery so you have room to work on the top alternator bolts
Loosen the power steering bolts and the belt tension enough to get the belt off the old alternator
Disconnect the electrical wires on the back of the old alternator
Remove the nuts on the front alternator bracket and fish out the bracket
Remove the remaining nuts, bolts and studs and fish out the old alternator and the rear bracket. Pay attention to the way the alternator and bracket come out because you will have to put them back in the same way.
The old and new alternators are close to the same dimensions but if you look at the brackets you'll see that the alternator rubs on both the front and rear brackets in the center span. You will need to use a grinder to cut down the center spans of the brackets so that they bolt up flush again.
Reverse the above steps to install new alternator
- Location
- Southern Maryland
The feet are fine, it's the round part of the alternator housing that collides with the brackets and keeps the brackets from closing up properly5-90 said:I've heard that, sometimes, the mounting feet (or the bracket on the engine) need to be ground slightly for clearance.
Rather than cut the housing it's far better to cut the part of the brackets that rub
Joshua
NAXJA Forum User
- Location
- Cincinnasty
I 'wallowed' out the mounting bracket with a bench grinder - made it a really easy job for me.
5-90
NAXJA Forum User
- Location
- Hammerspace
ehall said:The feet are fine, it's the round part of the alternator housing that collides with the brackets and keeps the brackets from closing up properly
Rather than cut the housing it's far better to cut the part of the brackets that rub
Ah. Got pix? I was never fully clear on the problem there, since I've never seen it...
aparke4
NAXJA Forum User
- Location
- Atlanta, Ga
wow i need to do this
jwtrapper
NAXJA Forum User
- Location
- Wetmore, CO
Did this a few years ago.


Thanks guys. Most of the info is what I saw that you all have previously posted. The grinding doesn't look like it makes anything weak. The connections are what I was worried about. I am not a huge expert on what will be needed. My XJ is a 2000. Will post a little poser pic below. 5-90, what do you use for an alt?

- Location
- Southern Maryland
Yep, that's the rear bracket. You also have to grind the front bracket the same amount.jwtrapper said:
5-90
NAXJA Forum User
- Location
- Hammerspace
xjjeepcjs said:Thanks guys. Most of the info is what I saw that you all have previously posted. The grinding doesn't look like it makes anything weak. The connections are what I was worried about. I am not a huge expert on what will be needed. My XJ is a 2000. Will post a little poser pic below. 5-90, what do you use for an alt?
I've got a RENIX, so I use a Delco CS-130. Parts are rated for 160A, but they were a fluke - and my shop set them aside for me. Max output of my unit is ~198A.
Just to see if I understand the pix properly, it's not really the mounting "feet" that want grinding - but that the Durango ND case is physically larger (meaning a larger armature,) and the bracket needs to be clearanced at the side of the case. Is that not so? Or am I looking at the wrong pictures (or holding them upside down?)
jwtrapper
NAXJA Forum User
- Location
- Wetmore, CO
5-90 said:I've got a RENIX, so I use a Delco CS-130. Parts are rated for 160A, but they were a fluke - and my shop set them aside for me. Max output of my unit is ~198A.
Just to see if I understand the pix properly, it's not really the mounting "feet" that want grinding - but that the Durango ND case is physically larger (meaning a larger armature,) and the bracket needs to be clearanced at the side of the case. Is that not so? Or am I looking at the wrong pictures (or holding them upside down?)
Bingo!! Yep the durango alt is larger and will not fit without grinding.
5-90
NAXJA Forum User
- Location
- Hammerspace
jwtrapper said:Bingo!! Yep the durango alt is larger and will not fit without grinding.
Got it - that's the part I was never clear on. So you don't alter the actual mount at all, then - just clearance for the alternator case.
Roughly how much do you need to grind down to make it fit? I've not gotten dimensioned drawings on various alternators yet - still workin' on that...
- Location
- In the islands
ehall said:Yep, that's the rear bracket. You also have to grind the front bracket the same amount.
That is exactly what I did 2 years ago and repeated on the front bracket. I have of some others who take a grinder to the alternator case. This is OK except it make replacing the alternator another costom project. Doing it this way make replacing the alternator a simple drop in replacement.
Yes 5-90 the entire alternator is larger than the stock 90 AMP that are standard on the XJ.
I prefer this rather than upgrading the 90 AMP unit. My experiances with these are that they need a higher RPM in order to have any usable output. The larger replacement have a very high output at idle (I do not remember the specs). This was needed when I installed my dual electric fans that are power hungry.
- Location
- Southern Maryland
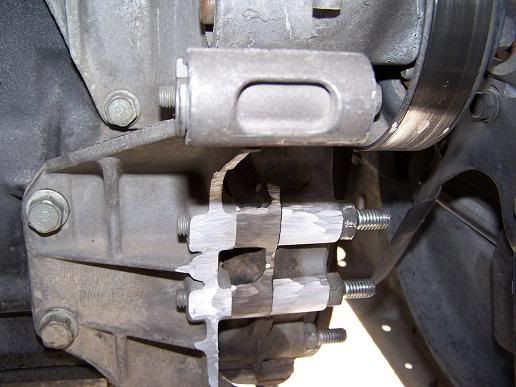
The rear bracket provides 100% of the support for the alternator, the front bracket is just a clamp that holds the alternator to the rear bracket.
If you look at the pic above, you see a tube with the oval stamp on it which is a threaded arm for one of the alternator feet (this is the top bolt that you have to remove the battery to access). There is another mounting arm at the bottom (it's behind the hard line that is blocking the pic) too. You can also see three studs coming out the front, and those go through the engine and into the rear bracket, and provide a mounting point for the front bracket.
The mounting points of the front and rear brackets are in the same place, but the brackets will not close around the larger alternator because the brackets were designed to accommodate a smaller shell. IN order to get everything together you have to cut/grind the center part of both brackets, at which point the brackets can come back together and provide their clamping action again. All you need to do is make room for the brackets to close up again. However there is a lot of material that has to be removed to make that work. I would say that I had to cut somewhere close to 2" from the center part, and maybe more.
- Location
- In the islands
I am not sure about the measurements (2") but I did take the aluminium bracket off and clearanced it with an angle grinder until the alternator fit. Afetr the bracket was bolted back on the engine, I had to grind a little more from the block and timing cover. I did nothing to the front (pressed) steel bracket. This as you know only help to sandwich the alternator between itself and the rear bracket. The rear bracket in my mind carries the entire alternator.
- Location
- Southern Maryland
I cut both brackets so it would fully close again. The front one was easy to hold and cut so I did it too. I did not need to cut into anything else.
Mutant_Xj
NAXJA Forum User
- Location
- Susquehanna Valley
I just did the 136 amp alt upgrade and didn't touch the front bracket. I just kept grinding at the back mount until the alt would fit. It seemed like I had to take off the casting markes and grind down the bumps where the bolts go through. It wasn't much at all
snow580
NAXJA Forum User
- Location
- Arlington,Mn.
I just got done swapping the 136 amp alt. in which went well but I had a question on if I would upgrade the main feed wire from the alternator what size fuse should I put in there?
Thanks
Thanks
5-90
NAXJA Forum User
- Location
- Hammerspace
snow580 said:I just got done swapping the 136 amp alt. in which went well but I had a question on if I would upgrade the main feed wire from the alternator what size fuse should I put in there?
Thanks
Best you'll probably be able to find is a 150A in ANL or AGU (I offer and use ANL fuses - I don't like glass underhood.)
Similar threads
- Replies
- 10
- Views
- 2K