- Location
- Southern Maryland
One of the big problems with the '91 beater that I inherited was that the power seats were practically destroyed. The sides of the bottom cushions were blown out, the back position would not adjust, and the clutches in the seat motors made a really bad grinding noise if anybody was sitting in them. The seat brackets had also been welded back together twice before already too. All in all, it was time to replace them.
Unfortunately there is no aftermarket for replacement power seats (and only a couple of vendors sell manual seat brackets for that era), and since the floorpan and studs are different for the 84-94 years I could not easily swap in ZJ seats either. Looking around, I found some power seats from an 2001 S-10 Blazer on eBay and ended up getting the whole set for pretty good price. They are leather, heated, and eight-way adjustable (up/down, forward/reverse, front up/down, rear up/down, lumbar in/out, and recline), with driver side memory, and all the controls are on the seat so no BCM or PCM wiring needed. These same seats are also found in a variety of S-15 Jimmy's btw.

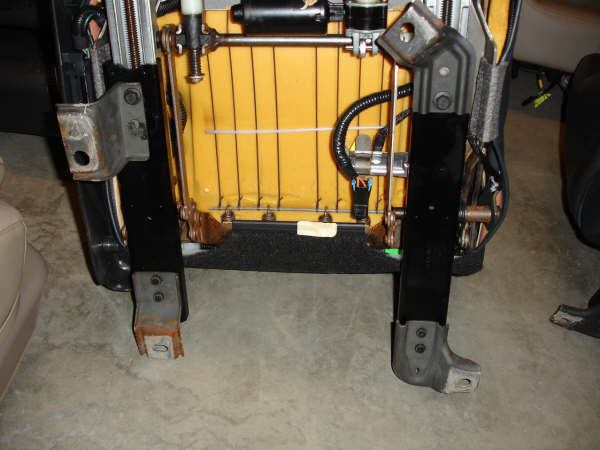
The seats have large aluminum rails with steel feet riveted on. The feet went every which direction, at different angles and heights, but the rails were straight, so first order of business was grinding off the feet and drilling out the rivets.

Then I made some brackets that would bridge between the XJ floorpan and the seat rails. This took several attempts. First I tried to reuse the existing floorpan studs with simple 90* uprights, but the seats are much wider than stock so the inside edges of the seats were on top of the hump, which in turn made them tall. The seat tracks are also different, so the seats were way too far forward. At full extension and all the way down, I was still scrunched up into the dash, and my line of sight was looking through the blue strip at the top of the windshield.
After thinking about the 3D geometry for a while I decided to abandon the existing studs, and repositioned the brackets closer to the doors and further back. This got me off the hump (mostly), and also got me plenty of leg room. However the XJ floorboard has a lot of drip channels that I did not want to block up, and it also has multiple angles (the front dips down, and the sides also drop out a little) so it took many many attempts to get something that would work.
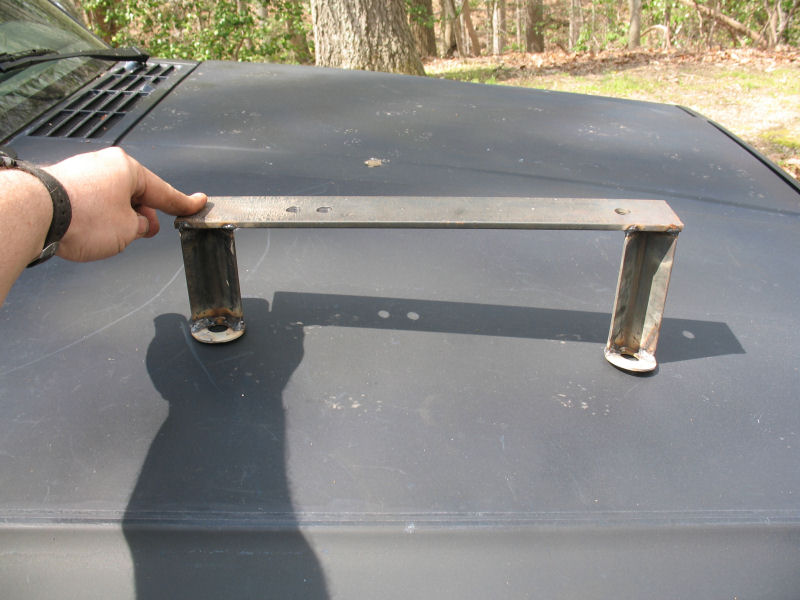
Here are the two pieces that I came up with. The first one shows the outside strip that is next to the door, and the other is the inside strip next to the hump. As you can see, the angles and positioning is kind of awkward.

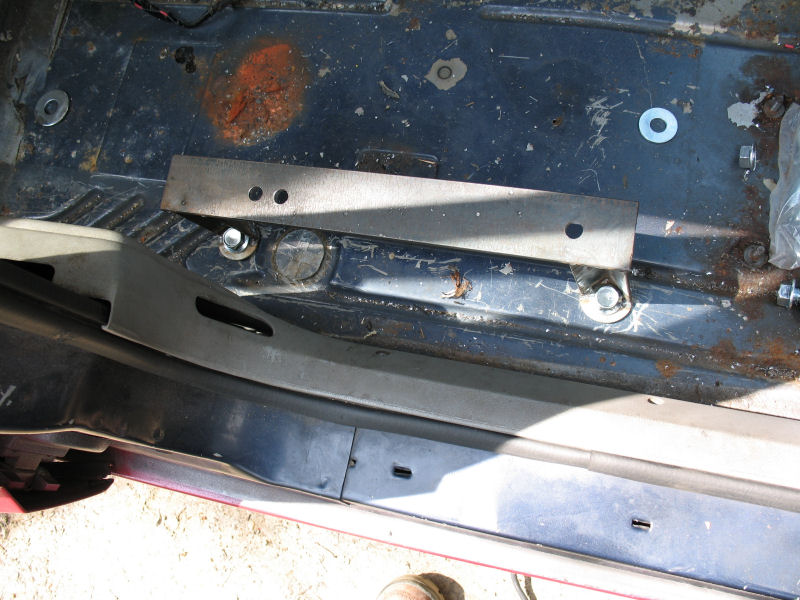
Here is the outside bracket installed. Note that the feet rest on the raised flat area of the floorpan next to the door and the drip channels are not blocked.
After the passenger side rails were bolted to the seats and floor, I tested for position. With the seat all the way down and all the way back, the controls stop just before the B-pillar trim. The plastic next to the controls rubs the trim a little bit as you can see in the next pic, but it's not bad.


With the door closed, there is about an inch between the controls and the map pocket on the door panel. The pocket is held on with some small torx screws so I might take it off, although I'm also considering a 97+ door swap for other reasons.

The passenger side also cleared the hump much better, but not completely, although it is way better than before. It's still a smidgin too tall but not bad by any means.

The hump was much of a problem for the driver's side. As you can see the hump shoots way out on the left, and this prevented the front inside leg from being usable.
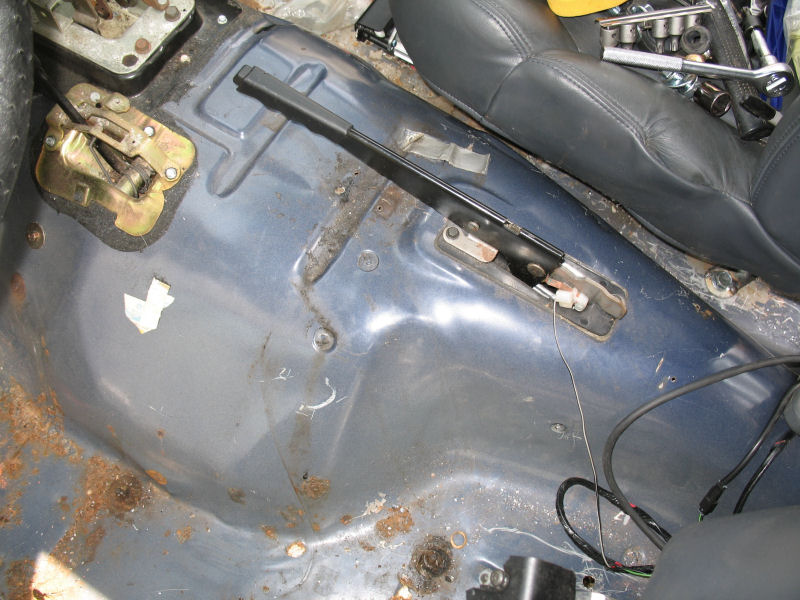
Even thought I mirrored the brackets exactly, the driver's side seat ended up closer to the door for some reason and was rubbing against the seat belt tensioner, and it was also missing the front inside leg because of the hump. We moved the outside legs over a bit and then putting the inside leg further back on the rail so that it could stand in the open area just behind the hump (as I said, many attempts), and that seems to have fixed it. Also, newer seats have the belt attached to the seat instead of the chassis, but the XJ floorboard is very weak and would not be able to restrain the seat and whoever was in it. Besides which the XJ buckle would not work with the S-10 clasp. So I removed the clasp and reattached the XJ clasp to the body mounts, and then slipped that through the opening. Here is a shot of the driver's side installed.

Finally we welded some ribbon stock between the rear legs so that the seats would have more bracing. Here is a shot from the rear.
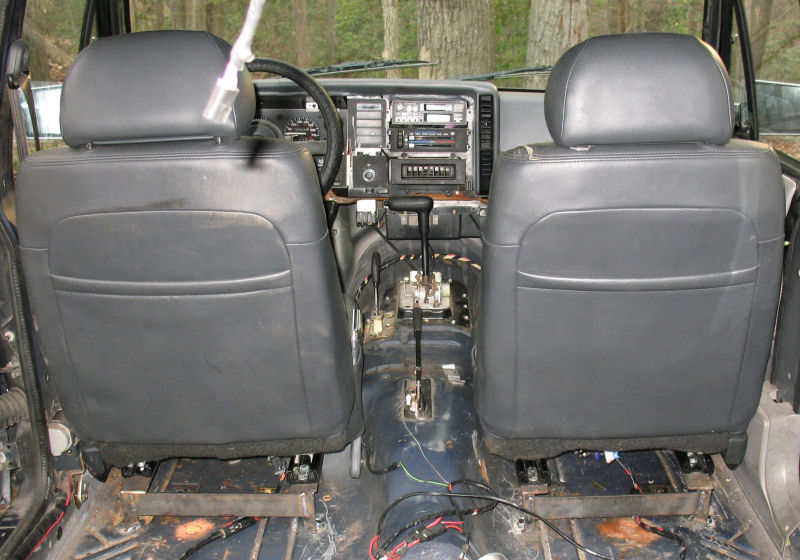
You can also see the power leads there--power is from the stock plugs, with a secondary lead from ignition for the heater, which is then tied into a stock S-10 pigtail. The wiring is pretty simple since all the controls are on the seat. Really, the wiring is the easiest thing about this.
After some testing, the seats are great. They are much firmer than stock, yet they seem to insulate the rider much better with far less road vibration being felt. We did some light off-roading and the seats were completely transparent as they should be. The positioning is good and the controls all work. At this point I need to do some cleanup work and give them a paint job, and then they are done but they are 100% operational and very sturdy.
I have not decided if I am going to mess with the rear seat. It's much nicer than stock, but if it's at all difficult I will give it a pass.
I got a bunch of help from two guys in the local off-road club, particularly DaffyXJ who is a member with a mondo bruiser of a rig.
Overall I would not recommend going this route. The seats are very wide which is nice, but frankly they are too wide for the XJ and the damned tcase hump. It would have been far easier to fabricate a mounting stand and drop in ZJ seats, I am certain. The 3D geometry was very painful and there was lots of trial and error before a suitable solution was found, while going the road more traveled would have probably been a simple job. If you decide to cut your own path here, get narrow seats.
Unfortunately there is no aftermarket for replacement power seats (and only a couple of vendors sell manual seat brackets for that era), and since the floorpan and studs are different for the 84-94 years I could not easily swap in ZJ seats either. Looking around, I found some power seats from an 2001 S-10 Blazer on eBay and ended up getting the whole set for pretty good price. They are leather, heated, and eight-way adjustable (up/down, forward/reverse, front up/down, rear up/down, lumbar in/out, and recline), with driver side memory, and all the controls are on the seat so no BCM or PCM wiring needed. These same seats are also found in a variety of S-15 Jimmy's btw.
The seats have large aluminum rails with steel feet riveted on. The feet went every which direction, at different angles and heights, but the rails were straight, so first order of business was grinding off the feet and drilling out the rivets.
Then I made some brackets that would bridge between the XJ floorpan and the seat rails. This took several attempts. First I tried to reuse the existing floorpan studs with simple 90* uprights, but the seats are much wider than stock so the inside edges of the seats were on top of the hump, which in turn made them tall. The seat tracks are also different, so the seats were way too far forward. At full extension and all the way down, I was still scrunched up into the dash, and my line of sight was looking through the blue strip at the top of the windshield.
After thinking about the 3D geometry for a while I decided to abandon the existing studs, and repositioned the brackets closer to the doors and further back. This got me off the hump (mostly), and also got me plenty of leg room. However the XJ floorboard has a lot of drip channels that I did not want to block up, and it also has multiple angles (the front dips down, and the sides also drop out a little) so it took many many attempts to get something that would work.
Here are the two pieces that I came up with. The first one shows the outside strip that is next to the door, and the other is the inside strip next to the hump. As you can see, the angles and positioning is kind of awkward.
Here is the outside bracket installed. Note that the feet rest on the raised flat area of the floorpan next to the door and the drip channels are not blocked.
After the passenger side rails were bolted to the seats and floor, I tested for position. With the seat all the way down and all the way back, the controls stop just before the B-pillar trim. The plastic next to the controls rubs the trim a little bit as you can see in the next pic, but it's not bad.
With the door closed, there is about an inch between the controls and the map pocket on the door panel. The pocket is held on with some small torx screws so I might take it off, although I'm also considering a 97+ door swap for other reasons.
The passenger side also cleared the hump much better, but not completely, although it is way better than before. It's still a smidgin too tall but not bad by any means.
The hump was much of a problem for the driver's side. As you can see the hump shoots way out on the left, and this prevented the front inside leg from being usable.
Even thought I mirrored the brackets exactly, the driver's side seat ended up closer to the door for some reason and was rubbing against the seat belt tensioner, and it was also missing the front inside leg because of the hump. We moved the outside legs over a bit and then putting the inside leg further back on the rail so that it could stand in the open area just behind the hump (as I said, many attempts), and that seems to have fixed it. Also, newer seats have the belt attached to the seat instead of the chassis, but the XJ floorboard is very weak and would not be able to restrain the seat and whoever was in it. Besides which the XJ buckle would not work with the S-10 clasp. So I removed the clasp and reattached the XJ clasp to the body mounts, and then slipped that through the opening. Here is a shot of the driver's side installed.
Finally we welded some ribbon stock between the rear legs so that the seats would have more bracing. Here is a shot from the rear.
You can also see the power leads there--power is from the stock plugs, with a secondary lead from ignition for the heater, which is then tied into a stock S-10 pigtail. The wiring is pretty simple since all the controls are on the seat. Really, the wiring is the easiest thing about this.
After some testing, the seats are great. They are much firmer than stock, yet they seem to insulate the rider much better with far less road vibration being felt. We did some light off-roading and the seats were completely transparent as they should be. The positioning is good and the controls all work. At this point I need to do some cleanup work and give them a paint job, and then they are done but they are 100% operational and very sturdy.
I have not decided if I am going to mess with the rear seat. It's much nicer than stock, but if it's at all difficult I will give it a pass.
I got a bunch of help from two guys in the local off-road club, particularly DaffyXJ who is a
member with a mondo bruiser of a rig.Overall I would not recommend going this route. The seats are very wide which is nice, but frankly they are too wide for the XJ and the damned tcase hump. It would have been far easier to fabricate a mounting stand and drop in ZJ seats, I am certain. The 3D geometry was very painful and there was lots of trial and error before a suitable solution was found, while going the road more traveled would have probably been a simple job. If you decide to cut your own path here, get narrow seats.


