• Welcome to the new NAXJA Forum! If your password does not work, please use "Forgot your password?" link on the log-in page. Please feel free to reach out to [email protected] if we can provide any assistance.

97+ ABS pump removal with pictures

xj_mike

NAXJA Forum User
Location
San Diego, CA
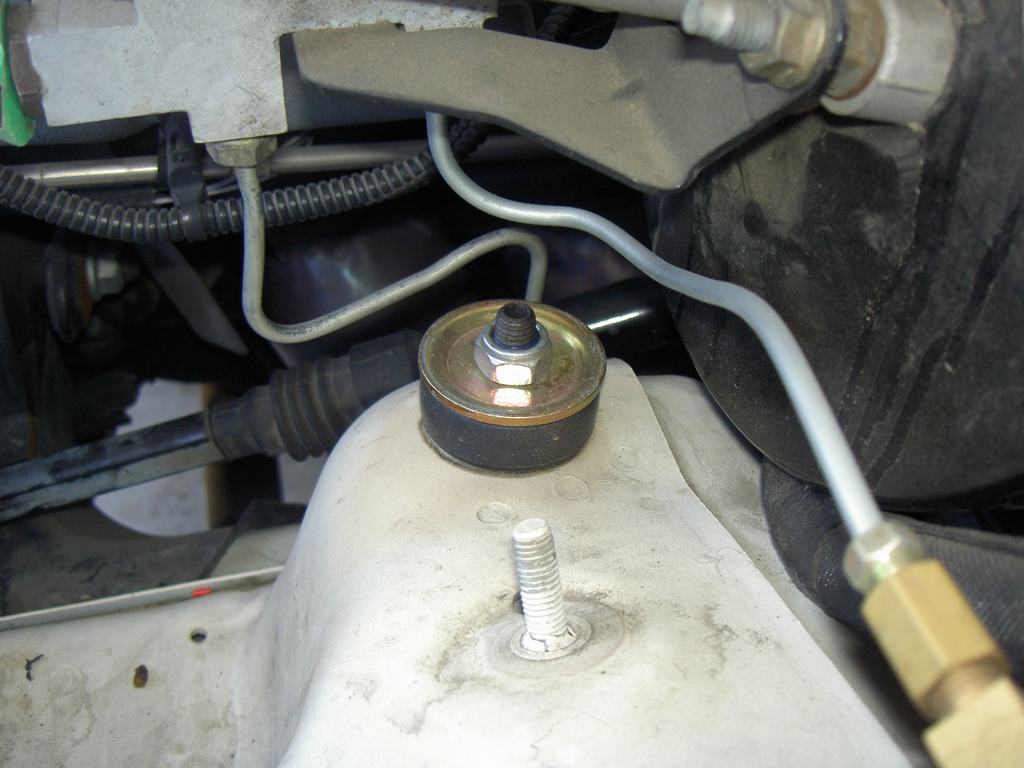
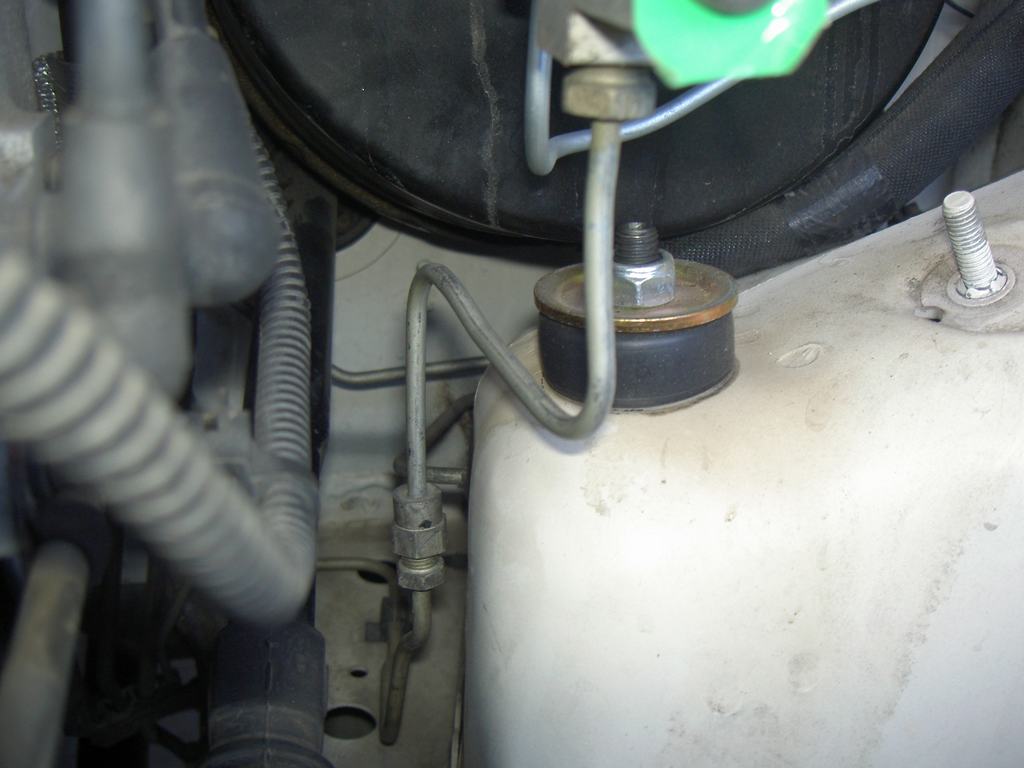
Since I have had a number of people ask me about the removal of the ABS pump and how I did the brake lines, I figured I should get some pictures and post up what I did. This was performed on a 2000 XJ. I think 97+ XJ’s would be the same but don’t know about earlier. Doing this also assumes you are very good at making double flared ends and can do this in the engine compartment, in a tight area. Luckily I have a lot of experience with doing double flares. Reason for removing the ABS pump is, according to the FSM, to bled the pump correctly, you have to hook it to a computer that will cycle the pump and valves. Outside of a dealer, I don’t know where you could have this done. Since I removed all my wheel sensors, it was easier to remove the pump and not deal with it.

The flare nuts on the prop valve are the original ones. I just cut them from the factory lines. The rear line is modified to fit so this one does not need to be replaced. The two front lines were cut after the ABS pump, bent, flared (with stand 3/16” double flare nuts) and hooked to the Tee. A new line was bent from the Tee to the prop valve, using the stock double flare nut at the prop valve end.

Remember when flaring ends, lube up the end with some brake fluid, debur the cut line and follow the directions with the flaring tool. I am just using a NAPA brand flaring tool, nothing special. One very big thing I have learned over the years is, anytime you are tightening new lines or fittings, tighten them snuggly, then loosen about a ¼ turn, then retighten it. This seems to seat the fitting better and keeps them from leaking. Before doing this, ever fitting I did leaked. After using this technique I have not had a fitting leak since and that’s been about 40 fittings.

All of this is done at your own risk. Blah, blah, blah. Also, don’t forget to remove your ABS pump relay and fuse in the under hood fuse/relay holder and the ABS fuse inside. My XJ has been this way for over a year and about 4000 miles without any problems. Nice firm pedal, better then when the ABS pump was in. Good luck on your removal and hope this pictures help.
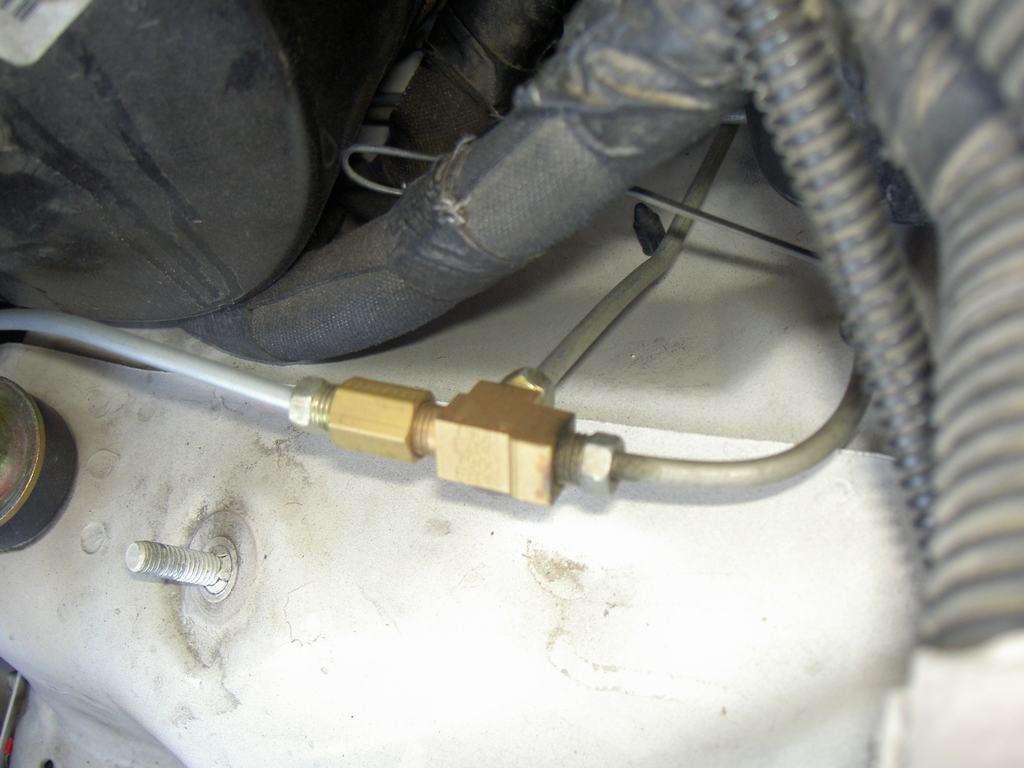
PICT3669.jpg

PICT3671.jpg

PICT3672.jpg

PICT3673.jpg
 
Thanks for posting the pictures. I have to do this soon on my XJ. How many pipes did you have to make?
 
One tube (from Tee to prop valve) was new, the other three are modified from the stock ones.
 
I have a flaring tool, but it seems that everytime I'm trying to flare, the pipe slips in the clamp, making ugly marks on the outside and not getting the flaring done. Is there any trick in using these cheaper, hand flaring kits?
 
Tighten the clamp more. I use a screwdriver on the wing nuts to tighten it up and it works every time for me. Also, thread the new fittings togethoruntil tight, then back them off about 1 turn then tighten again. This will help with leaks
 
My trick for making the flair is this, most flair tools have two wing nuts, one at each end. Put your tube into the correct size hole and snug up the wing nuts to keep the tube from falling out. Then tighten full, the wing nut furthest from the tube, then tighten the one closest. Since doing it this way I have not had a tube come loose while flairing.

As for the second part reelbigdundy87 mentioned about loosening and retightening a new flair, again since doing it this way I have not had a leak happen. I have done close to 100 new fittings this way.

Hope it helps.
 
How far must the tip of the pipe (the part that is about to be flared) stick out once everything is tightened up? Sorry for these simple questions, but my flaring tool, being a cheap chinese version didn't come with instructions...
 
gorman said:
How far must the tip of the pipe (the part that is about to be flared) stick out once everything is tightened up? Sorry for these simple questions, but my flaring tool, being a cheap chinese version didn't come with instructions...

Sorry I hadn't seen this earlier. The die you put in during the first step, typically has a ridge on it. If you lay the flat side of the die on the face of the clamp part, you make the tube stick out as much as the lip on this ridge.

Does that makes sense? Hope this helps.
 
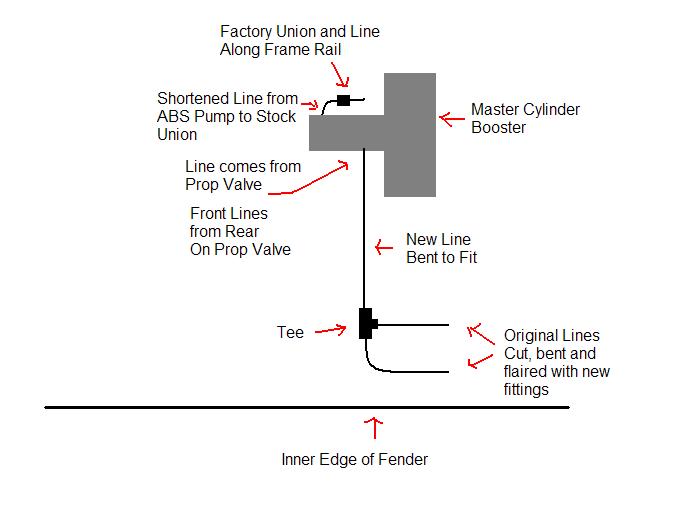
XJ Mike, this is great - thanks for the pics. Can you draw a basic diagram of how the lines are now connected, where the T-connection is, etc? I'm still a little confused...mostly because I haven't looked at my lines yet.
 
It will make more sense when you look at yours but here is a quick diagram, which I hope helps.

ABS_remvoal_diag.jpg
 
Not so much an increase in power but more consistant feel. The biggest advantage is not having the ABS in the dirt. I almost slid into a rock when backing down a climb. I hit the brakes (soft sand) trying to lock them up to dig in and the ABS kicked in and I kept rolling. I think I removed the ABS after that trip.
 
The reviving of this thread comes at the right time, because I've disconnected my ABS about a year ago, but never removed the pump. However I'm looking into fitting a snorkel and I like the Airflow snorkel which will fit without modification with my Bushwackers, but it only works on a non-ABS model because of the ABS pump that's in the way.

Mine's a RHD with the master cylinder on the right hand side, but the ABS pump in the same location as the left hand drive, so I assume the piping/connections will be the same as what you did. Quick question, how many pipes do you have coming out of your proportioning valve, two or three?
 
I only have two lines coming out of the prop valve. My ABS pump had two inputs (1 front, 1 rear) and three outputs (2 front, 1 rear) so I put the Tee to connect the two front lines together and ran one back to the prop valve.
 
What is this ABS you speak of? :D
 
This thread is awesome. I used it to ditch my Anti-lock Braking System so I could move my washer reservoir into that very spot. I got it at the junk yard from a later model cherokee, I think an early 90's it looks like a semi-deflated basketball and fits PERFECTLY where the ABS was.

Getting rid of the reservoir under the fender was key to the amount I cut and I was able to beat the inner fender into submission so I could get more uptravel. I had to use one of the washer pumps from the old bottle but somehow by the grace of the cherokee gods there was one old school electrical fitting that was just the trick. Absolutely no difference, just that the pump is louder. Used gasket maker and viola.

My mom delted the pics but let me tell you how freakin clean the area looks now. Once I get the battery moved to the rear I'm going to re-do the inner fenders wells so I can stuff bigger tires, 36.8"s IROK's baybe.

As far as pedal feel. More firm and responsive. Exactly what I'd expect a pedal to feel like with oversized tires. Stops on a damn dime and I like the man said I can manipulate the tires better. The only other mod I like more was cutting the begeases out of the rear fenders to fit these IROK's and welding them back again. Then using rear YJ flares all around cleaned it up!
 
mike where did you get that tee from? and im kinda lost sorry. i get that a new line will need to be made from the master cyl to the tee. and i understand that the line from the tee to the rear brakes can go straight into the tee?? but there is a 3rd line on the tee going where and does it need to be flared and where does the line come from???
 
All the fittings were bought at NAPA.

I am not 100% sure what you are refering to. The rear brake do NOT go through the tee. If you look at this picture, I am running the line for the rear, straight from the prop valve to the union fitting (already on the Jeep) that goes to the rear brakes.

PICT3673.jpg


The tee is ONLY for the front lines. One line comes in to it from the prop valve and Tee's to the two factory front hard lines. These factory lines where the ones I had to modify (bend and flair the end). Basically 1 in and 2 out. This only applies to the front lines.

PICT3669.jpg
 
ahhh ok now i get it!!! so the line for the rear brakes comes off the prop valve which i dont need to touch. or am i wrong again? but i do fully understand the components of the tee now.
 
Back
Top