• Welcome to the new NAXJA Forum! If your password does not work, please use "Forgot your password?" link on the log-in page. Please feel free to reach out to [email protected] if we can provide any assistance.

'96 XJ Alternator: What was the original wiring? What should I put in?

Anak

Stranger
NAXJA Member
I am trying to clean up the mess which has resulted from multiple previous owners making multiple attempts to tie into the electrical system. Everything between the battery, alternator and underhood fuse block is a fiasco. It's clean up time.

I know what I want to do with most of this mess, but the alternator leaves me with a couple of questions. First off, what was the original gauge wire between the alternator and the fuse block? I currently have two wires running between those two points. Apparently one wire wasn't enough.

Neither of the two is entirely original. One looks like some Monster Cable product, and the other is a spliced together job which is black with a white stripe at the alternator end and green where it connects to the fuse block.

The spliced wire gives rise to another question: Was there originally a fusible link between the alternator and the fuse block? Could it be that a PO cut out the fusible part? And if so, should I be putting some form of protection back in place here?

I am not particularly fond of fusible links. Is there anything special about them such that a high amp fuse would not suffice?

The goal is to fix this once and fix it right.
 
The lead from the Alternator to the PDC is the fusible link. When I installed the 200 A alternator, the fusible link was replaced with a 00 gauge wire and this:

PDCFuseInstall.jpg
[/URL][/IMG]

So far, it all works a charm.

What I found interesting was that the from of the PDC was setup to accept a fuse. All that was required was the addition of the second post.

NOTE!!!

This photo was taken after the fuse was installed but before the Alternator was installed. This is why the 100A fuse...
 
Last edited:
Thank you for corroborating what I suspected.

I like that fuse install. What was the additional hardware required in order to add that second post? More specifically, what is the bolt/post/stud part of the equation?

Thank you also for the clarification about the 100 amp fuse preceding the 200 amp alternator. As I had scrolled down to the picture I had immediately gone to a state of confusion. Yes. Short trip...
 
OEM wiring was 6AWG, with a 10AWG fusible link section.

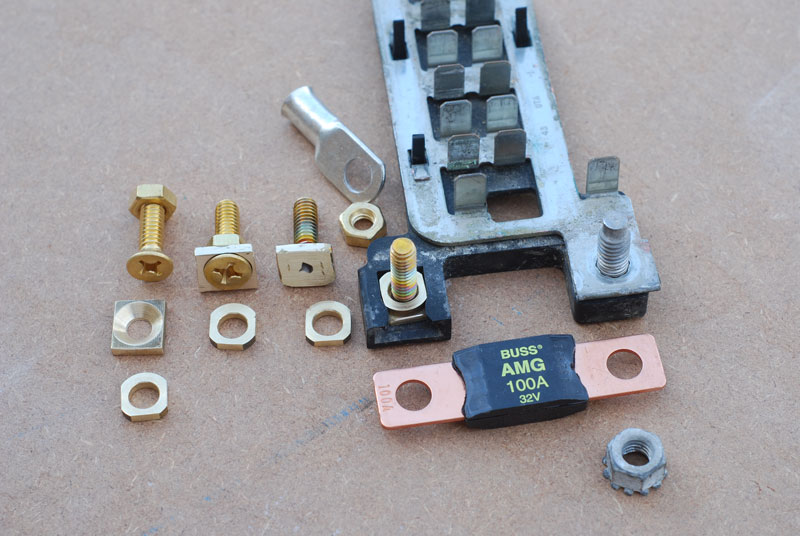
As far as installing the MEGA fuse on the PDC, the only thing you really need is a stud pulled from an OBD-II PDC and inserted into the empty slot on your PDC base plate. (I have a stud that someone was kind enough to send me - once I get my feet back under me properly, I intend to resume the search for an aftermarket part that will serve.)

An OEM stud from an OBD-II ChryCo PDC should slip right in, maybe a bit of RTV on the base as added insurance (since it doesn't need to connect to anything.)

Make sure you use a MEGA fuse - the stud spacing is wrong for proper connection with an ANL fuse. MEGA fuses can be had at Ford dealerships, or from industrial supply houses (they're common on electric forklifts and high-current battery chargers.)

Looks like he used a flanged nut and a short bit of M8-1.25 threaded rod (or maybe 5/16"-18 - but keep track of which nut goes where, if you do that!) and I'd either solder the stud into the nut if I did that, or grind a point on the end of the stud after cutting it, and crank the point into the baseplate of the PDC (and use a bit of LocTite #222 or #242 to retain it afterward) to keep the stud from slipping out of the slot.

However, the added stud wouldn't connect to anything, it merely provides a location for the other end of the fuse, and attachment to the alternator output lead (the fuse, if blown, should totally isolate the alternator output from the rest of the vehicle's electrical system.)

EDIT - And 00AWG may be overkill, but it's better to have main power wires too larger than too small (4AWG for up through 150A, 1AWG for up through about 275A. Hit me backchannel if you have more specific questions.)
 
Great information.

Thank you.
 
In my case, I used a flanged nut (had it in the tool box...) a chunk of all thread. The nut was lightly filed to fit the slot. Whole thing took maybe half an hour to do.
 
Should anybody else be looking for that fuse, it is available at Napa as P/N 782-1136. My receipt shows "Price" $12.58, "Net" $6.49.

It also shows in my Waytek catalog as Stock No. 46270.

Just for future reference.
 
I really like O-Gauge Steamer's solution, but I wanted something more secure than the filed flange nut. My trip to the junkyard didn't net me any good solutions. Perhaps I was in the wrong part of the yard (SUVs--only Chrysler products were two XJs and a half dozen Grand Cherokees, and I was on limited time constraints and couldn't go peruse the rest of the yard), but I couldn't come up with the right type of post for the slot on the existing fuse box. I did come up with a couple of extra fuse boxes to play around with though.

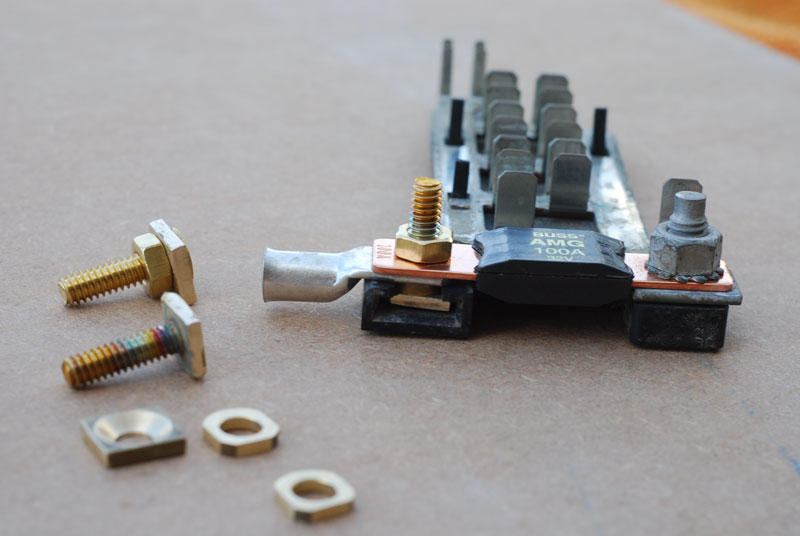
One thing I learned from playing around with the fuse boxes is that the plastic is not improving any with age. That underscored my desire to make sure I came up with a solid bit of hardware. Here is my solution:


JeepAltStud7OPT.jpg


JeepAltStud1OPT.jpg


Note the squared off washers. Those are the key to making this secure without risking the plastic housing. The T-bolts slid into the slot and then the washers drop in from above. As long as there is something to keep the washers from being able to rise above the plastic the T-bolt cannot slide back out. The washers are of a thickness to avoid over-compressing the plastic.

If anyone is interested in the sizing details, the rectangle which makes up the base of the T-bolt is 1/8" thick x 1/2" x 9/16" (or even up to 37/64"). The important part of the washers is that they be 3/32" thick. I made them from 1/2" dia round bar and then filed down three sides to make them fit. The tools at one's disposal will dictate process.

Just thought I would share, at the risk of straying from OEM Tech...

Edit to add: A better nut with an integral star washer is on the list of improvements still needed. A 5/16" bolt would have been even better, but would have left little meat to work with on the rectangular base.
 
Last edited:
Interesting! Where did you find the countersunk plates for the flat head machine screws, or did you have to machine those yourself? And, did you use an M8-1.25 machine screw to match the stud, or 5/16"-18 (if the latter, be VERY careful to not get the nuts mixed up...)

Instead of the captive star washer nuts, I'd replace both with flanged hex nuts. I consider them to be more secure, and they provide greater contact area than the captive star washers. If you look at the underside of a flanged nut, you'll see "teeth" formed into it that serve a similar function to the teeth on the star washer.

The square washer thicker than the plastic flanges makes good sense - the square dimensions are probably less important than the thickness of the thing (you could probably use a small round spacer, even.)

And, thank you for that picture of the stripped baseplate - I'd been wondering how they did the Buss bar on the PDC, I just hadn't torn one to bits. Looks like this just used tinned sheet (any idea how thick?) and bent tabs up to make contact with fuses. If you could measure the thickness of the thing (I'm curious) and file a tab on the thing to see what's under the tinning (ditto,) it would be appreciated - but not strictly necessary, in case you've already gotten quit of the thing (I'd like to know whether it's tinned copper or tinned steel...)
 
The plates I made. I went and bought a piece of 1/8" x 1/2" x 12" brass, cut pieces off with a hacksaw, drilled and countersunk them. Hardest part was getting them to hold still on the drill press table. There's not much to hold onto. I think it would be smarter to drill and countersink, then cut them off the strip. If there's another time I'll know better. I learn best the hard way...

The screws are 1/4-20. That was the best I could find at the borg. There's an excellent hardware store a few miles away, but traffic to get there and back kills the deal. That is probably where I will end up going in order to get the nuts however (I appreciate the input on the flanged ones with the serrated surface--that is a good point). I just have to have the right window of opportunity.

The buss plate is an interesting piece. I will get you some more details on that, but I will probably open another thread for that. I am planning on putting a bunch of those empty slots in the PDC to work for me. If I can get away without adding yet another fuse box I will be a happy camper. We'll see if I get time to work on that tomorrow.
 
At least by using 1/4"-20 for the other screw, you can't mix up the nuts!

However, I will definitely suggest a flat washer, in addition to the flanged nut. Just as insurance....

(And yes, it's much easier to drill/c'sink the plate before you cut it. Cheap lesson harshly learned - it took me three pieces flying away before I figured that out, a long time ago... ;) )

And, thanks in advance for the details on that Buss - I've long been curious. But, as you said, "right window of opportunity..."

If you're going to do a lot of fabrication-type stuff, you may want to get a catalogue from MSC Direct. It's about as thick as a New York City phone book, and free for the askin' (and, if you can't find it in there, you're probably going to have to make it...)
 
(And yes, it's much easier to drill/c'sink the plate before you cut it. Cheap lesson harshly learned - it took me three pieces flying away before I figured that out, a long time ago... ;) )

The worst part is, I swear I have learned that lesson before...and forgotten it. :helpme:

I will look into that catalog. The Bride will just be pleased as punch to see me add yet another phone-book thick catalog on the pile...

"I don't know how they found me..."

:dunno:
 
The worst part is, I swear I have learned that lesson before...and forgotten it. :helpme:

I will look into that catalog. The Bride will just be pleased as punch to see me add yet another phone-book thick catalog on the pile...

"I don't know how they found me..."

:dunno:

When I got my first XJ (1987/6-242/AW4/NP231/D30/D35,) I knew I'd not seen the transmission used before.

I went to the breaker's and bought one, as a core, so I could tear it to bits and see what made it tick.

Caught Hell from the handbrake for it...

Tore it to bits, inspected it, and realised there wasn't anything really wrong with it - so I got a gasket kit (something like $75,) and put it back together, then stuck it under the bench.

Caught Hell for that.

We got her first XJ (1989 Limited/6-242/AW4/NP242/D30/D35) about six months later.

Apparently, they'd run the factory fill in the transmission and changed it just before they sold it to us - the fluid, as I recall, was newish, but showed just a bit of wear.

About six months after that, she limped home from running errands one Saturday to tell me her truck was "driving funny - like it wasn't shifting properly or holding a gear." (She at least gives me more information than "It's broken."

I confirmed it was the transmission that night. Got up in the morning (Sunday,) pulled the spare out from under the workbench, and got to work.

By Sunday lunch the transmission had been swapped. I was clearing everything up and rechecking the fill after a test drive when she came out. I told her everything was sorted, she asked me how.

"Remember that transmission you were on about that I had under the workbench?"
"Yeah?"
"It's in your truck now, and working fine."
"I'm not going to (complain) about you having spare parts anymore..."

Whenever she slips, I remind her of that - she clams back up.
 
"Handbrake"

I love it. Boy can that fit. And it's largely a good thing too.

That's a great story.

I catch grief for my accumulations of stuff, but The Bride also sees when those things come in useful, so she tempers it a bit. Probably the best save for her sake was a 'Vette OEM CD player I picked up a swapmeet.

"Will it fit one of our vehicles?"

"I'm not sure."

"Well, what did you bring it home for?"

"It might be useful."

Raised eyebrows and "the look".

Within a year her CD player lost functionality on one of the buttons on the faceplate. I was able to fix it by swapping the faceplate from the 'Vette unit. Had to move around some wires, but it looked identical. Chassis was different so I couldn't swap the whole thing, but you would never know things weren't still original.

I've not saved a tranny overhaul all in one swell foop, but there have been plenty of "aren't you glad I saved that thing?" moments.

I don't catch nearly as much grief as I probably deserve. But she does keep me from turning the whole house into a shop.

BTW, that Power Distribution Box has been torn apart. Thread is down a bit. Buss plate is copper, figure 0.030" thick, but doubled over on the bottom. Any input you may have on the ratings of the OEM relays would be much appreciated.
 
Back
Top