• Welcome to the new NAXJA Forum! If your password does not work, please use "Forgot your password?" link on the log-in page. Please feel free to reach out to [email protected] if we can provide any assistance.

complete '91 doorless mod with power windows and locks

ehall

NAXJA Member
NAXJA Member
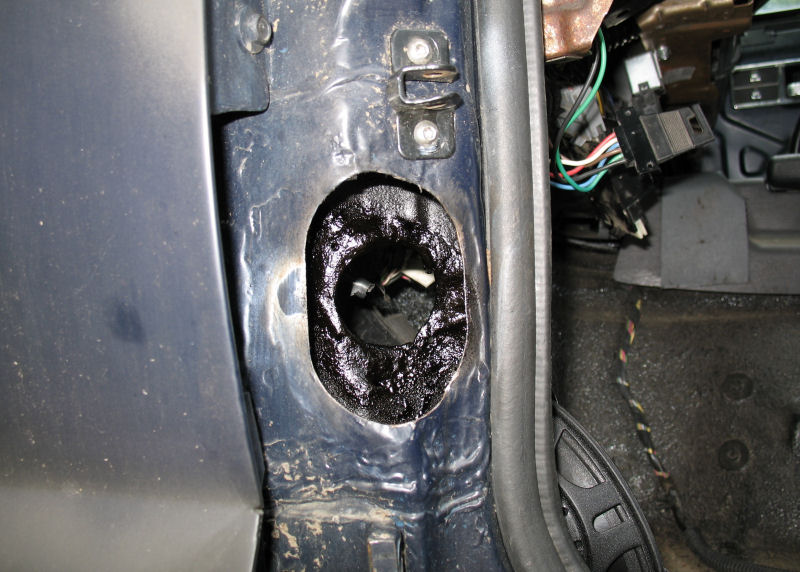
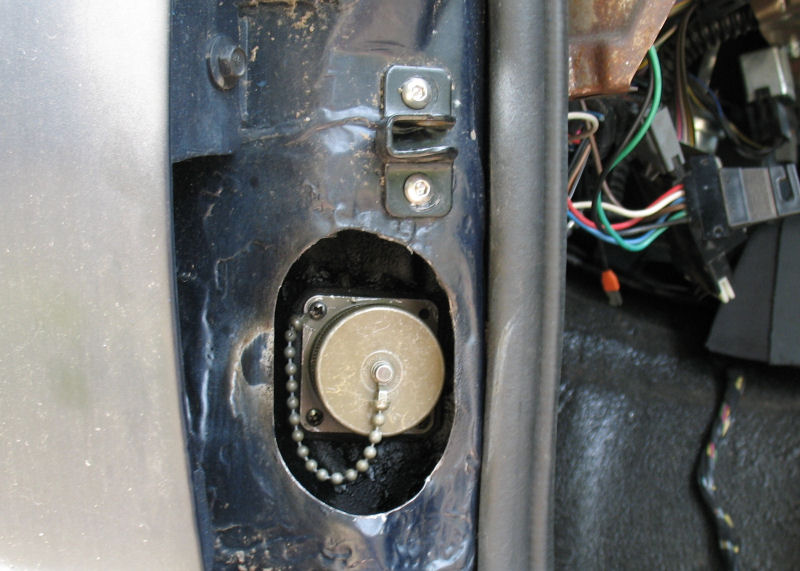
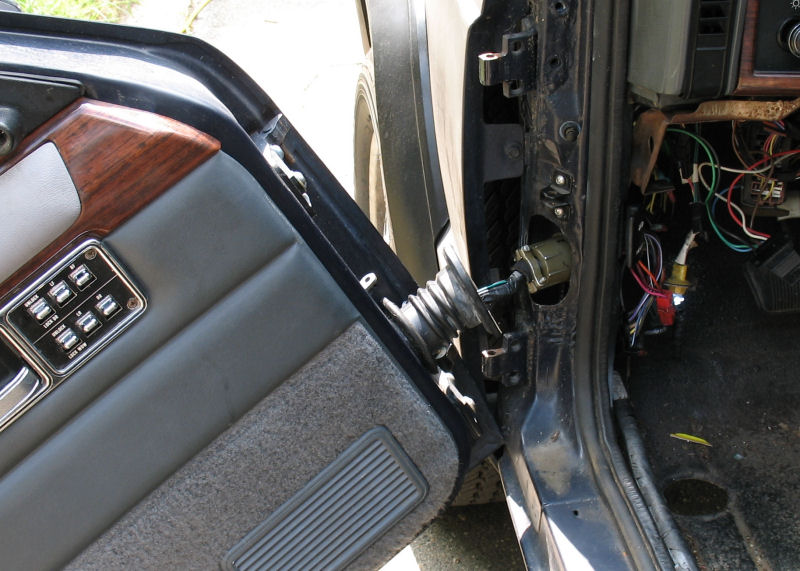
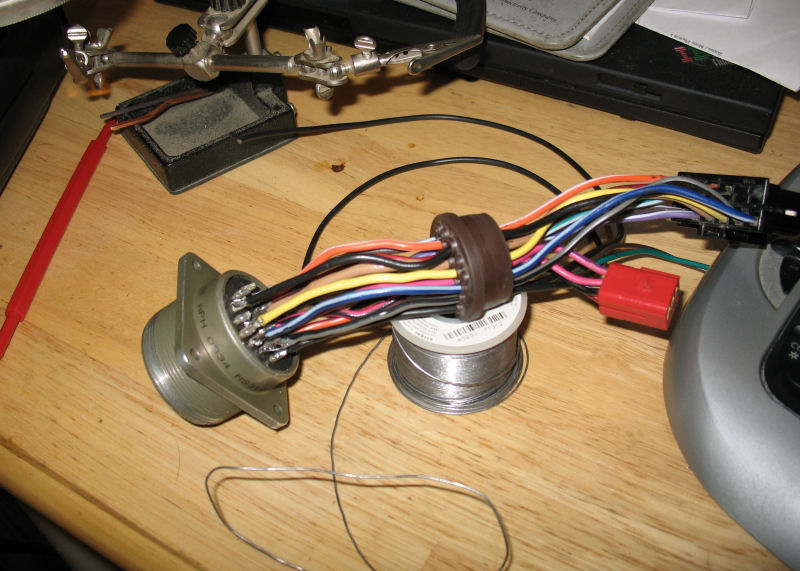
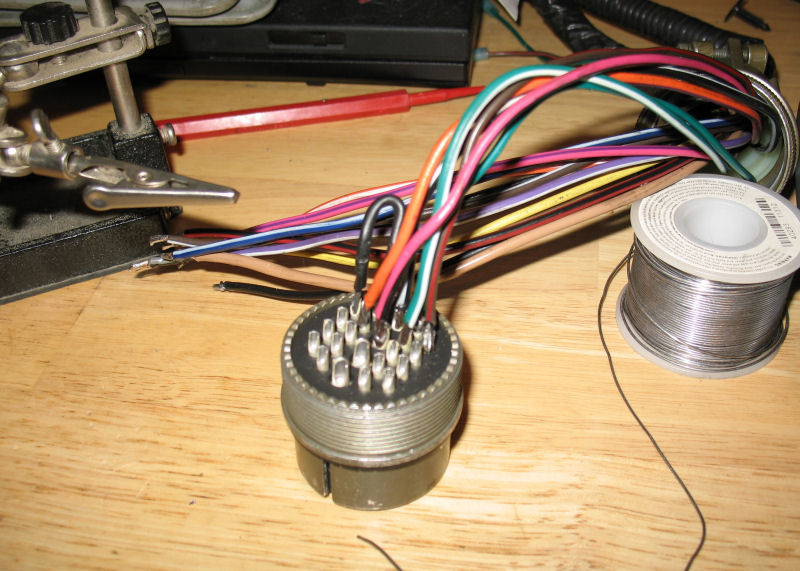
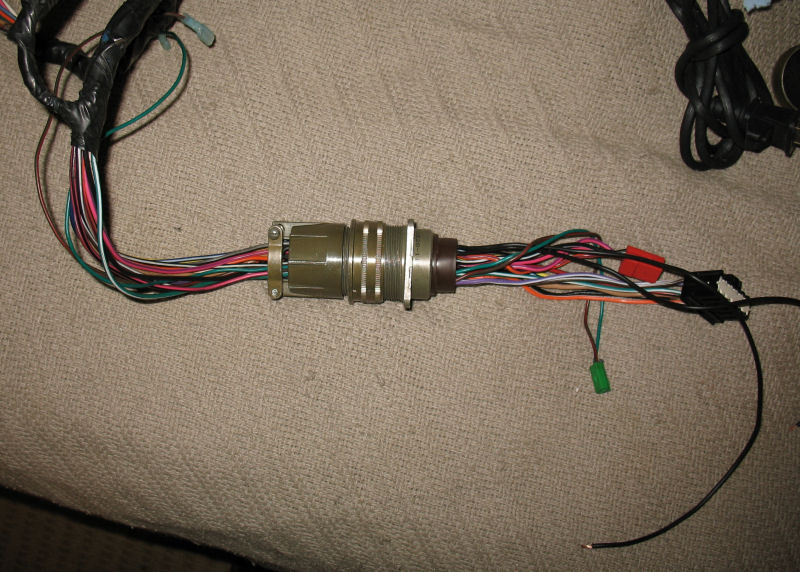
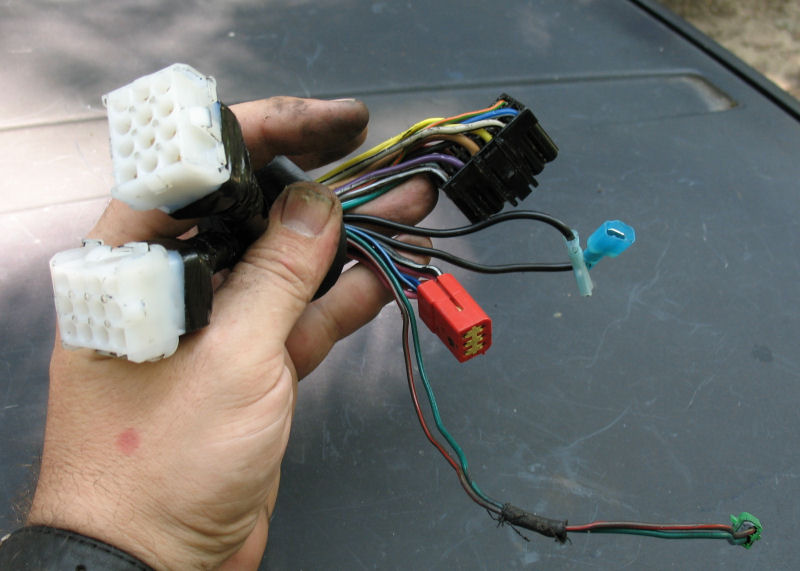
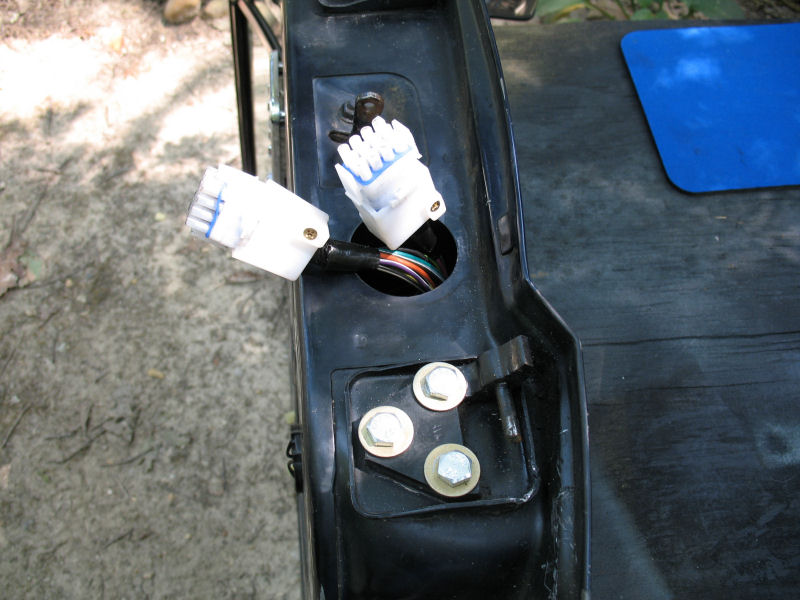
I wanted to make the doors removable for trail runs and nice weather, but I wanted to do it right, and I have power windows and locks which seems to have been a problem for other people in the past. Basically my goals for this were as follows:

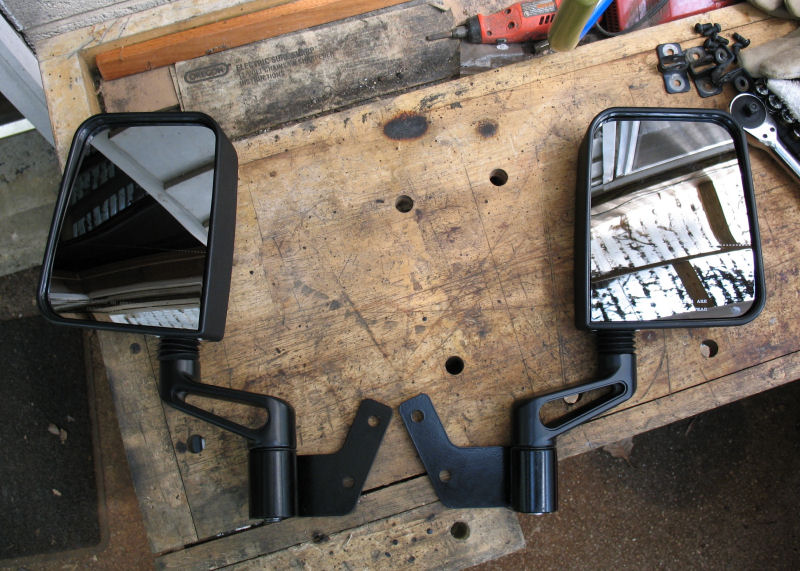
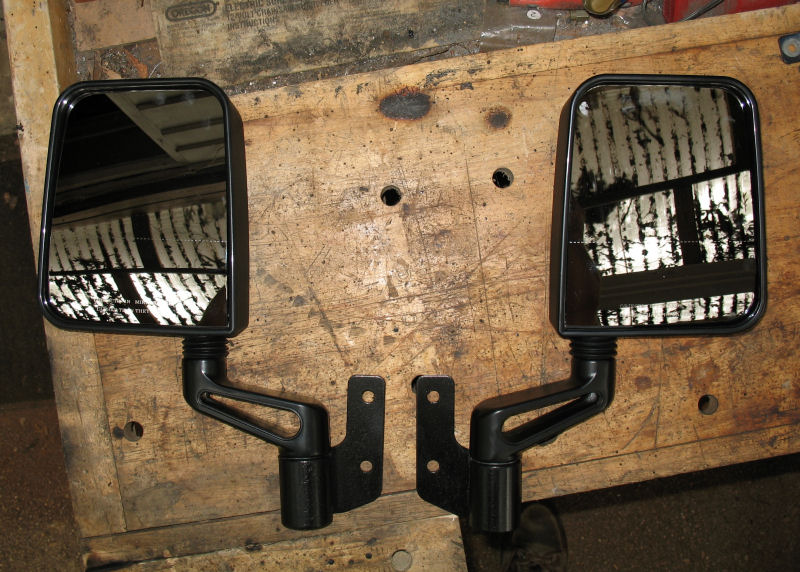
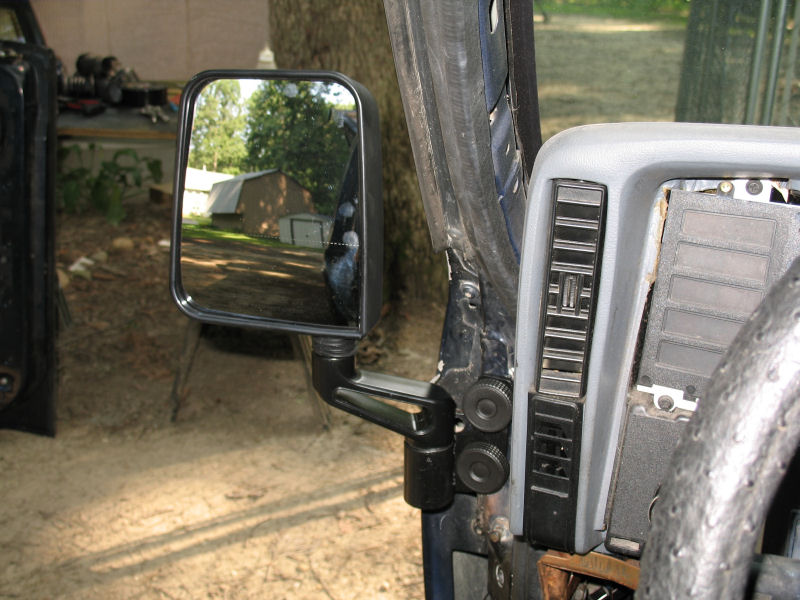
1) Keep it street legal, with mirrors on both sides.

2) Make the doors easily removable, with nothing but a flat-head screwdriver, and not having to remove any interior trim.

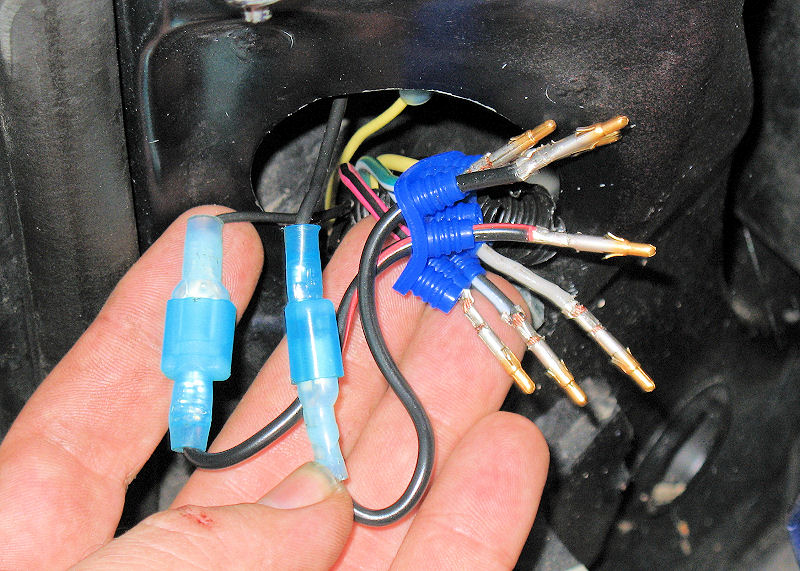
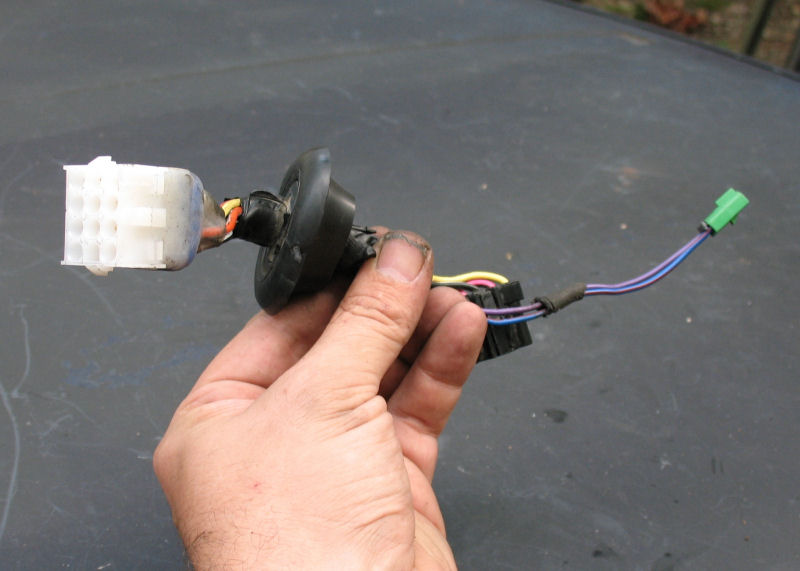
3) Make the doors fully functional when they are installed, IE make the power windows and locks still work.

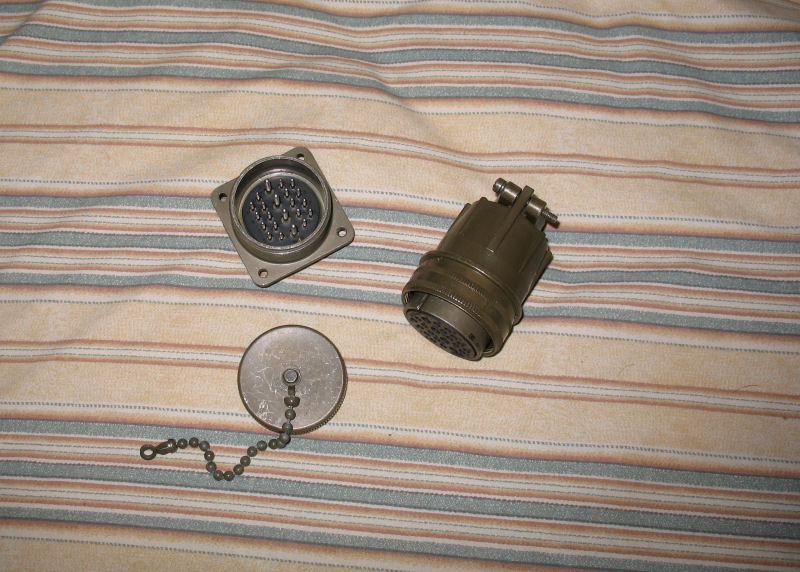
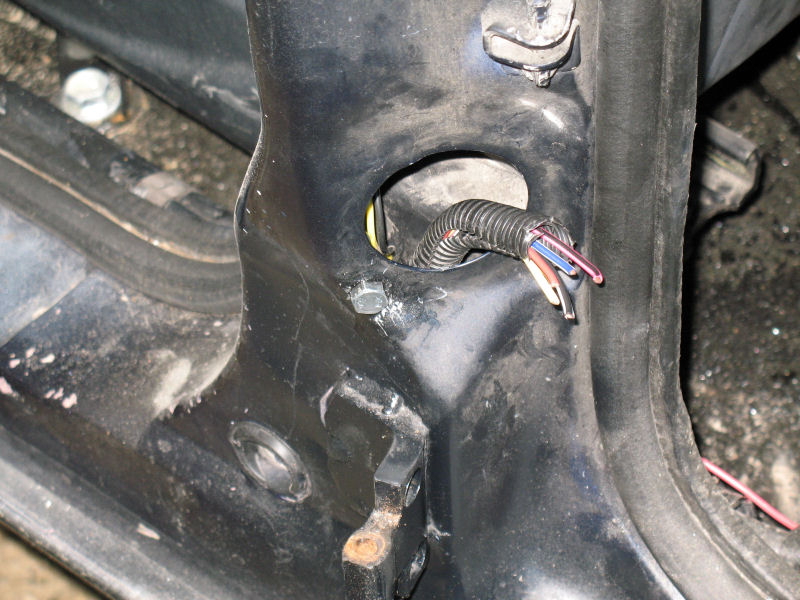
4) Bypass the door jamb switches so that the lights and buzzers don't sound when the doors are off.

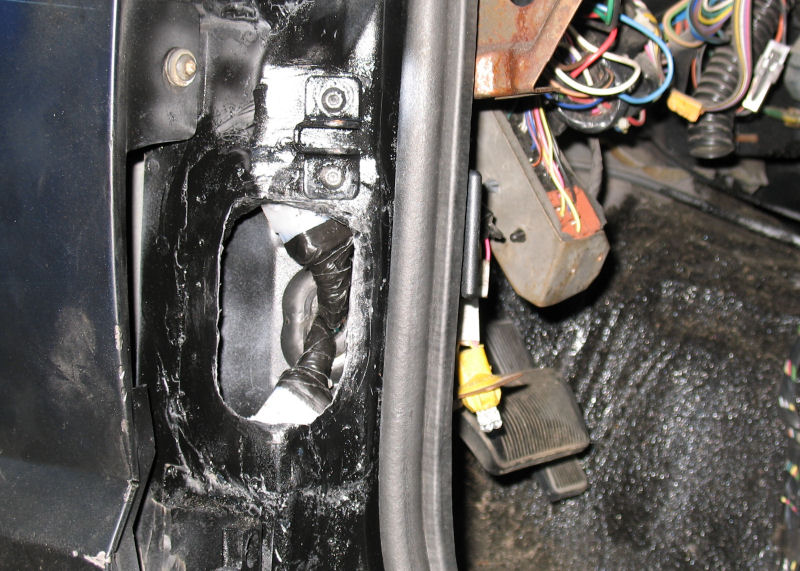
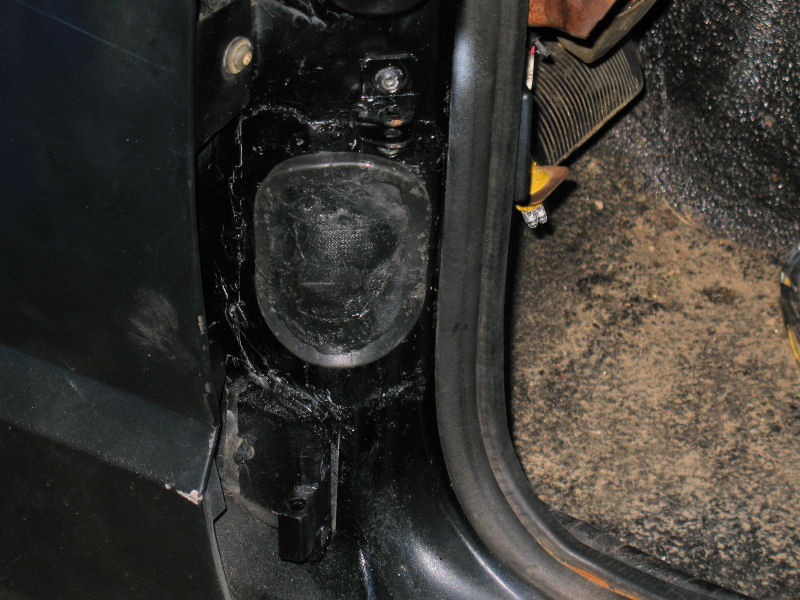
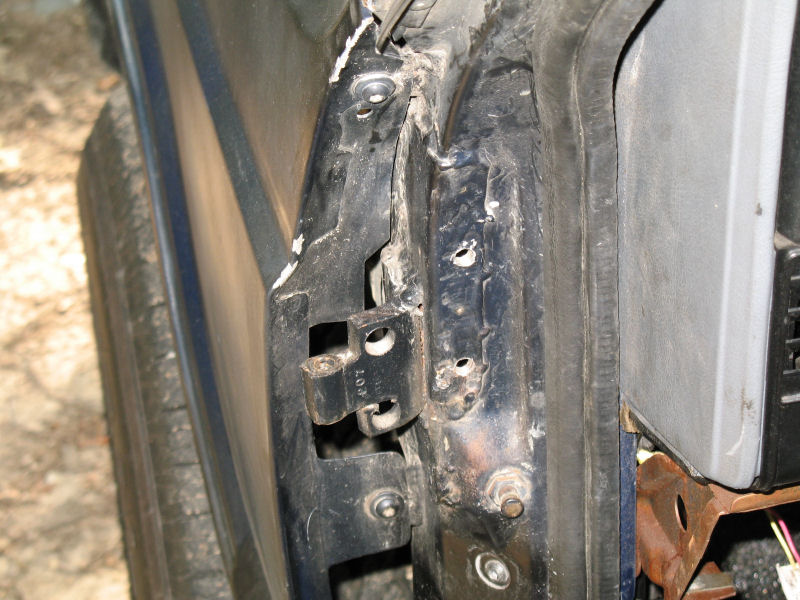
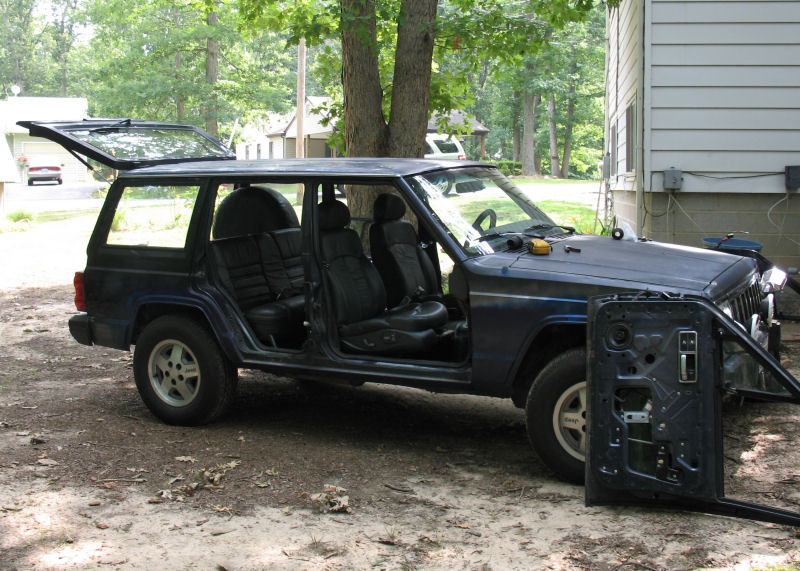
After a couple of months of working on this, I finally got it finished today. Here's a couple of shots of the thing with the doors off:

Doorless.jpg


Doorless_Passenger_View.jpg


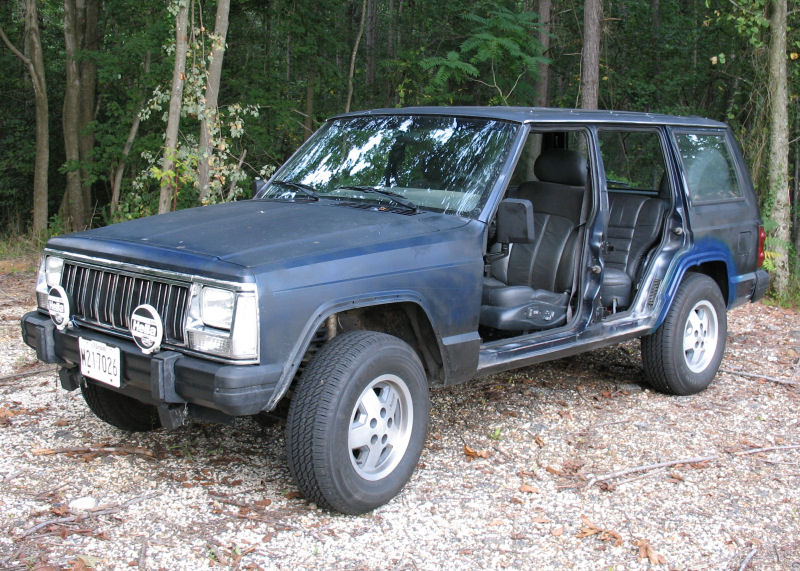
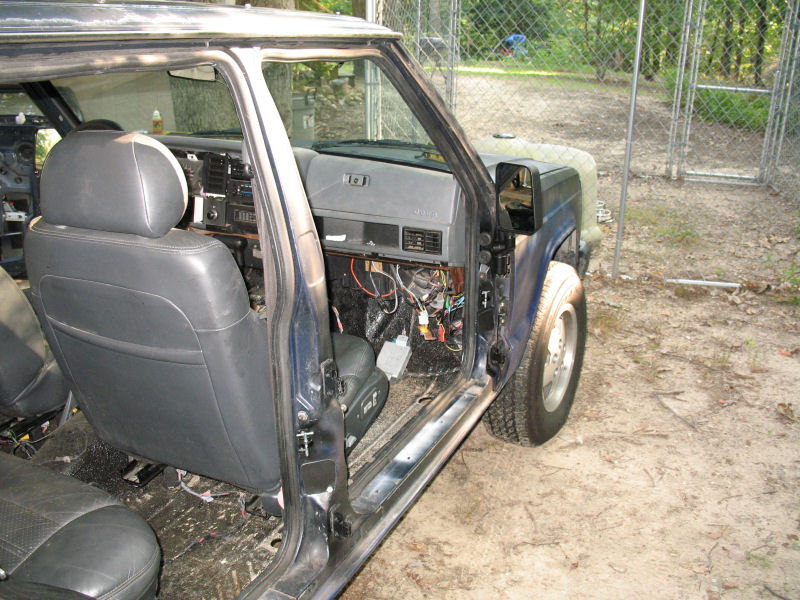
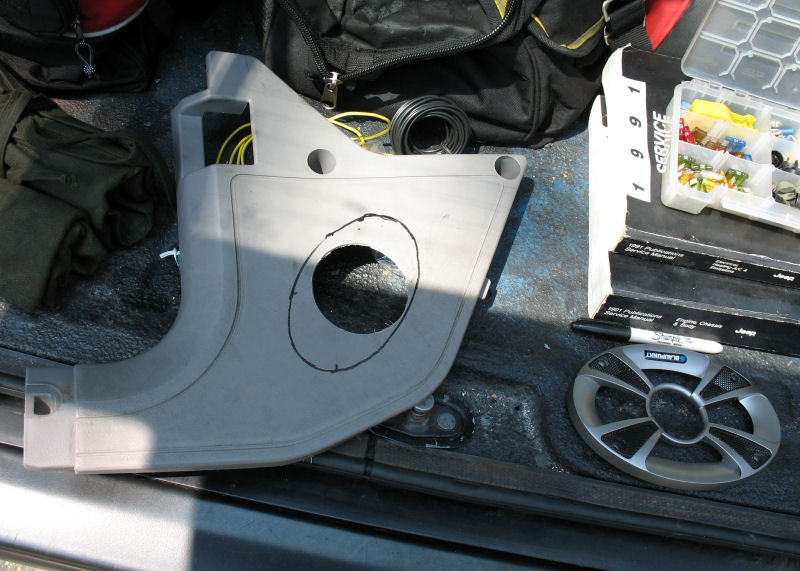
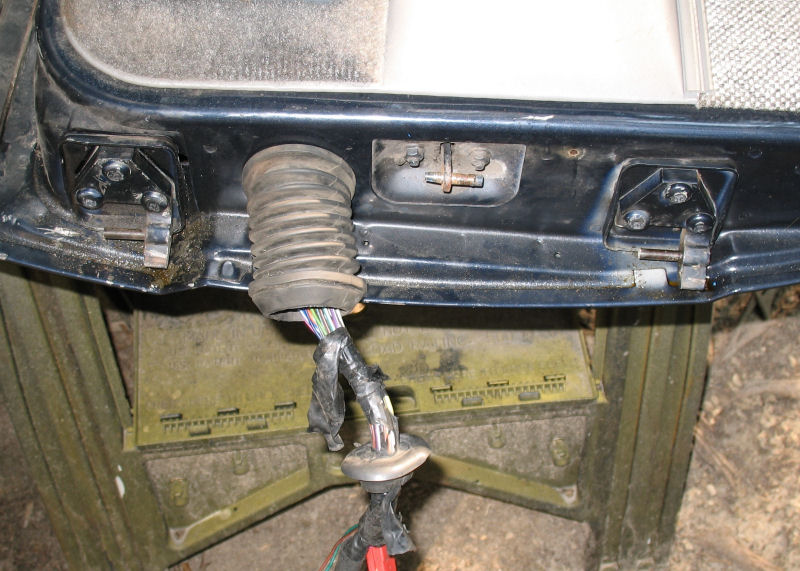
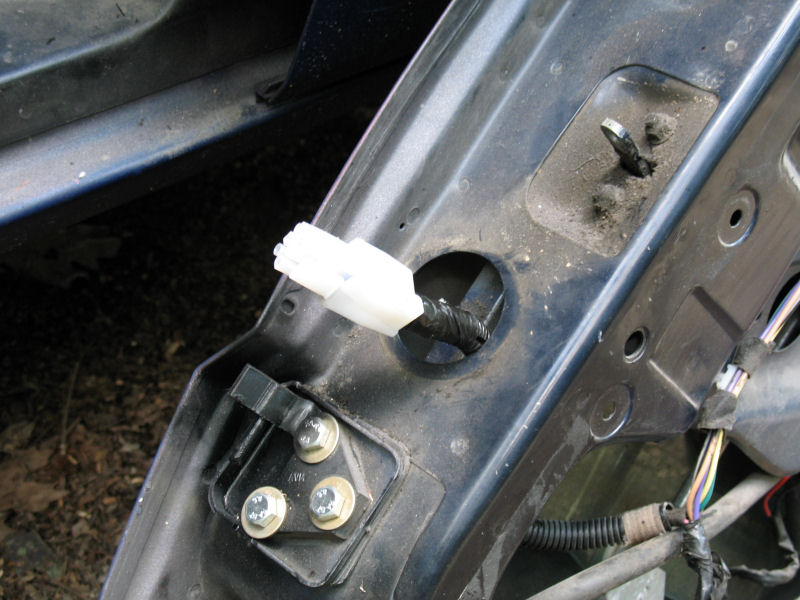
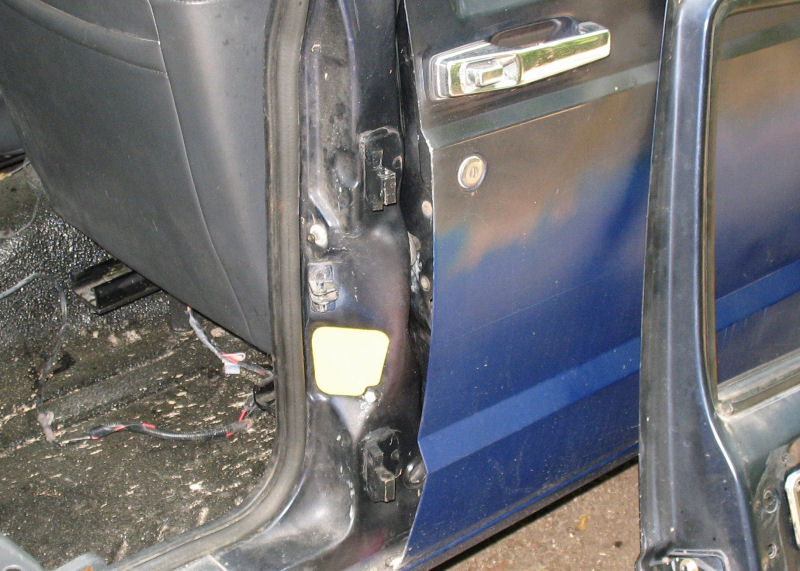
You can see from the above pics that it has legal mirrors, there's no wiring exposed in the door posts, and the interior lights are off.

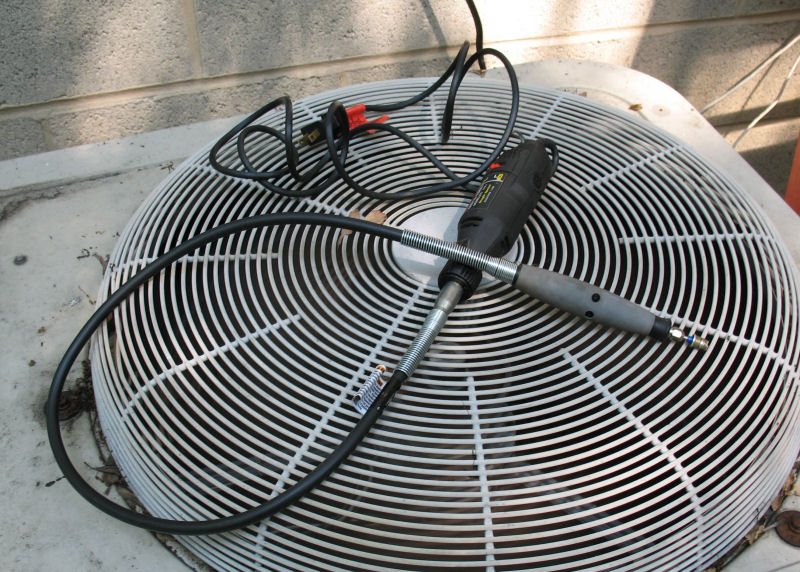
First, the tools I used included a Dremel with an extender, a couple packs of the white oversized Dremel bits, a set of cold chisels, basic hand tools, tin shears, and wire crimpers. Here is a pic of the Dremel extender if you've never seen one:

Dremel_Extender.jpg


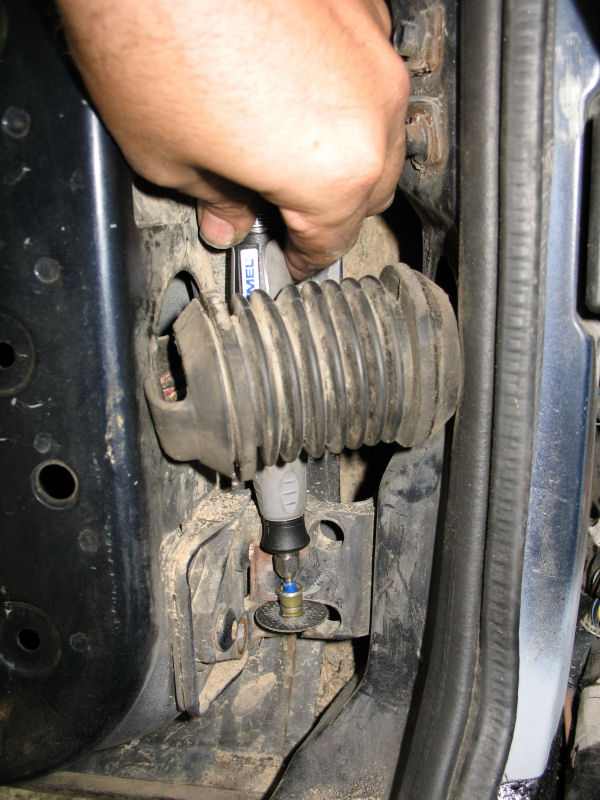
The first step is cutting the hinges. The other writeups on this talk about pounding out the pin, but on my old doors the pins were pretty much frozen into place and would not budge. So I used the Dremel to cut the bottom ear off the hinge, and then cut through the pin so that the ear would fall to the ground.

First_Cut.jpg


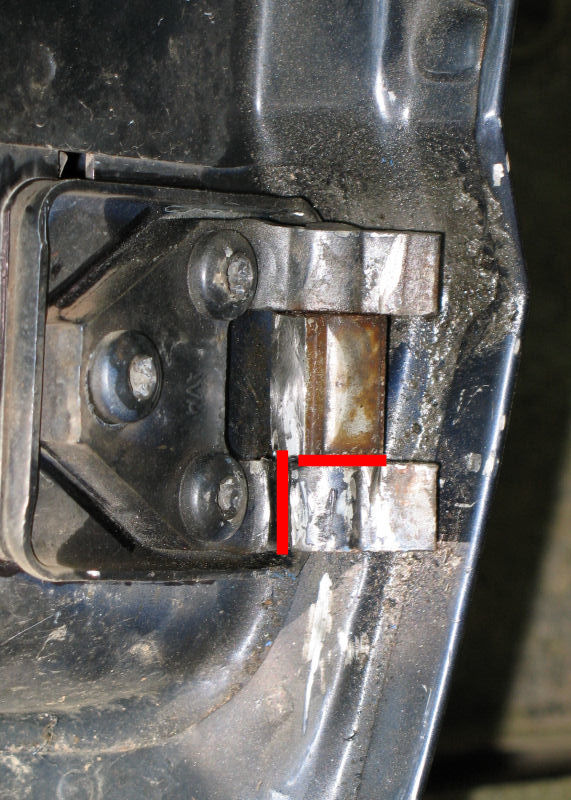
The Dremel extender and the large cut-off wheels make this workable, but it's a tight fit.

Dremel_In_Action.jpg


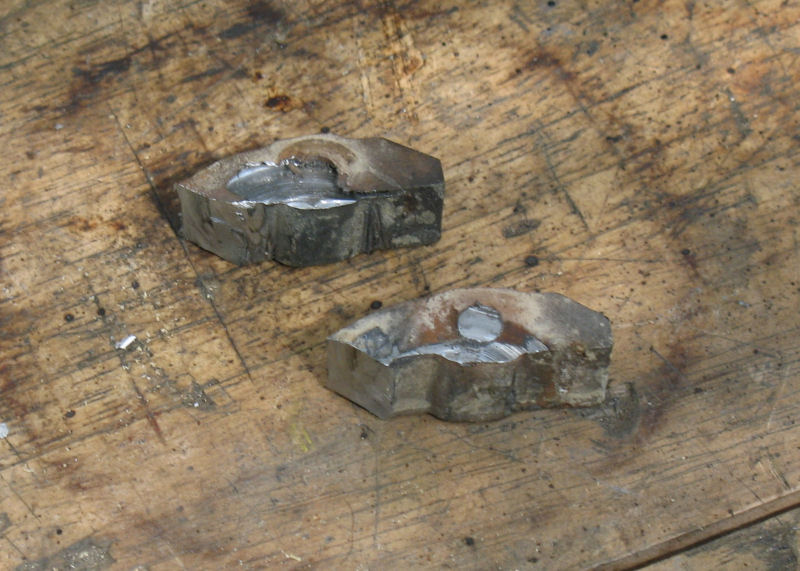
The ears after the Van Gogh treatment:

Chopped_Hinges.jpg


I am victorious:

All_Cuts.jpg


All_Doors_Off.jpg


After the doors were off I tried pressing the hinge pins again but they wouldn't freakin budge, so I welded the tops of the pins and locked them into place. I also ground down the tips so they are domed, drilled out the insulating sleeve from the hinge itself, and used a larger bit to give a little "cup" to the top of the hinge so that it's easier to drop the doors into place.

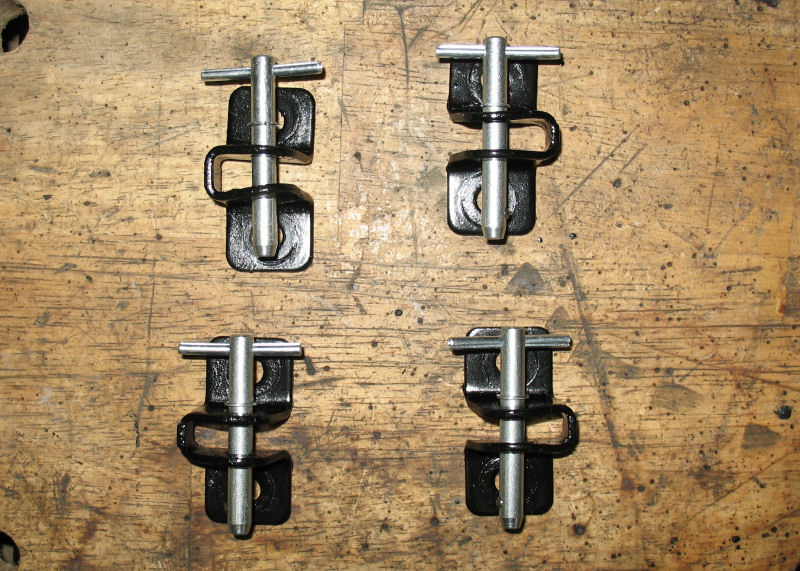
Team Cherokee sells factory hinges, so I may still buy a set of those and replace the pins with some quick-release pins. It works fine the way it is, but it's a little difficult getting both pins lined up, and it would be easier if only pin was "fixed" and the other could be just pushed into place.
 
Next I had to start dealing with the door wiring. I wanted the doors to be easily removable, for everything to work cleanly, and for the wiring to be protected. As such, I basically needed to cut the wires at the pillars, install some connectors at the cut, and then I could connect and disconnect as needed.

After thinking about it for a while, I decided to buy the AMP Mate-N-Lok connectors, which have waterproof seals on the connectors, support 14 gauge wiring (I've used it successfully with 12 gauge), lock and unlocking with finger pressure (no screwdriver tab), and come in the pin-counts that I need (mostly). The only real downside is that they are kind of bulky, but I was able to mostly work around that. Here is a link to the PDF catalog (PDF).

The wiring on the front doors has rubber booties that go through the A-pillars and create a waterproof seal, and this also keeps the chassis wiring locked into position so that it won't fall inside when the doors are removed. However, the rear doors just have the wires coming up the B-pillars and flopping out. In order to keep the rear door wiring from falling back down into the B-pillar, I used some of the rubberized loops from the hardware store, drilled a hole in the pillar, and clamped the harness in place:

Rubber_Wire_Clamps.jpg


Rear_Door_Wires_Clamped.jpg


While I was messing with that I noticed that the jamb switch wiring ran next to the door harness in the B-pillar. The way that the interior lighting is setup, each jamb switch is on its own circuit, and feeds into circuits for the interior lighting (the drivers door has a second "hot" lead for the door ajar buzzer). When the door is closed, the switch is depressed, which opens the circuit and turns the lights off. Open the door and the switch extends, which causes the circuit to close and the lights to come on. Thus, the easiest way to disable the lights for a door is to permanently open the circuit, then the jamb switch can extend and it won't matter because the circuit is still open.

What I did is cut the ground wire on the jamb switch wiring, install some quick disconnects on the wiring, and then extend the wiring through the Mate-N-Lok connector with a little loop on the door side of the connector. Thus, when the door is hooked up, the circuit is complete and the jamb switch works as expected, but when the door is disconnected the circuit is interrupted at the connector. You can kind of see what I mean with this picture, which shows the door wiring and the jamb ground wire connected into the switch--the other side of the connector (inside the door) has a little loop that bridges the jamb ground.

Jamb_Wiring_Spliced.jpg


Here's a pic of the rear door connector (I forgot to take pic of the jamb ground loop)

Rear_Door_Connector_Pigtail.jpg


This approach worked for all of the doors. Even though the front doors don't have the jamb wiring in the A-pillar with the door harness, the wires are pretty close, so I just used quick-disconnects and extended the wiring through the connectors.

One thing about this approach is that it adds two wires to each connector. This means that I needed 9-pin connectors for the rear doors (seven wires total), while the passenger front needed a 12-pin connector (twelve wires), and the driver's door needed two 12-pin connectors (22 actual wires).

Here's the front passenger wire harness

Passenger_Door_Wire_Plug.jpg


The driver door harness, which uses two connectors

Drivers_Door_Wire_Plug.jpg


And the driver's door

Drivers_Door_Wires.jpg
 
My plan with cutting the wires at the pillar was to be able to push the connector into the pillar so that it wouldn't get loaded with mud and water. However having a big hole in the pillar still provides a nice big opening for mud and water, so I needed something that would be able to block that off. What I did here was get some car magent scrap from a local sign maker, and bought some cheap neoprene mousepads from Staples. Then I cut the magnets to size, cut the mousepads into discs and glued the discs to the magnets.

Neoprene_With_Magnets.jpg


Here are pics of the rear door, with the connector hanging out, the connector tucked up into the pillar, and the hole covered up by the magent/neoprene.

Rear_Door_Connector_Exposed.jpg


Rear_Door_Connector_Tucked.jpg


Rear_Door_Connector_Covered.jpg


This works for all of the doors except the drivers door. It's really simple, and seems pretty effective at keeping the splashes out. I've since painted the magnets black, so they don't really stand out anymore either (you can see the magnets in the 2nd pic in the 1st post if you look for them).

The drivers side was much more of a challenge. Since I have two connectors coming out the door, the factory rubber bootie won't fit over the wires anymore (it fits over the one 12-pin connector on the front passenger door, but that is tight already). In order to be able to protect the wires when the doors are on, I needed something for the drivers door that would work with the double connectors. Interestingly, the best thing I found for this was the bootie on a Grand Cherokee, which is actually two booties in one mold--a small piece that goes between the door and the A-pillar, and a large bootie that goes through the inside of the A-pillar itself. Here is a pic showing the GC bootie next to the XJ bootie.

Dodge_Wiring_Bootie.jpg


Since I needed to use the large part of the bootie, I also needed to enlarge the hole in the A-pillar. I messed up here and had to do some repair work--first I discovered that part of the A-pillar is doubled up and there are spot welds holding the sheet metal together, and once I got the metal ground down, re-welded and cleaned up, I noticed that I'd roughed the hole too large. So I formed a patch from some scrap sheet metal, welded it over the hole, and used silicon adhesive to seal the seams. It should clean up with bondo and paint :)

Drivers_Door_Patch.jpg


For the other side of the bootie, I got smart and felt around the hole in the door, and noticed that the sheet metal was also doubled up. So for that side, I just cut a flange end off the XJ bootie, and glued it to small flange on the GC bootie. Since I don't have to worry about plugs going into the door, this works okay there.

In order to make a temporary seal for when the doors are off, I got another GC bootie and cut off just the large flange, cut more neoprene to fill the hole in the center, and glued it all up.

Drivers_Door_Connector_Covered.jpg


If I were doing this again, I'd try to find some other solution to this problem. I looked at using motherboard style power connectors (24 pins) and running them at an angle, but they max out at 16 gauge, and one of the power window wires in the drivers door is a 12 gauge master power wire that feeds all four window motors. I also bought a military-spec circular Amphenol connector with four 10-gauge pins and 18 16-gauge pins, which would work okay for the demands, but it was too large for the A-pillar and would not go into the door. What I ended up with works, but I am sure there is a better solution out there.
 
There are a lot of options out there for mirrors. Most people seem to use motorcycle mirrors mounted in the hinges, but I wanted something that would look clean and would not take much effort to install and remove. Eventually I decided to install some YJ mirrors that were available from Team Wrangler, along with some Skid Row mirror relocation brackets. Here is a pic of the mirrors and brackets as they came in the mail:

YJ_Mirrors_and_Relocation_Brackets.jpg


The first obvious thing was that the brackets would have to be modified to work on the XJ. I decided to install them on the A-pillars, just above the hinges, so I had to cut the tube off the bracket and weld them back together at a 90* angle. Here's a pic showing the mirrors and brackets reassembled after the bracket modifications:

YJ_Mirrors_and_Modified_Brackets.jpg


Next I drilled and tapped a couple of holes in each A-pillar. On the drivers side there is a reinforcing plate welded to the body, so the metal is plenty thick. The passengers side uses doubled-up sheet metal with spot welds, and is not as thick, but the taps seem to be holding. I have some nutserts, and may install those after some more testing.

YJ_Mirror_Bracket_Holes.jpg


Here's a pic of the driver's side mirror installed. It goes on and off with the two large thumbscrews, so no tools are needed to mount or remove the mirror. Since the brackets are beside the hinges, the arms have plenty of clearance, and I have plenty of adjustability.

YJ_Mirror_Mounted_Inside.jpg


Finally the last step was to modify the door checks, so that they could still be used whenever the doors were installed, but could be removed easily without me having to hunt down a pair of channel-lock pliers. What I came up with here was to use some .25" diameter quick-release pins with a 1" long shaft, which is long enough to go all the way in, but does not get caught up on the door.

Door_Check_Quick_Pins.jpg


I also replaced the bolts with button-head screws, so pulling and inserting the pin is really simple with no hangups. The only thing I would change about this is that I would use some .6" pins--the 1" is not too long but it is pushing it, and the clip is only .5" top to bottom. McMaster-Carr sells the .6" pins in stainless and zinc, so I will order some of those and try them later.

Here is the pic of the passenger door again. You can see the pins, the magnet/foam, and the mirrors there.

Doorless_Passenger_View.jpg


Overall I'm very pleased with this setup. I can remove all four doors in five minutes or less, and only have to "install" the mirrors and magnets which only requires flicking my wrist. When the doors are installed it all looks and works pretty much factory. I am only bummed about the problems I made for myself when trying to use the GC wiring bootie on the driver's door.
 
Last edited:
Cool idea on the pins. Going to take my beaten doors and half door them along with the hinge mod. Make them my "trail doors". Was wondering about the door stops.
 
ehall said:
Door_Check_Quick_Pins.jpg


The only thing I would change about this is that I would use some .6" pins--the 1" is not too long but it is pushing it, and the clip is only .5" top to bottom. McMaster-Carr sells the .6" pins in stainless and zinc, so I will order some of those and try them later.
I ordered a set of 4 and the .6" pins work fine and are easier to pull
 
update... The pair of Mate-N-Lok connectors for the drivers door has proven to be more annoying that I like, so I figured I would try the big-ass Amphenol 18-11 connector that I'd already bought. This is a milspec connector that has four 12-gauge pins and 18 18-gauge pins. Since they are milspec they are crazy expensive, but they are also nice and durable. I also bought the cap for when the doors are off

Amphenol_28_11_Connector.jpg


Soldering up the wires was a pain... Basically I put the power window and lock motor wires on the four 12-gauge pins and then spread the others out as they made sense. I have four unused pins left. The socket mounts to the A-frame in the stock location, so I put the rubber pin protectors on that side to prevent shorts and moisture in the kick panel.

In the default setup this won't fit in the A-pillar since the default hole is oblong to match the rubber plug on the factory door harness. In order to fit this through the A-pillar, I had to drill out the hole. I used a 1.75" hole saw which was good size, and then sprayed everything down with primer and underbody sealant.

Drivers_Door_Enlarged_Hole.jpg


To improve the seal, I used some more of my scrap neoprene mousepad material to make about 1/4" of gasket for the back of the plug, then used #6 machine screws and lock nuts to attach the plug to the A-pillar. As you can see the plug is a little to the side but I was able to adjust the angle with a piece of oak and a hand sledge.

Amphenol_Socket_Mounted.jpg


The outer hole in the A-pillar is kind of small but it's possible to get my fat fingers on IF the door is not on the hinges. Luckily the wires are plenty long so there is no problem attaching the connector while the door is nearby and then lifting the door into place afterwards

Amphenol_Connected_In_Door.jpg


So far I'd say this is better than the Mate-N-Lok because those were really crammed in and this actually has more work room. However I have not really done to much with this yet so it's too early to tell.
 
Pictures after 2nd para didn't make it in the last post

This half mounts to the A-pillar. You can see the rubber protector boot at the back, which goes through the A-pillar and into the kick panel.

Amphenol_Socket_Wired.jpg


Here is the half that goes in the door. The little black wire loop is the ground loop for the jamb switch

Amphenol_Plug_Wired.jpg


That took the better part of a day to solder up.

Amphenol_Connected.jpg


After it was installed and tested I went back and taped over the wires and used some of the scrap neoprene for a sleeve on the strain relief.

BTW I bought the parts from Newark (#96J8198 and #33K9869) for $107 and that was cheap :dunce: :looser:
 
Last edited:
Thanks for the link from the other thread... great writeup, I especially like the info on the ground loop to disable the jamb switches. Also, you can get right angle milspec connectors like this - I'm not sure if they'd fit, but they'd fit better and require less backspacing. You can probably go a little undersize on the connectors (i.e. use smaller ones that are not rated for as much current as they will be carrying) as the window/lock motors aren't used very often and they won't be interrupting current, just carrying it. I think Mouser has many of the same connectors and they had the best price I could find - Digi-Key was a ripoff, I seem to recall Allied and Newark being slightly lower but not the best, and Mouser was literally half Digi-Key's price, at least on the 24-7S (and mate) layout connectors, which I used on my last project.

EDIT: nominating for sticky, this is the best removable doors howto I've seen yet
 
Great write up with a lot of innovative solutions. Good to see you weren't afraid to post up on the errors too. That will save a lot of folks big headaches.

Strongly suggest that if you wheel in terrain where body damage is possible that you get a set of tube doors or make some XJ half doors. Taking a hit on the B pillar or C pillar will mess things up so bad that the doors wont go on again without a lot of painful body work.

John
 
IF you read this soon.. What are the power wires and windows also, I have a set of power doors that I am trying to disassemble and need to get the window down so I can remove the vent window. Any other suggestions would be great also.

Awesome write-up, I've thought about doing something similar, but do not really ahve a lot of time or need right now.
 
Amazing idea :doh: i will be doing this next week i was going to just use a huge male / female connector but now all i need is a nice small one for my windows

im making half doors out of an old xj i got off a friend cant wait

4x6_kick_speakers_marked.jpg
 
Last edited:
great write-up! I hate unplugging all the wires when I take the doors off, and hate it more trying to hook them back up!
 
Last edited:
i hope you realize that you legally need something next to you.. such as tube doors... and the mirrors on the side, you dont need... as an inspector, all you need is 1 working mirror to the rear. as long as your hatch has tinting above 20%, or nothing is in the path of your center mirror such as a tire carrier, you dont need side mirrors.

in fact. off topic from that, you dont legally need a windshield to pass inspection.
 
Back
Top