for some pics of a jeep floor with no carpet go here
http://www.allpar.com/SUVs/jeep/cherokee-floor.html
keep in mind that the pics from the above website are for a late model XJ.
Mine is a 97, and have a frame support bar for the front on the seat to rest on, this receives your front bolts for your front seat.
If you have a recent version of the XJ heres what you will find below
step 1, remove seats.
the back seat is cake, there are two arms that pivot against the sides of your floor board. You will notice one end has a release latch, unrelease it off the post and the opposite side will flex to allow its post out of the hole.
the front seats have 3 bolts and 1 nut each. There will be a threaded bolt post sticking up from the floor on one of these 4. Do not bend or damage it.
remove the seats by adjusting the seats all the way forward with the lever under the seat front. Tip the seat out the door and pull out. Mind you that the driver seat on my year has a small electrical connection on a wiring harness, be sure to disco this so you dont rip it out.
Step 2 rip out carpet.
The carpet is easy to pull. Take a sharp razor knife, slice right down the middle down to the steel. Dont be shy, slice it up :explosion. Get a hold of the edge and pull it out. You will notice a thick layer of recycled insulation under the carpet that will shred. Make more cuts into the carpet to remove hard to get spots. Under any console or side trim it should pull away easily if you have sliced it. I dont recommend removing the center console because its a pain. You can remove the side trim if you want, but its not critical. The center console will have a gap where the carpet used to be, and you may want to shore it up to reinforce it if a small amount of wiggle bothers you. I left it, I never paid any mind to it, ill probably reinforce it later.
Step 3 clean up floor.
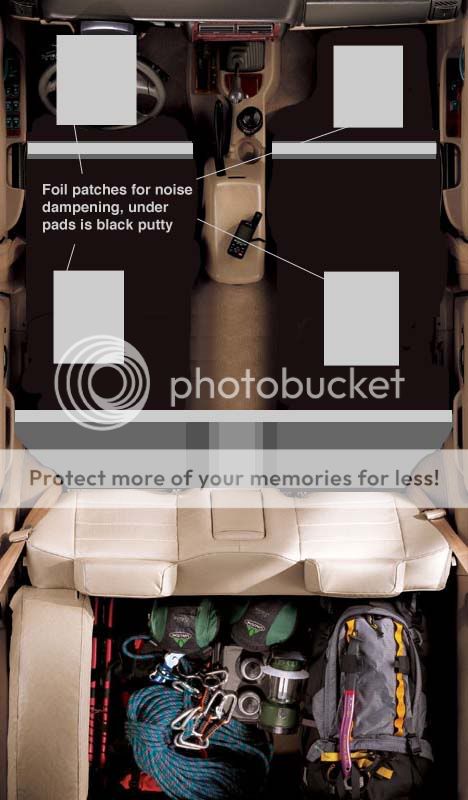
This is the fun part. On the floor you will see foil patches
Remove these carfully so you dont create a nightmare. BE PATIENT they are stubborn. I dont understand why jeep didnt use liek dynamat or somthing.:gonnablow
Take a putty knife an pry at one of the corners untill you can get the black substance to stick to your knife a little. Make sure you can get a clean spot under your knife where you can see the steel floor. Hold the foil onto the knife with your thumb and slowly, using your strength, pull back against the foil. Once you have enough room to grab it with you thumb and forefingers, pull it by hand upward slowly, using your strength. You will hear it pop like silly putty when air is trapped and released while pulling, thats a good thing because its lifting clean. Keep doing this to pull chunks out. You will create clean patches as you remove. Do this untill its almost all gone. Clean the remainder with goo gone, it will thin it out enough to wipe up. Ball up all the tar like putty you pulled and chuck it as hard as you can at your buddies head. :confused1:jester:
Prep your surface and finish with what ever you want. I also came across a rubber dampening pad against the firewall, Just trim it back as far as you want to allow you foot room and to allow you to finish the surface. The rubber plugs come out to allow for water drainage. I leave mine out cause i live in the desert. When your rig gets muddy, WHO CARES!!!, you can stick the damn hose in it and wash it out, sqeegee water to the drain holes, spray on some lemon pinesol or what ever, wipe clean, and your wife will never know you got into some mischief. TEE HEE. I put some rubber mats in mine too, adds a little dampening, comfort and looks a bit nicer.
For the bedlining process, scuff it with a scruffing wheel or sand it with 100 grit, try not to remove too much primer. You goal is to remove the gloss clear coat. You need it to be matte so the paint/bedliner can adhere. DO NOT mix any type of enamel with any type of laquer. In other words dont use spray paint and then spray over it with automotive paint in an air gun. This may differ with sprayon liner in a rattle can and roll on liner because in may be the same stuff. BETTER BE SURE. If you mix, it will look like an acid burn, or the jokers face. My advice, just mask it, use a paint brush with the roll on kit. Dab the corners good, then roll out the middle. Recoat until the texture is uniform.
Closeing remarks, dont over think it, keep it simple, use common sense. READ YOUR CHEMICAL LABELS!!