• Welcome to the new NAXJA Forum! If your password does not work, please use "Forgot your password?" link on the log-in page. Please feel free to reach out to [email protected] if we can provide any assistance.

fabed my own long arms

Status
Not open for further replies.

Pologuy1441

NAXJA Forum User
Location
NorCAL
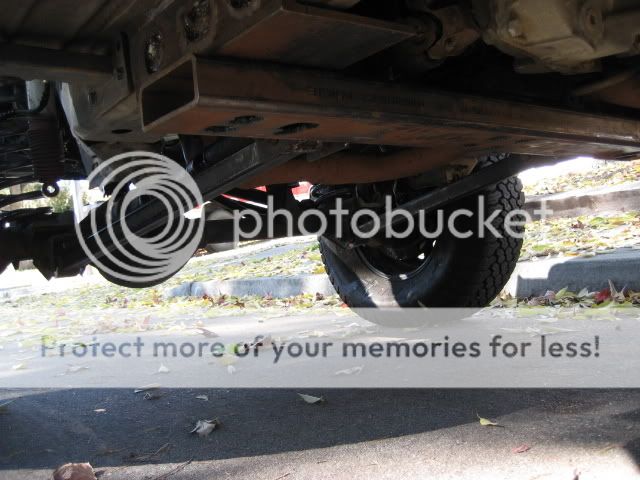
(1) 1/4" thick 2"x5" rectangle 40" long (cross member)$40
(2) 6"x4" angle iron (holds the cross member to the unibody rails) $15 each
(2) 1/4" 1 1/2"x1 1/2" square tubing 32" long (arms) $35
(4) LCA mount tabs free (scrap)
(2) johnny joints $44 each
(2) fixed joints $12 each
(2) rustys adjustable UCAs $150 used

IMG_0005-1.jpg

IMG_0003-2.jpg

IMG_0001-3.jpg
 
So you're running "longarms" but you're retaining the position of the UCA's?

How is the crossmember attached to the angle iron?

How are the arms attached to the crossmember?

How good is your flex?

More pics please.
 
Last edited:
aren't the upper control arms supposed to connect to the longarm
 
tomcat said:
aren't the upper control arms supposed to connect to the longarm

In a radius arm set-up, yes. Rusty's and TnT utilize this design as well.

Now his Is a lil more like RK, except he has 4 links... He might as well drop the passenger side UCA and make it a 3 link.

And he used square tube, unconventional but still effective.
 
BS.. thats Solid Rec Tubing. Same thing I'm using Buckwheat... Works fine. Look it up.. I bet there's 2 dozen folks on here using the same thing. I have been high centered on more than one rock pile on it.

If you think 1/4 wall Rec tubing is dinky, your head is a brick.
 
Its taking precautionary measures.... overkill is better than nothing. He even plug welded it.
 
I agree, it's a great build.

I'd redo the UCA's to mount lower, or remove the pass. side one and go with a 3-link, but it works.

good fab!
 
Ok I will agree that is a bit Ghetto Fab and the welds scare me a bit but I think a little cleanup on that and it could be a decent setup...

1. Remove your old stock lower brackets...
2. Pull it back off.. Reweld Do a Root weld then a coverweld (looks like you are using a 110 welder on 1/4 you need to Root weld that thing)
3. Shape your crossmember a bit (say a 30deg angle so you don't have such a drop on the edge
4. Grind clean
5. Round some corners
6. add some gussets?
7. Remove your passenger UCA
8. paint it :)
 
ZacSquatch said:
overkill is better than nothing. quote]

Agreed. But he should have ran the angle iron from frame rail to rail and put an extra bolt on either side just to give it 4 extra mounting points on the frame. It would also make the install much cleaner looking.
 
Yeah, but his set up isn't far from how I'm going to finish mine. Except I have unibody stiffeners and I'm running 30 inches of angle along my rails to tie in the crossmember.
crossmember2.jpg
 
it was sitting @ my buddies house for the last week. i just finished last nite enuf 2 drive it home. hopefully i'll have some flex pics this weekend. i have more angle iron to weld onto the unibody rails.

i do plan on making radius or Y-arms.
 
lilgreen, dude, don't try to go toe to toe with ZAC. you won't win. it might not be a pretty piece of work and it may look ghetto but with some work it could be a strong set up. i'm not into fabbing my own junk so it's cool to see what people are out there doing.
 
It's alot like the Scare-a-flex kit, long arm lowers with out a radius arm design.

Clean it up, mount the uppers to the lower arm like you already said you will do, and run it.

Justin
 
lilgreen said:
You keep thinkin that bud. He may have reinforced the mounting points but he is still counting on his set up to hold up offroad? The first hit that dinky crossmember takes, he is done. Nice welds, and hope you are planning on doing something with your stock lower mounts

lets see your superior setup...

I kinda helped pologuy through this process.
lil green... your an idiot... he fabbed up his own long arm system on a budget...
the angle iron is plug welded onto the unibody and 6, 1/2" Grade 8 bolts hold the 1/4" rectangular steel crossmember up. the LCA mounts on the crossmember are made of 3/16" plate that is shaped like an "L" and welded all the way on top of the crossmember.

he has plans to do a "radius arm" style system and join the upper arms to the lower arms. like TNT's and Rusty's

You could pick his xj up with a crane and drop it at whatever height onto the crossmember and the cherokee would fold like a taco around the crossmember and angle iron supports.

dont knock anyones setup until you have first hand wheeling experiance with it.
-Shomsky
 
Last edited by a moderator:
Is it pretty? Not really. Will it work? With the uppers moved to a radius arm setup, yup. And the cross member may be a lot of things, but "dinky" isn't one of them.
Post up some pics when it's done!

Just curious, how did you attach the joints to the 1.5" tube? Are they adjustable?
 
sgtmack said:
Is it pretty? Not really. Will it work? With the uppers moved to a radius arm setup, yup. And the cross member may be a lot of things, but "dinky" isn't one of them.
Post up some pics when it's done!

Just curious, how did you attach the joints to the 1.5" tube? Are they adjustable?

no adjustable, they are fixed arms, measured extremely careful and notched with a grinder, then welded to the joints.
 
Status
Not open for further replies.
Back
Top