• Welcome to the new NAXJA Forum! If your password does not work, please use "Forgot your password?" link on the log-in page. Please feel free to reach out to [email protected] if we can provide any assistance.

setting up RK 3 link. on a DD...couple questions

wishihad1

NAXJA Forum User
hey everybody

im about to get a rockkrawler 3 link, and i was wondering about whats the best way to set them up. i cant set my jeep up on jackstands for a week while i cut LCA mounts off the body and tack new stuff up. is it possible to set up the long arms with the LCA mounts still on the body, and after getting stuff set up, then cut off the mounts, and bolt the 3 link on?

thanks
 
you CAN mount the Longarm mounts without removing the CA mounts but this is only about 30-45 minutes of the total install. By far the most time consuming operation is removing the old CA mounts.
 
goodburbon said:
you CAN mount the Longarm mounts without removing the CA mounts but this is only about 30-45 minutes of the total install. By far the most time consuming operation is removing the old CA mounts.

Yep it's a lot of fun.. especially when you spend 1.5 - 2 hrs doing it w/ an angle grinder and cut off wheel only to realize... hey I've got a plasma cutter in my cousins shop :roflmao:

But yeah you can set them up w/ them still on.. BUT you cant drive on them prior to stitch welding them to the frame rail...

The way I did it was:
1. bolt them on...
2. stitch weld the LCA mounts
3. put it on jack stands and hack away at the factory mounts
4. install the UCA mount
5. bolt everything up...

But Goodburbon's right.. the factory mounts are the most time consuming... unless you have access to a plasma cutter..
 
wishihad1 said:
dang..i just thought it was pinch welds that could be drilled out, and then just beat it off..oh well..guess i got a few hours of angle grinding to do then

If you have a trailer... bring it down and we'll plasma them off in about 30 seconds...
 
im thinking i can find somebody around here with a plasma cutter. ive made friends with a couple shop owners, so ill see what theyve got

thanks for the offer, ill get back to you on that when the time comes
 
I just used a cordless sawzall to cut the brackets off. Its not too bad to do as long as the tires are off and you have access to everything. I took a grinder and ground them down afterwards, not perfect, but they don't hit the control arms.
 
I think it would be best to cut the stock mounts off first... They are a PITA but I used a reciprocating saw with like 5 metal blades from wal-mart the Black and Decker ones... and they came off in about 15 minutes each. I just stuck the blade right in between the connection from the bracket to the frame and pulled the trigger...
 
uncc civilengineer said:
But yeah you can set them up w/ them still on.. BUT you cant drive on them prior to stitch welding them to the frame rail...

No welding of brackets required on newest gen kit, only welding of the sleeves into the frame rails. Install is even easier now. But man what a BIT** getting those factory mounts off. I did the cutting wheel/grinding wheel route. Two things I would suggest;

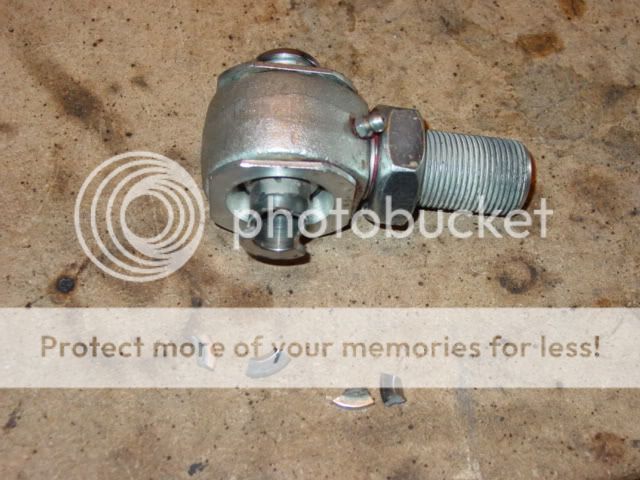
1) Upgrade the grease zerts and grease joints completely prior to install

2) Keep your fingers crossed that you don’t have over hardened balls


DSC00532.jpg
 
Grease zerks broke off when I put the gun on them. and i have a ball and broken spacer just like that. My front suspension clunks a lot now.
 
xjnwthefam said:
No welding of brackets required on newest gen kit, only welding of the sleeves into the frame rails. Install is even easier now. But man what a BIT** getting those factory mounts off. I did the cutting wheel/grinding wheel route. Two things I would suggest;

1) Upgrade the grease zerts and grease joints completely prior to install

2) Keep your fingers crossed that you don’t have over hardened balls


DSC00532.jpg


That's a different place for the grease fitting, correct? Did you take the joint apart to do that?
 
my joints have been bone dry for over 1.5 years now. they are still tight as the day i got em' no clunks.

not that i would reccomend that.
 
Jeep914x4 said:
That's a different place for the grease fitting, correct? Did you take the joint apart to do that?

No, that is the original location of the grease zert. Yes, I ended up taking apart 2 of the joints and replacing the 1 piece ball/spacer. At the same time drilled out, tapped, and upgraded the grease zerts. I also drilled out the inner bushings a little; I could notice where they blocked the grease zert from even allowing grease to enter. I'm not sure I would try all that without taking them apart. They are pretty easy to disassemble and reassemble. RK sent me the two new ball/spacers next day air when I called about the problem, so now I have a spare, even if it is one of the possible over hardened ones. I figure there still may be 2 potentially over hardened ones in the upper arm.

Even all greased up GOOD and almost completely rebuilt, mine is still a little clunky on the trail too. I'm way too happy with the kits performance and the customer service to let that bother me.
 
Back
Top