Rust Heap
NAXJA Forum User
- Location
- Chicago, IL
I wanted to open up some room under the hood of my ’93 XJ for future use so I decided to move the washer fluid bottle. The 97+ XJ has the washer bottle under the left front fender so I figured that would be a good place to put it.
What you will need:
97+ XJ washer bottle (make sure you get one with two pumps if you have a rear washer)
About 40ft of wire (5 strands of 8ft)
16 ft of washer hose 3/16 (2 strands of 8ft)
Wire splices
3/16” hose splices (I used ones for vacuum lines)
Zip ties
1” Split loom, about 8ft
½” Split loom, maybe 1ft
Electrical tape
1”1/4” hole saw
½” Drill bit
3/16” drill bit
The first step is to loosen the front header panel. You do not have to remove it all the way, just far enough to get to all the bolts that hold on the left front fender.
Next, remove the front fender, its pretty straight forward.
Mock up the placement of the new washer bottle and drill the 3/16” holes for the mounting screws to go. Then secure it in place and figure out where the fill head will go through the inner fender wall.

Remove the washer bottle and drill the 1-¼” hole with the ½” hole approximately 2” below it. Cut away the material in between. You want the fill head to fit through obviously. Re-secure the washer bottle in place with the fill head installed.


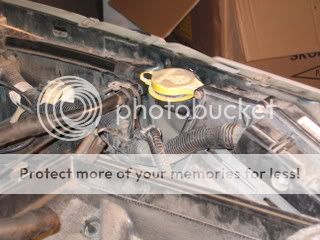
Remove the old washer bottle. It has the two bolts at the top and the lower mount is notched so you don’t have to remove that one all the way (it shares the bolt with the relay box). Remove the bottle and disconnect the wires and lines. The connectors for the pumps will be used on the new washer bottle but the one for the level sender will not.
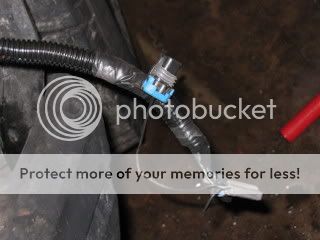
Mark your wires and splice on your wire extensions. Splice on your washer hose. Before you route your harness, drape it across the engine compartment and connect up the new washer bottle pumps.
This is to
1. Make sure that your junkyard washer bottle pumps work
2. That your wires are marked correctly
3. So you can mark the washer hose that goes to the front verses the rear.
The higher quality electrical connector for the pump (you will see) is for the front washer. The cheap looking one is for the rear. I do not think it matters which way your wire the level sender, or I just got lucky (its only two wires anyway).
Now that you know everything is going to work as it should, build up your new harness. DO NOT permanently splice in the electrical connectors for the pumps and level sender until after you route the harness.
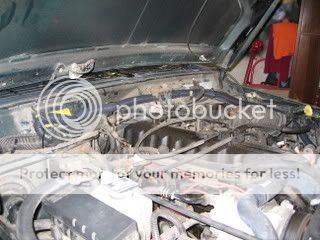
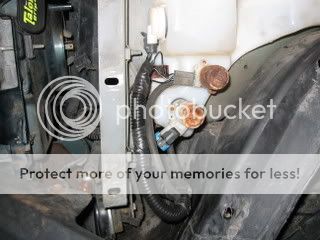
Route the harness (see pics)
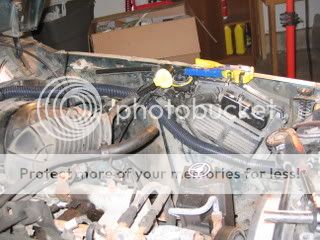
It should be hanging down near the lower front corner. Your wires and washer hose should look pretty long considering where they are going (trust me, its better than being short and starting over again). Cut them to length, one at a time and splice them to your pump connectors and level sender. Plug it in and test it out.
Reinstall your front fender and front header panel.
Close the hood and realize that you worked for several hours to make your XJ look like nothing has happened.
Ponder what toy you plan on installing into your newly created engine compartment real estate. . . . .
What you will need:
97+ XJ washer bottle (make sure you get one with two pumps if you have a rear washer)
About 40ft of wire (5 strands of 8ft)
16 ft of washer hose 3/16 (2 strands of 8ft)
Wire splices
3/16” hose splices (I used ones for vacuum lines)
Zip ties
1” Split loom, about 8ft
½” Split loom, maybe 1ft
Electrical tape
1”1/4” hole saw
½” Drill bit
3/16” drill bit
The first step is to loosen the front header panel. You do not have to remove it all the way, just far enough to get to all the bolts that hold on the left front fender.
Next, remove the front fender, its pretty straight forward.
Mock up the placement of the new washer bottle and drill the 3/16” holes for the mounting screws to go. Then secure it in place and figure out where the fill head will go through the inner fender wall.
Remove the washer bottle and drill the 1-¼” hole with the ½” hole approximately 2” below it. Cut away the material in between. You want the fill head to fit through obviously. Re-secure the washer bottle in place with the fill head installed.
Remove the old washer bottle. It has the two bolts at the top and the lower mount is notched so you don’t have to remove that one all the way (it shares the bolt with the relay box). Remove the bottle and disconnect the wires and lines. The connectors for the pumps will be used on the new washer bottle but the one for the level sender will not.
Mark your wires and splice on your wire extensions. Splice on your washer hose. Before you route your harness, drape it across the engine compartment and connect up the new washer bottle pumps.
This is to
1. Make sure that your junkyard washer bottle pumps work
2. That your wires are marked correctly
3. So you can mark the washer hose that goes to the front verses the rear.
The higher quality electrical connector for the pump (you will see) is for the front washer. The cheap looking one is for the rear. I do not think it matters which way your wire the level sender, or I just got lucky (its only two wires anyway).
Now that you know everything is going to work as it should, build up your new harness. DO NOT permanently splice in the electrical connectors for the pumps and level sender until after you route the harness.
Route the harness (see pics)
It should be hanging down near the lower front corner. Your wires and washer hose should look pretty long considering where they are going (trust me, its better than being short and starting over again). Cut them to length, one at a time and splice them to your pump connectors and level sender. Plug it in and test it out.
Reinstall your front fender and front header panel.
Close the hood and realize that you worked for several hours to make your XJ look like nothing has happened.
Ponder what toy you plan on installing into your newly created engine compartment real estate. . . . .