• Welcome to the new NAXJA Forum! If your password does not work, please use "Forgot your password?" link on the log-in page. Please feel free to reach out to [email protected] if we can provide any assistance.

Replacing XJ floor - Halp!

blistovmhz

NAXJA Forum User
Location
Vancouver, BC
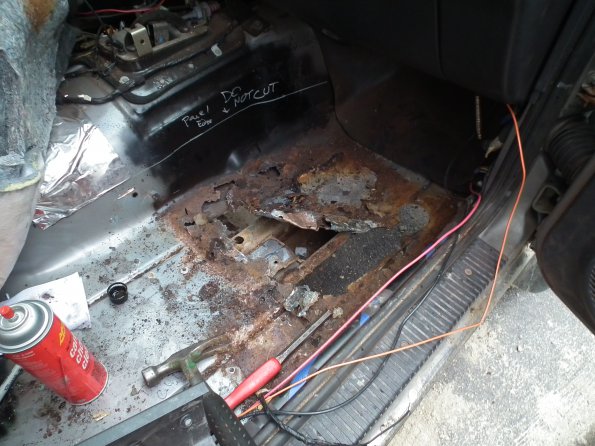
I finally got around to wiring up my under-body lights, and while pulling the carpet (driver side) discovered that the weak spot in my floor was actually the stock plug, and that everything 3-4" out from it was rotted right out. I figure it'd be silly to have my soggy carpet out to dry and not fix the floors while I'm in there.

This will be my first attempt at "structural" body work. As much as I dug the Flinstones, I really don't wanna experience it.

So, the plan is to strip the interior, rip out all the carpet, chop out anything that doesn't look nicely painted, and spot weld in some new sheet, and probably replace the carpet with some brand new Van liners (roomie has hundreds of them just taking up space at work. THey're thick, durable, apparently pretty pliable with some heat, rubber topped, and free).

On the specifics, I'd plan the following, and hoping someone can point out where I may be missing something:

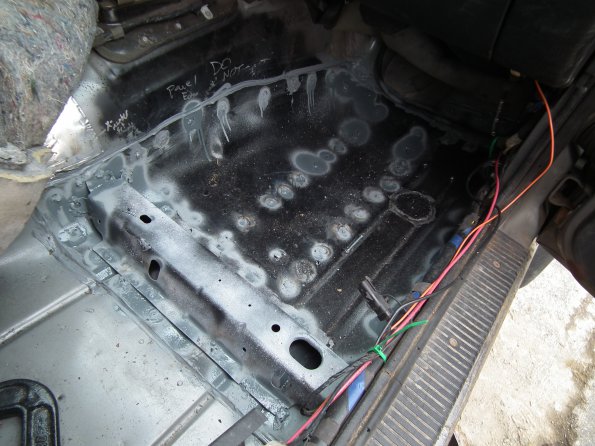
* Cut out the bad sections, clean them up real good, spray with weld-through primer, and spot weld my new floor material in.
* Fill the seams with seam sealer.
* Primer the hell out of the underside, followed by possibly more seam sealer and a bunch of paint.
* Cut the Van liner into a few sections to lay on top. One section over the tunnel, and probably on section per side for the passengers. This way if I need to get under the flooring again, I won't have to strip the entire interior.

Given I've got box sliders I could tie into, I may just remove the entire floor all the way to the wall, and weld floor right into the sliders. Haven't decided yet. If I was to start this build all over again, I'd probably cut out the floors before doing sliders, so it could all be tied together real nice.

Thoughts/suggestions? I'm hoping to get started on this tonight, and be done Tuesday/Wednesday.
 
Sounds like you have a better plan than I did. Hopefully your floor is in better shape than mine was as well. You won't know for sure how bad it is until you strip it down of course. My XJ has almost 300k miles on it now. I would say 75% of the floor feels like crushing potato chips when you push on it with your thumb, especially in the cargo area. I was told that welding wasn't a feasible option because it would just burn through the existing rotting metal and if I were to clean up all the rust that there would be practically nothing left to work with. I need an entire set of new floor pans but I figured with the mileage that I would just patch it as long as I could.

I cleaned up the holes the best I could. Then I got a car hood and a fender from a local mechanic/tow truck guy for free and cut out the different sized pieces I needed with a jigsaw. I placed the pieces over the holes (from the inside) and drilled holes through the patches and through some of the "good" metal in the floor and used pop rivets to hold them in place. My feet haven't gone through the floor yet and the floor seems to stay dry even though I didn't properly seal the edges of the patches.

You have the right idea about making flooring that you can take out easily. I just recently had to peel mine back to patch a new hole that ran all the way from the passenger seat to the firewall long and from the rocker to the frame rail wide, a 8.5" x 30" hole!

As far as the new flooring goes, you seem to be on the right path there as well. I did mine with four main sections and two small pieces to cover the wheel wells in the back. The cargo area was easy of course because it is flat. I made that section long enough to go under the back seat so it would look nice and neat. Consider anchor points so your sections don't move. It's a good thing if your material isn't too thick to fit under the trim and maybe even be screwed down with the trim screws. I couldn't get all my trim screws out but I was able to wedge my material under there. The little latch for the jack under the back seat, the rear seat belts, and the tie downs in the cargo area make good anchor points. Just make tight fitting holes in your material and slip it over. Next I made a section for either side of the passenger area that ran from underneath the back seat to the firewall. Once you have those in you can make the final piece to cover the tunnel which will overlap the sides of the driver and passenger section.

I can tell you that making the flooring fit in the passenger area was a lot harder than I thought it would be, especially on the driver's side. Beside the driver's seat, the tunnel bulges out pretty far. It is difficult to make a flat piece of material lay down against all the curves in the passenger area. You will wind up with bulges/folds in the material. What I did was work those folds into a spot where they aren't as noticeable like under the dash. Then I cut the material in the center of the fold all the way out to the edge of the material which resulted in two flaps that could then overlap each other and lay flat. Be warned though, when you cut those folds it changes how the rest of the piece lays and if you already have it cut and placed where you need it, it will be out of place. It can be extremely frustrating. The best way I found to get started was to just take a big piece of material and fasten it to the rails where the front part of the seats bolt in with vice grips. That brings up something else. When it comes time to put the seats back in it is also a pain to get the seat bolts to thread through the material and line up with the holes. I heated up a punch and melted out the holes in mine but it was still difficult.

That's all I can think of for now. Good luck with it!

Here's how mine turned out:
11017239_849023378516376_3734728976552540957_o.jpg

11141354_849023375183043_426357247565859647_o.jpg

11057449_849023405183040_8327921938278456860_o.jpg

11732040_849023395183041_5186351303345245430_o.jpg

11090985_793349810750400_6915936964930344077_o.jpg

10356367_634404839978232_6103168718459511873_n.jpg


It is far from perfect but it suits my needs. This is my daily driver. I got tired of riding around with nothing but a driver's seat while I was working on everything so getting it done was more important than doing an outstanding job on everything.
 
Well, this is what I've got to work with.

This is what it looked like after pulling the carpet and giving it a few whacks with a ball-peen.
01481d228338a215ae998cf3a1323ed9.jpg

ddfae6be96a14c7e8f916b2b8fc407d0.jpg

Ain't pretty, and it's rotted a few inches up the tunnel as well. I was actually surprised at the extent of the rust, given the rest of the body is in pretty good condition.


Here's 45-60 minutes of cutting while holding my breath.
21978c12d7be347d117f789d3acb3a1d.jpg

725c18e2950fa9e57ad30eeb4bbe79c8.jpg

7e77a9e40a36d21ef79daaacc60f0ce1.jpg

28f100d1bda82dfa22416a44bf5bb4c9.jpg


Not finished cutting yet. Still have to take it another inch or so up the firewall, another inch or two up the tunnel, and perhaps an inch back behind the seat brace. Really wasn't as much work as I thought it would be to get it all out relatively clean.

This was all done using a 4" cut-off wheel and a cold chisel. I didn't even remove my front DS or fuel line :p.

Also, my frame rail reinforcement folds up to the floor area as well, so I may just remove the top of the stock rail (the small folded piece) and weld directly to the frame stiffeners to the sliders.
I picked up some 0.023 wire and some new tips for the job. This will be my first attempt doing sheet metal with 0.023 wire. I normally just wing it with some 0.03, burn a lot of holes, pull hair out, fill holes, repeat. Hopefully things will go smoother this time with the correct wire. Also still trying to track down a brass spoon. Supposed to make welding this thin stuff dramatically easier as it removes the heat from the weld area much faster than air alone.
 
Last edited:
fishinpolejoe

Yea, I hear ya about gettin'r'dun. I normally go that route as well, but with the amount of time and non-removable parts on this rig, structural rust is the one thing I feel I should take seriously.

I'll hopefully have the driver floor done tomorrow. The passenger side didn't look too bad on initial inspection, but I'm going to remove all the carpet either way to give everything a thorough inspection and coat of some really evil paint, before trying to heat form the van liner in.
 
Ewww! Yeah, yours looks a little worse than mine did. Once the padding and carpet gets wet it pretty much stays wet and just eats it away. I wish I had the know how, time and equipment, and money to fix mine the right way.

Here's what I had to work with.

11781849_849022865183094_3576723710460794659_n.jpg

10255434_629150053837044_436216264007480241_n.jpg


Hillbilly engineering at it's finest.
10271636_629150063837043_2044496722804383748_n.jpg
 
Depending on what you find, buying the pre-formed pans can be a pretty good deal. It would have taken me a long time to form a patch to fit this hole and the result wouldn't have been as good.

DSCF5523_595.jpg

DSCF5560_595.jpg


The driver's side wasn't as bad and I just added some sheetmetal like you describe.

Yea, oddly enough, my room mate just happened across some pans for sale on CL last night. Guy wants $100 for the two DS pans. Given they're $160 each up here, and I figure if I'm lucky, forming my own pan would take at least 5-6 hours (I've never done sheet metal shaping), I may just wimp out and buy the pans. There was really nothing left of the driver front floor. The rest so far looks good though. Will strip the rest of the carpet out this afternoon to make sure, and trying to find someone who can grab those pans for me (in the next town over, and I'm sorta without wheels unless I wanna yabba-dabba-doo my way over there).
 
This is just my opinion which isn't worth much at all:

If the remainder of the floor has very little rust I would be curious as to why that one part rusted so bad. You could have a leak. I would give it a good spray and see if anything gets wet in that area.
 
1. We play in deep water/mud.
2. The floor pan plug area was rusted 8 years ago when I got this Jeep.
3. Mud flies in through the window often, and ends up in between the seat and the pillar.
4. There was a small hole in the firewall that also shot water in during deepish crossings.

I'm actually very surprised that the passenger side seems to be fine (at least on the pillar side where I've checked thus far).
 
Yea, oddly enough, my room mate just happened across some pans for sale on CL last night. Guy wants $100 for the two DS pans. Given they're $160 each up here, and I figure if I'm lucky, forming my own pan would take at least 5-6 hours (I've never done sheet metal shaping), I may just wimp out and buy the pans. There was really nothing left of the driver front floor. The rest so far looks good though. Will strip the rest of the carpet out this afternoon to make sure, and trying to find someone who can grab those pans for me (in the next town over, and I'm sorta without wheels unless I wanna yabba-dabba-doo my way over there).

If you don't want to learn sheet metal shaping anyway, you might as well buy it for $100 to avoid the hazzle.
 
For what you've got you should use the pan.

Simplest way is to an overlay patch. Cut out the damaged area, cut the replacement pan to match with a 1" overlay around the seams, drill holes in the perimeter of the replacement and tack weld it in place, then cover the inside and outside edges with seam sealer. Use a piece of brass or aluminum as a dolly, and MIG to that--it will draw current but the weld won't stick to it.

If you get some small wire (.023ish) on a 120 welder, you can try stitch welding the metal, lot more skill required and takes a longer, but you get a better result.
 
Well boys,I feel like I should've just done the overlay method. I'm not an expert welder by any means, but generally my beads look pretty good, get good penetration, and for structural stuff >1/16" I've got no problem. The sheet metal however, I'm just having a whore of a time with.

I cut out a sheet from the Mustang hood (it's been my donor for lots of stuff) and got it in last night. Still a few pin-holes, but it's in (1/2 of the section finished). But, the beads are UUUUGLYY. I dunno if I just suck at thin stuff, or if my welder sucks at it. I feel like at low voltage/amperage, the wire arcs, starts balling, then burns back without actually touching anything, then pushes out a bit and deposits a blob. This doesn't do much for penetration. Then if I crank anything up at all, it just burns through immediately. I've no idea why I didn't have this problem with the hood scoop, given it's the same thickness material.

At any rate, this is what I've got so far.
LUvmooCI-Nxl3ROYzmFk7LYn6V4eBsRhzf1MhOhwO7UQJsaU2PdK8VB5FOOEKZRGiZ3bvLd0L3dXWnXyilhpu1_jqZD1EWEZO9PKqnFQ8HdhEWi4RLrDzvKjeuZHaS-mKUsc-vvBhfrRkAEUaMd1tlAZH4zbvq_lWW1BpL6wO0mnd4R9jm1jVgStW2JUvpoMNcNFUJtQETRAJVp8Gnpj8FzMLMMixX7yoz_ytdmYQU5pJQXxi7EcJmWrxDwYSaEWHTWpjDqDaEkHSXznE9k--O7sEfHArOUH1IM5YOybT4nQbI3K3ZbCqHLcCvN6AyXQXRwv2NIpoQuwDTxrmLo1emdBTI3_mlb02Kh00r_s-K89tlMZoeOaE2omx50UJqeZzbJabmPpEOaO6DHb_HDcdV2et63oAOZMycGemboLUr9I6liiLT3OtZ41vBYivJr84yXKklDKXD_HcEoCRtYibsdvoHDbaaOD1ZjFgziwyO2SN1-dNAHwrJQ17_4zaqzev0eOPQyKlRrSJdH9ZyK8_hPRbVtlw5o_u6v0MEEws1jS=w1035-h1379-no

bbX7aZxZ5u6S41bnTXjbK5Zb0x5O_wEHYwK_pADjqt5OMGvqWV5jDfyPwqtPO0A8EfDqNqlbLegykVjZNn7__qsgtRHulNh1z_ehFci3fY2r5vZlyshOQLjQpqtMs_lyNG6impCJGCDEBFEoczBdQy5wLsJ2DuZKX3NGVaSBrnb3URbW7UCv3T4dVE54L2byz2pkr7mVX4m-E8ypYGU0zHQac8pshurbnRt0iG0HlaTMTt1cNv3Gl_4E3HIrdKbh97K3BKdLxHEeZpT3heIfC_FCG8cC6E4QnexEtx8lIdvq44NiUvaN_F8bmkLtHjB6BFYWQm1skq_Mjop0aBqvhKhk2ViuX3KPJWhjjnmAR-AtW4mGqHUBTCTUswuDS5YWUP68SrC3dlESPYvQ9-I-wyjkEdfSZrcqvGI8Yt_ckvNiZ9X2kaLe4gnjnt0mY-xZlVJzzOCTO_KNiJMp2aXVsjLBFJV0lvCyc3kmEYlpC1XzWwI2c_zSg93hHRPcufw6OE7m8y2aAo8armQvpJmds29GXY_LlHbgYJTJEtPiZBWg=w1035-h1379-no


This shit took me probably 4-5 hours to cut out, shape and burn in, and this is the easy, mostly flat part. I'm feeling like the front half will be cut large, and I'll just rosette it into place and chuck on loads of seam sealer, cause by the end of the first half, I wasn't even checking for fires anymore. Just didn't care :).
Honestly, if this isn't a welder (machine) problem, and I'm not just incompetent at welding (I may be), next time I think it'd be easier and almost faster to just buy another shell and swap everything over. Even with all the frame plating, stiffeners, engine/trans/axle/suspension/seat swap, and all the aux lighting, I could probably finish the swap in a solid day.


Anyhow, wtf is the trick to welding this stuff? When I did the hood, I did lots of reading first to make sure I wasn't going to totally mangle it. I ran 0.035 wire on it without a tonne of issues, but this project I swapped out to some 0.023 wire because it's supposed to be way easier to control at low V/A.
I'm running 0.023 at around 15.5-16V and between 30-35A, and it sucks. (that's as low as my welder goes).
I sorta feel like the IGBT inverters have a hard time with arc startup and that's where I'm having all the problems. Does this make sense? Anyone have some input that might prevent me from seppuku?
 
I don't see any pictures there. The hood metal may be thinner than the floor pans. I put my replacement pan in with a stick welder (80-TAC rod) using rosettes and seam sealer. Are you trying to butt-weld the patches? That will be hard.

Are both pieces of metal clean?
 
I don't see any pictures there. The hood metal may be thinner than the floor pans. I put my replacement pan in with a stick welder (80-TAC rod) using rosettes and seam sealer. Are you trying to butt-weld the patches? That will be hard.

Are both pieces of metal clean?
Damnit.
d406f3ff42028e66fc5720ad2066a5c5.jpg
9539d350f88795bb4747e54258a12ed9.jpg
a936e3709b416596c935910ff40a1d73.jpg


Yea, I'm butt welded the first half. Sorta re-thinking that now. I've got the second half rough cut and shaped and thinking it may make sense to just rosette it into place and seam seal as you said.
I don't have a helper to put some weight on it while I do the final cutting anyway, so your method would be waaay easier.

How well does the seam sealer work though? I assume I'd have to apply it both to the top and bottom, to prevent water from building up between seams yea?
 
How well does the seam sealer work though?
Works great if you do it right. Stock body has it all over the place, its the heavy goop around the gas fill tube seam, the wheel well seams, all over

I assume I'd have to apply it both to the top and bottom, to prevent water from building up between seams yea?
yeah seam sealer is good anywhere you have a SEAM that you want to SEAL ;)
 
Last edited:
Works great if you do it right. Stock body has it all over the place, its the heavy goop around the gas fill tube seam, the wheel well seams, all over


yeah seam sealer is good anywhere you have a SEAM that you want to SEAL ;)
So, how many tacks do I need then, if I'm going to seam seal it all?
Thus is what I've got so far.
2d5774139a2d97c9d2b3dd4a74c73ba2.jpg
 
Well made some progress. The floor is all tacked in, sealed, primed, and ready for paint.
Got impatient and wanted to work on the flooring in the passenger side. Roomie brought home some brand new, heavy duty van liner. It's awful to try to shape, but once it's in, it's pretty bomb proof. I set it up so it'll be easy to remove. Three pieces: one will go over the tunnel, and one on each side to under the rear seat.
440c4ff0f134325997da96286e2e0056.jpg
703d58c7abfd9c3583e5af08a5feaff3.jpg
54d8132a2f04498640311d4261cb5681.jpg
fd3d213477df8ef440b898ba88d2afeb.jpg
370300fbcf969d74d94776c8675e8301.jpg
f0f0af0db4c08052a95f2193095caf54.jpg
 
Looking good! That van liner looks like it forms to the contours really well, better than my floppy material did anyway. Very nice!

Heh. Forming the liner was... fun. It's not nearly as pretty as the picture suggests. I hit it with a heat gun at all the bends/curves which helped a bit, then made a few strategic cuts to fold over. Once the tunnel section is laid over, it'll hide all the ugly, and hopefully help cut down on the immense amount of uni-body noise I've been dealing with for the past year, since ripping out the rear carpet.

The rear is going to be some fun as well. I ripped out the carpet when I was welding in the through-floor shock mounts, which I never did seal, so water has just been getting launched into the rear (getting mud on the inside of the hatch window :p).

I threw some boots on the stocks and used some seam sealer to clean it all up. Should be good now. Hoping to be back on the road by tonight/tomorrow, in time for weekend wheelin'.
 
Back
Top